
If you’re an iPhone user, you may have experienced the convenience and discreetness of having your device set to vibrate mode. Whether it’s during a meeting, in a movie theater, or in a quiet environment, the vibrate feature allows you to receive notifications without causing any disruption. However, there may be instances where you want to disable vibrate mode and switch back to the traditional ringtone. In this article, we will guide you through the process of turning off the vibrate feature on your iPhone. Whether you’re using the latest iPhone model or have an older version, we’ve got you covered. So, if you’re ready to learn how to take off vibrate on iPhone, continue reading to find out!
Inside This Article
- Enabling the Silent Mode
- Adjusting the Ringer and Alerts Settings
- Customizing the Vibration Settings
- Using Do Not Disturb mode
- Conclusion
- FAQs
Enabling the Silent Mode
In certain situations, you may need to silence your iPhone to avoid disruptions or maintain etiquette. Luckily, iPhones come equipped with a handy Silent Mode feature, which allows you to mute incoming calls, messages, and app notifications. Enabling Silent Mode on your iPhone is a simple and straightforward process. Here’s how you can do it.
To start, locate the physical Ring/Silent switch on the side of your iPhone. This switch has two positions: one with a small orange indicator, indicating Silent Mode is enabled, and the other with no indicator, indicating Silent Mode is off.
To enable Silent Mode, simply slide the Ring/Silent switch towards the orange indicator until it is fully visible. Once you do this, your iPhone will no longer emit any sounds or vibrations for incoming calls, messages, or notifications.
If you want to disable Silent Mode and regain the sound and vibration functionality, slide the Ring/Silent switch back towards the position with no indicator. Your iPhone will now operate in its normal sound mode, allowing you to receive calls, messages, and notifications with audio and vibration alerts.
By enabling the Silent Mode on your iPhone, you can ensure that important meetings, quiet environments, or personal preferences are respected without the risk of your phone ringing or vibrating. It provides a convenient way to have total control over your device’s sound output.
It’s important to note that while in Silent Mode, you can still use your iPhone as usual to make calls, send messages, browse the internet, or use apps. The only difference is that your phone will remain silent and won’t vibrate to notify you of incoming notifications or calls.
Adjusting the Ringer and Alerts Settings
Your iPhone offers a range of customization options, allowing you to personalize your device to suit your preferences. One important setting you might want to adjust is the ringer and alerts settings, which determine how your device notifies you of incoming calls, messages, and other notifications. With these settings, you can control the volume, vibration, and other aspects of your iPhone’s alerts. In this article, we will walk you through the steps to adjust the ringer and alerts settings on your iPhone.
To begin adjusting the ringer and alerts settings, follow these steps:
Step 1: Open the Settings app on your iPhone. The Settings app is represented by an icon with gears and can typically be found on the home screen.
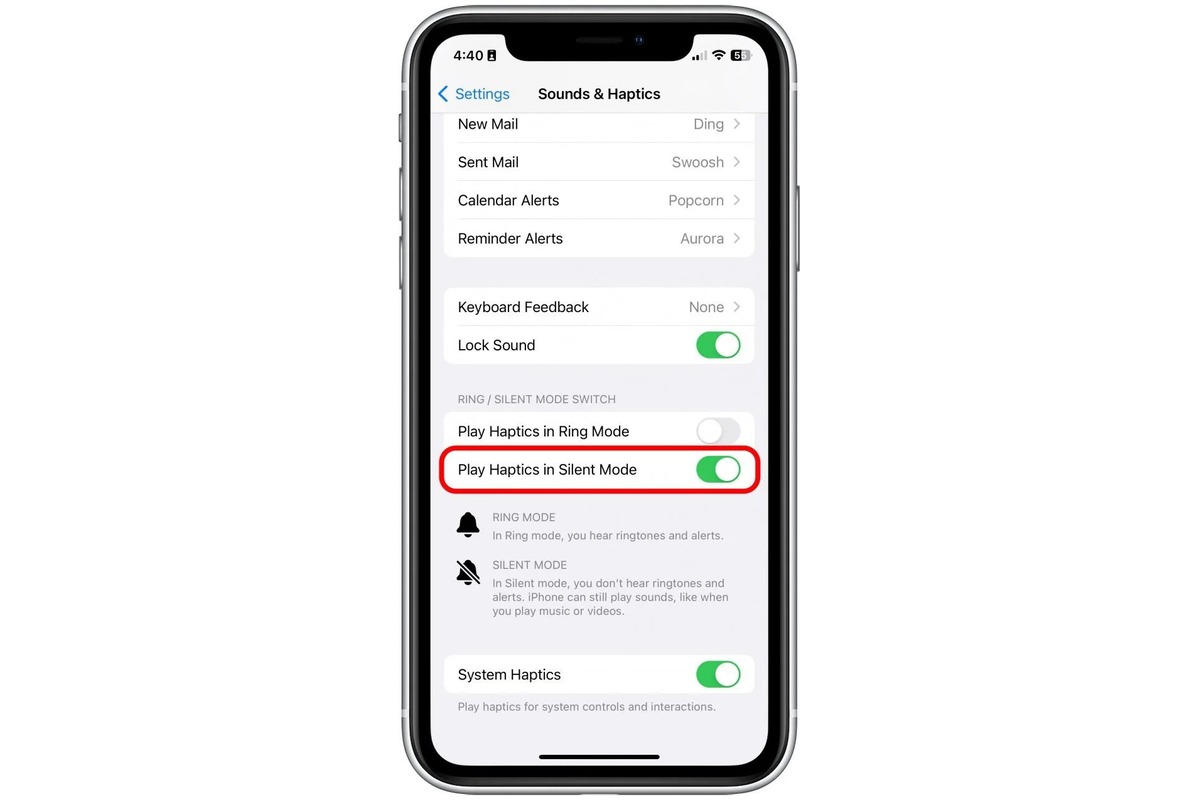
Step 2: Scroll down and tap on “Sounds & Haptics.” This option is usually located in the second section of the Settings menu.
Step 3: In the “Sounds and Vibration Patterns” section, you will find various settings to customize your iPhone’s alerts. Here are some options you can adjust:
- Ringer and Alerts Volume: Use the slider to adjust the volume levels for incoming calls and notifications.
- Vibration: Tap on “Vibration” to access different vibration patterns for incoming calls, texts, and other alerts. You can select from a range of pre-set patterns or create your own custom vibration.
- Ringtone: Tap on “Ringtone” to choose a different sound for your incoming calls. You can select from various built-in choices or set a custom ringtone.
- Text Tone: Similarly, you can tap on “Text Tone” to select a different sound for incoming text messages.
- New Mail: This option allows you to choose a specific sound for incoming emails.
By adjusting these settings, you can personalize your iPhone’s alerts to match your style and preferences. Whether you prefer a loud ringtone or a subtle vibration, you have the freedom to make your iPhone’s alerts truly your own. Take a few moments to explore these settings and fine-tune them according to your liking.
Remember, these settings are not only limited to calls and messages. You can also adjust the alerts for other apps and system notifications by accessing the “Sounds & Haptics” menu. This way, you can ensure that you never miss an important notification while also customizing your device’s alerts to your liking.
Customizing the Vibration Settings
Customizing the vibration settings on your iPhone allows you to personalize your device and optimize it to suit your preferences. Whether you want a subtle vibration for notifications or a more intense vibration for incoming calls, the iPhone offers a range of options to choose from. Here’s how you can easily customize the vibration settings on your iPhone:
1. Access the Settings: Start by opening the “Settings” app on your iPhone. You can find this app on your home screen, represented by a gray icon with gears.
2. Locate the Sounds & Haptics Section: Once you’re in the Settings app, scroll down and tap on “Sounds & Haptics.” This section allows you to control both the sound and vibration settings of your iPhone.
3. Adjust Vibration Settings: Under the “Vibration” section, you’ll find various options to customize the vibration settings. Tap “Ringtone” to configure the vibration pattern for incoming calls. You can choose from the pre-installed vibration patterns or create a custom one using the “Create New Vibration” option. For notifications, tap “Text Tone” to set the vibration pattern for incoming messages. Similarly, you can choose from the preset options or create a custom vibration pattern.
4. Fine-Tune Individual App Notifications: You also have the option to customize vibration settings for specific apps. Scroll down to the “Sounds and Vibration Patterns” section, and you’ll see a list of installed apps. Tap on any app to access its settings and adjust the vibration pattern according to your preference.
5. Additional Tip: Use the Ring/Silent Switch: Another way to control the vibration settings quickly is by using the ring/silent switch on the side of your iPhone. If the switch is turned on (revealing an orange strip), your iPhone will be in silent mode, and it won’t vibrate for incoming calls or notifications. When the switch is turned off, your iPhone will vibrate according to the selected vibration settings.
Remember, customizing the vibration settings allows you to tailor your iPhone’s alert system to your liking. Experiment with different vibration patterns to find the one that suits you best. Whether you prefer a gentle buzz or a more noticeable vibration, the options are there for you to customize and personalize your iPhone experience.
Using Do Not Disturb mode
Do Not Disturb mode is a helpful feature on your iPhone that allows you to silence notifications and alerts during specific times or when enabled manually. It is especially useful when you want to focus, relax, or avoid interruptions during meetings or important events. Here’s how to use Do Not Disturb mode on your iPhone:
Step 1: Access the Control Center
To enable Do Not Disturb mode, start by accessing the Control Center. On newer iPhone models, swipe down from the top right corner of the screen. On older models, swipe up from the bottom of the screen.
Step 2: Activate Do Not Disturb mode
In the Control Center, you will see various options. Look for the crescent moon icon, which represents Do Not Disturb mode. Tap on the icon to activate it. You will notice that the icon turns purple, indicating that Do Not Disturb mode is now enabled.
Step 3: Customize Do Not Disturb settings
If you want to customize the settings of Do Not Disturb mode, you can do so by going to the Settings app. Here, you can specify when you want Do Not Disturb mode to be enabled, such as for a set schedule, during bedtime, or when your iPhone is locked. You can also allow calls from specific contacts or repeated calls in case of emergencies.
Step 4: Allow important calls
Even though Do Not Disturb mode silences most notifications, you may still want to receive important calls. To allow calls from specific contacts, go to the Settings app, select “Do Not Disturb,” and then tap on “Allow Calls From.” Here, you can choose to allow calls from “Favorites,” specific contacts, or everyone.
Step 5: Schedule Do Not Disturb mode
If you want to schedule recurring Do Not Disturb times, you can do so in the Settings app. Tap on “Do Not Disturb,” then select “Scheduled.” Here, you can set the start and end times for Do Not Disturb mode to automatically activate. This is particularly handy if you have a regular schedule when you don’t want any interruptions.
Step 6: Manual mode
If you don’t want to stick to a specific schedule and prefer to enable Do Not Disturb mode manually, you can do that too. Simply repeat step 1 to access the Control Center and tap on the crescent moon icon to toggle Do Not Disturb mode on or off as needed.
Using Do Not Disturb mode on your iPhone is a great way to ensure that you have uninterrupted periods of focus or relaxation. By customizing the settings and allowing important calls, you can strike the right balance between staying connected and having peace of mind. Give it a try and enjoy a more tranquil iPhone experience!
As we reach the end of this article, it is evident that knowing how to turn off vibrate on an iPhone can greatly enhance your user experience. Whether you prefer the sound of incoming calls and notifications or simply want to conserve battery life, being able to switch off the vibrate function gives you the freedom to customize your iPhone settings.
We have explored the step-by-step process to disable vibrate on both calls and notifications, ensuring that you can now enjoy a quieter and more personalized iPhone experience. Remember, these instructions may vary slightly based on the iPhone model and operating system you are using, so always consult your device’s user manual or Apple’s official support page for specific instructions.
By familiarizing yourself with the options available within the Sound & Haptics settings menu, you can easily toggle vibrations on or off and tailor them to suit your preferences. So go ahead and give it a try, and discover a new level of control over your iPhone’s vibration settings!
FAQs
1. How do I turn off the vibrate function on my iPhone?
To turn off the vibrate function on your iPhone, go to the “Settings” app on your home screen. Scroll down and tap on “Sounds & Haptics” or “Sounds & Vibration Patterns,” depending on your iPhone model. From there, you can toggle off the “Vibrate on Ring” and “Vibrate on Silent” options.
2. Can I customize the vibrate settings on my iPhone?
Yes, you can customize the vibrate settings on your iPhone. After accessing the “Sounds & Haptics” or “Sounds & Vibration Patterns” in the Settings app, you can choose different vibration patterns or create your own custom vibrations. Simply tap on “Vibration” and select your preferred option. You can also tap on “Create New Vibration” to create a custom vibration pattern by tapping the screen in a specific sequence.
3. Why should I turn off the vibrate function on my iPhone?
There are several reasons why you might want to turn off the vibrate function on your iPhone. One reason is to conserve battery life, as vibrating requires more power than playing notification sounds. Additionally, turning off vibrate can help minimize distractions and interruptions in certain situations, such as during meetings or in quiet environments.
4. Will turning off vibrate affect other notifications on my iPhone?
No, turning off vibrate will only disable the vibration function for incoming calls and notifications. Other alerts, such as sound notifications and visual banners, will still work as usual. You can adjust these settings separately under the “Sounds & Haptics” or “Sounds & Vibration Patterns” section in the Settings app.
5. How do I know if the vibrate function is turned off on my iPhone?
To check if the vibrate function is turned off on your iPhone, you can test it by receiving a call or notification. If your iPhone remains silent without any vibrations, then the vibrate function is successfully turned off. You can also double-check the “Vibrate on Ring” and “Vibrate on Silent” options in the “Sounds & Haptics” or “Sounds & Vibration Patterns” section of the Settings app to ensure they are toggled off.