
If you’re struggling to forget a wireless network on your Windows 10 device, you’ve come to the right place. Whether you’re trying to remove an old network you no longer use or troubleshooting connectivity issues, knowing how to forget a wireless network can be incredibly helpful. Windows 10 offers a straightforward process to erase saved network information, but it may not be immediately apparent to everyone. In this article, we will guide you through the steps to forget a wireless network on Windows 10, ensuring a clean slate for your device’s network connection. So, let’s dive in and learn how to easily remove unwanted wireless networks from your Windows 10 system!
Inside This Article
- Why Do You Need to Forget a Wireless Network?
- How to Forget a Wireless Network in Windows 10
- Option 1: Forget a Network through Network Settings
- Option 2: Forget a Network through Command Prompt
- Option 3: Forget a Network through PowerShell
- Conclusion
- FAQs
Why Do You Need to Forget a Wireless Network?
Forgetting a wireless network on your Windows 10 device can be a useful task to perform. There are several reasons why you might need to forget a wireless network:
- Network performance issues: If you are experiencing slow or unreliable internet connection on a particular wireless network, forgetting and reconnecting to it can sometimes help resolve the problem.
- Security concerns: If you have connected to a public or unsecured network in the past, forgetting it ensures that your device won’t automatically connect to it again in the future, reducing the risk of potential security threats.
- Network changes: If you have recently changed the password or network settings of your wireless network, forgetting it allows you to enter the updated information when reconnecting, ensuring a seamless and secure connection.
- Device management: Forgetting a wireless network can also be beneficial if you want to clean up the list of saved networks on your device, making it easier to select and connect to the networks you frequently use.
- Troubleshooting: In some cases, when you encounter persistent connectivity issues on a specific wireless network, forgetting it and setting up the connection again from scratch can help resolve the problem.
Now that you understand why it is important to forget wireless networks at times, let’s explore how to do it on your Windows 10 device.
How to Forget a Wireless Network in Windows 10
Forgetting a wireless network in Windows 10 can be necessary in a variety of situations. Perhaps you want to remove a network you no longer use, or you need to troubleshoot connection issues. Whatever the reason, Windows 10 provides multiple options to forget a wireless network and start fresh. In this guide, we will explore three different methods to accomplish this task.
Option 1: Forget a Network through Network Settings
The easiest way to forget a wireless network in Windows 10 is through the Network Settings menu. Here’s how to do it:
- Click on the Start menu and select the gear icon to access the Settings app.
- In the Settings app, click on “Network & Internet”.
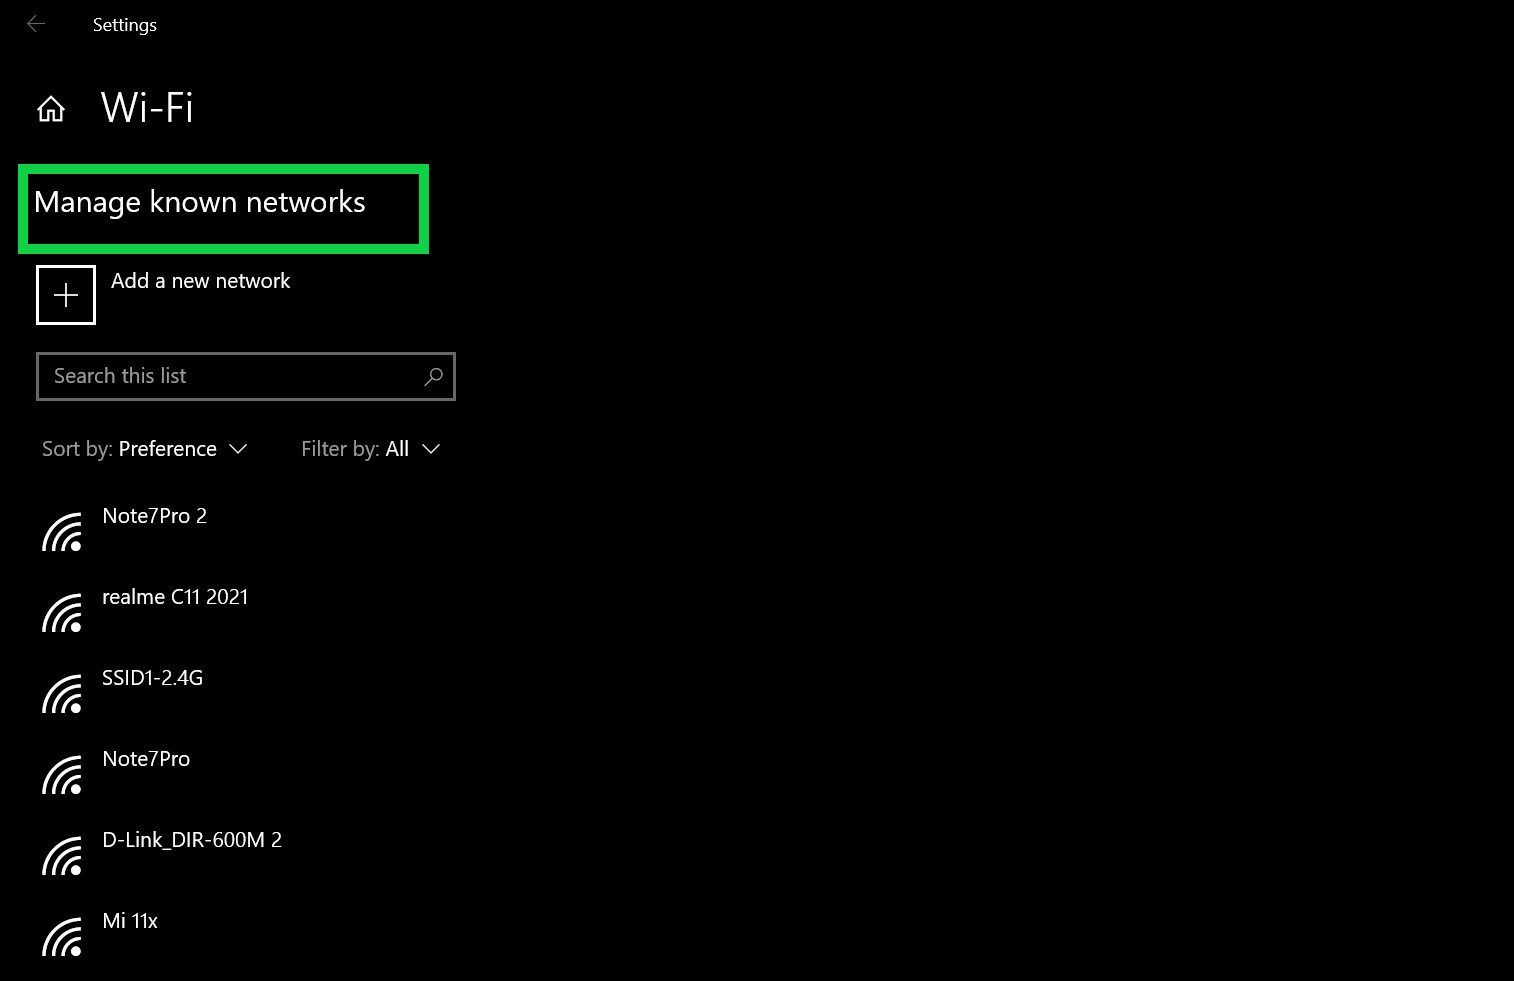
- On the left sidebar, select “Wi-Fi”.
- Scroll down and click on “Manage known networks”.
- A list of saved Wi-Fi networks will appear. Locate the network you want to forget and click on it.
- Finally, click on the “Forget” button to remove the network from your saved networks.
Option 2: Forget a Network through Command Prompt
If you prefer using command-line tools, you can also forget a wireless network in Windows 10 through the Command Prompt. Follow these steps:
- Open the Command Prompt by typing “cmd” in the search bar and selecting the “Command Prompt” app.
- Type the following command and press Enter:
netsh wlan show profiles - A list of saved Wi-Fi profiles will appear. Find the profile name of the network you want to forget.
- Then, type the command:
netsh wlan delete profile name="[network name]", replacing “[network name]” with the actual profile name of the network. - Press Enter to execute the command.
Option 3: Forget a Network through PowerShell
If you are familiar with PowerShell or prefer using it over the Command Prompt, you can forget a wireless network in Windows 10 using PowerShell. Here’s how:
- Launch PowerShell by typing “PowerShell” in the search bar and selecting the “Windows PowerShell” app.
- Type the following command and press Enter:
netsh wlan show profiles - Identify the profile name of the network you wish to forget.
- Enter the command:
netsh wlan delete profile name="[network name]", replacing “[network name]” with the actual profile name of the network. - Press Enter to execute the command.
Now that you know three different methods to forget a wireless network in Windows 10, you can choose the one that suits you best. Remember, forgetting a network will remove it from the list of saved networks, and you will need to reconnect and enter the password next time you want to connect to that network. Happy network troubleshooting!
Option 1: Forget a Network through Network Settings
Forgetting a network through the network settings is a simple and straightforward process in Windows 10. This option allows you to remove a wireless network from your device’s memory, ensuring that it won’t automatically connect to that network in the future.
To forget a network through network settings, follow these steps:
- Click on the Start menu and open the Settings app.
- In the Settings window, click on the Network & Internet option.
- From the left-hand menu, select Wi-Fi.
- Scroll down to the Manage known networks section and click on it.
- A list of all the Wi-Fi networks your device has connected to will appear. Locate the network you want to forget, and click on it.
- Click on the Forget button that appears for that network.
By following these steps, you have successfully forgotten the selected network through the network settings in Windows 10. Your device will no longer automatically connect to that network, and it will be removed from the list of known networks.
Option 2: Forget a Network through Command Prompt
If you prefer a more technical approach to forget a wireless network in Windows 10, you can use the Command Prompt utility. By following these steps, you can quickly and efficiently remove a stored network from your system:
1. Press the Windows key + X on your keyboard to open the Quick Access menu.
2. From the menu, select “Command Prompt (Admin)” or “Windows PowerShell (Admin)” – either option will work for this method.
3. Once the Command Prompt or PowerShell window appears, type in the following command:
netsh wlan delete profile name="NETWORK NAME"
Remember to replace “NETWORK NAME” with the name of the wireless network you wish to forget. Make sure to type it exactly as it appears, including any capitalizations or spaces.
4. Press Enter to execute the command.
5. Once the command is completed, the wireless network should be successfully removed from your system.
By using the Command Prompt method, you have the option to quickly forget a wireless network without navigating through the Windows 10 settings menu. This method is especially useful for those who prefer a command-line interface or need to perform bulk operations.
Option 3: Forget a Network through PowerShell
If you prefer a more advanced method to forget a wireless network in Windows 10, you can use PowerShell. PowerShell is a command-line shell and scripting language that allows you to automate various tasks in Windows.
Here’s how you can forget a network using PowerShell:
- Open the Start menu and search for “PowerShell”. Right-click on “Windows PowerShell” and select “Run as administrator”.
- In the PowerShell window, type the following command: Netsh WLAN delete profile name=”NETWORK NAME”, replacing “NETWORK NAME” with the name of the network you want to forget.
- Press Enter to execute the command.
A command prompt will appear with a confirmation message indicating that the network profile has been successfully deleted.
Using PowerShell to forget a network provides a more precise and efficient way of removing network profiles. It allows you to manage your wireless connections with greater control and flexibility.
It is important to note that when using PowerShell, you need to be cautious and ensure that you have entered the correct network name to avoid accidentally deleting the wrong network profile.
The PowerShell method is particularly useful when dealing with multiple networks or if you are experiencing connectivity issues with a specific network. By deleting the network profile, you can start fresh and establish a new connection, potentially resolving any connection problems.
Remember to close the PowerShell window when you have finished forgetting the network.
Conclusion
Forgetting a wireless network on Windows 10 can be a straightforward process, allowing you to remove unwanted or outdated network connections from your device. By following the steps outlined in this guide, you can easily navigate to the network settings, locate the network you wish to forget, and remove it from your saved list.
Whether you are experiencing connectivity issues or simply wanting to clean up your network preferences, forgetting a wireless network can help streamline your wireless experience on Windows 10. Remember to keep your information secure by only connecting to trusted and secure networks.
With these simple steps and a clear understanding of how to forget a wireless network on Windows 10, you can confidently manage your network connections and enjoy a smoother and more reliable wireless experience on your device.
FAQs
1. How do I forget a wireless network in Windows 10?
To forget a wireless network in Windows 10, follow these steps:
- Click on the network icon in the taskbar, usually located in the bottom-right corner of the screen.
- Select “Network & Internet settings.”
- In the Settings app, click on “Wi-Fi” on the left sidebar.
- Scroll down and click on “Manage known networks.”
- Find the network you want to forget, then click on it.
- Click on the “Forget” button.
2. Why would I want to forget a wireless network in Windows 10?
Forgetting a wireless network can be useful in several scenarios:
- If you no longer want to connect to a particular network.
- If you are experiencing connectivity issues with a specific network and want to start fresh.
- If you have changed the password of a network and need to enter the new credentials.
- If you want to prioritize networks and remove clutter from your list of known networks.
3. Will forgetting a wireless network delete the network settings?
No, forgetting a wireless network in Windows 10 will only remove it from the list of known networks. It will not delete any network settings or configurations on your computer.
4. Can I reconnect to a forgotten wireless network in Windows 10?
Yes, you can reconnect to a forgotten wireless network. When you are in range of the network, Windows 10 will automatically detect it and prompt you to enter the network password or security key.
5. How do I prevent Windows 10 from automatically connecting to a forgotten network?
If you want to prevent Windows 10 from automatically connecting to a forgotten network, you can follow these steps:
- Go to “Settings” and click on “Network & Internet.”
- In the Settings app, click on “Wi-Fi” on the left sidebar.
- Scroll down and click on “Manage known networks.”
- Select the network you want to prevent Windows 10 from automatically connecting to.
- Toggle the “Connect automatically” switch to off.