
Connecting to a wireless network in Windows 8 is a crucial step in today’s digitally connected world. Whether you’re at home, at work, or on the go, having the ability to connect your device to a wireless network allows you to stay connected and access the internet with ease. Windows 8 provides a simple and user-friendly interface that makes connecting to a wireless network a breeze. In this article, we will guide you through the process of connecting to a wireless network in Windows 8, from finding available networks to entering the password and ensuring a stable connection. By following these steps, you’ll be able to enjoy all the benefits of wireless connectivity on your Windows 8 device in no time.
Inside This Article
- Step 1: Accessing the Network Settings
- Step 2: Scanning for Available Networks
- Step 3: Connecting to the Wireless Network
- Step 4: Entering the Network Password
- Additional Troubleshooting Tips
- Conclusion
- FAQs
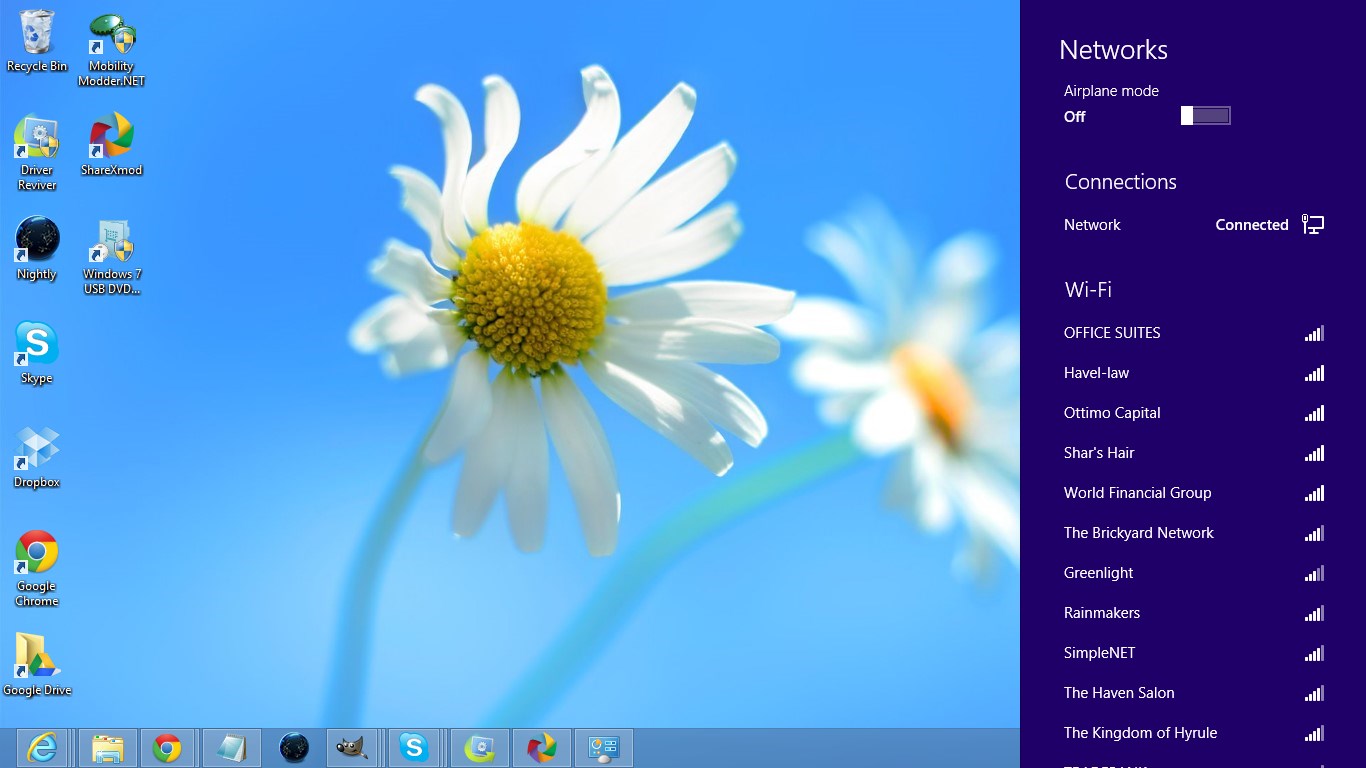
Step 1: Accessing the Network Settings
To connect to a wireless network on Windows 8, the first step is to access the network settings. This can be done by following these simple steps:
1. From the desktop, move the cursor to the top-right corner of the screen or swipe in from the right side to open the Charms menu.
2. Click on the “Settings” option, represented by a gear icon.
3. In the Settings menu, select “PC Settings.”
4. Within the PC Settings menu, choose “Network” from the options on the left sidebar.
5. You will now see the options for various network connections. Select “Wi-Fi” to access the wireless network settings.
6. The network settings will open, displaying a list of available wireless networks in your area.
By following these steps, you will have successfully accessed the network settings on your Windows 8 device, allowing you to proceed with connecting to the desired wireless network.
Step 2: Scanning for Available Networks
After accessing the network settings in Windows 8, the next step is to scan for available networks. This allows your device to detect all the wireless networks in your vicinity that you can connect to. The process is relatively simple and can be done with just a few clicks.
To begin scanning for available networks, follow these steps:
- Click on the Wi-Fi icon located in the system tray at the bottom right corner of your screen. It looks like a series of curved lines representing signal strength.
- A list of available Wi-Fi networks will appear. Windows 8 will automatically start scanning for nearby networks, so you may need to wait a few seconds for the list to populate.
As the list populates, you will see the names of different networks along with their signal strengths. This information is crucial in determining which network you want to connect to, especially if you’re in an area with multiple networks.
Take note of the network names and their respective signal strengths. Generally, networks with higher signal strengths tend to offer better connectivity and faster internet speeds. However, keep in mind that other factors such as network congestion and distance can also affect the overall performance.
Once you have scanned for available networks and reviewed the list, you are ready to proceed to the next step of connecting to the wireless network. This takes you one step closer to enjoying seamless internet access on your Windows 8 device.
Step 3: Connecting to the Wireless Network
Once you have located the list of available networks, it’s time to connect to the wireless network of your choice. Follow these steps:
- Click on the name of the network you want to connect to.
- Click on the “Connect” button.
- If the network is secured, you may be prompted to enter the network password.
- Click on the “Next” button.
- Wait for a few moments.
- Once connected, you will see a notification confirming the successful connection.
This will highlight the network and enable the “Connect” button.
Windows will attempt to establish a connection to the selected network.
Enter the password in the provided field. Make sure to double-check for any typos as passwords are case-sensitive.
If the password is correct, Windows will finish connecting to the wireless network.
Windows will take a few moments to establish the connection and obtain an IP address.
You can now start using the internet on your Windows 8 device through the wireless network.
It’s important to note that some networks may have additional security measures such as a network key or a certificate, which may require further authentication. Follow any prompts or instructions provided by Windows to complete the connection process.
If you encounter any connectivity issues, consider restarting your device or troubleshooting the wireless network. You can also reach out to your network administrator or internet service provider for assistance.
Now that you know how to connect to a wireless network on your Windows 8 device, you can enjoy the convenience of wireless internet access wherever you go!
Step 4: Entering the Network Password
Once you have identified the wireless network you want to connect to, you will need to enter the network password. This password is usually set by the network administrator or the owner of the Wi-Fi router. It is a security measure designed to ensure that only authorized users can access the network.
Follow these steps to enter the network password:
- Click on the wireless network that you want to connect to in the list of available networks.
- A dialog box will appear, asking you to enter the network password or passphrase. This is also known as the Wi-Fi password or security key.
- Type in the password in the provided field. Be careful to enter it correctly, paying attention to capitalization and any special characters.
- Click on the “Connect” or “OK” button to connect to the network.
Once you have successfully entered the network password, your Windows 8 device will attempt to connect to the wireless network. If the password is correct, you will be connected to the network and will be able to access the internet.
If you encounter any issues during this step, double-check that you have entered the password correctly. Passwords are often case-sensitive, so make sure you are entering uppercase and lowercase letters correctly. If you are still unable to connect, try restarting your computer and repeating the process.
It is also worth noting that some wireless networks use advanced security protocols such as WPA2-Enterprise, which may require additional settings or authentication credentials to connect. If you are connecting to a network with these advanced security settings, consult the network administrator for the necessary information.
Once you have successfully connected to the wireless network, your Windows 8 device will remember the network and automatically connect to it whenever it is in range. This makes it convenient for future use as you won’t have to re-enter the password every time you want to connect.
Remember to keep your network password secure and avoid sharing it with unauthorized individuals. This will help protect the privacy of your connection and prevent unauthorized access to your network.
Additional Troubleshooting Tips
Even with the most straightforward network setup, there can still be hiccups along the way. Here are some additional troubleshooting tips to help you connect to a wireless network on Windows 8:
- Restart your computer: Sometimes, a simple restart can resolve connectivity issues. Give your computer a fresh start by restarting it and then attempt to connect to the wireless network again.
- Check your Wi-Fi adapter: Make sure that your Wi-Fi adapter is working properly. You can do this by going to the Device Manager and checking for any driver issues or conflicts. Update the driver if needed.
- Move closer to the router: If you’re having trouble establishing a stable connection, try moving closer to the Wi-Fi router. Distance and physical obstacles can weaken the signal strength and affect the network connection.
- Check for interference: Other electronic devices, such as cordless phones or microwave ovens, can interfere with Wi-Fi signals. Keep these devices away from your computer or router to avoid experiencing connection problems.
- Forget and re-add the network: If you’re unable to connect to a specific wireless network, you can try forgetting the network and then re-adding it. To do this, go to the network settings, locate the network, and select “Forget”. Afterward, scan for available networks, find the network again, and try connecting to it.
- Disable antivirus/firewall temporarily: Sometimes, antivirus software or firewalls can block the connection to a wireless network. Temporarily disable them and see if you’re able to connect. If this resolves the issue, consider adding an exception or adjusting the settings to allow network connections.
- Contact your Internet Service Provider (ISP): If you’ve tried all the troubleshooting steps and are still unable to connect to the wireless network, it may be time to reach out to your ISP. They can help diagnose any potential issues on their end or provide further assistance in resolving the problem.
By following these troubleshooting tips, you should be able to overcome any obstacles and successfully connect to a wireless network on Windows 8. Remember to be patient and persistent, as connectivity issues can sometimes be resolved with a little bit of troubleshooting.
Conclusion
In conclusion, connecting to a wireless network on Windows 8 is a fairly straightforward process. By following the steps outlined in this guide, you can quickly and easily connect your computer to a wireless network and enjoy the benefits of wireless connectivity. Remember to ensure that you have the necessary network credentials and that your wireless adapter is enabled. If you encounter any issues during the setup process, refer to the troubleshooting section for potential solutions. Once connected, you can enjoy the convenience and flexibility of accessing the internet and network resources without the need for wired connections. So go ahead and get connected to the wireless world with your Windows 8 device!
FAQs
1. How do I connect to a wireless network on Windows 8?
To connect to a wireless network on Windows 8, follow these steps:
- Click on the network icon in the system tray at the bottom-right corner of the screen.
- A list of available wireless networks will appear. Click on the network you want to connect to.
- If the network is secured, you will be prompted to enter the network password. Enter the password and click Connect.
- Once connected, you will see a confirmation message and the network icon will display the signal strength.
2. What should I do if I can’t find the wireless network I want to connect to?
If you can’t find the wireless network you want to connect to, make sure that the wireless adapter on your Windows 8 device is turned on. You can usually do this by pressing a physical button or using the function keys on your keyboard. If the wireless adapter is already on and you still can’t find the network, try moving closer to the router or restarting the router and your device.
3. How do I forget a wireless network on Windows 8?
To forget a wireless network on Windows 8, follow these steps:
- Click on the network icon in the system tray at the bottom-right corner of the screen.
- Right-click on the network you want to forget and select Forget network.
- The network will be removed from your list of saved networks.
4. Why am I getting a “Limited or no connectivity” message when trying to connect to a wireless network on Windows 8?
The “Limited or no connectivity” message indicates that your Windows 8 device is not able to establish a proper connection with the wireless network. This can be caused by various factors, such as incorrect network settings, outdated drivers, or network interference. Try the following steps to resolve the issue:
- Restart your Windows 8 device and the wireless router.
- Check if other devices can connect to the same wireless network.
- Update the wireless network adapter drivers on your Windows 8 device.
- Double-check the network settings and make sure they are correct.
- If the issue persists, consider contacting your Internet Service Provider or the manufacturer of your device for further assistance.
5. Can I connect to a hidden wireless network on Windows 8?
Yes, you can connect to a hidden wireless network on Windows 8. To do so, follow these steps:
- Click on the network icon in the system tray at the bottom-right corner of the screen.
- Select “Hidden network” from the list of available networks.
- Enter the network name (SSID) and other required information.
- If the network is secured, you will be prompted to enter the network password.
- Click Connect to establish a connection to the hidden network.