
Have you ever connected your Windows 10 device to a wireless network and now want to forget it? Whether you’ve changed your wireless setup or simply want to remove an unnecessary network from your list, making Windows 10 forget a wireless network is a relatively straightforward process.
By instructing your Windows 10 device to forget a wireless network, you are essentially removing it from the list of saved networks. This means that the device will no longer automatically connect to the network when it is in range. Forgetting a wireless network can help declutter your network connections and ensure that you only connect to the networks you actively use.
In this article, we’ll guide you through the steps to make Windows 10 forget a wireless network, providing you with a hassle-free experience and helping you maintain better control over your network connections. So, let’s dive in and learn how to remove those unwanted networks!
Inside This Article
- Steps to Make Windows 10 Forget a Wireless Network
- Additional Tips to Forget a Wireless Network in Windows 10
- Conclusion
- FAQs
Steps to Make Windows 10 Forget a Wireless Network
Forgetting a wireless network on your Windows 10 device can be essential in scenarios where you no longer want your device to automatically connect to a particular network. This can be useful when you’re connecting to a new network or when you’re experiencing connectivity issues with a specific network. Follow the steps below to make Windows 10 forget a wireless network:
- Step 1: Open the Settings app
- Step 2: Go to the Network & Internet section
- Step 3: Access the Wi-Fi settings
- Step 4: Manage known networks
To begin, click on the “Start” menu and then click on the gear icon to open the Settings app.
Once the Settings app is open, locate and click on the “Network & Internet” section.
In the Network & Internet section, look for the “Wi-Fi” option in the left-hand menu. Click on it to access the Wi-Fi settings.
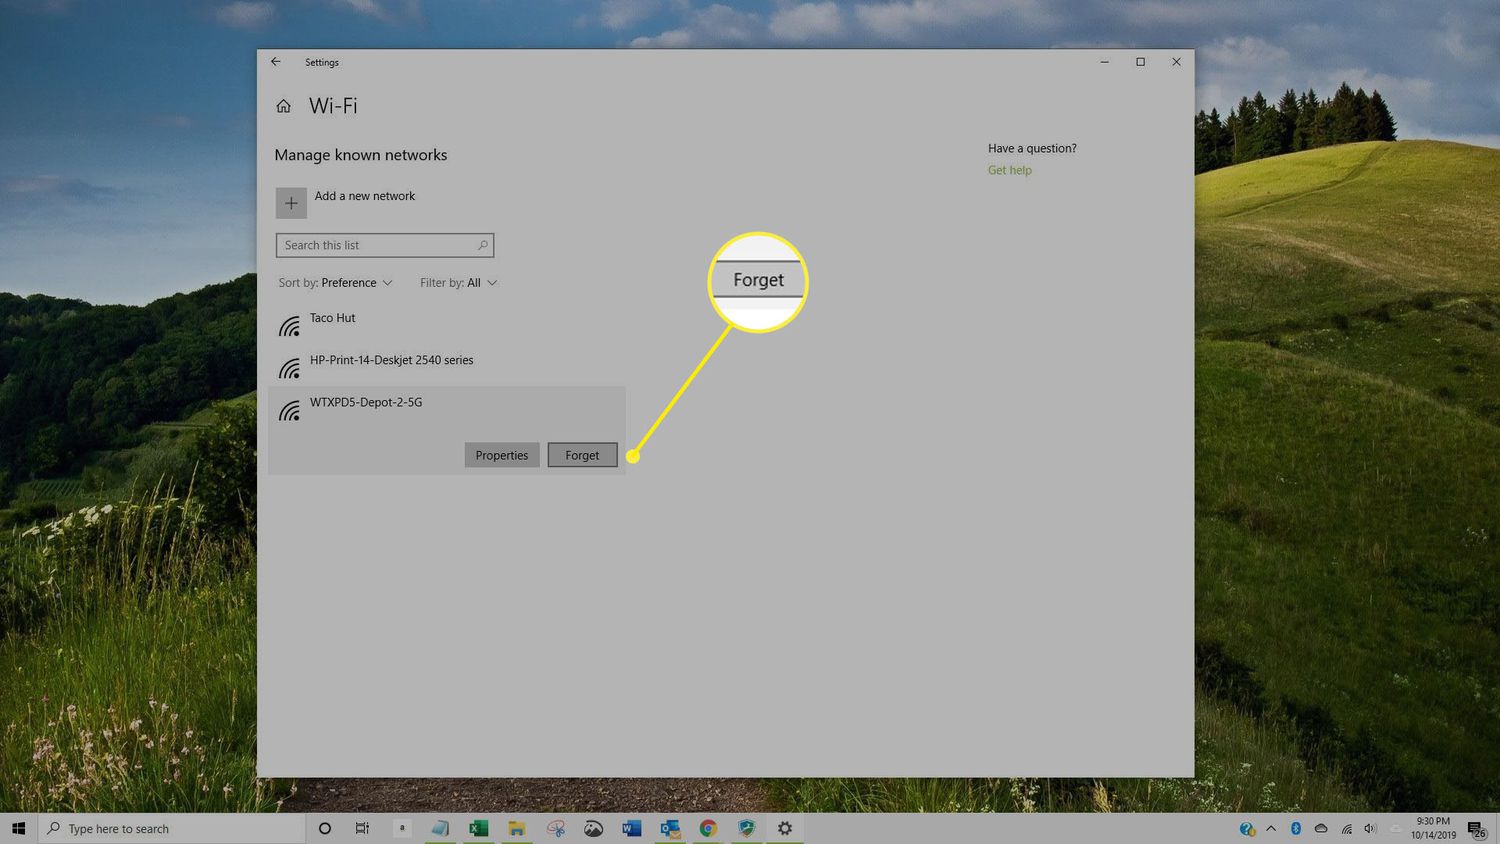
Within the Wi-Fi settings, scroll down to the “Manage known networks” section. Here, you will find a list of all the wireless networks your device has connected to in the past.
Find the network you want to forget and click on it. Then, click on the “Forget” button that appears.
Following these steps will remove the selected wireless network from your device’s list of known networks, and it will no longer automatically connect to that network.
Additional Tips to Forget a Wireless Network in Windows 10
If you’re looking for alternative methods to forget a wireless network in Windows 10, you’re in luck! In addition to the steps mentioned earlier, there are two additional tips that you can use: utilizing the Command Prompt and accessing the Control Panel. These methods provide an alternative way to manage your network connections and remove unwanted networks from your device’s memory.
Tip 1: Use the Command Prompt
If you’re comfortable using the Command Prompt, this method offers a quick and efficient way to forget a wireless network in Windows 10. Simply follow these steps:
- Open the Command Prompt by searching for it in the Windows search bar or by pressing the Windows key + R, typing “cmd”, and hitting enter.
- In the Command Prompt window, type the following command:
netsh wlan show profiles - A list of all the wireless networks you’ve connected to will be displayed. Identify the network you want to forget and take note of its name.
- To forget the network, type the following command, replacing “NetworkName” with the actual name of the network:
netsh wlan delete profile name="NetworkName" - Press enter, and the selected network will be forgotten.
Tip 2: Use the Control Panel
If you prefer a more user-friendly approach, you can also use the Control Panel to forget a wireless network. Here’s how:
- Open the Control Panel by searching for it in the Windows search bar or by right-clicking the Start button and selecting “Control Panel”.
- In the Control Panel, navigate to the “Network and Sharing Center” or “Network and Internet” section.
- Click on “Change adapter settings” from the left-hand side menu.
- A new window will open, displaying the network connections on your device. Right-click on the Wi-Fi connection and select “Properties”.
- In the Properties window, click on the “Wireless Networks” tab.
- Under “Preferred networks”, you will find a list of networks you have connected to. Select the network you want to forget and click on the “Remove” button.
- Confirm the deletion when prompted.
- The selected network will be forgotten, and you can close the Control Panel.
By utilizing these additional tips, you have multiple options to forget a wireless network in Windows 10. Whether you prefer the efficiency of the Command Prompt or the user-friendly Control Panel, you can easily manage and remove unwanted networks from your device. Experiment with these methods and find the one that suits you best!
Conclusion
Forgetting a wireless network on Windows 10 is a simple and effective way to resolve connection issues and maintain your network preferences. Whether you’re experiencing connectivity problems or simply want to remove a network from your list, the steps outlined above provide an easy-to-follow guide.
By accessing the Network & Internet settings, you can quickly forget a wireless network and ensure that Windows 10 no longer attempts to connect to it automatically. This can help you manage your available networks and prioritize the ones you use most frequently.
Remember to exercise caution when forgetting a network, as you will need to re-enter the password if you wish to reconnect in the future. Additionally, be aware that forgetting a network will not disable or affect the network or its settings in any way.
With the knowledge of how to make Windows 10 forget a wireless network, you have the power to control your network connections and optimize your browsing experience.
FAQs
1. Why would I want to make Windows 10 forget a wireless network?
There are several reasons why you might want to make Windows 10 forget a wireless network. Perhaps you no longer have access to that network, or maybe you want to prioritize a different network. Forgetting a wireless network allows you to clean up your network list and ensure that Windows 10 does not automatically connect to a network that you no longer want to use.
2. How do I make Windows 10 forget a wireless network?
To make Windows 10 forget a wireless network, follow these steps:
a. Go to the “Start” menu and click on the “Settings” gear icon.
b. In the Settings window, click on “Network & Internet.”
c. In the Network & Internet settings, click on the “Wi-Fi” tab.
d. Scroll down and click on “Manage known networks.”
e. Find the network you want to forget in the list and click on it.
f. Click on the “Forget” button.
Once you have completed these steps, Windows 10 will remove the network from its list of known networks.
3. Will forgetting a wireless network delete the Wi-Fi password?
Forgetting a wireless network does not delete the Wi-Fi password. It only removes the network from the list of known networks on your device. If you want to reconnect to the network in the future, you will need to re-enter the password.
4. What happens if I accidentally forget a wireless network?
If you accidentally forget a wireless network, do not worry. You can easily reconnect to the network by following the same steps you would normally use to connect to a new network. Simply search for the network in the Wi-Fi settings, select it, and enter the password.
5. Can I make Windows 10 forget all wireless networks at once?
Yes, you can make Windows 10 forget all wireless networks at once. Instead of selecting a specific network in the “Manage known networks” list, you can click on the “Forget all” button located at the top of the list. This will remove all saved networks from your device.