
Are you looking for a way to remove a wireless network on your Windows 7 computer? Well, you’ve come to the right place! In this article, we will provide you with a step-by-step guide on how to easily remove a wireless network from your Windows 7 operating system. Whether you want to delete an old network or simply declutter your network list, we’ve got you covered. We understand that managing your wireless connections can sometimes be a bit confusing, but fear not! With our expert tips and instructions, you’ll be able to remove any unwanted wireless networks with ease. So let’s get started and clear up some space on your network list!
Inside This Article
- Steps to Remove a Wireless Network on Windows 7
- Open the Network and Sharing Center
- Manage Wireless Networks
- Locate the network to remove
- Remove the wireless network
- Conclusion
- FAQs
Steps to Remove a Wireless Network on Windows 7
If you’re using Windows 7 and want to remove a wireless network that you no longer need, you can do so using a few simple steps. In this guide, we’ll walk you through different methods to remove a wireless network on Windows 7.
Method 1: Using the Network and Sharing Center
1. Click on the network icon located in the system tray at the bottom right corner of the screen.
2. Select “Open Network and Sharing Center” from the list of available options.
3. In the Network and Sharing Center window, click on “Manage wireless networks” on the left-hand side.
4. A list of all saved wireless networks will appear. Right-click on the network you want to remove and select “Remove network”.
5. Windows will ask for confirmation. Click on “Yes” to remove the network.
Method 2: Using the Command Prompt
1. Open the Command Prompt by pressing the Windows key + R, then type “cmd” and hit Enter.
2. In the Command Prompt window, type “netsh wlan show profiles” and hit Enter. This will display a list of all connected wireless networks.
3. Identify the name of the network you want to remove and note down its profile name.
4. To remove the network, type “netsh wlan delete profile name=[profile name]” and hit Enter. Replace “[profile name]” with the actual name of the network.
5. The selected wireless network will be removed successfully.
Method 3: Removing the Network Profile Manually
1. Open the Control Panel by clicking on the Start button and selecting “Control Panel”.
2. In the Control Panel window, choose “Network and Internet”, and then click on “Network and Sharing Center”.
3. On the left-hand side, click on “Change adapter settings”.
4. Right-click on the Wi-Fi adapter, select “Properties”, and then click on the “Wireless Networks” tab.
5. Find the network profile you want to remove in the list and click on the “Remove” button.
6. Confirm the action by clicking on “OK” to remove the network profile.
Method 4: Using the Registry Editor
WARNING: Editing the registry can be risky. Proceed with caution and back up your registry before making any changes.
1. Press the Windows key + R, then type “regedit” and hit Enter to open the Registry Editor.
2. In the Registry Editor window, navigate to the following location: HKEY_LOCAL_MACHINE\SOFTWARE\Microsoft\Windows NT\CurrentVersion\NetworkList\Profiles.
3. Expand the “Profiles” folder and look for the subkeys with the names starting with “ProfileName” followed by a long string of alphanumeric characters.
4. Find the subkey that represents the network profile you want to remove and right-click on it. Select “Delete” to remove the network profile.
5. Confirm the action when prompted.
Remember to exercise caution when making changes to your system, especially when editing the registry.
And there you have it! By following the steps outlined above, you can easily remove a wireless network on Windows 7. Whether you choose to use the Network and Sharing Center, the Command Prompt, removing the network profile manually, or the Registry Editor, you’ll be able to delete unwanted wireless networks quickly and efficiently.
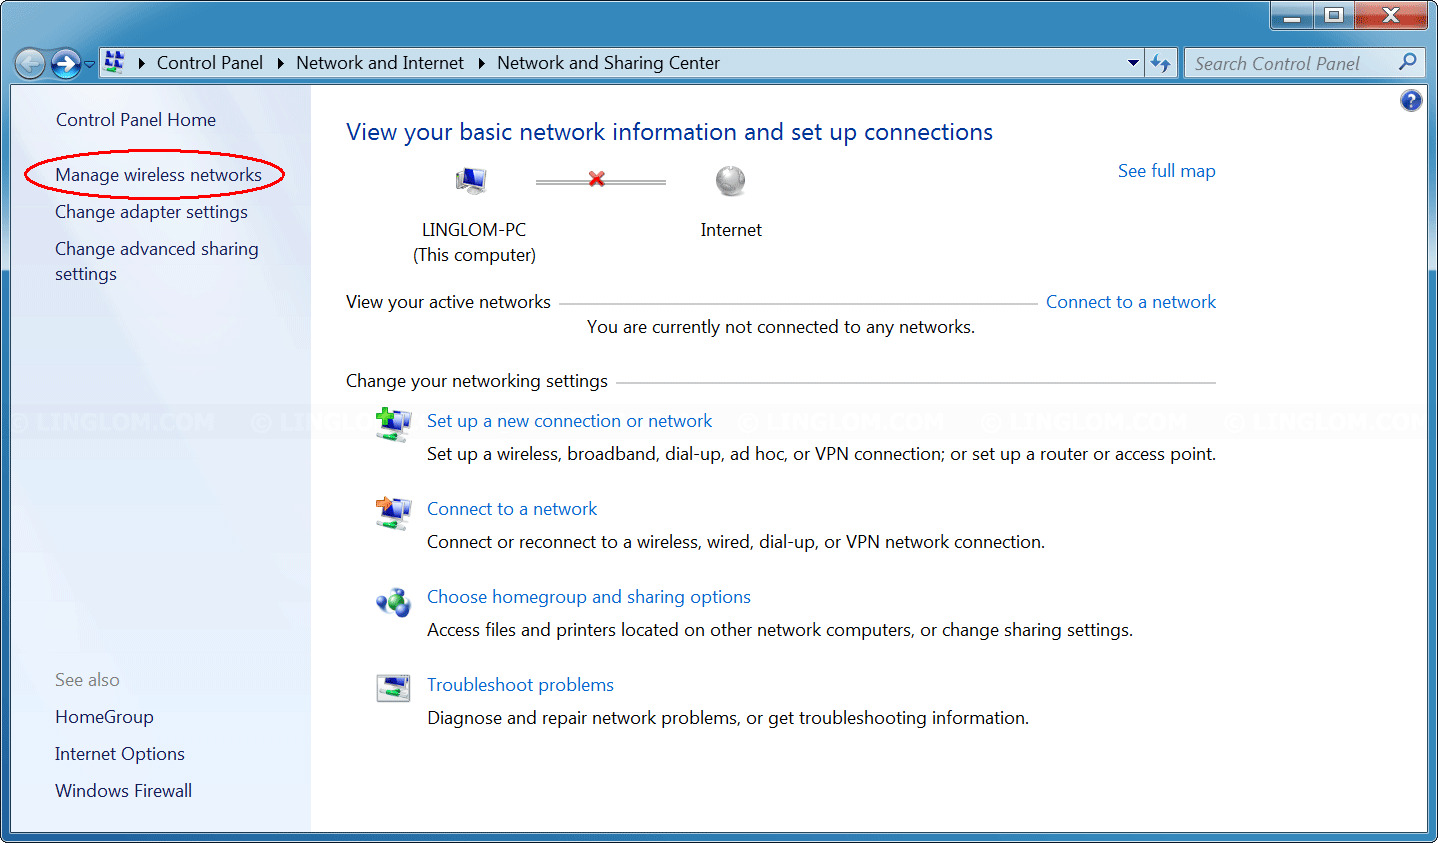
Open the Network and Sharing Center
To remove a wireless network on Windows 7, start by opening the Network and Sharing Center. This can be accessed by clicking on the network icon in the system tray, usually located in the bottom-right corner of the screen. Alternatively, you can navigate to the Control Panel and search for “Network and Sharing Center.”
Manage Wireless Networks
Once the Network and Sharing Center is open, look for the option that says “Manage wireless networks” on the left-hand side of the window. Click on it to open the Wireless Network Management window.
Locate the network to remove
In the Wireless Network Management window, you will see a list of all the wireless networks that your computer has connected to in the past. Scroll through the list and locate the network that you want to remove. This list may contain the names of both secured and unsecured networks.
Remove the wireless network
To remove the wireless network, simply right-click on the network name and select the “Remove network” option from the drop-down menu. Windows 7 will prompt you to confirm the action. Click “Yes” to confirm and remove the network.
Please note that this is a general outline, and the actual steps may vary slightly based on individual computer settings and configurations. It is always recommended to refer to specific instructions or consult the Windows 7 documentation for accurate and detailed information.
Conclusion
In conclusion, removing a wireless network on Windows 7 is a simple and straightforward process. By following the steps outlined in this article, you can easily delete unwanted or problematic networks from your device. Whether you no longer have access to a specific network or want to get rid of networks that are causing connectivity issues, the steps provided will help you achieve your goal.
Remember to always exercise caution when deleting wireless networks, only removing those that you no longer need or are causing problems. By regularly managing your wireless networks, you can optimize your device’s performance and ensure a smooth and hassle-free browsing experience.
If you encounter any difficulties or have further questions regarding removing wireless networks on Windows 7, don’t hesitate to consult the Windows support documentation or seek assistance from a technical professional. With a little bit of knowledge and guidance, you can easily manage your wireless networks and enjoy a seamless connectivity experience.
FAQs
1. How do I remove a wireless network on Windows 7?
Removing a wireless network on Windows 7 is a simple process. Follow these steps:
- Click on the Start button in the bottom left corner of your screen.
- Go to the Control Panel.
- Click on Network and Internet.
- Under Network and Sharing Center, click on the link that says “Manage wireless networks.”
- A list of all the wireless networks you have connected to will appear. Right-click on the network you want to remove.
- Click on Remove network.
- Confirm the removal by clicking on Yes.
The wireless network will now be removed from your Windows 7 system.
2. Can I remove multiple wireless networks at once on Windows 7?
Unfortunately, Windows 7 does not provide a built-in option to remove multiple wireless networks at once. You will need to remove each network individually by following the steps mentioned above.
3. Will removing a wireless network affect my internet connection?
No, removing a wireless network from your Windows 7 system will not affect your internet connection. You can still connect to other available networks or reconnect to the removed network if needed.
4. How can I forget a wireless network on Windows 7?
To forget a wireless network on Windows 7, you can follow these steps:
- Click on the Start button.
- Go to the Control Panel.
- Click on Network and Internet.
- Under Network and Sharing Center, click on the link that says “Manage wireless networks.”
- A list of all the wireless networks you have connected to will appear. Right-click on the network you want to forget.
- Click on Forget this network.
- Confirm the action by clicking on Yes.
The selected wireless network will be forgotten from your Windows 7 system.
5. Can I remove a wireless network on Windows 7 even if I am not connected to it?
Yes, you can remove a wireless network on Windows 7 even if you are not currently connected to it. The steps to remove the network remain the same as mentioned earlier. Simply locate the network in the list of managed networks and remove it.