
Setting up Family Sharing on iOS 8 is a convenient way to keep your family members connected and share various content, such as apps, music, and photos. With this feature, you can easily manage your family’s digital life and ensure that everyone has access to the same content without having to purchase it multiple times. Whether you’re trying to share apps, books, or even a subscription to Apple Music, Family Sharing simplifies the process and makes it easier for everyone to stay connected. In this article, we’ll take a closer look at how you can set up Family Sharing on iOS 8 and explore the benefits of using this fantastic feature.
Inside This Article
- What is Family Sharing?
- Setting Up Family Sharing in iOS 8
- Step 1: Sign in to iCloud
- Step 2: Set Up Family Sharing
- Step 3: Add Family Members
- Step 4: Manage Family Purchases
- Step 5: Share Your Location with Family Members
- Step 6: Set Up Ask to Buy
- Step 7: Share Photos, Calendars, and Reminders
- Step 8: Use shared features with Apple Music
- Conclusion
- FAQs
What is Family Sharing?
Family Sharing is a feature on iOS devices that allows up to six family members to share access to various Apple services and purchases. With Family Sharing, you can easily share App Store purchases, Apple Music subscriptions, iCloud storage, and more, all while maintaining individual accounts and personal preferences.
Family Sharing provides a seamless way for families to stay connected, share content, and manage their devices. It’s a convenient solution for parents who want to monitor and control their children’s digital activities, as well as for adults who want to share media and resources with their family members.
By setting up Family Sharing, you’ll be able to share purchases from the App Store, iTunes Store, and Books Store with your family members. This means that you and your family members can download and enjoy books, music, movies, TV shows, and other digital content without having to purchase them individually.
Additionally, Family Sharing also allows you to share subscriptions to services like Apple Music, Apple News+, and Apple Arcade. This means that everyone in your family can access and enjoy these services without the need for separate subscriptions.
With Family Sharing, you can also share a common iCloud storage plan, which helps you save money by pooling your storage space. This is especially useful for families who have multiple devices and need to back up photos, videos, and other files.
Family Sharing also enables you to share your location with your family members. This can be helpful for keeping track of loved ones and ensuring their safety. You can easily see the location of your family members on a map and even set up notifications for when they arrive or leave certain locations.
Setting Up Family Sharing in iOS 8
Family Sharing in iOS 8 is a great feature that allows you to share your purchases, photos, calendars, and more with your family members. It’s a convenient way to keep everyone in your family connected and to easily manage shared content. Here’s a step-by-step guide on how to set it up in iOS 8.
Step 1: Sign in to iCloud
The first step to setting up Family Sharing is to sign in to iCloud on your device. Make sure you’re signed in with your Apple ID and password. If you don’t have an Apple ID, you can create one by tapping on “Create New Apple ID” in the iCloud settings.
Step 2: Set Up Family Sharing
Once you’re signed in to iCloud, go to the settings app and tap on your name at the top. Then, tap on “Set Up Family Sharing” and follow the prompts. You’ll need to confirm your payment method and agree to the terms and conditions.
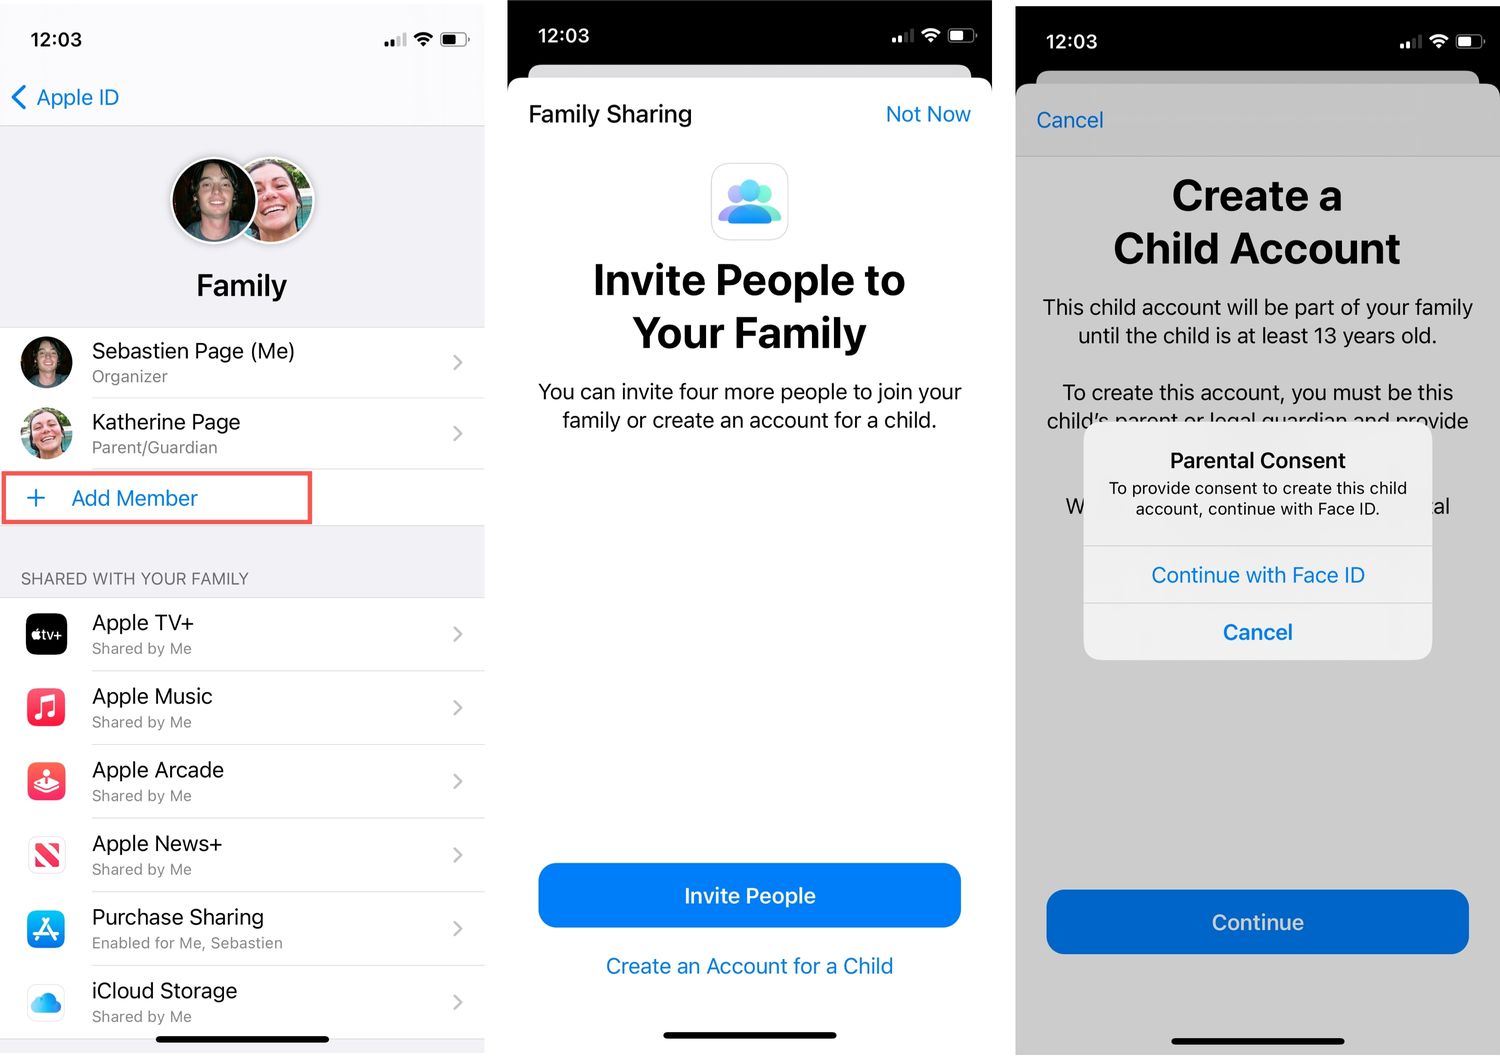
Step 3: Add Family Members
After setting up Family Sharing, you can add family members to your group. Tap on “Add Family Member” and enter their Apple ID or create an account for a child under 13. They will receive an invitation to join your family sharing group. Once they accept the invitation, they will be able to share purchases and access shared content.
Step 4: Manage Family Purchases
With Family Sharing, you can easily manage and share purchases made by family members. Any purchases made by one family member can be downloaded and installed by other family members at no additional cost. You can also designate one adult as the “Family Organizer” to approve purchases made by children and set spending limits.
Step 5: Share Your Location with Family Members
If you want to share your location with your family members, you can easily do so using Family Sharing. Open the Find My app on your device, tap on “Me” at the bottom of the screen, then tap on “Share My Location”. From there, you can choose which family members to share your location with.
Step 6: Set Up Ask to Buy
Ask to Buy is a feature that allows parents to approve or decline purchases made by their children. To set up Ask to Buy, go to the settings app and tap on your name at the top. Then, tap on “Family Sharing” and select the child’s name. Toggle on the “Ask to Buy” option and you’ll receive purchase requests from your child that you can approve or decline.
Step 7: Share Photos, Calendars, and Reminders
Family Sharing allows you to easily share photos, calendars, and reminders with your family members. To do this, open the settings app, tap on your name, and select “Family Sharing”. From there, you can toggle on the option to share photos, calendars, and reminders with your family.
Step 8: Use shared features with Apple Music
If you have an Apple Music subscription, you can also share it with your family members using Family Sharing. Simply go to the settings app, tap on your name, select “Family Sharing”, and enable the option to share Apple Music. This allows your family members to access your Apple Music library and enjoy all the benefits of the subscription.
With these simple steps, you can easily set up Family Sharing in iOS 8 and enjoy seamless content sharing and management with your family. It’s a great way to stay connected and make the most out of your Apple devices.
Step 1: Sign in to iCloud
Before you can set up Family Sharing in iOS 8, you need to ensure that you are signed in to iCloud on your device. iCloud is Apple’s cloud storage and synchronization service that allows you to access your files, photos, contacts, and more across all your Apple devices. Here’s how you can sign in to iCloud:
1. Open the Settings app on your iOS device.
2. At the top of the Settings menu, you will see your name or Apple ID. Tap on it.
3. On the next screen, tap “iCloud.”
4. Enter your Apple ID and password in the respective fields. If you don’t have an Apple ID, you can create one by tapping “Don’t have an Apple ID or forgot it?” at the bottom of the screen.
5. Once you’ve entered your Apple ID and password, tap “Sign In.”
6. If two-factor authentication is enabled for your Apple ID, you may be asked to enter a verification code sent to your trusted device or phone number. Enter the code to proceed.
7. After signing in, you will see the main iCloud settings page. Here, you can enable or disable various iCloud features like iCloud Backup, iCloud Drive, and more.
By signing in to iCloud, you will be able to access the full suite of iOS 8 features, including Family Sharing.
Step 2: Set Up Family Sharing
Once you have signed in to iCloud on your iOS device, the next step is to set up Family Sharing. Family Sharing allows you to share apps, music, movies, books, and more with up to six family members, all while maintaining separate personal accounts. This feature is especially useful for families who want to share purchases and have access to each other’s content.
To set up Family Sharing, follow these simple steps:
1. Open the Settings app on your iOS device.
2. Tap on your name at the top of the screen to access your Apple ID settings.
3. Scroll down and select “Set Up Family Sharing.”
4. Tap “Get Started” to begin the setup process.
5. You will be prompted to choose which features of Family Sharing you want to enable. These include sharing purchases, sharing your location, sharing photos, calendars, and reminders, and setting up Ask to Buy. You can select all or only a few of these options based on your preferences.
6. Once you have chosen the desired features, tap “Continue.”
7. Next, you will be asked to review the Terms and Conditions for Family Sharing. Read through the terms and tap “Agree” to proceed.
8. The final step is to confirm your payment method for purchases made by family members. You can choose to use your own payment method or have each family member use their own. Tap “Continue” once you have made your selection.
Congratulations! You have successfully set up Family Sharing on your iOS device. Now, it’s time to add your family members and start enjoying all the benefits of sharing content and managing purchases together.
Step 3: Add Family Members
Now that you have set up Family Sharing in iOS 8, the next step is to add family members to your group. By adding family members, you can share purchases, subscriptions, and even create a shared family photo album. Here’s how you can add family members:
1. Open the Settings app on your iOS device.
2. Tap on your name at the top of the Settings menu to access your Apple ID settings.
3. Scroll down and select “Family Sharing”.
4. Tap “Add Family Member”.
5. Choose the method you want to use to send an invitation to the family member. You can either send an invitation via iMessage, email, or invite them in person.
6. Enter the family member’s name and email address or phone number. If they are already in your contacts, you can select their name from the suggestions.
7. Tap “Next” to send the invitation.
8. The family member will receive the notification and can accept the invitation to join your family group.
9. Once the family member accepts the invitation, they will be added to your Family Sharing group and can start enjoying the benefits of shared purchases, subscriptions, and more.
10. To manage the family members in your group, you can go back to the Family Sharing settings and tap on the family member’s name to view their individual settings and permissions.
Adding family members to your group is a simple and convenient way to share purchases and services with your loved ones. Whether it’s sharing a movie rental, accessing each other’s apps and music, or managing subscriptions, Family Sharing makes it easy to stay connected and share the benefits of your iOS devices.
Step 4: Manage Family Purchases
One of the key features of Family Sharing in iOS 8 is the ability to manage and control family purchases. This allows the family organizer to have oversight and control over the purchases made by other family members. Here’s how you can easily manage family purchases:
1. Open the App Store on your iOS device and navigate to the “Today” tab.
2. Tap on your profile picture or initials at the top right corner of the screen.
3. From the dropdown menu, select “Purchased”.
4. You will see a list of all the apps, games, music, movies, and TV shows that have been purchased by your family members.
5. To approve a purchase made by a family member, simply tap on the “Not on this iPhone/iPad” tab.
6. Scroll through the list and tap on the item that you want to approve.
7. Tap on the “Download” or “Play” button next to the item to download or stream it to your device.
8. If you want to hide a specific purchase from the rest of the family members, swipe left on the item and tap on the “Hide” button.
9. You can also individually manage the automatic downloads for each family member. This allows you to control whether apps, music, and other purchases are automatically downloaded to their devices.
10. To do this, tap on the name of the family member, and then toggle the switches for “Apps”, “Music”, and “Books & Audiobooks” according to your preference.
By following these simple steps, you can easily manage and control the purchases made by your family members in iOS 8’s Family Sharing feature. This ensures that you have oversight and can approve or hide purchases as needed, giving you peace of mind.
Step 5: Share Your Location with Family Members
One of the convenient features of Family Sharing in iOS 8 is the ability to share your location with your family members. This can be particularly useful for keeping track of your loved ones and ensuring their safety. With location sharing, you can easily view the whereabouts of your family members on a map, making it easier to coordinate and stay connected.
To enable location sharing, follow these simple steps:
- Open the “Settings” app on your iOS device.
- Scroll down and tap on “Privacy.”
- Select “Location Services.”
- Scroll down and tap on “Share My Location.”
- Toggle on the “Share My Location” option.
- You can also choose to enable “Share My Location” for specific family members by tapping on their name in the “Family” section below.
By sharing your location, you can easily keep tabs on family members who may be running late or need assistance. It can also be a great way to organize meetups or plan family outings. However, it’s important to communicate and respect individual privacy preferences. Not everyone may feel comfortable sharing their location all the time, so make sure to discuss and agree on the level of location sharing that works best for everyone.
Additionally, it’s worth noting that you can also set location-based alerts and notifications for specific family members. This can be helpful if you want to receive a notification when a family member arrives at or leaves a certain location. To set up location-based alerts, follow these steps:
- Go back to the “Privacy” settings in the “Settings” app.
- Select “Location Services” and scroll down to “System Services.”
- Tap on “Share My Location” and enable “Location-Based Alerts.”
- You can then customize the notifications for each family member by tapping on their name in the “Family” section below.
With location sharing and location-based alerts, Family Sharing in iOS 8 becomes an even more powerful tool for keeping your loved ones connected and safe. So, take advantage of this feature and start sharing and coordinating with your family members more effectively.
Step 6: Set Up Ask to Buy
Ask to Buy is a convenient feature that allows parents to approve or decline app purchases, in-app purchases, and download requests made by their family members. By enabling Ask to Buy, you can maintain control over the content your children have access to and ensure that their purchases are appropriate.
To set up Ask to Buy, follow these simple steps:
1. Go to Settings: Open the Settings app on your iOS device.
2. Tap on your name: Scroll down and tap on your name at the top of the screen. This will take you to your Apple ID settings.
3. Select “Family Sharing”: Tap on “Family Sharing” to access the Family Sharing settings.
4. Tap on your family member: Scroll down to the list of family members and select the individual for whom you want to enable Ask to Buy.
5. Enable Ask to Buy: Toggle the switch next to “Ask to Buy” to enable this feature for the selected family member.
6. Confirm Apple ID password: Enter your Apple ID password to confirm the changes.
Once Ask to Buy is enabled, whenever the selected family member wants to make a purchase or download an app, a notification will be sent to you (the organizer) for approval. You will have the option to approve or decline the request from your own device.
This feature provides an extra layer of security and parental control, ensuring that you are aware of your family members’ digital activities and expenditures. It gives you the ability to review and manage their purchases, setting healthy boundaries and fostering responsible digital behavior.
Step 7: Share Photos, Calendars, and Reminders
One of the great features of Family Sharing in iOS 8 is the ability to share not just purchases, but also photos, calendars, and reminders with your family members. This allows for better coordination and organization within the family unit.
Sharing photos through Family Sharing is simple and convenient. All you need to do is enable the shared photo album, and any photos you add to that album will be accessible to all family members. This is a great way to share vacation memories, family events, or other special moments with your loved ones.
Calendars are another essential tool for staying organized, and with Family Sharing, you can easily share calendars with your family members. This means that everyone in the family can view and edit events on the shared calendar, helping to keep everyone on the same page and avoid scheduling conflicts.
Reminders are a useful tool for keeping track of tasks and to-do lists, and with Family Sharing, you can also share reminders with your family members. This is great for keeping everyone in the loop and ensuring that important tasks or events are not overlooked.
To enable sharing of photos, calendars, and reminders, follow these simple steps:
- Open the Settings app on your iOS device.
- Tap on your name at the top of the screen.
- Select “Family Sharing”.
- Tap on “Photo Sharing” to enable sharing of photos.
- Tap on “Calendar Sharing” to enable sharing of calendars.
- Tap on “Reminders” to enable sharing of reminders.
- Choose the specific photos, calendars, or reminders you want to share.
- Repeat these steps for each family member you want to share with.
Once you have enabled sharing of photos, calendars, and reminders, you and your family members will be able to access and edit these shared resources through the respective apps on your iOS devices. This makes it easy to stay connected and organized as a family.
By sharing photos, calendars, and reminders through Family Sharing, you can make sure that important moments are captured and shared, important events are coordinated, and important tasks are not forgotten. It’s a simple yet powerful way to enhance the communication and organization within your family unit.
Step 8: Use shared features with Apple Music
If you and your family members are music enthusiasts, you’ll be glad to know that Apple Music offers shared features that allow you to enjoy music together. With the Family Sharing feature in iOS 8, you can share your Apple Music subscription with your family members and create a collaborative music experience.
Here are some of the shared features available with Apple Music:
- Shared Playlists: Create playlists that can be accessed and enjoyed by all family members. Whether it’s a playlist for a road trip or a collection of favorite songs, everyone can contribute and listen to the same tunes.
- Shared Library: With shared library, each family member can access and enjoy the music library of others. This means that if one family member adds a new album or song to their collection, it will be available for everyone else to listen to as well.
- Personalized Recommendations: Apple Music’s recommendation system takes into account the musical preferences of all family members. This means that the recommendations you receive will be influenced by the collective listening habits of your family. Discover new artists and genres that you may not have explored on your own.
- Family Mix: Family Mix is a curated playlist that combines the music preferences of everyone in your family. It’s a great way to discover new songs and enjoy a mix of everyone’s favorite tunes.
To access these shared features in Apple Music, make sure that each family member has their own Apple Music subscription and is part of the Family Sharing group. Once that is set up, you can start exploring and enjoying the collaborative music experience that Apple Music offers.
Now, you can bond over your favorite songs, discover new music together, and create a harmonious musical environment for your entire family to enjoy.
Conclusion
In conclusion, setting up Family Sharing in iOS 8 is a simple and convenient way to manage and share content across multiple devices within your family. With Family Sharing, you can easily share purchases from the App Store, iTunes Store, and iBooks Store, as well as share photos, calendars, and even your location with family members.
By following the step-by-step instructions provided in this guide, you can quickly set up Family Sharing and enjoy the benefits of seamless content sharing and enhanced family communication. Whether it’s sharing apps, books, or music, or staying connected through shared calendars and reminders, Family Sharing in iOS 8 makes it easier than ever to stay connected and share your digital experiences with your loved ones.
So why wait? Start setting up Family Sharing on your iOS 8 device today and elevate your family’s digital sharing and communication to the next level!
FAQs
Q: What is Family Sharing in iOS 8?
Family Sharing is a feature introduced in iOS 8 that allows you to easily share purchases, subscriptions, and other content with other members of your family. It enables you to share apps, music, books, movies, and more without needing to purchase them multiple times.
Q: How many members can be part of a Family Sharing group?
Up to six members can be added to a Family Sharing group. This includes the organizer, who is responsible for setting up and managing the group, as well as any additional adult members. For children under 13, parental consent is required for their inclusion.
Q: Can I share my existing app purchases and subscriptions with my Family Sharing group?
Yes, you can share your existing app purchases and subscriptions with your Family Sharing group. This means that any apps, subscriptions, movies, or music you have already purchased can be accessed by the other members of your family group without them needing to buy them separately.
Q: How can I set up Family Sharing in iOS 8?
To set up Family Sharing in iOS 8, follow these steps:
1. Open the Settings app on your iOS device.
2. Tap on your Apple ID at the top of the screen.
3. Tap on “Set Up Family Sharing”.
4. Follow the prompts to invite family members and set up sharing options.
5. Confirm the payment method and start sharing.
Q: What are the benefits of using Family Sharing in iOS 8?
Family Sharing in iOS 8 offers several benefits, including:
– Shared purchases: You can share apps, music, movies, and more with your family members without having to buy them separately.
– Family Sharing organizer: The organizer has control over spending and can approve or decline purchases made by other members, especially for children.
– Shared calendar and reminders: You can create a shared family calendar and reminders, making it easier to keep everyone on the same page.
– Location sharing: You can keep track of each family member’s location with the Find My app, ensuring everyone’s safety and peace of mind.