
Excel is a powerful tool that offers numerous functionalities to handle data effectively. One such function is the ability to split data into separate columns. Whether you have a dataset with names and last names in a single column or a list of addresses in a single cell, splitting the data into columns can make it easier to analyze and manipulate.
Splitting data into columns in Excel can be accomplished in several ways. From using text-to-columns feature to using formulas and macros, there are various methods to suit your specific needs. In this article, we will explore these methods step by step, offering you a comprehensive guide on how to split data into columns in Excel.
Inside This Article
- Understanding Data Splitting in Excel
- Method 1: Text to Columns
- Method 2: Using Formulas
- Method 3: Split Cells with Flash Fill
- Method 4: Splitting Data with Power Query
- Conclusion
- FAQs
Understanding Data Splitting in Excel
When working with data in Excel, often there are instances where you need to split a single cell into multiple columns. This can be necessary when dealing with data such as full names, addresses, or dates that are all combined into one cell. Fortunately, Excel provides several methods to help you split data into separate columns, making it easier to work with and analyze the information.
Here are some commonly-used methods for splitting data in Excel:
1. Using the Text to Columns feature in Excel
Excel’s Text to Columns feature is a powerful tool that allows you to split data based on a specified delimiter or fixed width. It is especially useful when dealing with data that is separated by commas, tabs, or other characters. By following a few simple steps, you can quickly split your data into separate columns.
2. Splitting data using the LEFT, MID, and RIGHT functions
If you don’t want to use the Text to Columns feature, Excel offers three functions – LEFT, MID, and RIGHT – that allow you to extract specific parts of a string. These functions are handy when you know the position or length of the data you want to extract. For example, you can use the LEFT function to extract the first name from a full name in a cell.
3. Using Excel’s Flash Fill feature to split data into columns
One of Excel’s more recent features, Flash Fill, can be a real time-saver when it comes to splitting data. By entering an example of how you want to split the data, Excel can automatically recognize the pattern and split the remaining cells accordingly. It’s a quick and intuitive way to split your data without the need for complex formulas.
4. Using the Power Query feature in Excel to split data into columns
For more advanced users, Excel’s Power Query feature provides a powerful way to split data into columns and perform other data transformations. With Power Query, you can connect to various data sources, apply transformations, and split data based on specific rules or patterns. It offers a lot of flexibility and control over the data splitting process.
By understanding these methods and using the appropriate one for your specific needs, you can efficiently split data into columns in Excel. Whether it’s using the Text to Columns feature, the LEFT, MID, and RIGHT functions, Flash Fill, or Power Query, these tools will help you organize and analyze your data more effectively.
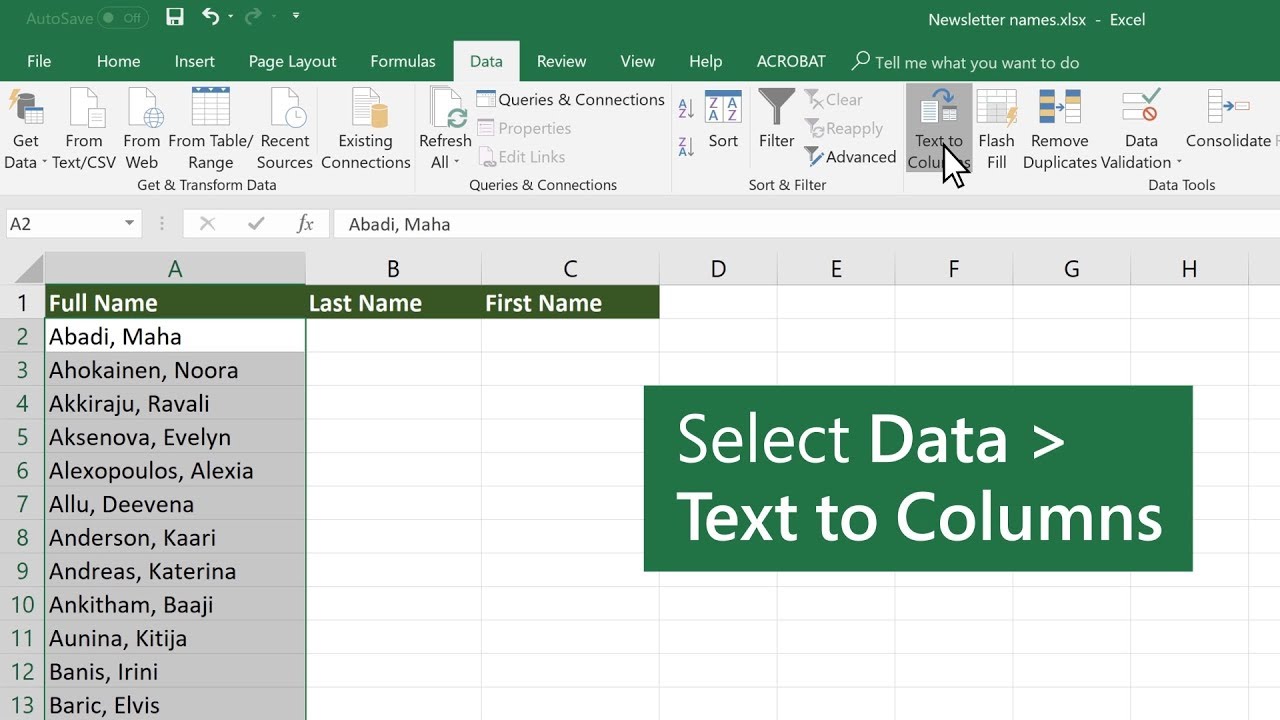
Method 1: Text to Columns
One of the easiest ways to split data into columns in Excel is by using the Text to Columns feature. This feature allows you to split a single column into multiple columns based on a delimiter or fixed width. Here’s how you can do it:
Step 1: Select the column or range of cells containing the data you want to split.
Step 2: Go to the Data tab in the Excel ribbon and click on the Text to Columns button.
Step 3: In the Text to Columns wizard, choose the delimiter option that matches how your data is separated. You can select options such as comma, space, tab, or even a custom delimiter. If your data is not separated by a delimiter and has a fixed width, select the Fixed Width option.
Step 4: Preview the results in the Data preview section. You can adjust the column breaks by clicking and dragging the vertical lines. If the preview looks correct, click Next.
Step 5: In the next step, you can choose the data format for each column. You can select General, Text, Date, or choose a custom format. Click Finish once you have made your selections.
After following these steps, Excel will split the data into separate columns based on the delimiter or fixed width you specified. Each piece of data will be placed in its own column, allowing you to work with the information more effectively.
Method 2: Using Formulas
If you’re looking for a more flexible and dynamic approach to splitting data into columns in Excel, using formulas is a great option. This method allows you to customize the splitting process according to your specific requirements.
Here are a few commonly used formulas to split data into columns:
1. LEFT function: The LEFT function allows you to extract a specific number of characters from the beginning of a text string. To split data into columns using LEFT, you need to determine the number of characters to extract.
2. MID function: The MID function helps you extract a specified number of characters from the middle of a text string. You will need to provide the starting position and the number of characters to extract.
3. RIGHT function: The RIGHT function allows you to extract a specific number of characters from the end of a text string. Similar to the LEFT function, you need to specify the number of characters to extract.
Let’s say you have a column containing full names, and you want to split them into two separate columns for first names and last names.
To extract the first name, you can use the LEFT function combined with the FIND or SEARCH function to locate the space between the first and last names. Here’s an example formula:
=LEFT(A1,FIND(" ",A1)-1)
This formula will extract all the characters to the left of the space character.
To extract the last name, you can use the RIGHT function along with the LEN and FIND or SEARCH functions. Here’s an example formula:
=RIGHT(A1,LEN(A1)-FIND(" ",A1))
This formula will extract all the characters to the right of the space character.
By using a combination of these formulas and adjusting the parameters, you can split data into columns based on specific criteria, such as extracting email domains or splitting addresses into separate fields.
Remember to adjust the references in the formulas according to the location of your data.
Using formulas provides a high level of control and customization when splitting data into columns. However, it does require a basic understanding of Excel functions and formulas. With practice, you’ll be able to perform complex data splitting tasks efficiently and accurately.
Method 3: Split Cells with Flash Fill
Another powerful feature that Excel offers for splitting data into columns is the Flash Fill feature. Flash Fill is a smart tool that can automatically recognize patterns and populate data based on the desired outcome. It can be incredibly useful when you have a large dataset that needs to be split into multiple columns.
To use the Flash Fill feature to split cells, follow these steps:
- Start by entering the desired outcome in separate columns adjacent to the column you want to split. For example, if you have a column with full names and you want to split them into first names and last names, enter the first name in the adjacent column and the last name in the next adjacent column.
- Click on the first cell in the output column adjacent to the column you want to split.
- Excel will automatically recognize the pattern based on the adjacent cells and suggest how to split the data. If the suggested split is correct, press Enter to fill in the rest of the column using the Flash Fill feature.
- If Excel doesn’t automatically suggest the correct split, manually enter the desired split in the adjacent cells and then press Enter. Excel will then use the entered pattern to fill in the rest of the column.
The Flash Fill feature is powerful and can save you a lot of time when splitting data into columns. However, it may not always work perfectly, especially if the data is not consistent or there are complex patterns. In such cases, you may need to use other methods like Text to Columns or formulas.
It’s important to note that the Flash Fill feature may not be available in older versions of Excel. If you’re using an older version, you may need to consider alternative methods for splitting data into columns.
With the help of the Flash Fill feature, you can efficiently split data into columns without the need for complex formulas or manual copying and pasting. This can greatly improve your productivity and streamline your data management tasks in Excel.
Method 4: Splitting Data with Power Query
If you’re looking for a more advanced method to split data into columns in Excel, you can utilize the Power Query feature. Power Query is a powerful tool that allows you to extract, transform, and load data from various sources.
Here’s how you can use Power Query to split data into columns:
- Step 1: Select the data range that you want to split into columns.
- Step 2: Go to the Data tab and click on Get Data from the Get & Transform Data group.
- Step 3: Choose the appropriate data source option based on where your data is located. This could be from a file, a database, or an online source.
- Step 4: Follow the instructions on the Power Query Editor window to transform your data. This may include removing unnecessary columns, filtering rows, and performing other data cleansing tasks.
- Step 5: To split your data into columns, select the column you want to split, go to the Transform tab, and click on Split Column. Choose the appropriate option based on how you want to split your data (e.g., by delimiter, by number of characters, etc.).
- Step 6: Power Query will automatically split your data into columns based on your chosen method. You can preview the changes in the Power Query Editor window. If everything looks correct, click Close & Load to load the modified data into Excel.
By using Power Query, you have the flexibility to split data into columns based on various criteria, such as delimiters, fixed widths, or custom formulas. This allows you to handle complex data splitting scenarios with ease.
Note that Power Query is available in newer versions of Excel (Excel 2010 and later) and may require additional installation if you’re using an older version of Excel.
Now that you’re familiar with this advanced method, you have multiple options at your disposal to split data into columns in Excel. Choose the method that best suits your needs and start organizing your data effectively.
In conclusion, learning how to split data into columns in Excel can greatly enhance your data analysis and organization capabilities. By following the step-by-step process outlined in this article, you can efficiently separate data into different columns based on specific criteria, such as delimiter or fixed width. This feature is particularly useful when dealing with large datasets or when formatting data for better visualization and understanding. With Excel’s powerful tools and functions, you can easily manipulate and transform your data to meet your specific needs. So, whether you’re a student, a professional, or an enthusiast, mastering the art of splitting data into columns in Excel will undoubtedly boost your productivity and proficiency in handling data.
FAQs
1. How do I split data into columns in Excel?
To split data into columns in Excel, you can use the Text to Columns feature. Follow these steps:
– Select the cells that contain the data you want to split
– Go to the Data tab in the Excel ribbon and click on Text to Columns
– Choose the delimiter that separates the data (comma, tab, space, etc.)
– Select the destination where you want the split data to be placed (existing or new columns)
– Click Finish and the data will be split into separate columns based on the chosen delimiter.
2. Can I split data in Excel based on specific conditions?
Yes, you can split data in Excel based on specific conditions using formulas and functions. For example, you can use the IF function combined with other functions like LEFT, RIGHT, or MID to split data based on certain criteria. Another option is to use the FILTER or the Advanced Filter feature to extract specific data into separate columns or sheets based on specific conditions.
3. Is it possible to split a single cell into multiple columns in Excel?
Yes, it is possible to split a single cell into multiple columns in Excel. One way to do this is by using the Text to Columns feature mentioned earlier. However, instead of selecting multiple cells, you will select only the cell you want to split. Excel will split the content of that cell into multiple columns based on the delimiter you specify.
Another option is to use formulas, such as the LEFT, RIGHT, or MID function, combined with the “&” operator to split the content of a cell into multiple columns based on specific criteria.
4. Can I automate the process of splitting data into columns in Excel?
Yes, you can automate the process of splitting data into columns in Excel by using macros or VBA (Visual Basic for Applications). Macros allow you to record a set of actions and play them back later, automating repetitive tasks. You can record a macro that splits data into columns and assign it to a shortcut key or a button for quick and easy access.
Alternatively, you can write VBA code to achieve the same result. VBA provides more flexibility and control over the splitting process, allowing you to customize it based on your specific requirements.
5. What should I do if the data I want to split contains complex patterns or irregular delimiters?
If the data you want to split contains complex patterns or irregular delimiters, you might need to use advanced techniques in Excel, such as using regular expressions or writing custom functions in VBA. Regular expressions can help you identify and split data based on specific patterns, regardless of the delimiter used. Custom functions in VBA can be tailored to handle complex splitting scenarios where the built-in Excel functions or features might not be sufficient.