
If you’ve ever worked with data in Microsoft Excel, you know how crucial it is to organize it effectively. One common task is to separate data that is combined in a single cell using commas. Whether you are dealing with a list of names, email addresses, or any other type of data, properly separating it can make your workflow much easier.
In this article, we will walk you through the process of separating data with commas in Excel. We will share step-by-step instructions and demonstrate how to use Excel’s built-in functionalities to achieve this. Whether you are a beginner or an experienced Excel user, this guide will help you effortlessly split your data into separate cells, saving you time and eliminating the need for manual intervention.
So, let’s dive in and learn how to separate data with commas in Excel!
Inside This Article
- Basic Method- Step-by-step instructions on how to separate data using the Text to Columns feature in Excel- Explanation of choosing the delimiter option and selecting comma as the separator
- Advanced Method- Instructions on using formulas to separate data with commas, including the use of functions like LEFT, RIGHT, MID, and FIND- Examples provided to illustrate the usage of each formula
- Using Macros: Overview of using macros or custom VBA code to automate the process of separating data with commas
- Conclusion
- FAQs
Basic Method- Step-by-step instructions on how to separate data using the Text to Columns feature in Excel- Explanation of choosing the delimiter option and selecting comma as the separator
When working with data in Excel, it is often necessary to separate information that is combined in a single cell. One common way to achieve this is by using the Text to Columns feature. This powerful tool allows you to split data based on a chosen delimiter, such as a comma. Here, we will walk you through the basic method of separating data using Text to Columns in Excel.
Step 1: Select the column containing the data you want to separate. You can either click on the column letter or drag your mouse to select the entire column.
Step 2: Go to the “Data” tab in the Excel ribbon, and locate the “Text to Columns” button. Click on it to open the Text to Columns wizard.
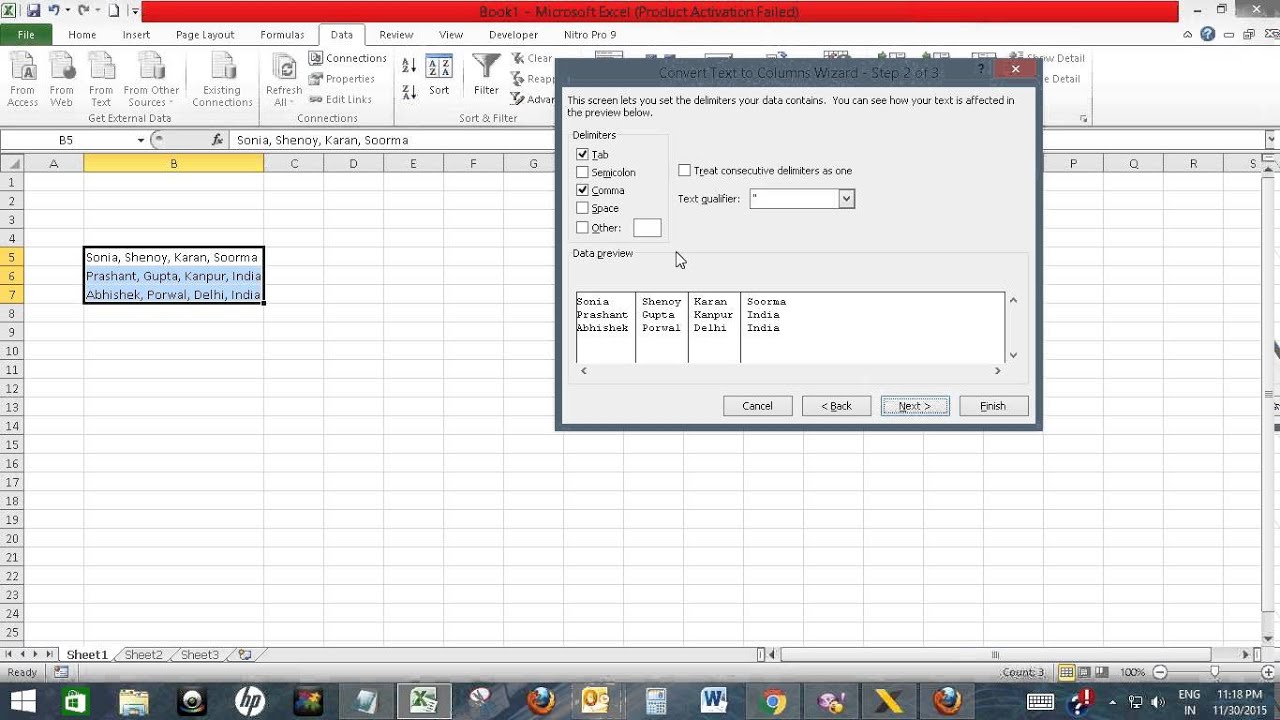
Step 3: In the Text to Columns wizard, choose the “Delimited” option if it is not already selected. This option allows you to specify a delimiter to split the data.
Step 4: On the next screen, select the delimiter that separates the data in your column. In this case, choose the “Comma” option as your delimiter.
Step 5: You can also choose additional options, such as specifying the destination cell for the separated data or choosing the data format for each column. If you do not need these options, you can skip them and click “Finish” to complete the process.
Step 6: Excel will split the data in the selected column into separate columns, with each piece of information in its own cell. You can now work with the individual pieces of data as needed.
By following these simple steps, you can easily separate data using the Text to Columns feature in Excel. By choosing the comma as the delimiter, you can split data that is comma-separated into separate columns, which can greatly enhance data organization and analysis.
Advanced Method- Instructions on using formulas to separate data with commas, including the use of functions like LEFT, RIGHT, MID, and FIND- Examples provided to illustrate the usage of each formula
While the Text to Columns feature in Excel is a convenient way to separate data with commas, there may be situations where you need more control over the process. In such cases, using formulas can give you the flexibility you need. Excel offers several functions that can help you achieve this, including LEFT, RIGHT, MID, and FIND.
The LEFT function allows you to extract a specific number of characters from the left side of a cell. To separate data with commas using the LEFT function, you can specify the number of characters you want to extract. For example, suppose you have a cell containing “John Doe,123 Main Street”. To extract only the name “John Doe”, you can use the formula =LEFT(A1,FIND(“,”,A1)-1).
The RIGHT function works similarly to the LEFT function but extracts characters from the right side of a cell. To separate data with commas using the RIGHT function, you can specify the number of characters you want to extract. For example, if you have a cell containing “john.doe@example.com”, and you want to extract only the domain name “example.com”, you can use the formula =RIGHT(A1,LEN(A1)-FIND(“.”,A1)).
The MID function allows you to extract a specific number of characters from the middle of a cell. To separate data with commas using the MID function, you need to specify the starting position and the number of characters you want to extract. For example, suppose you have a cell containing “Apple,Orange,Banana”. To extract only the word “Orange”, you can use the formula =MID(A1,FIND(“,”,A1)+1,FIND(“,”,A1,FIND(“,”,A1)+1)-FIND(“,”,A1)-1).
The FIND function helps you locate the position of a specific character or a substring within a cell. It returns the position of the character or substring, which you can then use as a reference point in other formulas. For example, if you have a cell containing “New York, NY”, and you want to extract only the state code “NY”, you can use the formula =MID(A1,FIND(“,”,A1)+2,2).
By combining these functions, you can create more complex formulas to separate data with commas in Excel. For instance, if you have a cell with multiple names separated by commas, you can use a combination of LEFT, MID, and FIND functions to extract specific names. Experiment with different formulas to achieve the desired results.
Here are a few examples to illustrate the usage of these formulas:
- Example 1: Extracting the first name from a cell containing “John Doe, 123 Main Street” using the formula =LEFT(A1,FIND(“,”,A1)-1).
- Example 2: Extracting the last name from a cell containing “John Doe, 123 Main Street” using the formula =RIGHT(A1,LEN(A1)-FIND(“,”,A1)-1).
- Example 3: Extracting the middle name from a cell containing “John H. Doe, 123 Main Street” using the formula =MID(A1,FIND(” “,A1)+1,FIND(“,”,A1)-FIND(” “,A1)-1).
Remember, these are just a few examples to get you started. Depending on your specific data structure and requirements, you may need to adjust the formulas accordingly.
Using Macros: Overview of using macros or custom VBA code to automate the process of separating data with commas
Macros in Excel are powerful tools that can automate repetitive tasks, such as separating data with commas. By creating a macro, you can streamline the process and save valuable time. In this section, we will explore how to create a macro to automate the process of separating data with commas.
Before we delve into creating a macro, it’s important to understand what a macro is. In Excel, a macro is a series of recorded commands that can be executed with a single click or a shortcut key. By creating a macro for separating data with commas, you can perform the task with just a few simple steps.
To create a macro in Excel, follow these steps:
- Open Excel and go to the “Developer” tab. If you can’t see the “Developer” tab, enable it by going to the Excel Options and selecting “Customize Ribbon.”
- Click on the “Record Macro” button. A dialog box will appear, allowing you to provide a name for your macro and assign it to a shortcut key or create a button for easy access.
- In the dialog box, give your macro a descriptive name, such as “SeparateDataWithCommas.”
- Select a location to store your macro. Choose either “This Workbook” to save it within the current workbook or “Personal Macro Workbook” to make it available for all Excel workbooks.
- Click “OK” to start recording your macro.
Once you’ve started recording, perform the steps to separate data with commas manually. For example, you can use the Text to Columns feature or any other method you prefer.
After you’ve completed the steps to separate the data, go back to the “Developer” tab and click the “Stop Recording” button. Your macro is now created and ready to be executed with a single click or a keyboard shortcut.
To execute your macro, simply click on the button you created or use the shortcut key you assigned. The macro will run the recorded commands automatically, separating the data with commas based on the actions you performed while recording.
Using macros to automate the process of separating data with commas not only saves time but also ensures consistency and accuracy. You can use the macro repeatedly, eliminating the need to perform the manual steps every time you have data that needs to be separated.
It’s worth noting that if you are familiar with Visual Basic for Applications (VBA), you can customize your macro further by coding specific instructions to handle different scenarios. This allows you to have greater control over the separation process and adapt it to your specific requirements.
In conclusion, knowing how to separate data with commas in Excel is a valuable skill that can save you time and effort when working with large sets of data. By using the Text to Columns feature or formulas, you can easily split data into separate columns based on a comma delimiter. This allows for better organization and analysis of your data, making it easier to perform calculations, create charts, and generate meaningful insights.
Whether you need to split names, addresses, or any other kind of data that is separated by commas, Excel provides various methods to accomplish this task. By mastering these techniques, you can manipulate and manage your data effectively, improving your productivity and efficiency in data analysis tasks.
So, next time you encounter a dataset with comma-separated values in Excel, remember the methods discussed in this article. With a few simple steps, you can separate the data into individual columns, giving you the flexibility to work with and analyze the data more effectively.
FAQs
1. Can I separate data with commas in Excel?
Absolutely! Excel provides you with various methods to separate data using commas. You can use functions, formulas, or use Excel’s built-in features to achieve this.
2. How can I separate data with commas using a function or formula?
To separate data with commas using a function, you can use the CONCATENATE function or the TEXTJOIN function in your formula. These functions allow you to combine multiple cells or text strings with a delimiter, such as a comma.
3. What is the benefit of separating data with commas in Excel?
Separating data with commas in Excel has several advantages. It allows you to organize and parse data easily. You can use comma-separated values (CSV) files to import or export data between Excel and other applications. Additionally, using commas can make data more readable and structured, especially when dealing with long lists or multiple values.
4. Can I customize the separator instead of using commas?
Yes, you can customize the separator according to your needs. While commas are commonly used, Excel allows you to use different separators such as semicolons, spaces, or any other character of your choice. Simply replace the comma with your preferred separator when using functions or formulas to separate the data.
5. Is it possible to separate data based on a specific condition?
Yes, Excel provides powerful tools like the Text to Columns feature that allows you to specify a delimiter and separate data based on a specific condition. For example, you can split a cell into multiple columns based on a comma if you want to extract specific information or categorize data differently.