
Are you an iPhone user looking to change your printer settings? With the AirPrint feature on iOS devices, it’s easier than ever to print documents directly from your iPhone. Whether you need to adjust the print quality, paper size, or select specific printer options, this article will guide you on how to change printer settings on your iPhone using AirPrint. By following these simple steps, you’ll be able to customize your printing preferences and ensure that your documents are printed exactly how you want them. So, let’s dive in and discover how to take control of your printing settings on your iPhone and make the most out of your printing experience.
Inside This Article
- Setting up AirPrint on iPhone
- Accessing Printer Settings on iPhone
- Changing Printer Options on iPhone
- Troubleshooting Printer Issues on iPhone
- Conclusion
- FAQs
Setting up AirPrint on iPhone
If you want to easily print from your iPhone, AirPrint is the way to go. AirPrint is a built-in feature on iOS devices that allows you to wirelessly print documents, photos, and more directly from your iPhone. To start using AirPrint, you need to follow a few simple steps to set it up on your iPhone.
First, make sure that your iPhone and the printer you want to use are both connected to the same Wi-Fi network. AirPrint relies on Wi-Fi connectivity to establish a direct connection between your iPhone and the printer.
Next, ensure that AirPrint is enabled on your iPhone. To do this, go to the Settings app on your iPhone, scroll down and tap on “Printers & Scanners.” If AirPrint is not already enabled, you will see an option to enable it. Tap on the toggle switch to turn on AirPrint.
Now that AirPrint is enabled, you can easily print from your iPhone. Open the app or document that you want to print, and tap on the share button. This button usually looks like a square with an arrow pointing upward. In the share menu, you should see an option to “Print.” Tap on “Print,” and your iPhone will search for available AirPrint printers.
After the printers are detected, you will see a list of available printers. Select the printer you want to use, and adjust any settings you need. For example, you can choose the number of copies, the paper size, and other print options. Once you have customized the settings, tap on the “Print” button to start the printing process.
With AirPrint set up on your iPhone, you can now conveniently print your documents and photos without the need for any cables or additional software. Whether you’re at home, in the office, or on the go, AirPrint makes printing from your iPhone a breeze.
Accessing Printer Settings on iPhone
Printing documents and photos directly from your iPhone has become incredibly convenient with the introduction of AirPrint. With AirPrint, you can wirelessly print from your iPhone to compatible printers without the need for any additional software or drivers.
To access the printer settings on your iPhone, follow these easy steps:
- Ensure that you have enabled AirPrint on your iPhone. If you haven’t done so, go to Settings, tap on “Wi-Fi,” and make sure AirPrint is turned on.
- Make sure your iPhone is connected to the same Wi-Fi network as the printer you want to print to. This is crucial for the iPhone to detect and communicate with the printer.
- Open the document or photo you want to print on your iPhone.
- Tap on the Share button, which resembles a square with an arrow pointing upward. This will bring up the sharing options menu.
- Scroll through the options until you find the Print icon. It often appears towards the right end of the bottom row. Tap on it.
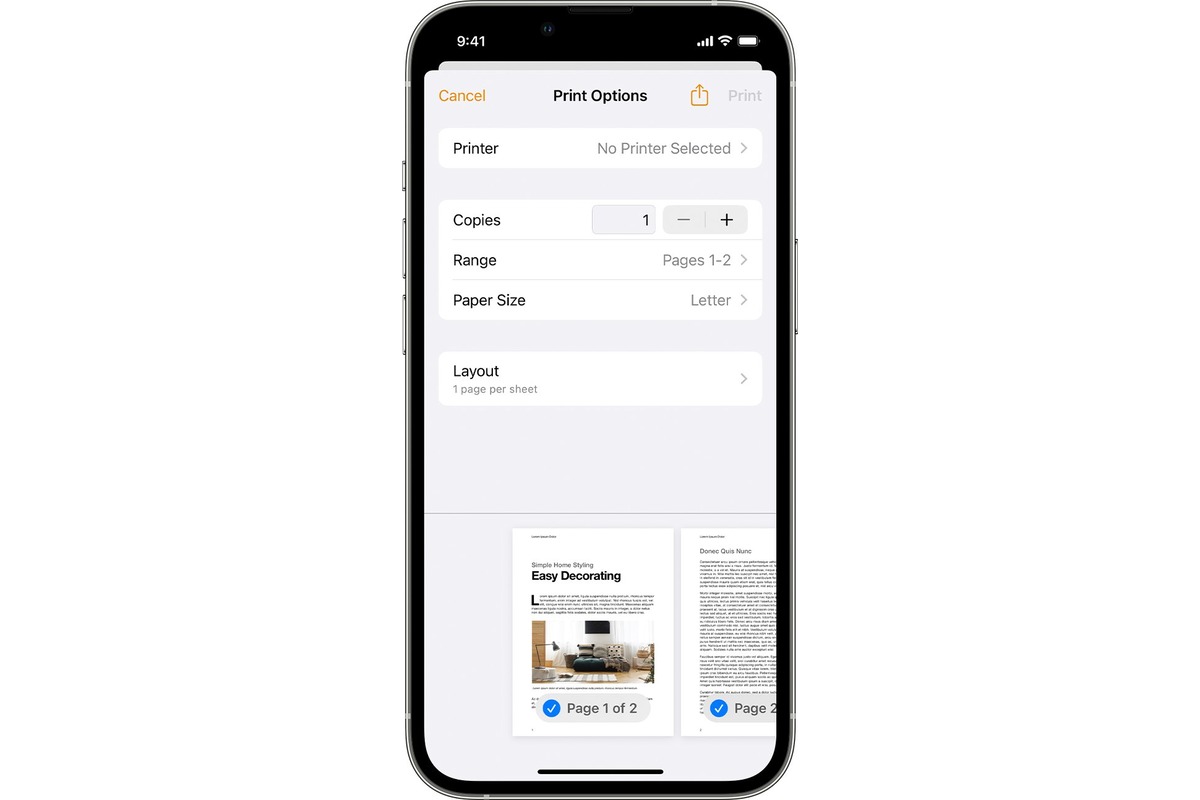
- A printer options screen will appear, showing a preview of the document you’re about to print and various printing settings.
- Tap on the Printer option to select the printer you want to use. Your iPhone will scan for available printers on the network.
- Once you’ve selected the printer, you can customize the printing settings. This may include choosing the number of copies, page range, paper size, and orientation.
- After adjusting the desired settings, tap on the Print button located in the top-right corner to start the printing process.
By following these simple steps, you can easily access and adjust the printer settings on your iPhone. Whether you need to print documents for work or photos to cherish memories, AirPrint simplifies the process and allows you to achieve high-quality prints directly from your iPhone.
Changing Printer Options on iPhone
PRINTERS play a vital role in our daily lives, enabling us to effortlessly convert digital files into hard copies. With the advancement of technology, we can now conveniently print documents, photos, and more directly from our iPhones using AirPrint. However, there may be instances when we need to adjust printer settings to meet our specific requirements. In this article, we will guide you on how to change printer options on your iPhone, so you can optimize your printing experience.
Enable AirPrint on iPhone
The first step in changing printer options on your iPhone is to ensure that AirPrint is enabled. AirPrint is a wireless printing feature that allows you to print directly from your iOS device without the need for additional drivers or software.
- To enable AirPrint, open the “Settings” app on your iPhone.
- Scroll down and tap on “Printers & Scanners”.
- Make sure the “AirPrint” option is turned on. If not, toggle the switch to enable it.
Connect iPhone to the same Wi-Fi network as the printer
In order for your iPhone to communicate with the printer, both devices must be connected to the same Wi-Fi network. This allows the printer to receive printing commands from your iPhone.
- Open the “Settings” app on your iPhone.
- Tap on “Wi-Fi”.
- Make sure you are connected to the same Wi-Fi network as your printer. If not, select the appropriate network and enter the password if required.
Access printer options on iPhone
Once you have enabled AirPrint and connected your iPhone to the same Wi-Fi network as the printer, you can access the printer options on your iPhone.
- Open the document or photo you want to print on your iPhone.
- Tap on the “Share” button, usually indicated by an arrow pointing upwards.
- Scroll down and select the “Print” option.
Customize printer settings on iPhone
After accessing the printer options on your iPhone, you can now customize the printer settings to suit your needs.
- Tap on the printer name at the top of the Print screen.
- In the Printer Options menu, you can adjust settings such as paper size, orientation, number of copies, and more.
- Once you have made the desired changes, tap on the “Print” button to initiate the printing process.
With these simple steps, you can easily change printer options on your iPhone and optimize your printing experience. Whether you need to print important documents, memorable photos, or creative projects, having the ability to customize printer settings ensures that your prints turn out just the way you want them to. So, make the most out of your iPhone and enjoy the convenience of printing at your fingertips!
Troubleshooting Printer Issues on iPhone
If you’re experiencing printer issues on your iPhone, don’t worry – you’re not alone. Many iPhone users encounter difficulties when trying to print documents or photos from their device. Fortunately, there are several troubleshooting steps you can take to resolve these problems and get your printer working smoothly again. In this article, we’ll walk you through some common printer issues and provide simple solutions to help you troubleshoot them.
1. Check the Printer Connection
The first step in troubleshooting printer issues on your iPhone is to ensure that the printer is properly connected. Check that the printer is turned on and connected to the same Wi-Fi network as your iPhone. If not, disconnect and reconnect both devices to the network.
2. Update Printer Firmware
Outdated firmware can often cause compatibility issues between your iPhone and the printer. To update the printer firmware, visit the manufacturer’s website and download the latest version for your specific printer model. Follow the instructions provided to install the update.
3. Restart Printer and iPhone
Restarting both your printer and iPhone can help resolve minor software glitches that may be causing printing issues. Turn off the printer and unplug it from the power source. Also, power off your iPhone by holding down the power button and sliding to power off. After a few seconds, turn both devices back on and try printing again.
4. Check Print Settings
Ensure that the print settings on your iPhone are configured correctly. Go to the print settings menu and check options such as paper size, print quality, and orientation. Make any necessary adjustments to match your printing requirements.
5. Update iOS
Keeping your iPhone’s operating system up to date is crucial for optimal device performance. Updates often include bug fixes and improvements that can address printing issues. Go to the Settings app, tap General, and then tap Software Update to check for available iOS updates. If an update is available, follow the prompts to install it.
6. Reset Network Settings
If your printer still isn’t working correctly, resetting your network settings on the iPhone may help. Go to the Settings app, tap General, scroll down, and tap Reset. Then, select Reset Network Settings. Keep in mind that this will remove all saved Wi-Fi networks and their passwords from your device, so be prepared to reconnect to Wi-Fi networks afterward.
7. Delete and Reinstall Printer
If none of the above steps resolve the issue, you can try deleting and reinstalling the printer on your iPhone. Go to the Settings app, tap Printers, select the printer you’re having trouble with, and tap Delete Printer. Then, follow the instructions to reinstall the printer and try printing again.
8. Contact Printer Manufacturer or Apple Support
If you’ve exhausted all troubleshooting steps and the printer still isn’t working on your iPhone, it may be a more complex issue that requires assistance from the printer manufacturer or Apple support. Reach out to their customer service for further guidance and support.
By following these troubleshooting steps, you can resolve most printer issues on your iPhone and get back to printing seamlessly. Remember to stay patient and methodical, and don’t hesitate to seek assistance if needed. Happy printing!
Conclusion
Changing printer settings on iPhone using AirPrint is a straightforward process that allows you to personalize your printing experience. Whether you want to adjust the print quality, paper size, or layout, the AirPrint feature makes it convenient and hassle-free. By accessing the printer settings through various applications or directly from your device settings, you have the flexibility to tailor your prints to suit your needs.
Remember to ensure that your printer is compatible with AirPrint technology, as this will enable seamless communication between your iPhone and the printer. With just a few taps, you can customize your print settings and achieve professional-quality prints from the comfort of your iPhone. So, whether you’re printing important documents or treasured memories, AirPrint on your iPhone offers a user-friendly solution for all your printing requirements.
FAQs
1. Can I change printer settings on my iPhone using AirPrint?
Yes, you can change printer settings on your iPhone using AirPrint. AirPrint is a built-in feature on iOS devices that allows you to print wirelessly to compatible printers. With AirPrint, you can easily adjust various printer settings, such as paper size, print quality, and color options, directly from your iPhone.
2. How do I access the printer settings on my iPhone?
To access the printer settings on your iPhone, go to the app or document you want to print and tap the share icon (usually a square with an arrow pointing upwards). From the sharing options, select the Print option. On the Print Preview screen, tap on Printer Options. Here, you can access and modify various printer settings, including paper size, layout, and number of copies.
3. Are all printers compatible with AirPrint?
Not all printers are compatible with AirPrint. AirPrint requires the printer to have built-in support for the feature. To check if your printer is compatible, refer to the printer’s manual or visit the manufacturer’s website. Alternatively, you can also check the list of AirPrint compatible printers on Apple’s official website to ensure compatibility.
4. Can I change printer settings for individual print jobs on my iPhone?
Yes, you can change printer settings for individual print jobs on your iPhone. When you choose the Print option, you will have the opportunity to modify the print settings for that specific print job. This allows you to customize settings such as paper size, orientation, and color options according to your preference for each print job.
5. What should I do if I can’t find my printer when using AirPrint on my iPhone?
If you can’t find your printer when using AirPrint on your iPhone, there are a few things you can try. First, ensure that both your iPhone and printer are connected to the same Wi-Fi network. Restarting your printer and iPhone may also help in resolving connectivity issues. Additionally, make sure that your printer is AirPrint compatible and that AirPrint is enabled on your printer. If the problem persists, consult the printer’s manual or contact the manufacturer’s support for further assistance.