
Are you tired of fumbling through different apps on your iPhone or iPad just to scan a QR code? Well, here’s some good news – you can now add a QR scanner directly to the Control Center of your device! With this handy feature, you’ll be able to quickly and easily scan QR codes without the need for a third-party app.
In this article, we’ll guide you step-by-step on how to add a QR scanner to the Control Center on your iPhone or iPad. We’ll also explain why QR codes are so popular, provide tips on using QR codes effectively, and address some commonly asked questions about QR scanners. So, get ready to elevate your scanning game and make your device even more versatile!
Inside This Article
- Enabling the QR Scanner in Control Center
- Adding the QR Scanner Shortcut to Control Center
- Scanning a QR Code using Control Center
- Customizing the Control Center QR Scanner settings
- Conclusion
- FAQs
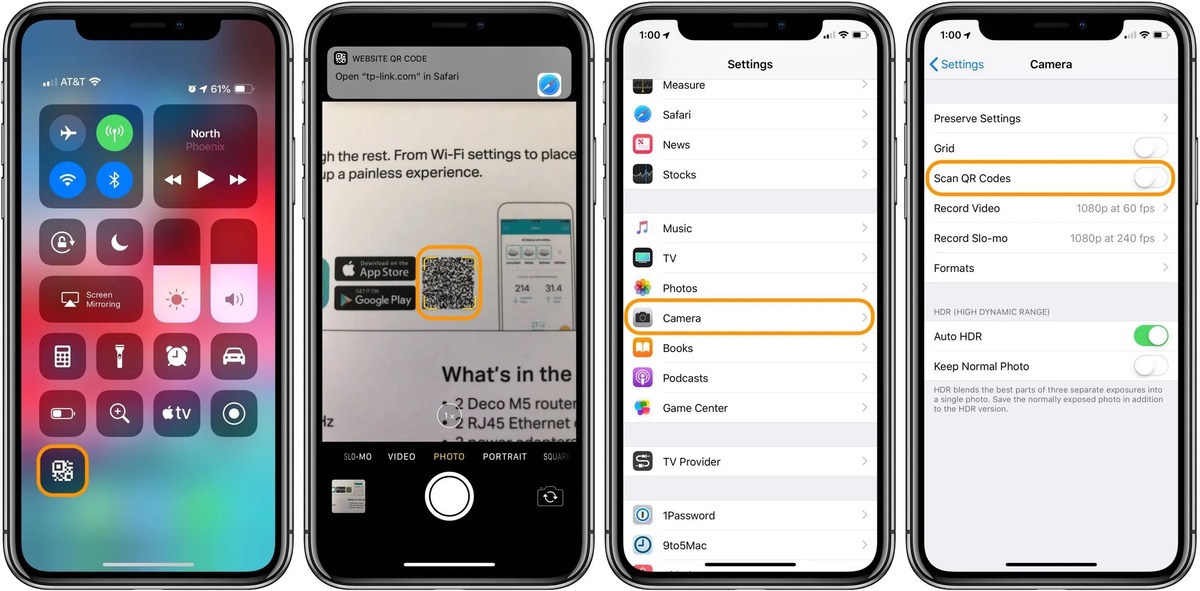
Enabling the QR Scanner in Control Center
If you frequently find yourself needing to scan QR codes on your iPhone or iPad, you’ll be pleased to know that iOS has a built-in QR scanner. By default, the QR Scanner is not displayed in the Control Center. However, enabling it is a simple process that only takes a few moments.
To enable the QR Scanner in Control Center, follow these steps:
- Open the “Settings” app on your iPhone or iPad.
- Scroll down and tap on “Control Center.”
- Look for “QR Code Scanner” in the list of available controls.
- Tap on the green “+” button next to “QR Code Scanner” to add it to the “Included Controls” section.
Once you’ve completed these steps, the QR Scanner will now be available in Control Center. You can access Control Center by swiping down from the top-right corner of the screen on newer iPhones or by swiping up from the bottom of the screen on older iPhones and iPads.
Adding the QR Scanner Shortcut to Control Center
With the latest iOS update, Apple introduced a built-in QR scanner that allows users to quickly scan QR codes without the need for a separate app. By adding the QR scanner shortcut to your Control Center, you can easily access this feature with just a few taps.
To add the QR scanner to your Control Center, follow these simple steps:
- Open the Settings app on your iPhone or iPad.
- Scroll down and tap on “Control Center”.
- Under the “More Controls” section, look for “QR Code Reader”.
- Tap the green “+” button next to “QR Code Reader” to add it to your Control Center. You can also use the “Reorder” button to change its position in the Control Center menu.
- Exit the Settings app and swipe down from the top-right corner (or up from the bottom if you have an iPhone with a home button) to open the Control Center.
Once you have added the QR scanner shortcut to your Control Center, you can easily access it by swiping down (or up) and tapping the QR Code Reader icon. This will launch the QR scanner, ready for you to scan any QR code you encounter.
It’s important to note that the QR scanner in Control Center is only available on iPhones and iPads with Face ID or Touch ID capabilities. If your device does not have these features, you may need to use a third-party QR scanner app from the App Store.
Now that you have added the QR scanner to your Control Center, scanning QR codes has never been easier. Whether you want to quickly access a website, join a Wi-Fi network, or check the information on a product, simply use the QR scanner shortcut in Control Center, and you’re good to go!
Scanning a QR Code using Control Center
Scanning QR codes using Control Center on your iPhone or iPad is a convenient and quick way to access information, websites, or apps. With just a few simple steps, you can easily scan any QR code using the built-in QR scanner feature. Let’s walk through the process below:
1. First, ensure that you have added the QR Scanner shortcut to your Control Center. If you haven’t done so, refer to the previous section on “Adding the QR Scanner Shortcut to Control Center” to learn how.
2. Once you have the QR Scanner enabled in Control Center, simply swipe down from the top right corner of your iPhone or iPad screen to open Control Center. You will find the QR Scanner icon among other shortcuts.
3. Tap on the QR Scanner icon to launch the built-in scanner. A camera viewfinder will appear on your screen.
4. Align your device’s camera with the QR code you wish to scan. Make sure the QR code is within the frame, and your device will automatically recognize and capture it.
5. Once the QR code is successfully scanned, a notification will appear at the top of your screen, displaying the information or action associated with the code. This can include website links, contact details, app download links, or any other relevant data.
6. Tap on the notification to open and view the content associated with the QR code. For instance, if it is a website link, your device’s browser will open and load the page. If it is a contact, you will be prompted to save it to your contacts.
That’s it! You have successfully scanned a QR code using Control Center on your iPhone or iPad. It’s a straightforward process that allows for easy access to various types of information or actions. Make sure to keep Control Center QR Scanner handy by adding it to your shortcuts for quick and hassle-free scanning whenever needed.
Customizing the Control Center QR Scanner settings
The Control Center QR Scanner provides a convenient way to scan QR codes directly from your iPhone or iPad. While the feature is great out of the box, you have the option to customize its settings to suit your preferences. Here’s how you can do it:
1. Open the Settings app on your iPhone or iPad.
2. Scroll down and tap on “Control Center”.
3. Under the “MORE CONTROLS” section, find “QR Code Reader” and tap on the green plus icon to add it to your Control Center.
4. Rearrange the order of controls by tapping and holding the three horizontal lines next to each control, then dragging it up or down in the list.
5. Once you have added the QR Code Reader to Control Center, you can further customize its behavior by tapping on it.
6. In the QR Code Reader settings, you can choose whether to use the flashlight when scanning codes in low light conditions. Toggle the switch next to “Use Flashlight” to enable or disable this feature.
7. You can also enable or disable the “Confirm Scan” option. When enabled, it will prompt you with a confirmation before opening a URL or performing any action associated with the scanned QR code.
8. Additionally, you can decide whether to show an on-screen notification after successfully scanning a QR code. Toggle the switch next to “Show Scan Notification” to enable or disable this feature.
9. Lastly, you can customize the sound feedback for scanning QR codes. Tap on “Scan Sound” to select from a range of available sounds or choose “None” if you prefer not to have any sound when scanning.
By customizing the Control Center QR Scanner settings, you can personalize your QR code scanning experience and make it more suitable for your needs.
Adding a QR scanner to the Control Center on your iPhone or iPad is a convenient feature that enhances your device’s functionality. With just a few simple steps, you can easily access the QR scanner anytime you need to scan a QR code. This eliminates the need for a separate app and saves you time and effort.
By having a QR scanner readily available in your Control Center, you can scan QR codes with ease, whether you’re in a store, restaurant, or anywhere else. It’s a handy tool that allows you to quickly get information, visit websites, or even make payments by simply scanning a code.
The Control Center is designed to provide quick access to essential features and functions on your device, and adding a QR scanner is a useful customization option. Now you can enjoy the convenience of scanning QR codes directly from your Control Center, making your iPhone or iPad even more versatile.
FAQs
Q: Can I add a QR scanner to the Control Center on my iPhone or iPad?
Yes, you can easily add a QR scanner to the Control Center on your iPhone or iPad.
Q: Why would I want to add a QR scanner to the Control Center?
Adding a QR scanner to the Control Center allows you to quickly access it with just a swipe and a tap. This makes it more convenient to scan QR codes whenever you need to, especially when you’re using your device frequently.
Q: How do I add a QR scanner to the Control Center?
To add a QR scanner to the Control Center on your iPhone or iPad, follow these steps:
- Open the “Settings” app on your device.
- Scroll down and tap on “Control Center”.
- Tap on “Customize Controls”.
- Under the “More Controls” section, locate “QR Code Scanner” and tap on the green “+” button next to it to add it to your Control Center.
- Now, you can swipe down from the top-right corner of your screen (or swipe up from the bottom of the screen, depending on your device) to open the Control Center and access the QR scanner by tapping on its icon.
Q: Can I rearrange the order of controls in the Control Center?
Yes, you have the flexibility to rearrange the order of controls in the Control Center. To do this, follow these steps:
- Open the “Settings” app on your device.
- Scroll down and tap on “Control Center”.
- Tap on “Customize Controls”.
- Under the “Include” section, you will see the controls already added to the Control Center. To rearrange the order, simply tap and hold the three lines next to a control, then drag it up or down to your desired position.
- Once you’ve rearranged the controls to your preference, exit the Settings app. The changes will be reflected in your Control Center.
Q: Can I remove a control from the Control Center?
Yes, you can remove a control from the Control Center. To do this, follow these steps:
- Open the “Settings” app on your device.
- Scroll down and tap on “Control Center”.
- Tap on “Customize Controls”.
- Under the “Include” section, locate the control you want to remove.
- Tap on the red “-” button next to the control to remove it from the Control Center.