
In today’s fast-paced world, staying organized and efficient is key. One way to manage your workflow effectively is by scheduling emails in Apple Mail on your iPhone. Whether you need to send an important message at a specific time or want to draft emails in advance and have them automatically sent later, the scheduling feature in Apple Mail can be a game-changer.
With the release of iOS 16, Apple has introduced new features and improvements to enhance the user experience. Scheduling emails is a convenient feature that allows you to compose messages and choose the exact date and time for them to be delivered from your iPhone. This feature not only helps you avoid missing deadlines and ensures timely communication, but it also allows you to maintain a consistent and organized email workflow.
In this article, we will guide you step-by-step on how to schedule an email in Apple Mail on your iPhone running iOS 16. Let’s dive in!
Inside This Article
- Setting up Email Accounts on Apple Mail
- Using the Compose Window in Apple Mail
- Scheduling Emails in Apple Mail on iPhone
- Managing Scheduled Emails in Apple Mail
- Conclusion
- FAQs
Setting up Email Accounts on Apple Mail
Setting up email accounts on Apple Mail is a straightforward process that allows you to access and manage your emails conveniently. Whether you have a personal or professional email, Apple Mail makes it easy to set up multiple accounts and consolidate them into one centralized inbox.
To begin, open the Mail app on your iPhone and navigate to the Settings menu. From there, scroll down and select the “Passwords & Accounts” option. Here, you will find a list of your existing accounts, as well as the option to add a new one.
Tap on “Add Account” to initiate the account setup process. You will be presented with a list of popular email providers, such as Gmail, Outlook, Yahoo, and more. Simply select the appropriate provider, or choose “Other” for custom email setups.
Next, enter your email address and password in the corresponding fields. Apple Mail will attempt to automatically detect the necessary server settings based on the email provider selected. If the auto-detection fails, you will need to manually enter the incoming and outgoing server details.
Once you have provided the required information, tap on “Next” to proceed. Apple Mail will now verify the account information and establish a connection with the email server. This process may take a few moments, depending on your internet connection and the email provider’s server response time.
After the account is successfully set up, you will be prompted to select the settings for the newly added account. This includes options such as Mail, Contacts, Calendars, and Notes. Toggle the desired settings on or off based on your preferences. Once you have made your selections, tap on “Save” to finalize the account setup.
Repeat these steps for each additional email account you wish to add to Apple Mail. The app allows you to seamlessly switch between accounts and access all your emails from one unified inbox. This means you no longer need to switch between multiple email apps to manage different accounts, saving you time and effort.
Setting up email accounts on Apple Mail is a quick and easy process that enhances your productivity by providing a centralized platform for managing all your emails. Whether you use personal or professional accounts, Apple Mail offers a user-friendly experience that simplifies email management on your iPhone.
Using the Compose Window in Apple Mail
When it comes to writing and sending emails from your iPhone, Apple Mail provides a user-friendly and intuitive interface. The compose window is where you craft your message, add recipients, and fine-tune your email before sending it out into the digital world.
To access the compose window in Apple Mail, launch the Mail app on your iPhone and tap on the square icon with a pencil located in the bottom right corner. This will open a blank email template, ready for your input.
Once you’re in the compose window, you can start by adding the recipients of your email. You can do this by tapping on the “To” field and typing in the email addresses or selecting them from your contacts list. If you want to add additional recipients, such as CC or BCC, simply tap on the respective fields and follow the same process.
Next, it’s time to fill in the subject line. This is the part that will grab the recipient’s attention and give them an idea of what the email is about. Tap on the “Subject” field and enter a concise and descriptive subject that accurately reflects the content of your email.
Now that you have the recipients and subject line in place, it’s time to work on the body of your email. The compose window includes a full-featured text editor where you can type your message, format the text, and even add attachments if needed. Use the on-screen keyboard to enter your text and make use of the formatting options such as bold, italics, underline, and bullet points to enhance your message.
When you’re satisfied with the content of your email, you have the option to preview it before sending. To do this, simply tap on the “More” button (represented by three dots) in the top right corner of the compose window. From the drop-down menu, select “Send Preview” to see how your email will appear to the recipients.
If everything looks good, it’s time to hit the send button and make your email journey to its destination. Tap on the arrow icon in the top right corner of the compose window to send your email. Apple Mail will take care of the rest, ensuring your email is delivered swiftly and securely to the recipients.
Remember, you can always save your email as a draft if you need to revisit it later. Simply tap on the back button in the top left corner of the compose window, and Apple Mail will ask if you want to save the email as a draft. It will be stored in the draft folder, ready for you to pick up where you left off.
The compose window in Apple Mail on your iPhone provides a convenient and user-friendly way to write and send emails on the go. Whether you’re sending a quick message or drafting a detailed email, this versatile tool has got you covered. Use it to stay connected and communicate effectively from the palm of your hand.
Scheduling Emails in Apple Mail on iPhone
Do you often find yourself wanting to send an email at a later time? With the latest update of iOS 16, Apple Mail now allows you to schedule emails on your iPhone. This convenient feature gives you the flexibility to compose emails whenever it is convenient for you and have them automatically sent at a specific time. In this article, we will guide you through the process of scheduling emails in Apple Mail on your iPhone.
Step 1: Setting up Email Accounts on Apple Mail
The first step is to ensure that your email accounts are properly set up within Apple Mail. Open the Mail app on your iPhone and navigate to the “Accounts” section. Here, you can add or sign in to your email accounts using your account credentials. Make sure all your email accounts are successfully added and synced with Apple Mail.
Step 2: Using the Compose Window in Apple Mail
Next, open the Apple Mail app and tap on the compose icon to create a new email. The compose window will appear, allowing you to enter the recipient’s email address, subject line, and message. Take your time to craft your email and ensure all necessary details are included.
Step 3: Scheduling Emails in Apple Mail on iPhone
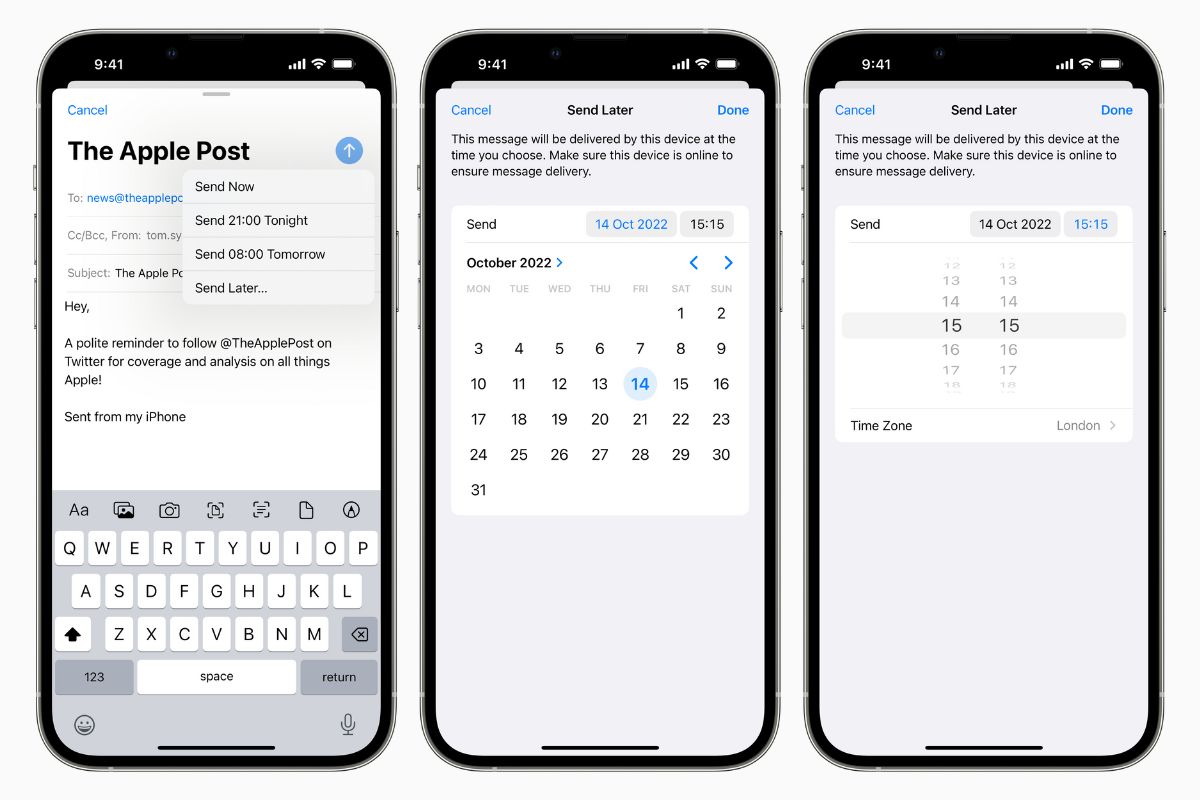
Now comes the exciting part — scheduling your email. Once you have composed your message, tap and hold the send button (represented by a paper plane icon) in the email compose window. A new menu will pop up with several options, including “Schedule Send”. Tap on this option to proceed.
Step 4: Selecting the Date and Time
After tapping on “Schedule Send”, you will be presented with a date and time picker. Choose the desired date and time when you want the email to be sent. You can select a specific time and even set it for a future date. Once you have selected the date and time, tap on “Schedule” to confirm.
Step 5: Managing Scheduled Emails in Apple Mail
If you need to review or make changes to your scheduled emails, you can access them through the “Scheduled” folder in the Mail app. From the main screen, tap on the three-line icon in the top left corner to open the mailbox menu. Look for the “Scheduled” folder and tap on it to view all your scheduled emails. From here, you can edit, reschedule, or delete any scheduled emails as needed.
And that’s it – you have successfully scheduled an email in Apple Mail on your iPhone. This feature is incredibly helpful for staying organized and ensuring your emails are sent at the most appropriate time. Whether you want to send a reminder to a colleague, follow up on an important task, or simply plan ahead, scheduling emails in Apple Mail can make your life easier. Give it a try and take control of your email communication!
Managing Scheduled Emails in Apple Mail
Once you have scheduled an email in Apple Mail on your iPhone, you may want to manage and keep track of your scheduled emails. Luckily, Apple Mail offers a seamless way to do just that. Here’s how you can efficiently manage your scheduled emails in Apple Mail:
1. Accessing the Scheduled Folder: To view your scheduled emails, open the Apple Mail app on your iPhone. Tap on the “Mailboxes” button located at the top left corner of the screen. Scroll down until you find the “Scheduled” folder, and tap on it. This will display all your scheduled emails in chronological order.
2. Editing Scheduled Emails: If you need to make changes to a scheduled email, locate the email you want to edit in the “Scheduled” folder. Swipe left on the email to reveal the options menu. Tap on “Edit” to open the email in the compose window. Make any necessary changes and tap on “Schedule” to save the updated version.
3. Rescheduling or Cancelling Scheduled Emails: If you want to reschedule or cancel a scheduled email, find the email in the “Scheduled” folder and swipe left. Tap on the “Cancel” button to remove the email from the scheduled list. If you wish to reschedule the email, tap on “Edit” and adjust the date and time accordingly.
4. Viewing the Delivery Status: To check the delivery status of a scheduled email, locate the email in the “Scheduled” folder and swipe left. Choose the “Status” option to view the delivery status. This will show whether the email has been successfully sent or if there was any issue during delivery.
5. Organizing Scheduled Emails: If you have multiple scheduled emails, you can organize them by creating folders within the “Scheduled” folder. To create a folder, tap on the “Edit” button in the “Scheduled” folder, then tap on the “New Mailbox” option. Name the folder and tap on “Save” to create it. You can now move scheduled emails to the created folder for better organization.
6. Clearing the Scheduled Folder: If you no longer need to keep track of your scheduled emails, you can clear the “Scheduled” folder to remove all the scheduled emails at once. Tap on the “Edit” button in the “Scheduled” folder and then select “Delete All” to remove all the scheduled emails.
With these simple steps, you can effectively manage your scheduled emails in Apple Mail on your iPhone. Whether you need to make changes, check their delivery status, or organize them into folders, Apple Mail provides a user-friendly interface to keep you in control of your scheduled communications.
Conclusion
With the ability to schedule emails on your iPhone using Apple Mail in iOS 16, managing your communications has never been easier. Whether you want to send important messages while you’re away, time-sensitive reminders, or simply optimize your workflow, the scheduling feature provides a convenient and efficient solution.
By following the step-by-step instructions in this guide, you can effortlessly schedule emails to be sent at specific dates and times. This feature enables you to stay organized, maintain effective communication, and ensure that your messages reach recipients at the most favorable moments.
Take advantage of the scheduling feature in Apple Mail and enjoy greater control over your email communications. With the ability to compose and schedule emails in advance, you can streamline your workflow, boost productivity, and create more efficient email management habits.
FAQs
Q: How can I schedule an email in Apple Mail on my iPhone?
A: To schedule an email in Apple Mail on your iPhone, you can follow these steps:
1. Open the Mail app on your iPhone.
2. Compose a new email message or reply to an existing one.
3. Instead of tapping the send button, long-press on it.
4. A menu will appear, and you can select “Schedule” from the options.
5. Choose a pre-defined time to send the email or customize it by selecting “Pick Date & Time”.
6. Once you have set the desired time, tap on “Schedule”.
The email will now be scheduled to be sent at the designated time.
Q: Can I schedule recurring emails in Apple Mail on my iPhone?
A: Unfortunately, Apple Mail on iPhone does not have a built-in feature to schedule recurring emails. You can only schedule individual emails to be sent at a specific time and date. However, there are third-party email scheduling apps available on the App Store that offer this functionality.
Q: Can I edit a scheduled email in Apple Mail on my iPhone?
A: Yes, you can edit a scheduled email in Apple Mail on your iPhone. To do this, follow these steps:
1. Open the Mail app on your iPhone.
2. Tap on the “Scheduled” folder, located in the bottom navigation bar.
3. Find the email you want to edit and tap on it to open it.
4. Make the necessary edits to the email content.
5. After making the changes, tap on the send button to reschedule the email with the updated content.
Please note that any changes you make to a scheduled email will only apply to future instances of that email, not to any previously sent instances.
Q: How can I view my scheduled emails in Apple Mail on my iPhone?
A: To view your scheduled emails in Apple Mail on your iPhone, follow these steps:
1. Open the Mail app on your iPhone.
2. Tap on the “Mailboxes” button in the top-left corner.
3. Scroll down and find the “Scheduled” folder.
4. Tap on the “Scheduled” folder to view all your scheduled emails.
In the “Scheduled” folder, you’ll be able to see a list of all your upcoming scheduled emails.
Q: Can I cancel a scheduled email in Apple Mail on my iPhone?
A: Yes, you can cancel a scheduled email in Apple Mail on your iPhone. To do this, follow these steps:
1. Open the Mail app on your iPhone.
2. Tap on the “Scheduled” folder in the bottom navigation bar.
3. Find the email you want to cancel and swipe left on it.
4. Tap on the “Cancel” option that appears.
The email will be removed from the scheduled list and will not be sent.