
Have you ever wondered how to scan documents directly from your Android phone? With the advancement in technology, scanning on the go has become incredibly convenient and accessible. Whether you need to digitize a physical document, create a PDF, or capture a receipt, your Android phone can serve as a portable scanner.
In this article, we will guide you through the process of scanning documents on your Android phone. We will explore built-in scanning features, as well as recommend some popular scanning apps available on the Google Play Store. By the end of this article, you will be equipped with the knowledge and tools to scan documents effortlessly and efficiently using your Android device. So let’s dive in and discover how to unleash the scanning capabilities of your Android phone!
Inside This Article
- Section 1: Overview of Scanning on Android
- Section 2: Preparing Your Android Phone for Scanning
- Section 3: Choosing and Installing a Scanning App
- Section 4: Scanning Documents and Images on Your Android Phone
- Section 5: Editing and Managing Scanned Files
- Section 6: Troubleshooting and Tips for Better Scanning
- Conclusion
- FAQs
Section 1: Overview of Scanning on Android
Scanning documents and images on your Android phone can be incredibly useful, whether you need to digitize important paperwork, create electronic copies of receipts, or capture high-quality images. With the convenience of having a scanner right in your pocket, you can easily scan and store documents without the need for bulky scanners or complicated setups.
Android phones are equipped with powerful cameras that can be utilized for scanning purposes. By using specific scanning apps, you can transform your Android phone into a handy scanner, enabling you to capture and digitize physical documents and images effortlessly.
Scanning on Android offers a range of benefits. Firstly, it provides a portable and convenient solution, allowing you to scan documents on the go. Whether you’re in a coffee shop, at the office, or traveling, all you need is your Android phone and a reliable scanning app.
In addition to convenience, scanning on Android offers versatility. Most scanning apps offer features such as OCR (Optical Character Recognition), which allows you to extract text from scanned documents and make them searchable. This feature comes in handy when you want to find specific information within a large document quickly.
Furthermore, the quality of scans produced by Android phones has dramatically improved over the years. With high-resolution cameras and advanced image processing algorithms, you can capture clear and sharp scans that rival those produced by traditional scanners.
Whether you’re a student, professional, or individual looking to reduce clutter and go paperless, scanning on Android provides a simple and efficient way to manage and store important documents. By harnessing the power of your Android phone and utilizing the right scanning apps, you can streamline your workflow, save time, and eliminate the need for physical filing systems.
Section 2: Preparing Your Android Phone for Scanning
Before you dive into the world of scanning on your Android phone, it’s important to ensure that your device is properly prepared. Here are some steps you can follow to get your phone ready for scanning:
1. Clear Storage Space: Scanning documents and images can take up valuable storage space on your phone. Before you start scanning, make sure you have enough free space by deleting unnecessary files or transferring them to an external storage device.
2. Update your Android Version: It’s always a good idea to keep your Android operating system up to date. Check for any available system updates and install them to ensure you have the latest features and stability.
3. Charge Your Phone: Scanning can be a battery-intensive task, so it’s best to start with a fully charged phone. This will prevent any unexpected shutdowns or interruptions while you’re in the middle of scanning an important document.
4. Check Camera Permissions: Scanning requires access to your phone’s camera. Go to your device settings, navigate to the App Permissions section, and make sure that the scanning app you plan to use has permission to access your camera.
5. Clean Your Camera Lens: A clean camera lens will ensure that your scanned documents and images come out clear and high-quality. Use a microfiber cloth or lens cleaning solution to wipe away any smudges or fingerprints from the camera lens.
6. Disable Flash: When scanning documents, it’s best to keep the flash turned off. The flash can cause glare or unwanted reflections on the scanned image, affecting its quality. Disable the flash in your camera app settings before you start scanning.
Section 3: Choosing and Installing a Scanning App
When it comes to scanning documents and images on your Android phone, having a reliable scanning app is crucial. These apps enhance the scanning capabilities of your device, allowing you to digitize and organize important paperwork with ease. Here are some key considerations to keep in mind when choosing and installing a scanning app:
1. Compatibility: Before selecting a scanning app, make sure it is compatible with your Android phone’s operating system. Most scanning apps are designed to work across different Android versions, but it’s always wise to double-check.
2. Features: Assess the features offered by various scanning apps. Look for functionalities such as document cropping, image enhancement, OCR (Optical Character Recognition), multi-page scanning, cloud storage integration, and file format options. Identify the features that align with your scanning needs.
3. User Interface: Consider the user interface of the scanning app. It’s important to choose an app that is intuitive and easy to navigate. Look for an app that allows you to quickly access essential functions and adjust settings effortlessly.
4. Reviews and Ratings: Take the time to read reviews and check the ratings of different scanning apps. Pay attention to user feedback regarding reliability, speed, accuracy, and overall user experience. This can give you insights into the performance of the app and help you make an informed decision.
5. Security: Ensure that the scanning app prioritizes the security of your scanned documents. Look for apps that offer password protection or encrypted storage options. It’s essential to choose an app that maintains the confidentiality of your sensitive information.
6. Cost: Consider the cost of the scanning app. Some apps are available for free with limited features, while others may require a one-time purchase or a subscription. Evaluate your budget and the value you derive from the features offered before making a decision.
Once you have chosen a scanning app that meets your requirements, installing it is a simple process. Follow these steps to install a scanning app on your Android phone:
Step 1: Open the Google Play Store on your Android phone.
Step 2: Search for the scanning app you have chosen using the search bar.
Step 3: Select the app from the search results.
Step 4: Click on the “Install” button to download and install the app on your phone.
Step 5: Once the installation is complete, you can find the app on your home screen or in the app drawer.
Now that you have successfully installed a scanning app on your Android phone, you are ready to start scanning documents and images conveniently and efficiently.
Section 4: Scanning Documents and Images on Your Android Phone
Now that you have installed a scanning app on your Android phone, it’s time to dive into the process of actually scanning documents and images. In this section, we will walk you through the steps involved in capturing high-quality scans using the camera on your phone.
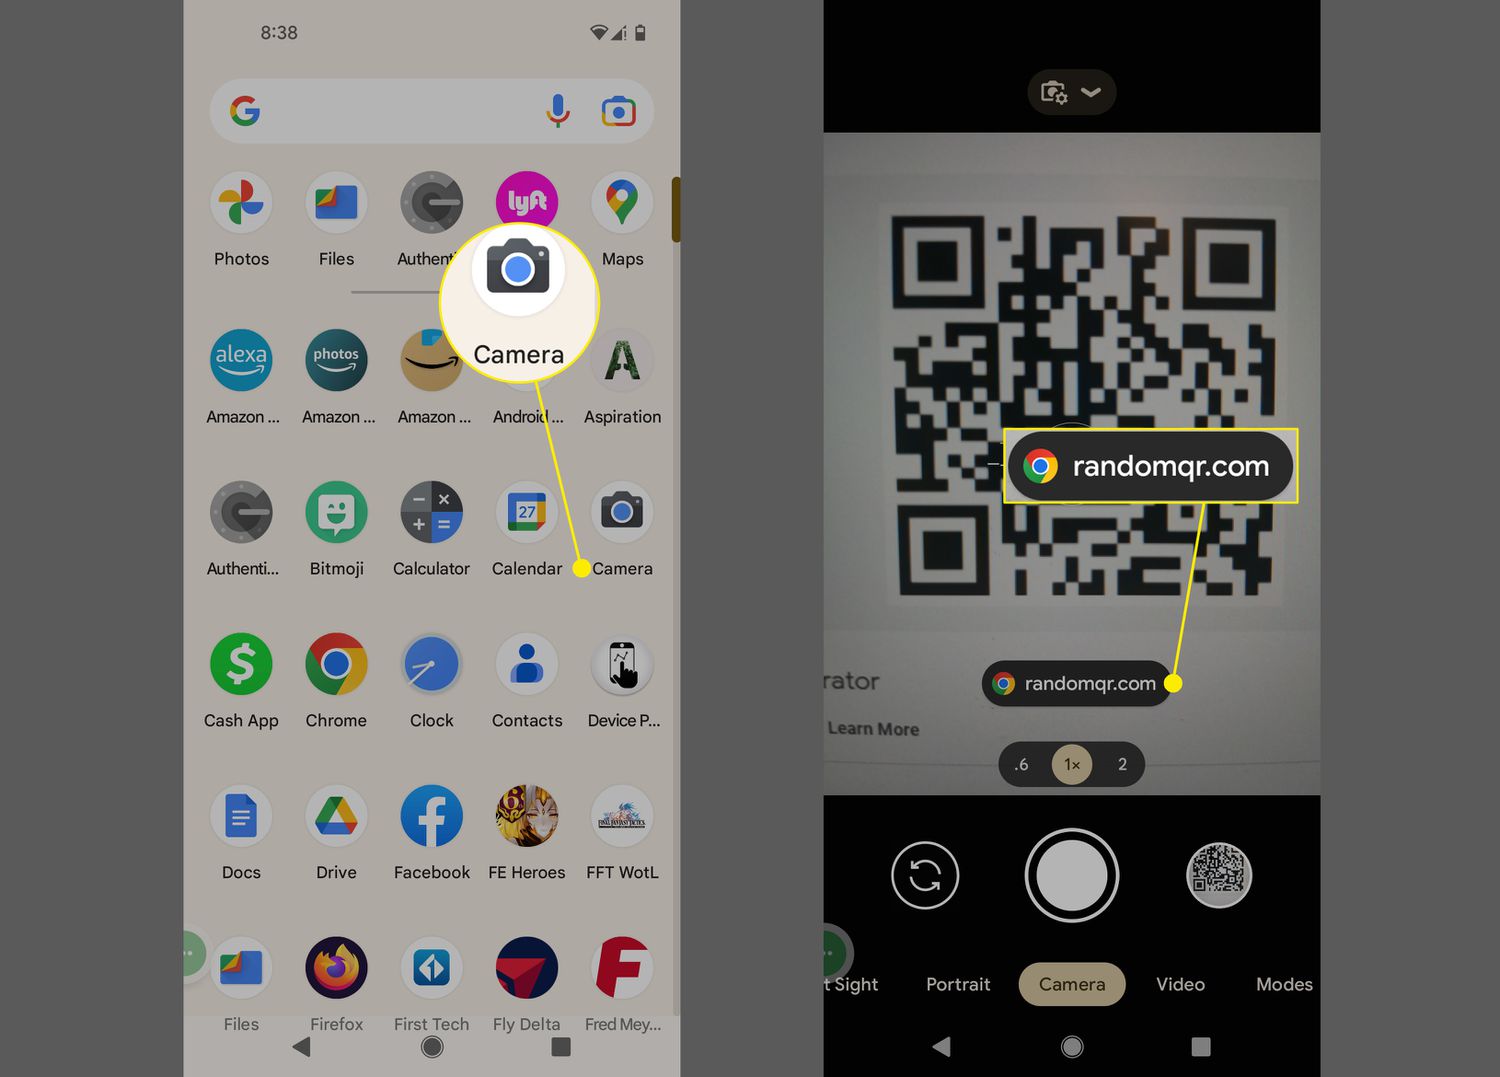
1. Open the scanning app: Locate the scanning app you installed on your Android phone and tap on its icon to open it. The app’s interface will typically provide you with options for scanning documents, images, or QR codes.
2. Position the document or image: Place the document or image you want to scan on a flat surface with adequate lighting. Ensure that there are no shadows or obstructions that may affect the quality of the scan. If you are scanning a document with multiple pages, arrange them in the correct order.
3. Align the camera: Most scanning apps will display guiding lines on the screen to help you align the document or image within the frame. Make sure the entire content is within these lines to capture the full document/image accurately.
4. Adjust the settings: Depending on the scanning app, you may have the option to adjust various settings such as the resolution, color mode, and file format. Higher resolution settings will result in better image quality but may also increase the file size. Experiment with different settings to find the right balance for your needs.
5. Capture the scan: Once you have positioned the document or image and adjusted the settings, tap the on-screen capture button or physical volume buttons to capture the scan. Hold the phone steady, making sure not to move or shake it to avoid blurry images.
6. Review and enhance the scan: After capturing the scan, the app will typically display the image on the screen. Take a moment to review the scan and make sure it is clear and legible. Some scanning apps may offer options to enhance the scan by adjusting brightness, contrast, or cropping the image.
7. Save and name the scan: Once you are satisfied with the scan, choose the appropriate option to save it. The app will usually prompt you to name the scan and select the desired storage location, such as the phone’s internal storage or an SD card.
8. Repeat the process for additional pages or images: If you have more pages to scan or want to capture multiple images, repeat the above steps for each document or image. Most scanning apps allow you to create multi-page PDFs or albums to keep your scans organized.
9. Share or export the scans: Once you have finished scanning, you can share the scans directly from the app. Look for options to share via email, messaging apps, or cloud storage services. Additionally, you can export the scans to your computer or other devices for further editing or archival purposes.
That’s it! With these simple steps, you can efficiently scan documents and images using your Android phone. Whether you need to digitize important paperwork, capture receipts, or save cherished memories, your Android phone can serve as a powerful scanning tool.
Section 5: Editing and Managing Scanned Files
Once you have successfully scanned your documents or images on your Android phone, you may want to perform some editing or manage the scanned files. Here are some tips and techniques to help you with editing and managing your scanned files effectively.
1. Rename and Organize: After scanning, it’s a good practice to rename your files with meaningful names. This will make it easier to search and retrieve them later. Additionally, consider organizing your scanned files into folders based on categories or project names for better file management.
2. Crop and Rotate: If you scanned a document or image in an incorrect orientation or with unnecessary surrounding areas, you can use a scanning app or a photo editing app to crop and rotate the scanned file. This will help to align the content properly and remove any unwanted parts.
3. Adjust Brightness and Contrast: Sometimes, the scanned files may appear too bright or too dark. To enhance the readability or visual quality, you can use image editing tools to adjust the brightness and contrast levels. This will make the scanned documents or images easier to view and work with.
4. Merge and Split: In some cases, you may need to combine multiple scanned pages into a single document. Look for a scanning app that supports merging scanned files. On the other hand, if you have a large document or a multi-page PDF, you can also split it into smaller, more manageable files using the same app.
5. Convert to Different File Formats: Depending on your requirements, you might want to convert your scanned files to different file formats such as PDF, JPEG, or PNG. Most scanning apps offer options to export or save the scanned files in various formats, allowing you to choose the one that suits your needs best.
6. Cloud Storage Integration: To ensure the safety and accessibility of your scanned files, consider integrating your scanning app with cloud storage services like Google Drive, Dropbox, or OneDrive. This will enable you to automatically backup and sync your scanned files across multiple devices and access them anytime, anywhere.
7. Secure Your Scanned Files: If you are dealing with sensitive or confidential documents, it is essential to protect your scanned files from unauthorized access. Look for scanning apps that offer password protection or encryption features. This will add an extra layer of security to your scanned files.
By following these tips for editing and managing your scanned files on your Android phone, you can ensure better organization, easy retrieval, and enhanced usability of your scanned documents and images.
Section 6: Troubleshooting and Tips for Better Scanning
Scanning documents and images on your Android phone can be a convenient and efficient way to digitize your important files. However, like any technology, there may be instances where you encounter some challenges during the scanning process. In this section, we will explore some troubleshooting tips to overcome common scanning issues and provide you with useful tips to achieve better scanning results.
1. Ensure Sufficient Lighting: One of the most common issues with scanning is poor lighting, which can result in blurry or shadowy scans. To overcome this, make sure you have adequate lighting when scanning. Natural light from a nearby window or well-lit room can help improve the quality of your scans. Additionally, you can also consider using the flashlight feature on your phone to enhance the lighting conditions.
2. Clean Camera Lens: Over time, dust and smudges can accumulate on your phone’s camera lens, which can negatively impact the clarity of your scans. It’s essential to regularly clean the lens with a soft cloth or lens cleaning solution to ensure optimum image quality.
3. Adjust Focus and Exposure: Some scanning apps allow you to manually adjust the focus and exposure settings before capturing the scan. Experiment with these settings to achieve optimal results. Move your phone closer or further away from the document to adjust focus, and use exposure controls to balance the brightness and contrast of the scan.
4. Keep Document Flat and Aligned: Aligning the document properly on the screen and keeping it as flat as possible will help reduce distortions or skewed scans. Make sure the document edges are parallel to the edges of the screen and avoid any folds or creases that could result in a skewed image.
5. Choose the Right File Format: Different scanning apps offer various file format options for saving your scans. Consider choosing a file format that suits your needs. For documents, PDF format is commonly used for better compatibility, while JPEG format is suitable for images.
6. Use OCR (Optical Character Recognition): OCR technology allows you to convert scanned documents into editable text. Some scanning apps offer OCR capabilities, which can be useful when you need to extract text from a scanned document. This can eliminate the need for manual typing and save you time and effort.
7. Calibrate Your Scanner: If you notice consistent issues with color accuracy or image quality, it may be worth calibrating your scanner. Some scanning apps provide a calibration option that allows you to adjust the settings to ensure accurate color reproduction and improve overall scan quality.
8. Keep Storage Space in Mind: Scans can take up a significant amount of storage space on your phone. It’s important to regularly manage your scanned files and consider backing up important scans to cloud storage or external devices to free up space and avoid slowing down your device.
9. Update Your Apps: It’s crucial to keep your scanning apps and your Android phone’s operating system up to date. Developers often release updates that address bugs, improve performance, and introduce new features that can enhance your scanning experience.
By following these troubleshooting tips and utilizing the suggested techniques, you can overcome common scanning issues and achieve better results when scanning documents and images on your Android phone. Remember, practice makes perfect, so don’t hesitate to experiment and fine-tune your scanning process to suit your specific needs.
Conclusion
In conclusion, scanning on an Android phone is a useful and convenient feature that can help you digitize documents, save important information, and streamline your workflow. With the built-in camera and a variety of scanning apps available, you can easily turn your Android phone into a portable scanner.
Whether you need to scan documents, receipts, business cards, or even handwritten notes, the scanning capabilities of Android phones allow you to do so efficiently and effectively. By following the steps outlined in this article, you can quickly and easily scan documents on your Android phone and enjoy the benefits of a paperless environment.
Remember to choose a reliable scanning app that suits your specific needs and preferences. Take advantage of the different features and settings to optimize your scanning experience. With the ability to scan, edit, share, and organize your scanned documents all on your Android phone, you can stay productive and organized wherever you go.
FAQs
1. Can I scan documents on my Android phone?
Absolutely! Android phones come equipped with built-in scanning capabilities. There are various apps available on the Google Play Store that allow you to easily scan documents, receipts, or photos using your phone’s camera.
2. What app should I use to scan documents on my Android phone?
There are many great apps available for scanning documents on Android phones. Some popular choices include Adobe Scan, Microsoft Office Lens, and CamScanner. These apps provide features like image enhancement, automatic document detection, and easy sharing options.
3. How do I scan a document using my Android phone?
To scan a document on your Android phone, follow these steps:
– Download and install a scanning app from the Google Play Store.
– Open the app and grant the necessary permissions.
– Position the document within the camera’s viewfinder and ensure it is well-lit.
– Tap the capture button to take a scan of the document.
– Review the scan and make any necessary adjustments.
– Save the scanned document as a PDF or image file to your phone or cloud storage.
4. Can I edit scanned documents on my Android phone?
Yes, many scanning apps offer built-in editing features. You can crop, rotate, adjust brightness and contrast, and even add annotations or signatures to scanned documents directly on your Android phone. These edited documents can then be saved or shared as needed.
5. Is scanning on an Android phone secure?
Scanning documents on an Android phone is generally secure, as long as you download reputable and trusted scanning apps. However, it is always advisable to be cautious when granting permissions and ensure that you are using a reliable app from a trusted source to protect your privacy and data.