
The ability to screen record on iOS devices has become increasingly valuable, allowing users to capture and share what’s happening on their screens. Whether you want to create tutorials, demonstrate app functionalities, or even capture gameplay, screen recording on iOS provides a convenient and powerful tool.
In this article, we will delve into the world of screen recording on iOS, exploring the various methods and tools available to iPhone and iPad users. We will guide you step-by-step through the process, ensuring that you can easily record your screen and share your recordings with others.
From the built-in screen recording feature in iOS to third-party apps, we will cover it all. So, whether you’re a seasoned iOS user or a newcomer, read on to discover the best ways to screen record on your iPhone or iPad.
Inside This Article
- Introduction:
- Prerequisites
- Methods for Screen Recording on iOS
- Option 1: Using the Built-in Screen Recording Feature
- Option 2: Using Third-Party Screen Recording Apps
- Option 3: Using a Computer and Screen Mirroring
- Troubleshooting Tips
- Introduction
- Prerequisites
- Methods for Screen Recording on iOS
- Option 1: Using the Built-in Screen Recording Feature
- Option 2: Using Third-Party Screen Recording Apps
- Option 3: Using a Computer and Screen Mirroring
- Troubleshooting Tips
- Conclusion
- Conclusion
- FAQs
Introduction:
Screen recording has become an essential feature for many iOS users. Whether you want to capture a tutorial, showcase a gaming achievement, or save important conversations, being able to record your screen can be incredibly useful. If you’re wondering how to screen record on iOS, you’ve come to the right place. In this article, we will explore different methods for screen recording on iOS devices.
Before we delve into the specifics, let’s address a common question: why would you want to screen record on iOS? Screen recording allows you to capture and share what’s happening on your iPhone or iPad screen. You can create video tutorials, record app demonstrations, or even capture gameplay for streaming or review purposes.
It’s important to note that screen recording on iOS was introduced in iOS 11, so make sure your device is running this version or a more recent one. Additionally, keep in mind that some apps and features may have restrictions on screen recording due to privacy or copyright concerns.
Now that we’ve covered the basics, let’s explore different methods for screen recording on iOS devices.
Prerequisites
Before you begin screen recording on your iOS device, it’s important to ensure you have met the necessary prerequisites. Here are the key requirements you should consider:
- iOS Version: Make sure your iPhone or iPad is running on iOS 11 or later. The built-in screen recording feature is only available on these versions of iOS.
- Enough Storage Space: Screen recordings can take up a significant amount of storage on your device. Ensure that you have enough free space available to accommodate the recordings.
- Access to Control Center: To use the built-in screen recording feature, you need to make sure the Screen Recording option is accessible from your Control Center. If it’s not visible, you can add it through your device’s settings.
- Permission for Third-Party Apps: If you plan on using a third-party screen recording app, you may need to grant it permission to record your screen. Check the app’s settings to ensure it has the necessary permissions.
- Stable Internet Connection: If you opt for screen recording through a computer and screen mirroring, it’s important to have a reliable internet connection on both your iOS device and the computer you’re using.
By meeting these prerequisites, you can ensure a smooth and successful screen recording experience on your iOS device.
Methods for Screen Recording on iOS
Screen recording on iOS has become an incredibly useful feature, allowing users to capture their device’s screen in action. Whether you want to create tutorials, demonstrate a new app, or share an exciting gameplay moment, screen recording can come in handy. In this article, we will explore three different methods for screen recording on iOS.
Before we dive into the methods, it is important to note that screen recording is available on iOS devices running iOS 11 or later. So make sure your device is updated to the required operating system version.
Now, let’s explore the different options you have for screen recording on iOS:
- Option 1: Using the Built-in Screen Recording Feature
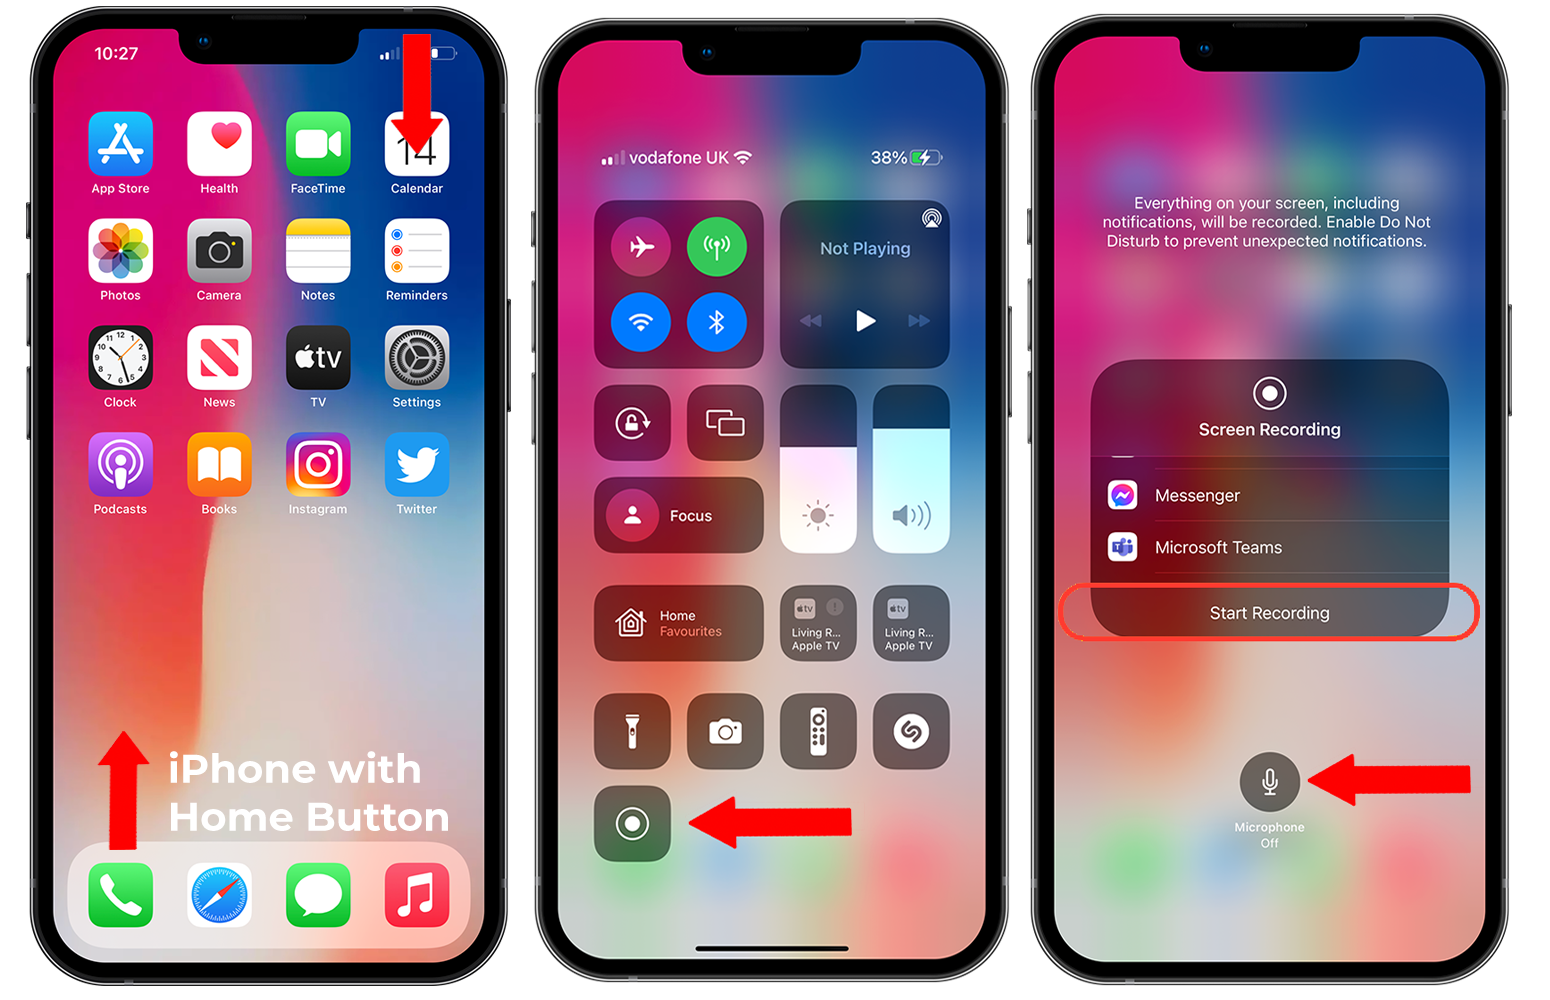
- Open the Control Center as mentioned above.
- Tap on the Screen Recording icon, which looks like a filled circle inside a larger circle.
- A three-second countdown will appear, giving you time to prepare.
- Once the countdown finishes, the recording will start. You will see a red status bar at the top indicating that the screen is being recorded.
- To stop the recording, tap on the red status bar and select “Stop” in the popup menu.
- The recorded video will be saved in the Photos app on your device.
- Option 2: Using Third-Party Screen Recording Apps
- DU Recorder
- ScreenFlow
- Camtasia
- Option 3: Using a Computer and Screen Mirroring
The most straightforward way to screen record on iOS is by using the built-in screen recording feature. This feature is accessible through the Control Center, which can be accessed by swiping down from the top-right corner on devices with Face ID, or swiping up from the bottom on devices with a Home button.
To enable screen recording, follow these steps:
If you’re looking for additional features and customization options, you can explore third-party screen recording apps available on the App Store. These apps offer advanced recording settings, video editing capabilities, and more.
Some popular screen recording apps for iOS include:
To use these apps, simply download them from the App Store, follow the app-specific instructions for screen recording, and start capturing your screen.
If you prefer to use your computer for screen recording, you can take advantage of screen mirroring options available on iOS and mirror your device’s screen onto your computer. Then, you can use screen recording software on your computer to capture the mirrored screen.
To mirror your iOS device’s screen to your computer, you can use software like AirServer or Reflector. These programs allow you to wirelessly mirror your iOS device’s screen to your computer and record it using screen recording software.
Once the screen is mirrored on your computer, you can use any screen recording software of your choice to capture the screen in action.
These are the three main methods for screen recording on iOS. Whether you choose the built-in screen recording feature, third-party apps, or screen mirroring, you can now easily capture and share your iOS device’s screen. So go ahead and start recording!
Option 1: Using the Built-in Screen Recording Feature
One of the easiest ways to screen record on iOS is by utilizing the built-in screen recording feature. This feature, introduced in iOS 11, allows you to capture everything happening on your iPhone or iPad screen.
To access the screen recording feature, you’ll need to first enable it in your device’s control center. Here’s how:
- Go to your iOS device’s Settings.
- Scroll down and tap on Control Center.
- Choose Customize Controls.
- Locate Screen Recording and tap on the green plus icon next to it to add it to the control center.
Once you have added the screen recording feature to your control center, you can easily access it by swiping down from the top right corner of your screen (on newer iPhone models) or swiping up from the bottom of your screen (on older iPhone models with a home button).
To start a screen recording, simply tap on the screen recording button in the control center. You’ll see a countdown timer, indicating that the recording is about to start. Once the countdown is over, anything you do on your device will be captured in the screen recording.
When you are done with the screen recording, you can stop it by tapping on the red status bar at the top of your screen or by accessing the control center and tapping on the screen recording button again.
After stopping the screen recording, it will be saved to your device’s Photos app. From there, you can edit, share, or delete the recording as needed.
It’s important to note that the built-in screen recording feature may not be available on all iOS devices, particularly older models. If you don’t see the screen recording option in your control center, you may need to update your device’s operating system or consider using a third-party screen recording app.
Option 2: Using Third-Party Screen Recording Apps
If you prefer additional customization options and features beyond what the built-in screen recording feature offers, you can explore third-party screen recording apps. These apps are available for download from the App Store and provide enhanced functionality for capturing your iOS screen.
Here are a few popular third-party screen recording apps for iOS:
- Record it!: This app offers a user-friendly interface and allows you to record your screen with high-quality audio. It also provides editing capabilities, allowing you to trim, crop, and add text and graphics to your recordings.
- DU Recorder: With DU Recorder, you can capture your screen videos in high definition with adjustable frame rates. It also supports live streaming and offers a built-in video editor.
- Go Record: This app offers a seamless screen recording experience with easy-to-use controls. It allows you to record your screen, microphone, and even add facecam footage. You can also edit your recordings within the app.
When using third-party screen recording apps, be sure to read user reviews and check the app’s compatibility with your iOS version to ensure a smooth recording experience.
Once you have chosen and installed a third-party screen recording app, launch the app on your device and follow the on-screen instructions to start recording. Many of these apps offer customizable settings such as video resolution, frame rates, and audio sources, allowing you to tailor your recording to your specific requirements.
Remember to grant the necessary permissions for the app to access your device’s screen recording capabilities and microphone. Some apps may require you to enable the screen recording feature from the Control Center as well.
After recording your screen, these apps typically provide options for saving, sharing, or editing your recordings. You can easily export your videos to your camera roll or share them directly to social media platforms or cloud storage services.
Using third-party screen recording apps gives you greater flexibility and control over your screen recordings, making them an excellent choice for those who require advanced features and customization options.
Option 3: Using a Computer and Screen Mirroring
If you prefer to use a larger screen for screen recording and have access to a computer, you can utilize screen mirroring to record your iOS device. This method requires a few additional steps but offers more flexibility in terms of recording options and editing capabilities.
Here’s how you can use a computer and screen mirroring to record your iOS device:
- Connect your iOS device to your computer: Start by connecting your iOS device to your computer using a Lightning or USB-C cable, depending on your device model.
- Enable screen mirroring: Once your device is connected, open the screen mirroring feature on your iOS device. On older iOS versions, you can access this feature by swiping up from the bottom of the screen to reveal the Control Center and tapping on the “AirPlay” or “Screen Mirroring” option. On newer iOS versions, you can access this feature by swiping down from the upper-right corner of the screen.
- Select your computer as the mirrored display: In the screen mirroring menu, you should see a list of available devices to mirror your screen to. Select your computer from the list to establish the connection.
- Open screen recording software on your computer: Once the screen mirroring connection is established, open screen recording software on your computer. There are several options available, such as QuickTime Player on macOS or third-party screen recording software like OBS Studio. Make sure to adjust the recording settings according to your preferences.
- Start recording: With the screen recording software running on your computer, you can now start recording the screen of your iOS device. Simply click the record button in the software interface to begin the recording.
- End the recording: When you’re finished with the screen recording, click the stop button in the screen recording software. The recorded video will be saved on your computer, allowing you to edit or share it as needed.
Using a computer and screen mirroring offers more advanced screen recording options and editing capabilities. It allows you to record your iOS device’s screen while utilizing the resources of your computer. However, keep in mind that this method requires additional setup and might not be as convenient as the built-in screen recording feature or third-party apps.
With these three options available to you, you can choose the method that best suits your needs and preferences when it comes to screen recording on iOS. Whether you opt for the built-in feature, third-party apps, or utilize a computer and screen mirroring, you can easily capture and share your iOS device’s screen with others.
Troubleshooting Tips
While screen recording on iOS can be a straightforward process, sometimes you may encounter issues or face challenges along the way. Here are some troubleshooting tips to help you overcome common problems:
- Ensure Sufficient Storage: Before you start recording, make sure you have enough free space on your device. Insufficient storage can cause recording failures or interruptions.
- Restart Your Device: If you’re experiencing issues with screen recording, try restarting your iOS device. This simple step can often resolve temporary glitches or conflicts.
- Check for Updates: Make sure that your device’s operating system and the screen recording app (if applicable) are up to date. Developers regularly release updates to fix bugs and improve performance.
- Disable Do Not Disturb: If you’re not receiving notifications during screen recordings, check if Do Not Disturb mode is enabled. Disabling this feature allows notifications to appear while recording.
- Reset Settings: If you encounter persistent issues with screen recording, you can reset your device’s settings. Go to Settings > General > Reset > Reset All Settings. Keep in mind that this will erase your personalized settings but not your data.
- Clear Cache: Clearing the cache of the screen recording app can help resolve performance issues. Check the app’s settings or consult its documentation to learn how to clear the cache.
- Restart the Recording: If your screen recording stops unexpectedly, try restarting the recording. You can do this by accessing the Control Center again and tapping on the screen recording icon to start a new session.
- Test with Different Apps: If you’re having trouble recording a specific app or game, try recording a different app to determine if the issue is app-specific or more general. It’s possible that certain apps have restrictions on screen recording.
- Consult the Help Documentation: If you’re using a third-party screen recording app, refer to the app’s documentation or support resources. They may have specific troubleshooting steps or answers to frequently asked questions.
- Contact Customer Support: If all else fails, reach out to the customer support of the screen recording app or Apple Support for further assistance. They can provide personalized guidance and help resolve your specific issue.
By following these troubleshooting tips, you can overcome common challenges and ensure a smooth and uninterrupted screen recording experience on your iOS device.
Introduction
In today’s digital age, screen recording has become an essential tool for capturing and sharing moments on our iOS devices. Whether you want to create a tutorial, showcase a gaming achievement, or simply save a memorable video call, knowing how to screen record on your iOS device can be incredibly useful. In this article, we will explore different methods for screen recording on iOS, including both built-in and third-party options. Get ready to unlock the full potential of your iPhone or iPad and start recording your screen with ease.
Prerequisites
Before we dive into the methods for screen recording on iOS, there are a few prerequisites you need to ensure are in place:
- An iOS device running iOS 11 or later.
- Adequate storage space available on your device to save the recorded videos.
- Permission to access the screen recording feature on your device.
Make sure your device meets these requirements so that you can enjoy screen recording without any issues.
Methods for Screen Recording on iOS
There are several methods you can use to screen record on your iOS device. Let’s explore each option in detail:
Option 1: Using the Built-in Screen Recording Feature
iOS offers a convenient built-in screen recording feature that allows you to capture your screen without the need for any additional apps. Here’s how to use it:
- Open the Control Center on your iOS device. For devices with Face ID, swipe down from the top right corner of the screen. For devices with Touch ID, swipe up from the bottom of the screen.
- Tap the “Screen Recording” button, represented by a circle within a circle.
- If you haven’t enabled the screen recording feature in the Control Center before, you may need to add it. To do this, go to “Settings > Control Center > Customize Controls” and tap the green “+” icon next to “Screen Recording”.
- A countdown timer will appear, giving you a few seconds to navigate to the screen you want to record.
- To start recording, tap the red button in the top left corner of the screen.
- You can stop the recording at any time by tapping the red status bar at the top of the screen and tapping “Stop”. Alternatively, you can return to the Control Center and tap the “Screen Recording” button again.
- The recorded video will be saved to your Photos app.
This built-in screen recording feature is a convenient and accessible way to capture your iOS device’s screen without the need for any additional apps. It’s especially useful if you prefer a straightforward and integrated solution.
Option 2: Using Third-Party Screen Recording Apps
If you’re looking for more advanced screen recording features and customization options, you might want to explore third-party screen recording apps from the App Store. These apps offer additional functionalities and settings to enhance your screen recording experience. Here’s how to use a third-party screen recording app:
- Head to the App Store on your iOS device and search for a screen recording app that suits your needs. Some popular options include “AZ Screen Recorder” and “ScreenFlow”.
- Install and open the chosen app.
- Follow the app’s instructions to set your preferred recording settings, such as video quality, audio source, and screen orientation.
- Once the settings are configured, start the recording by tapping the app’s record button.
- When you’re done recording, stop the recording through the app’s interface or by following the app’s instructions.
- Your recorded video will be saved within the app or in the Photos app, depending on the app you choose.
Third-party screen recording apps offer a wide range of features and customization options, making them ideal for users who require more control over their screen recordings.
Option 3: Using a Computer and Screen Mirroring
Another option for screen recording on iOS is to use a computer and screen mirroring. This method allows you to mirror your iOS device’s screen onto your computer and capture it using screen recording software. Here’s how to do it:
- Connect your iOS device to your computer using a Lightning cable.
- Launch screen mirroring software on your computer, such as QuickTime Player on Mac or LonelyScreen on Windows.
- Follow the instructions provided by the screen mirroring software to establish a connection between your iOS device and the computer.
- Once your iOS device’s screen is mirrored on your computer, open screen recording software on your computer, such as OBS Studio or Screencast-O-Matic.
- Start the screen recording through the screen recording software on your computer.
- When you’re finished recording, stop the screen recording and save the video to your desired location on your computer.
Using a computer and screen mirroring allows for more flexibility and control over your screen recording process. It’s a great option if you prefer working with larger screens or if you need to annotate or edit your screen recordings on a computer.
Troubleshooting Tips
Here are some troubleshooting tips to help you if you encounter any issues while screen recording on iOS:
- Ensure you have enough storage space on your device to save the recorded videos.
- Restart your device if you experience any performance issues.
- Check that you have granted permission for the screen recording feature.
- Update your iOS software to the latest version.
- If using a third-party screen recording app, make sure it is up to date.
- If using screen mirroring, check that your computer and iOS device are connected to the same Wi-Fi network.
By following these troubleshooting tips, you’ll be able to address common issues and enjoy a smooth screen recording experience on your iOS device.
Conclusion
Screen recording on iOS opens up a world of possibilities for capturing and sharing moments on your iPhone or iPad. Whether you choose the built-in screen recording feature, third-party apps, or screen mirroring with a computer, each method provides unique advantages that cater to different needs and preferences. Experiment with different options and find the one that suits your requirements the best. Start recording your screen today and unleash your creativity with iOS screen recording!
Conclusion
Screen recording on iOS devices has become an essential tool for many users. Whether you want to capture a gaming session, create a tutorial, or share a memorable moment, the screen recording feature on iOS provides a convenient way to do so. With just a few taps, you can capture high-quality videos directly from your iPhone or iPad screen.
By following the simple steps outlined in this guide, you can start screen recording on iOS with ease. Remember to enable the microphone if you want to include audio in your recordings and take advantage of the various customization options available in the Control Center.
Screen recording on iOS is a versatile feature that offers endless possibilities. Whether you’re a content creator, educator, or simply someone who wants to document important moments, screen recording on iOS is a powerful tool that can enhance your mobile experience. So go ahead, unleash your creativity, and start recording those memorable moments on your iOS device today!
FAQs
1. Can I screen record on iOS devices?
Yes, you can screen record on iOS devices. Apple introduced a built-in screen recording feature with iOS 11 that allows you to capture what’s happening on your iPhone or iPad screen.
2. How can I enable screen recording on my iOS device?
To enable screen recording on your iOS device, follow these steps:
– Go to the Settings app on your device.
– Scroll down and tap on Control Center.
– Tap on Customize Controls.
– Find Screen Recording in the list and tap on the green plus icon next to it to add it to your Control Center.
– Close the Settings app and swipe down from the top-right corner (iPhone X or newer) or swipe up from the bottom edge (iPhone 8 or older) to access the Control Center.
– Tap on the Screen Recording icon (a circle within a circle) to start recording.
3. Where can I find my screen recordings on iOS?
After you stop the screen recording, iOS will save the video to your Photos app. You can find your screen recordings by launching the Photos app and navigating to the “Recents” album or the “Videos” album, depending on the iOS version you’re using.
4. Can I record audio while screen recording on iOS?
Yes, you can record audio while screen recording on iOS. By default, the screen recording feature captures both the sound from your device’s internal audio and the microphone input. However, you can customize your screen recording settings to choose whether you want to include or exclude microphone audio.
5. Is there a time limit for screen recordings on iOS?
There is no specific time limit for screen recordings on iOS. You can record your screen for as long as your device has sufficient storage space. However, it’s worth noting that longer recordings will consume more storage and may require additional post-processing if you want to share or edit them.