
Do you ever find yourself in a situation where you want to capture your iPhone screen activity? Whether you’re trying to demonstrate a feature, record a tutorial, or simply share something interesting on your device, having the ability to screen record on your iPhone can be incredibly useful.
In this article, we will guide you step-by-step on how to add screen record on iPhone. You don’t need any fancy third-party apps or complex settings to achieve this – Apple has made it easy for iPhone users to record their screens directly from the device itself. You’ll be able to capture everything happening on your screen, be it an app, a game, or even your home screen.
So, if you’re ready to unlock this hidden feature and start recording your iPhone screen like a pro, keep reading to learn all the tips and tricks you need to know.
Inside This Article
- Enabling Screen Recording on iPhone
- Enabling Screen Recording on iPhone
- Accessing the Control Center
- Adding the Screen Record Button to Control Center
- Recording Your Screen on iPhone
- Adding the Screen Record Button to Control Center
- Enabling Screen Recording on iPhone
- Accessing the Control Center
- Adding the Screen Record Button to Control Center
- Recording Your Screen on iPhone
- Conclusion
- FAQs
Enabling Screen Recording on iPhone
Screen recording has become a popular feature among iPhone users, as it allows them to capture and share their device’s screen activities. Whether you want to create video tutorials, share gameplay, or troubleshoot technical issues, enabling screen recording on your iPhone is a must. In this article, we will guide you through the process of enabling screen recording on your iPhone device.
To start, you need to ensure that your iPhone is running on iOS 11 or later, as the screen recording feature was introduced in iOS 11. If you have an older version of iOS, you will need to update your device to access this feature. Once you are running the required iOS version, follow the steps below to enable screen recording:
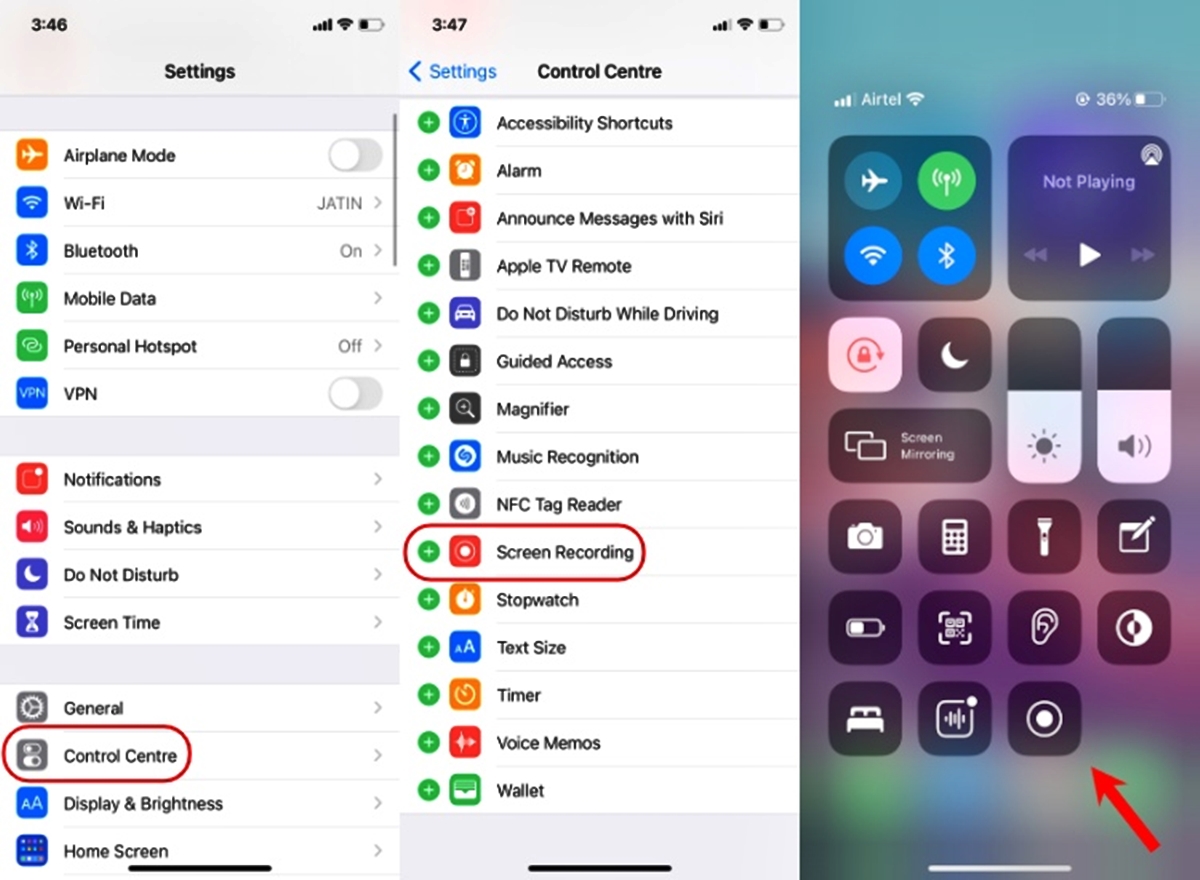
- Open the Settings app on your iPhone.
- Scroll down and tap on Control Center.
- Next, tap on Customize Controls.
- Scroll through the list of available controls until you find Screen Recording.
- Tap on the green plus icon next to Screen Recording to add it to your Control Center.
Congratulations! You have successfully enabled screen recording on your iPhone. Now, let’s move on to accessing the Control Center.
Enabling Screen Recording on iPhone
These days, capturing and sharing your mobile screen has become increasingly important. Whether you want to record a tutorial, share your gameplay, or troubleshoot an issue, screen recording can be a valuable tool. If you own an iPhone, you’re in luck because Apple has made it incredibly easy to enable screen recording on their devices.
To get started with screen recording on your iPhone, follow these simple steps:
- Open the Settings app on your iPhone.
- Scroll down and tap on Control Center.
- Tap on Customize Controls.
- Scroll down and look for the Screen Recording option.
- Tap the green plus icon next to Screen Recording to add it to the Control Center.
Once you have enabled screen recording through the Control Center, you can easily access it whenever you need to capture your screen.
Accessing the Control Center
The Control Center is a convenient feature on your iPhone that allows you to quickly access various settings and functions. To access the Control Center, simply follow these steps:
- If you have an iPhone X or newer, swipe down from the top right corner of the screen to open the Control Center.
- If you have an iPhone 8 or older, swipe up from the bottom edge of the screen to bring up the Control Center.
Once you have accessed the Control Center, you will see a range of options and shortcuts available to you. These include things like volume control, brightness adjustment, and connectivity settings.
Now, with screen recording enabled in the Control Center, you can easily start recording your screen with just a few taps.
Adding the Screen Record Button to Control Center
Before you can start recording your screen, make sure you have added the Screen Record button to the Control Center. If you followed the previous steps to enable screen recording, you should already have it added. However, if you don’t see the Screen Record button in the Control Center, you can add it by following these steps:
- Open the Settings app on your iPhone.
- Tap on Control Center.
- Tap on Customize Controls.
- Scroll down to find the Screen Recording option.
- Tap the green plus icon next to Screen Recording to add it to the Control Center.
Once you have added the Screen Record button to the Control Center, it will be readily available for you to use whenever you want to start recording your screen.
Recording Your Screen on iPhone
Now that you have enabled screen recording and added the Screen Record button to the Control Center, it’s time to start capturing your screen. Here’s how:
- Open the app or screen that you want to record.
- Access the Control Center by swiping down from the top right corner (on iPhone X or newer) or swiping up from the bottom edge of the screen (on iPhone 8 or older).
- Tap the Screen Record button. A three-second countdown will appear.
- Once the countdown finishes, your screen recording will begin.
- To stop the recording, you can either tap the red banner at the top of the screen and confirm or access the Control Center again and tap the Screen Record button.
- Your screen recording will be saved to your Photos app, where you can view, edit, and share it as you please.
Now you can effortlessly capture and share your iPhone screen with the screen recording feature. Whether it’s for work, education, or entertainment purposes, screen recording on your iPhone offers endless possibilities. So go ahead, try it out, and unleash the power of screen recording on your iPhone!
Adding the Screen Record Button to Control Center
The Control Center on your iPhone is a convenient tool that allows you to access various features and settings with just a swipe. It’s your go-to hub for quick access to essential functions like adjusting brightness, enabling Do Not Disturb mode, and even capturing screenshots. By adding the Screen Record button to the Control Center, you can easily start and stop recording your iPhone screen.
Here’s how you can add the Screen Record button to your Control Center:
- Unlock your iPhone and navigate to the home screen.
- Open the Settings app.
- Scroll down and tap on “Control Center.”
- Under the “More Controls” section, locate “Screen Recording” and tap on the green plus button (+) next to it. This will add the Screen Record button to your Control Center.
Once you’ve added the Screen Record button to your Control Center, you can easily access it by following these steps:
- Swipe up from the bottom of your iPhone screen to open the Control Center.
- Look for the Screen Record button, which looks like a white circle inside a larger red circle.
- Tap on the Screen Record button to start recording your screen.
Now that you’ve successfully added the Screen Record button to your Control Center, you can conveniently capture your iPhone screen whenever you need to. Whether you want to demonstrate a process, create a tutorial, or share a gameplay session, screen recording on your iPhone is a valuable feature that can come in handy in various scenarios.
Please note that when you start a screen recording, your iPhone will automatically record audio from the device’s microphone. If you wish to include external audio, such as your voice or sound from an app, make sure to enable the microphone option in the Control Center by long-pressing the Screen Record button and toggling the microphone button on.
Additionally, it’s important to be mindful of the content you’re capturing during the screen recording. Make sure to respect the privacy of others and avoid capturing any sensitive or confidential information inadvertently.
The ability to add the Screen Record button to your Control Center puts the power of screen recording at your fingertips. Explore the endless possibilities of capturing and sharing your iPhone screen with this convenient feature.
Enabling Screen Recording on iPhone
Screen recording on iPhone is a handy feature that allows you to capture and share your screen activity. Whether you want to create a tutorial, save a video call, or share gameplay footage with friends, screen recording can come in handy. Here’s how you can enable screen recording on your iPhone:
1. Go to the Settings app on your iPhone.
2. Scroll down and tap on Control Center.
3. Select Customize Controls.
4. Locate the Screen Recording option under More Controls.
5. Tap the green plus icon next to Screen Recording to add it to the Control Center.
With screen recording enabled, you can now easily access it from the Control Center.
Accessing the Control Center
The Control Center is a convenient hub for accessing essential functions and toggling various settings on your iPhone. To access the Control Center:
1. On an iPhone X or newer, swipe down from the top-right corner of the screen.
2. On an iPhone 8 or older, swipe up from the bottom of the screen.
3. The Control Center will appear, displaying shortcuts to commonly used features.
By accessing the Control Center, you can quickly enable screen recording and perform other actions with just a few taps.
Adding the Screen Record Button to Control Center
Before you can begin screen recording, you need to ensure that the Screen Record button is added to your Control Center. To add the Screen Record button:
1. Open the Settings app on your iPhone.
2. Tap on Control Center.
3. Select Customize Controls.
4. Scroll down to the More Controls section.
5. Locate the Screen Recording option and tap the green plus icon next to it.
Now, when you access the Control Center, you will see the Screen Record button ready for use.
Recording Your Screen on iPhone
Now that you have enabled screen recording and added the Screen Record button to your Control Center, you are ready to start recording your screen:
1. Access the Control Center by swiping down from the top-right corner (or up from the bottom) of your iPhone screen.
2. Locate the Screen Record button, which looks like a white circle inside a larger circle.
3. Tap on the Screen Record button.
4. A countdown of 3 seconds will appear, indicating that the screen recording is about to start.
5. Perform the actions you wish to record on your iPhone.
6. To stop the screen recording, tap on the red status bar at the top of the screen and select Stop.
Once you stop the screen recording, the video will be saved to your Photos app, where you can access and share it as needed.
By following these simple steps, you can quickly enable screen recording, access the Control Center, add the Screen Record button, and start recording your screen on your iPhone. Make the most of this handy feature to capture and share important moments and valuable information with ease.
Conclusion
Screen recording on iPhone is a valuable feature that allows users to capture and share their device’s screen with ease. Whether you want to create tutorials, showcase gameplay, or simply save important moments, the screen recording feature provides a convenient way to do so.
In this article, we explored the various methods to add screen recording on iPhone. We discussed the native screen recording feature available on iOS devices, as well as third-party apps that offer additional functionality. By following the step-by-step instructions and tips provided, you can start recording your iPhone’s screen in no time.
Remember to consider any privacy concerns when using screen recording and respect the rights of others before sharing recorded content. Additionally, ensure that you have enough storage space available on your device to accommodate the recorded videos.
With screen recording on iPhone, you can unlock a whole new level of creativity and sharing possibilities. So go ahead, experiment with different recording techniques, and let your iPhone become a powerful tool for capturing and sharing moments that matter to you.
FAQs
Q: Can I screen record on my iPhone?
Yes, you can screen record on your iPhone. Apple introduced a built-in screen recording feature starting from iOS 11. This allows you to capture everything that happens on your iPhone’s screen.
Q: How do I enable screen recording on my iPhone?
To enable screen recording on your iPhone, follow these steps:
1. Open the Settings app on your iPhone.
2. Scroll down and tap on Control Center.
3. Tap on Customize Controls.
4. Under “More Controls,” you will find Screen Recording. Tap on the green plus (+) button next to it to add it to your control center.
5. Exit the settings and swipe down from the top-right corner of your screen (on iPhone X and newer models) or swipe up from the bottom of the screen (on iPhone 8 and older models) to open the Control Center.
6. Tap on the Screen Recording icon (a circular button with a dot inside) to start screen recording.
Q: Where can I find the recorded screen videos on my iPhone?
After you finish recording your screen on iPhone, the video will be saved to the Photos app in your Camera Roll or Videos album, depending on your iPhone’s settings. You can access the recorded screen videos by opening the Photos app on your device.
Q: Are there any limitations to screen recording on iPhone?
Yes, there are a few limitations to screen recording on iPhone:
1. You cannot record certain types of content due to copyright restrictions, such as movies or copyrighted material in certain apps.
2. Screen recording does not capture system-level audio or external audio input by default. However, you can enable microphone audio recording during screen recording by long-pressing or force-touching the Screen Recording icon in Control Center and toggling on the microphone option.
3. Screen recording stops automatically when you make or receive a phone call.
4. Some streaming apps may have restrictions that prevent screen recording. You will see a black screen when attempting to record content from these apps.
Q: Can I edit or trim the recorded screen videos on my iPhone?
Yes, you can edit or trim the recorded screen videos on your iPhone. After opening the recorded video in the Photos app, tap on the “Edit” button and make the desired adjustments, such as trimming the length of the video. Once you are satisfied with the changes, tap on “Done” to save the edited video.