
In this digital age, our smartphones have become an extension of ourselves, capturing our precious moments through the lens of a camera. iPhones, known for their exceptional camera quality, allow us to capture stunning photos that we want to preserve and share. However, when it comes to transferring those cherished memories from your iPhone to your Mac, it can sometimes feel like a daunting task.
Whether you want to save space on your iPhone or simply want a backup of your photos on your Mac, knowing how to download pictures from your iPhone to your Mac is essential. In this article, we will guide you through the step-by-step process of transferring your photos so that you can easily access and organize them on your Mac.
Inside This Article
- Overview
- Method 1: Using the Photos App
- Method 2: Using AirDrop
- Method 3: Using iCloud Photos
- Method 4: Using iTunes
- Additional Tips and Considerations
- Conclusion
- FAQs
Overview
If you own an iPhone and a Mac, you may find yourself needing to transfer photos taken with your iPhone to your Mac for various reasons. Whether it’s to free up storage space on your iPhone, back up your precious memories, or simply to edit and organize your photos on a larger screen, there are several methods for downloading pictures from your iPhone to your Mac.
In this article, we will explore four different methods that you can use to transfer photos from your iPhone to your Mac. These methods include using the Photos app, utilizing AirDrop, syncing with iCloud Photos, and using iTunes. Each method has its advantages and limitations, so you can choose the one that suits your needs and preferences.
Regardless of which method you choose, it’s important to ensure that you have the latest versions of iOS and macOS installed on your devices to ensure compatibility and to have access to the latest features and improvements.
Without further ado, let’s dive into the step-by-step instructions for each method:
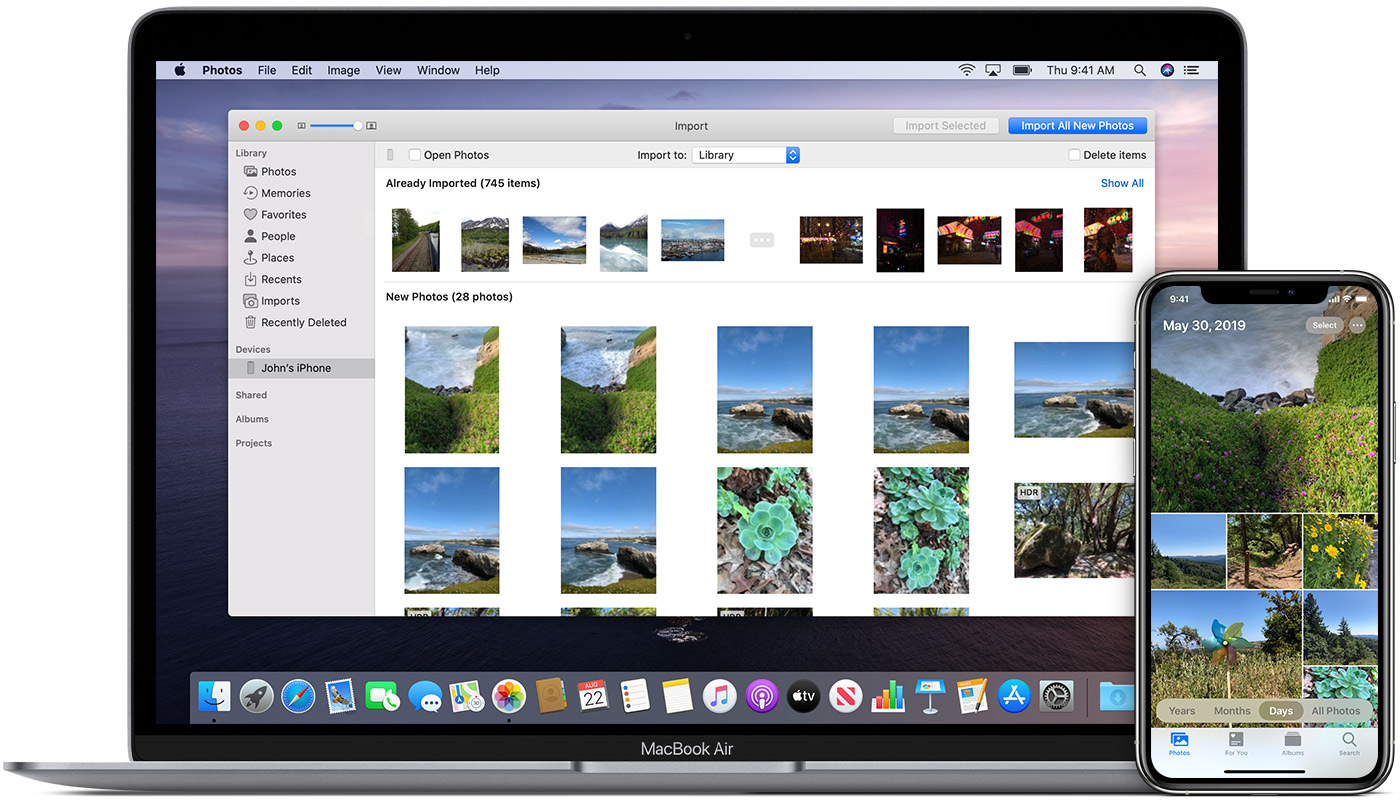
Method 1: Using the Photos App
If you want to download pictures from your iPhone to your Mac, the Photos app is a convenient and reliable method. Follow the steps below to transfer your photos:
- Connect your iPhone to your Mac using a USB cable.
- Open the Photos app on your Mac. It should automatically launch when your iPhone is connected.
- In the Photos app, click on the “Import” button located in the top right corner of the screen. If you don’t see it, click on the “Devices” tab on the left sidebar and select your iPhone.
- A list of all the photos and videos on your iPhone will appear. You have the option to select “Import All New Items” if you want to download all the pictures or select specific photos by clicking on them.
- Once you have made your selection, click on the “Import” button in the top right corner. The Photos app will start transferring the selected photos from your iPhone to your Mac.
- After the transfer is complete, you can find your downloaded photos in the “Photos” or “Pictures” folder on your Mac, depending on your system settings.
Using the Photos app is a straightforward and quick way to download pictures from your iPhone to your Mac. However, keep in mind that it may take some time to transfer a large number of photos, depending on the file size and your internet connection speed.
Method 2: Using AirDrop
If you want to quickly and wirelessly transfer your photos from your iPhone to your Mac, AirDrop is the perfect solution. AirDrop allows you to share files between Apple devices seamlessly, without the need for any additional cables or software.
To use AirDrop, make sure that both your iPhone and Mac have AirDrop enabled. On your iPhone, swipe up from the bottom of the screen to open the Control Center and tap on the AirDrop icon. Select “Contacts Only” or “Everyone” to determine who can discover your device.
On your Mac, open Finder and click on “AirDrop” in the sidebar. Ensure that your Mac is discoverable by setting the “Allow me to be discovered by” option to “Contacts Only” or “Everyone” in the AirDrop settings.
Now, follow these steps to transfer photos from your iPhone to your Mac using AirDrop:
- On your iPhone, open the Photos app and select the photos you want to transfer.
- Tap the “Share” button, which looks like a square with an arrow pointing upwards.
- In the share sheet that appears, you’ll see a list of nearby AirDrop-enabled devices. Tap on your Mac’s name to send the photos.
- On your Mac, a notification will appear asking you to accept the incoming photos. Click “Accept” to start the transfer.
- The transferred photos will be saved in the Downloads folder on your Mac by default. You can then move them to a different folder if desired.
AirDrop provides a convenient and hassle-free way to transfer pictures from your iPhone to your Mac. It’s especially useful when you have a large number of photos to transfer or when you’re in a hurry.
Remember to disable AirDrop or set it to “Contacts Only” after successfully transferring your photos to ensure the privacy and security of your device.
Method 3: Using iCloud Photos
If you are an iPhone user and have iCloud Photos enabled on your device, you can easily download pictures from your iPhone to your Mac using the iCloud Photos feature. iCloud Photos allows you to store all your photos and videos in the cloud, making them accessible across all your Apple devices.
Here’s how you can download pictures from iPhone to Mac using iCloud Photos:
- On your iPhone, open the Settings app and tap on your name at the top to access your Apple ID settings.
- Select “iCloud” from the list of options.
- Tap on “Photos” and make sure the toggle switch for “iCloud Photos” is turned on.
- On your Mac, open the Photos app.
- In the top menu bar, click on “Photos” and select “Preferences”.
- In the “Preferences” window, click on the “iCloud” tab.
- Check the box next to “iCloud Photos” to enable it on your Mac.
- Click on the “Options” button next to “iCloud Photos”.
- In the “iCloud Photos Options” window, make sure the box next to “Download new photos and videos to my Mac” is checked.
- Click “Done” to save the changes.
Once you have enabled iCloud Photos on both your iPhone and Mac, the photos on your iPhone will automatically sync with the Photos app on your Mac. This means that any new photos you capture or import on your iPhone will be downloaded to your Mac.
To access the downloaded photos on your Mac, simply open the Photos app. The downloaded photos will be available in the “Photos” tab, organized by date and location.
Using iCloud Photos is a convenient way to keep your photos synchronized across your Apple devices. It allows you to access your photos from anywhere, anytime, as long as you have an internet connection.
Keep in mind that iCloud Photos uses your iCloud storage space, so make sure you have enough storage available or consider upgrading your iCloud storage plan if needed.
Method 4: Using iTunes
Another way to download pictures from your iPhone to your Mac is by using iTunes. iTunes is a powerful media management tool developed by Apple, and it allows you to sync your photos between your iPhone and Mac.
Before you begin, make sure you have the latest version of iTunes installed on your Mac. You can download it from the Apple website if needed. Once you have iTunes installed, follow the steps below to transfer your pictures:
- Connect your iPhone to your Mac using a USB cable. Launch iTunes if it doesn’t open automatically.
- On the iTunes interface, click on your iPhone’s icon located in the upper-left corner of the window.
- Click on the “Photos” tab in the left sidebar.
- Check the box next to “Sync Photos.”
- Choose the application or folder from which you want to sync your photos. You can select the “Photos” app or a specific folder on your Mac.
- Select the photo albums or folders you want to sync. You can choose to sync all albums or specific ones.
- Click on the “Apply” or “Sync” button located in the lower-right corner of the window. iTunes will start transferring the selected photos from your iPhone to your Mac.
- Wait for the sync process to complete. The time it takes will depend on the number of photos being transferred.
- Once the sync is finished, you can disconnect your iPhone from your Mac. The transferred photos will be available on your Mac in the designated folder or application.
Using iTunes to transfer photos from your iPhone to your Mac provides a convenient way to keep your photo library organized and up to date. However, it’s important to note that syncing your photos via iTunes will replace any existing photos on your Mac, so make sure to back up your files beforehand if necessary.
Additionally, keep in mind that iTunes also allows you to customize your photo sync preferences, including options to optimize photos for your Mac’s screen size or to include videos along with your photos.
Now that you know how to use iTunes to download pictures from your iPhone to your Mac, you can choose the method that suits your needs best. Whether it’s using the Photos app, AirDrop, iCloud Photos, or iTunes, you can easily transfer your precious memories and enjoy them on your Mac.
Additional Tips and Considerations
When downloading pictures from your iPhone to your Mac, there are a few additional tips and considerations to keep in mind. These will help ensure a smooth and efficient transfer process, as well as protect your data and maintain the quality of your images.
1. Keep your iPhone updated: Before attempting to download pictures, make sure your iPhone’s software is up to date. This will ensure compatibility with your Mac and any necessary apps or tools for the transfer process.
2. Check your storage capacity: Ensure that your Mac has enough available storage space to accommodate the pictures you want to download. If your Mac is running low on storage, consider freeing up space or using an external storage device.
3. Use a reliable connection: Connect your iPhone to your Mac using a reliable USB cable. This will ensure a stable and secure connection, minimizing the chance of interruptions during the transfer.
4. Organize your photos: Before initiating the transfer, consider organizing your photos on your iPhone. This can make it easier to locate and select the specific pictures you want to download.
5. Backup your iPhone: It’s always a good idea to create a backup of your iPhone before downloading pictures. This will protect your data in case of any unforeseen issues during the transfer process.
6. Delete unwanted pictures after the transfer: Once you have successfully downloaded the pictures to your Mac, consider deleting any unwanted or duplicate photos from your iPhone. This will help free up space and keep your photo library organized.
7. Ensure privacy and security: If you have sensitive or personal pictures on your iPhone, ensure that you have appropriate security measures in place. This can include using a passcode or enabling Touch ID/Face ID for added protection.
8. Take advantage of photo editing tools: After downloading the pictures to your Mac, take advantage of the various photo editing tools available. This will allow you to enhance the images, adjust brightness, crop, or apply filters as desired.
9. Keep an eye on battery levels: During the transfer process, it’s important to keep an eye on the battery levels of both your iPhone and your Mac. If either device is running low on battery, connect it to a power source to avoid any interruptions.
10. Check image formats: Different image formats may have different compatibility with your Mac. Before downloading pictures, make sure the formats are supported to avoid any issues with viewing or accessing the images.
By keeping these additional tips and considerations in mind, you can ensure a hassle-free process when downloading pictures from your iPhone to your Mac. Enjoy transferring and organizing your memories with ease!
Conclusion
Downloading pictures from your iPhone to your Mac is a simple and straightforward process that allows you to conveniently transfer and access your photos. Whether you choose to use the traditional method of connecting your iPhone to your Mac via a USB cable or utilize wireless methods such as iCloud or AirDrop, there are multiple options available to suit your preferences.
By following the steps outlined in this guide, you can easily transfer your pictures and enjoy them on your Mac, whether it’s to create backups, edit them using photo editing software, or share them with family and friends. Remember to choose the method that works best for you and is compatible with your devices.
Now that you have the knowledge and tools to download pictures from your iPhone to your Mac, you can effortlessly manage and organize your photo library. Embrace the convenience and versatility of technology to enhance your digital photo experience.
FAQs
1. Can I download pictures from my iPhone to a Mac?
Absolutely! You can easily transfer pictures from your iPhone to a Mac using various methods. In this article, we will guide you through the process of downloading pictures from your iPhone to a Mac.
2. What are the different methods to download pictures from iPhone to Mac?
There are several methods to transfer pictures from your iPhone to a Mac. You can use a USB cable, iCloud Photo Library, AirDrop, or third-party software like iMazing or AnyTrans. Each method has its own advantages, and we will explore them in detail.
3. How do I transfer pictures using a USB cable?
To transfer pictures from your iPhone to a Mac using a USB cable, simply connect your iPhone to the Mac using the cable. Open the Photos app on your Mac, and your iPhone will appear as a device in the sidebar. Click on your iPhone, select the pictures you want to download, and click on the “Import” button.
4. Can I download pictures from my iPhone to a Mac using iCloud?
Yes, you can use iCloud Photo Library to sync and download pictures from your iPhone to a Mac. Ensure that iCloud Photo Library is enabled on both your iPhone and Mac. The photos will automatically sync, and you can access them through the Photos app on your Mac.
5. Are there any third-party software options to download pictures from iPhone to Mac?
Yes, there are third-party software options like iMazing and AnyTrans that offer additional features and flexibility when it comes to transferring pictures from your iPhone to a Mac. These tools enable you to selectively transfer photos, manage albums, and even transfer other types of files between your devices.