
Are you looking for a way to keep your sensitive notes secure on your iPhone? Look no further! In this comprehensive guide, we will show you how to lock notes on your iPhone, ensuring that your private information stays protected. Whether it’s personal thoughts, passwords, or important reminders, locking your notes adds an additional layer of security to keep them away from prying eyes.
With the built-in Notes app on your iPhone, you can easily lock individual notes with a passcode or using Touch ID or Face ID. We will walk you through the step-by-step process, highlighting the different methods available to secure your notes effectively. So, let’s dive in and discover how you can keep your digital notes private and safeguarded on your iPhone.
Inside This Article
- Enable Notes Lock Feature
- Setting up a Lock Password for Notes
- Locking Individual Notes
- Changing or Removing the Notes Lock Password
- Conclusion
- FAQs
Enable Notes Lock Feature
Ensuring the privacy and security of your sensitive information is of utmost importance, especially when it comes to personal notes on your iPhone. To protect your notes from prying eyes, Apple has introduced a built-in feature that allows you to enable a password or biometric authentication to lock your notes. Follow the steps below to activate this invaluable security feature:
1. Open the “Settings” app on your iPhone and scroll down to find the “Notes” option. Tap on it to access the Notes settings.
2. Inside the Notes settings, you will see the “Password” section. Tap on it to continue.
3. You will be prompted to enter your Apple ID password for security purposes. Once you’ve entered your password, you will be taken to the “Notes Password” page.
4. On the “Notes Password” page, tap on the “Enable Password” option. This will allow you to set a password for accessing your locked notes.
5. Enter a strong and memorable password in the “Password” field. Make sure it is a unique combination of letters, numbers, and symbols to enhance its security.
6. In the “Verify” field, re-enter the password to confirm it. Ensure that both the entries match before proceeding.
7. Optionally, you can add a hint for your password in the “Password Hint” field. This hint will assist you in remembering the password, but make sure it’s not too obvious to others.
8. Once you’ve set the password and hint, tap on the “Done” button in the top-right corner to save your settings.
Congratulations! You have successfully enabled the Notes lock feature on your iPhone. From now on, whenever you try to access your locked notes, you will be required to enter the password you’ve set.
Note: Enabling the Notes lock feature will also secure your notes in other Apple devices linked to your iCloud account, providing a seamless and secure experience across devices.
Setting up a Lock Password for Notes
Securing your notes on iPhone is paramount to protect your sensitive information. Fortunately, Apple provides a seamless solution by allowing you to set up a lock password for your notes. This feature ensures that only you can access the content, keeping your personal and confidential data safe from prying eyes.
To enable the notes password, follow these simple steps:
- Open the Notes app on your iPhone.
- Tap on the “Settings” icon located at the top right corner of the app.
- From the menu, select “Notes Password” to proceed.
- Tap on “Set Password” to create a new password for your notes.
- Enter a strong and memorable password of your choice. Make sure it is lengthy, combining uppercase and lowercase letters, numbers, and special characters.
- Confirm your password by entering it again.
- Optionally, you can provide a hint as a reminder of your password. This can be helpful if you tend to forget passwords.
- Once the password is set, you will need to verify your identity using Face ID, Touch ID, or the device passcode whenever you access locked notes.
It’s worth noting that this password will be used to unlock all your locked notes on iPhone, so make sure to choose a password that is not only strong but also easy for you to remember.
With your notes password set up, you can rest easy knowing that your confidential information is protected. Whether it’s personal thoughts, financial details, or important work-related information, your notes are safeguarded against unauthorized access.
Locking Individual Notes
Locking individual notes on your iPhone adds an extra layer of security and ensures that only you have access to your private information. Whether you want to protect personal thoughts, sensitive information, or any other confidential data, locking individual notes is a simple yet effective way to keep them safe.
Follow these steps to lock individual notes on your iPhone:
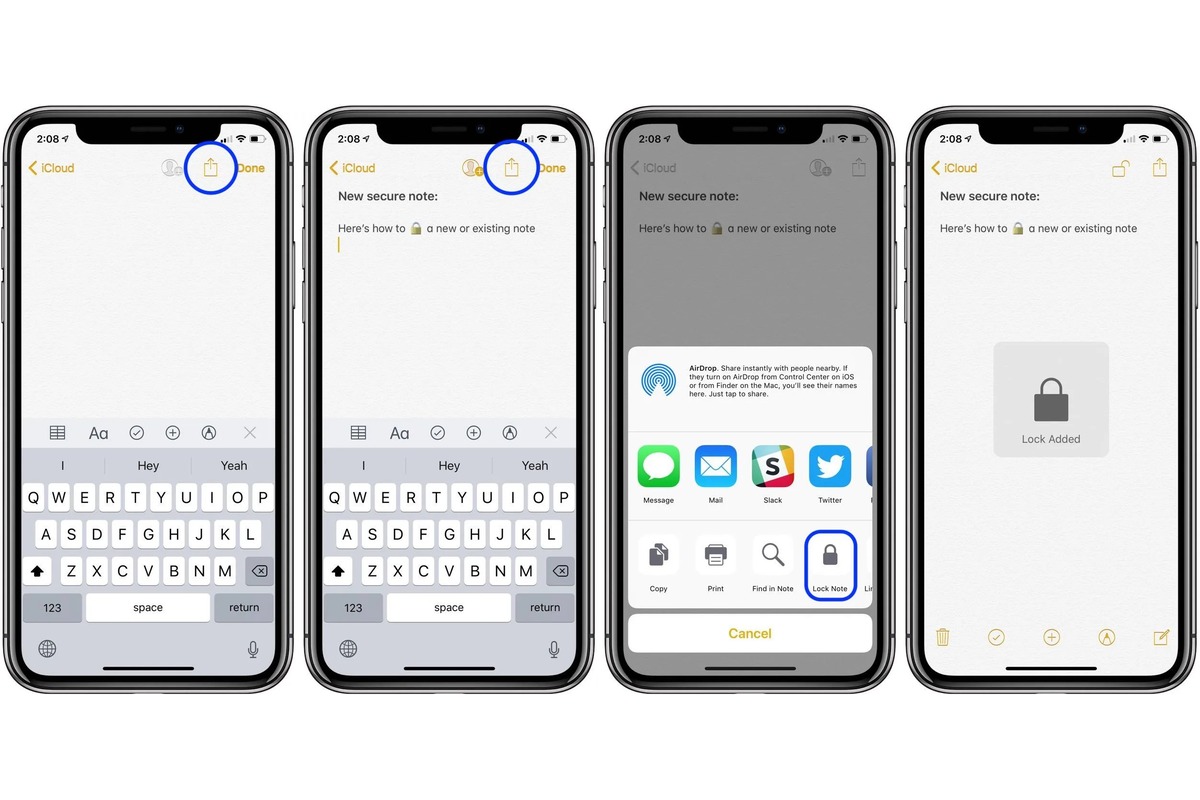
- Open the Notes app on your iPhone.
- Choose the note you want to lock by tapping on it.
- Tap the share icon located in the upper-right corner of the screen.
- From the available options, select “Lock Note.”
- If you haven’t already set up a password for your notes, you will be prompted to create one.
- Enter the desired password, confirm it, and add a hint to help you remember it (optional).
- Once the password is set, the note will be locked, and you can see a lock icon next to its title.
- To unlock the note, tap on it, enter the password, and it will become accessible.
Remember to choose a strong and unique password to ensure the highest level of security. Avoid using easily guessable passwords and consider using a combination of uppercase and lowercase letters, numbers, and special characters.
By locking individual notes, you can rest assured that your private information stays protected, even if someone gains access to your iPhone.
Changing or Removing the Notes Lock Password
If you’ve previously set up a password to protect your notes on iPhone, but now want to change or remove it, you can easily do so. Whether it’s because you want to create a new, stronger password or you simply no longer feel the need for the extra security measure, the process is straightforward. Here’s how you can change or remove the lock password for your iPhone notes.
To change the notes lock password, follow these steps:
- Launch the “Settings” app on your iPhone.
- Scroll down and tap on “Notes”.
- Select “Password”.
- Enter your current password when prompted.
- Tap on “Change Password”.
- Enter your current password again.
- Now, enter your new password.
- Confirm your new password by entering it again.
- Tap on “Done”.
If you want to remove the notes lock password completely, follow these steps:
- Go to the “Settings” app on your iPhone.
- Scroll down and tap on “Notes”.
- Select “Password”.
- Enter your current password.
- Tap on “Turn Off Password”.
- Confirm your selection by entering your password again.
- Your notes lock password will now be removed, and you will no longer need a password to access your notes.
Note that when you remove the notes lock password, all your existing locked notes will be unlocked, and anyone with access to your iPhone will be able to view them. Therefore, it is important to consider the implications before removing the lock password from your notes.
By following these steps, you can easily change or remove the notes lock password on your iPhone. Whether you want to enhance security or simplify the access to your notes, these options provide you with the flexibility to protect your privacy in a way that suits your needs.
Conclusion
Locking notes on your iPhone is a simple yet effective way to protect your sensitive information. Whether it’s personal thoughts, important passwords, or confidential details, utilizing the built-in Notes app’s locking feature ensures that only you have access to them.
In this article, we’ve explored the step-by-step process of locking notes on your iPhone, providing you with both convenience and security. By following these instructions, you can confidently safeguard your private notes from prying eyes.
Remember to regularly update your iPhone and Notes app to take advantage of the latest security features and bug fixes. Additionally, consider using a strong passcode or Touch ID/Face ID for added protection.
With the ability to lock your notes, you can now keep your important information truly secure on your iPhone, giving you peace of mind in this digital age.
FAQs
1. Can I lock notes on my iPhone?
Yes, you can lock notes on your iPhone. The Notes app on iPhone allows you to protect your private information by adding a password or using biometric authentication.
2. How do I lock notes on iPhone?
To lock notes on iPhone, follow these steps:
– Open the Notes app on your iPhone.
– Tap on the note you want to lock.
– Tap on the share icon at the top-right corner of the screen.
– Select “Lock Note” from the share options.
– Enter a password or use Touch ID/Face ID to secure the note.
– Once locked, you can only access the note with the password or biometric authentication.
3. Can I unlock a locked note on iPhone?
Yes, you can unlock a locked note on iPhone by following these steps:
– Open the Notes app on your iPhone.
– Find the locked note you want to unlock.
– Tap on the note to open it.
– You will be prompted to enter the password or use Touch ID/Face ID to unlock the note.
– Once unlocked, you can view and edit the note as before.
4. What if I forget the password for a locked note on iPhone?
If you forget the password for a locked note on iPhone, unfortunately, there is no way to recover or reset the password. You will permanently lose access to the locked note and its contents. It is important to remember your password or enable Touch ID/Face ID for easy unlocking.
5. Can I lock all my notes on iPhone at once?
Unfortunately, you cannot lock all your notes on iPhone at once. You need to individually lock each note that contains sensitive information. However, you can rearrange notes within the Notes app by creating folders, making it easier to manage and locate locked notes.