
Are you tired of sifting through a long list of voice memos on your iPhone to find the one you need? Wouldn’t it be great if you could organize your voice memos based on location? Well, good news! In this article, we will take you through a step-by-step guide on how to save a voice memo on an iPhone by location. Whether you’re a business professional who wants to categorize memos based on different client meetings or a traveler who wants to keep track of important notes in specific destinations, this feature can be incredibly useful. By the end of this article, you’ll be able to easily save and find your voice memos based on their corresponding locations, making your life a whole lot easier. So, let’s get started!
Inside This Article
- Overview
- Step 1: Enable Location Services for Voice Memos
- Step 2: Recording a Voice Memo with Location
- Step 3: Saving a Voice Memo by Location
- Troubleshooting: Common Issues and Solutions
- Conclusion
- FAQs
Overview
When it comes to saving voice memos on an iPhone, one convenient feature is the ability to save them by location. This means that you can assign a specific location to a voice memo, making it easier to access and organize your recordings. This feature can be incredibly useful for a variety of purposes, such as cataloging important notes from meetings or attaching voice reminders to specific locations.
In order to save a voice memo by location on your iPhone, there are a few steps you need to follow. First, you’ll need to enable Location Services on your device, which allows your iPhone to determine its location. Then, you can simply record a voice memo using the Voice Memos app. Once the recording is complete, you can save it with its corresponding location, making it easy to locate and listen to later on.
In this article, we will guide you through the process of saving a voice memo on an iPhone by location. Whether you’re a business professional looking to organize your meeting notes, a student wanting to attach voice reminders to specific study locations, or simply someone who wants to keep their voice memos well-organized, this article will provide you with all the information you need.
Step 1: Enable Location Services for Voice Memos
Location Services is a crucial feature on your iPhone that allows apps to access your device’s location information. To save a voice memo by location, you need to ensure that Location Services is enabled for the Voice Memos app. Here are two options to enable Location Services:
Option 1: Using Settings
1. Open the “Settings” app on your iPhone.
2. Scroll down and tap on “Privacy.”
3. Select “Location Services” from the list.
4. Scroll down and find “Voice Memos.”
5. Tap on “While Using the App” or “Always” depending on your preference. “While Using the App” allows the Voice Memos app to access your location only when the app is open and active, while “Always” grants continuous access even when the app is running in the background.
6. Exit the Settings app and proceed to the next step to start recording a voice memo.
Option 2: Prompt for Location
1. Open the Voice Memos app on your iPhone.
2. When prompted to enable location access, tap on “Allow While Using App” or “Allow Once.” Choosing “Allow While Using App” will grant location permission whenever you’re using the Voice Memos app. “Allow Once” provides location access for the current session only.
3. If you didn’t receive a location prompt upon opening the app, don’t worry. You can enable location access manually by following the steps for Option 1 above.
By enabling Location Services for the Voice Memos app, you ensure that your iPhone can tag your voice memos with the location where they were recorded. This makes it easier to organize and locate your voice memos based on the places they were recorded.
Step 2: Recording a Voice Memo with Location
When it comes to recording a voice memo on your iPhone, you have the option to add location information during or after the recording process. Here are the two options available:
Option 1: Adding Location during Recording
If you want to include location data while recording a voice memo, follow these steps:
- Open the Voice Memos app on your iPhone. It’s a gray icon with a waveform symbol.
- Tap the red record button to start recording your voice memo.
- While recording, tap the “…” (three dots) button.
- Select “Add Location” from the options menu.
- A map will appear with a pin indicating your current location. You can move the pin to adjust the location if needed.
- Tap “Done” to save the voice memo with the added location.
By using this option, your voice memo will be automatically tagged with the location where it was recorded.
Option 2: Adding Location after Recording
If you forgot to add location information during the recording process or changed your mind, don’t worry. You can still add or edit the location data after recording the voice memo. Just follow these steps:
- Open the Voice Memos app on your iPhone.
- Select the voice memo you want to add or edit the location for.
- Tap the “…” (three dots) button to access more options.
- Choose “Edit Recording” from the menu.
- Tap the “…” (three dots) button again.
- Select “Add Location” to add a location or “Edit Location” to modify the existing location.
- Adjust the location by moving the pin on the map if necessary.
- Tap “Done” to save the changes to the voice memo.
With this option, you have the flexibility to add or modify the location information even after the recording is complete.
Step 3: Saving a Voice Memo by Location
Once you have recorded a voice memo on your iPhone, you have the option to save it by location. This feature allows you to easily retrieve and organize your voice memos based on where they were recorded. There are two options available for saving a voice memo by location: saving from the Voice Memos app or saving from the Location History.
Option 1: Saving from the Voice Memos App
To save a voice memo by location from the Voice Memos app, follow these steps:
- Open the Voice Memos app on your iPhone. It is a native app that comes pre-installed on all iPhones.
- Select the voice memo that you want to save by location. You can scroll through your list of voice memos to find the one you want to save.
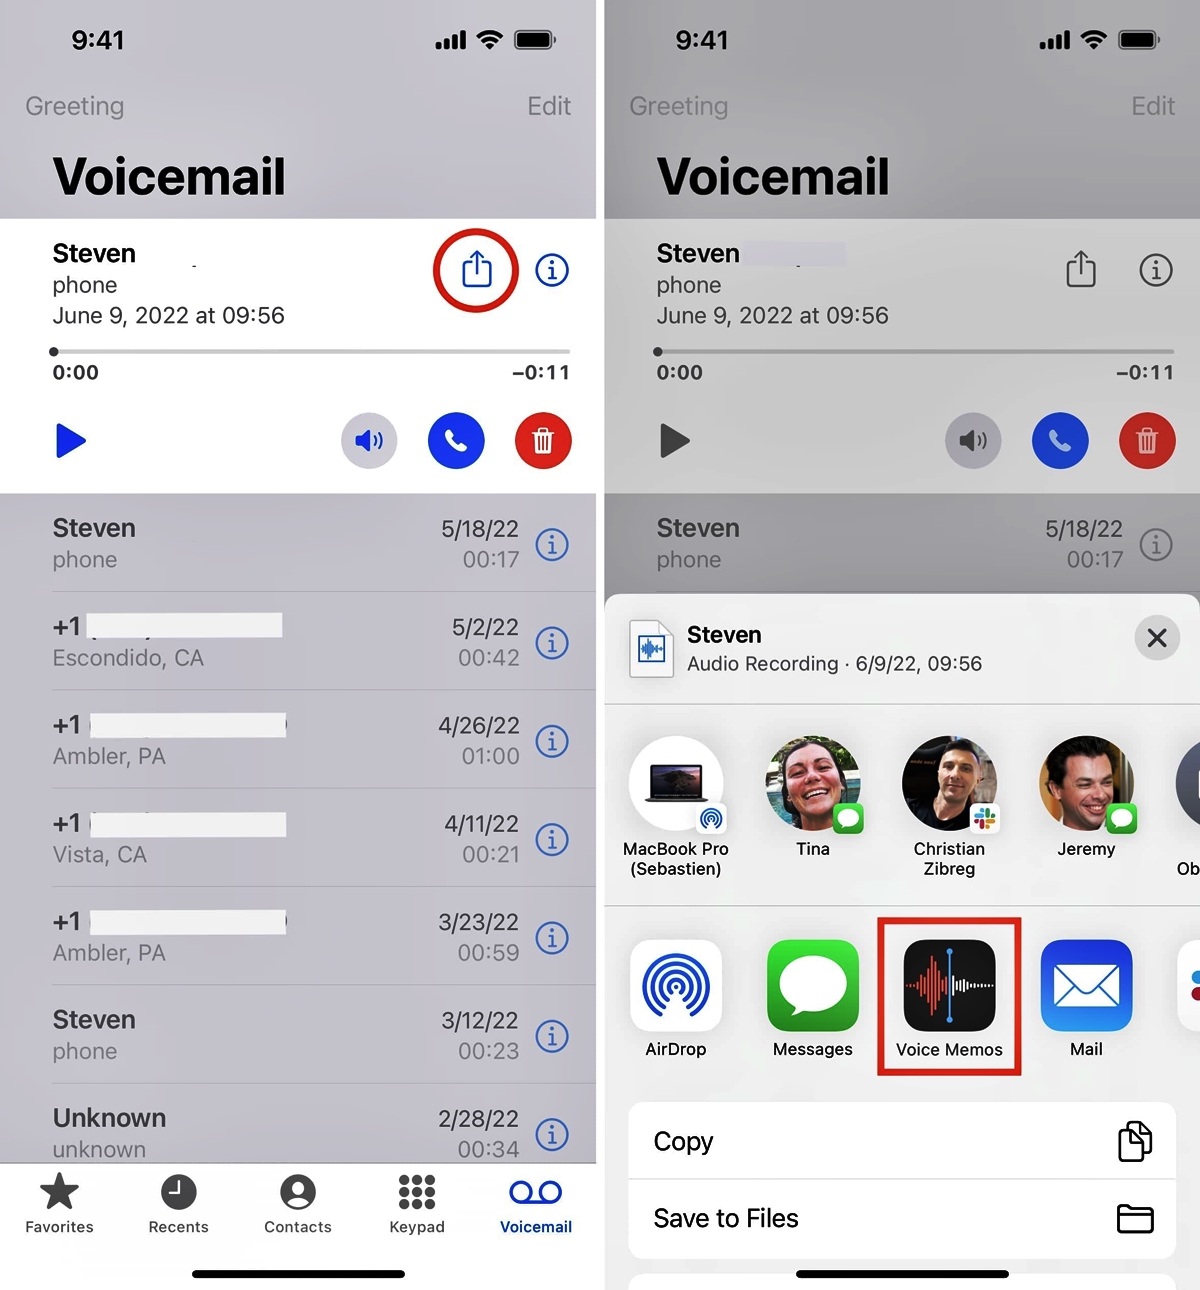
- Tap on the “More” button (represented by three dots) located at the bottom-right corner of the screen. A menu will pop up with various options.
- From the menu, select “Share” and then choose “Save to Files”.
- In the Save to Files menu, you can choose the folder where you want to save the voice memo. If you don’t have a specific folder in mind, you can select “On My iPhone” to save it locally.
- Tap on “Add” to save the voice memo to the chosen location.
Option 2: Saving from the Location History
If you have Location Services enabled on your iPhone and you want to save a voice memo to a specific location, you can utilize the Location History feature. Here’s how:
- Open the Voice Memos app on your iPhone.
- Select the voice memo you want to save to a specific location.
- Tap on the “More” button (represented by three dots) located at the bottom-right corner of the screen.
- From the menu that appears, select “Add to Location”.
- A map will open, displaying your current location. To select a different location, you can search for it using the search bar at the top or simply zoom in and out on the map.
- Once you have found the desired location, tap on it to set it as the location for the voice memo. The pin on the map will indicate the selected location.
- Tap “Save” to save the voice memo with the chosen location.
By saving a voice memo by location, you can easily access and organize your recordings based on specific places. Whether it’s for work, personal use, or for capturing memorable moments during your travels, this feature makes it convenient to find and listen to your voice memos based on where you made them. Now you can keep your recordings organized and never misplace an important voice memo again.
Troubleshooting: Common Issues and Solutions
When it comes to technology, it’s not uncommon to encounter issues or glitches. Cell phones, including iPhones, are no exception. Fortunately, many common issues can be easily resolved with some simple troubleshooting steps. In this article, we will explore some of the most common issues that iPhone users might face and provide detailed solutions to help you get your device back on track.
1. Frozen Screen: One common issue is when your iPhone screen becomes unresponsive or frozen. To fix this, try pressing and holding the power and home buttons simultaneously for about 10 seconds until you see the Apple logo. This will force a restart of your device and should resolve the frozen screen issue.
2. Battery Drain: If you notice that your iPhone’s battery is draining quickly, there are a few possible culprits. First, check if there are any apps running in the background and close them. Additionally, adjust the brightness level and disable unnecessary features like push email or background app refresh. If the issue persists, you may need to recalibrate your battery by letting it drain completely, then fully charging it again.
3. Wi-Fi Connectivity: Having trouble connecting to Wi-Fi or experiencing frequent disconnections can be frustrating. First, make sure that your Wi-Fi is enabled and that you are within range of a stable network. If the issue persists, try restarting your router or resetting your network settings on your iPhone. You can do this by going to Settings > General > Reset > Reset Network Settings.
4. App Crashes: Apps occasionally crash for various reasons. If you experience app crashes, the first step is to fully close the app and reopen it. If the problem persists, check for any available updates for the app in the App Store and install them. If none of these steps work, you can try deleting and reinstalling the app.
5. No Sound: If you’re having trouble with sound on your iPhone, start by checking if the volume is turned up and the silent mode is disabled. Make sure that the ringer switch on the side of your device is not engaged. If the problem persists, go to Settings > Sounds & Haptics, and check if the settings are properly configured.
6. Unresponsive Touchscreen: If the touchscreen on your iPhone is not responding, try cleaning it with a lint-free cloth and make sure your hands are clean and dry. If that doesn’t work, try restarting your device by pressing and holding the power button until the “Slide to power off” message appears. Slide to power off and then turn your iPhone back on.
7. Poor Performance: If your iPhone is running slowly or lagging, there are a few steps you can take. First, make sure that your device has the latest software update. You should also clear your device’s cache by closing unused apps and restarting it. If the problem persists, consider resetting your device to its factory settings, but make sure to back up your data first.
8. Unable to Update or Install Apps: If you’re having trouble updating or installing apps from the App Store, start by checking your internet connection. If that’s not the issue, try signing out of your Apple ID and signing back in. You can also try resetting the App Store cache by going to Settings > iTunes & App Store > Your Apple ID and tapping on “Sign Out.” After signing back in, try updating or installing the app again.
9. No Service or Weak Signal: If you’re experiencing no service or a weak cellular signal, check if there are any known outages in your area. If not, try toggling airplane mode on and off or resetting your network settings. In some cases, you may need to contact your service provider for further assistance.
10. Overheating: If your iPhone becomes unusually hot, it’s important to address the issue promptly. First, remove any protective case as it may be trapping heat. Additionally, close any unnecessary apps and avoid using the device while it’s charging. If the problem persists, consider taking your iPhone to an authorized service center for further diagnosis.
By following these troubleshooting steps, you should be able to resolve many common issues with your iPhone. However, if you continue to experience persistent issues, it’s recommended to reach out to Apple support or visit an authorized service center for more advanced assistance.
Conclusion
In conclusion, saving a voice memo on an iPhone by location can be a useful feature that allows you to easily organize and access your recordings. By using location-based reminders or tagging your voice memos with specific locations, you can quickly find and listen to the recordings you need, whether it’s a note about an important meeting or a creative idea that struck you while on the go.
With the simplicity and convenience of this feature, you can save time and effort in searching for specific voice memos. Take advantage of the location-based saving functionality on your iPhone and enjoy a more streamlined and efficient way of managing your recordings.
So, start exploring this feature today, make the most out of your voice memos, and elevate your productivity to new heights!
FAQs
Q: Can I save a voice memo on my iPhone by location?
Yes, you can save a voice memo on your iPhone by location. The iPhone has a built-in feature that allows you to add location information to your voice memos, making it easier for you to organize and find them later.
Q: How do I save a voice memo by location on my iPhone?
To save a voice memo by location on your iPhone, follow these steps:
- Open the Voice Memos app on your iPhone.
- Select the voice memo you want to save by location.
- Tap on the “More Options” (three-dot) button next to the voice memo.
- Choose “Edit Recording” from the menu.
- Scroll down and tap on “Location” to add location information to the voice memo.
- Choose whether you want to use your current location or search for a specific location.
- Save the changes and your voice memo will be saved with location information.
Q: How can I find a voice memo based on its location?
To find a voice memo based on its location on your iPhone, you can use the Search feature in the Voice Memos app. Here’s what you need to do:
- Open the Voice Memos app on your iPhone.
- Tap on the search bar at the top of the screen.
- Type in the location or address you want to search for.
- Tap on the voice memo you want to play or view.
Q: Can I save voice memos by location using third-party apps?
Yes, there are third-party apps available on the App Store that allow you to save voice memos by location. These apps often provide additional features and customization options for organizing and managing your voice memos based on their location.
Q: Is it possible to transfer voice memos with location information to a computer?
Yes, you can transfer voice memos with location information from your iPhone to a computer using various methods. You can use iTunes, iCloud, or third-party software like iExplorer or iMazing to transfer the voice memos along with their location metadata to your computer.