
Are you tired of your iPhone automatically filling in forms with information that you no longer need? Autofill can be a convenient feature, but sometimes it can get in the way or contain outdated information. In this article, we will guide you on how to remove autofill on your iPhone. Whether it’s clearing specific form data or disabling autofill altogether, we’ve got you covered. Say goodbye to accidentally selecting the wrong name, address, or password from your autofill suggestions. By the end of this article, you will have the knowledge and tools to take control of your iPhone’s autofill feature and ensure that your browsing and form-filling experiences are streamlined and up-to-date.
Inside This Article
- Disabling Autofill for Safari
- Clearing Autofill Data
- Managing Autofill for Passwords
- Disabling Autofill for Apps
- Conclusion
- FAQs
Disabling Autofill for Safari
Autofill is a convenient feature that allows Safari, the default web browser on your iPhone, to automatically fill in your personal information, such as passwords, usernames, and contact details. However, there may be situations where you want to disable autofill on your iPhone for privacy or security reasons. Fortunately, disabling autofill in Safari is a straightforward process.
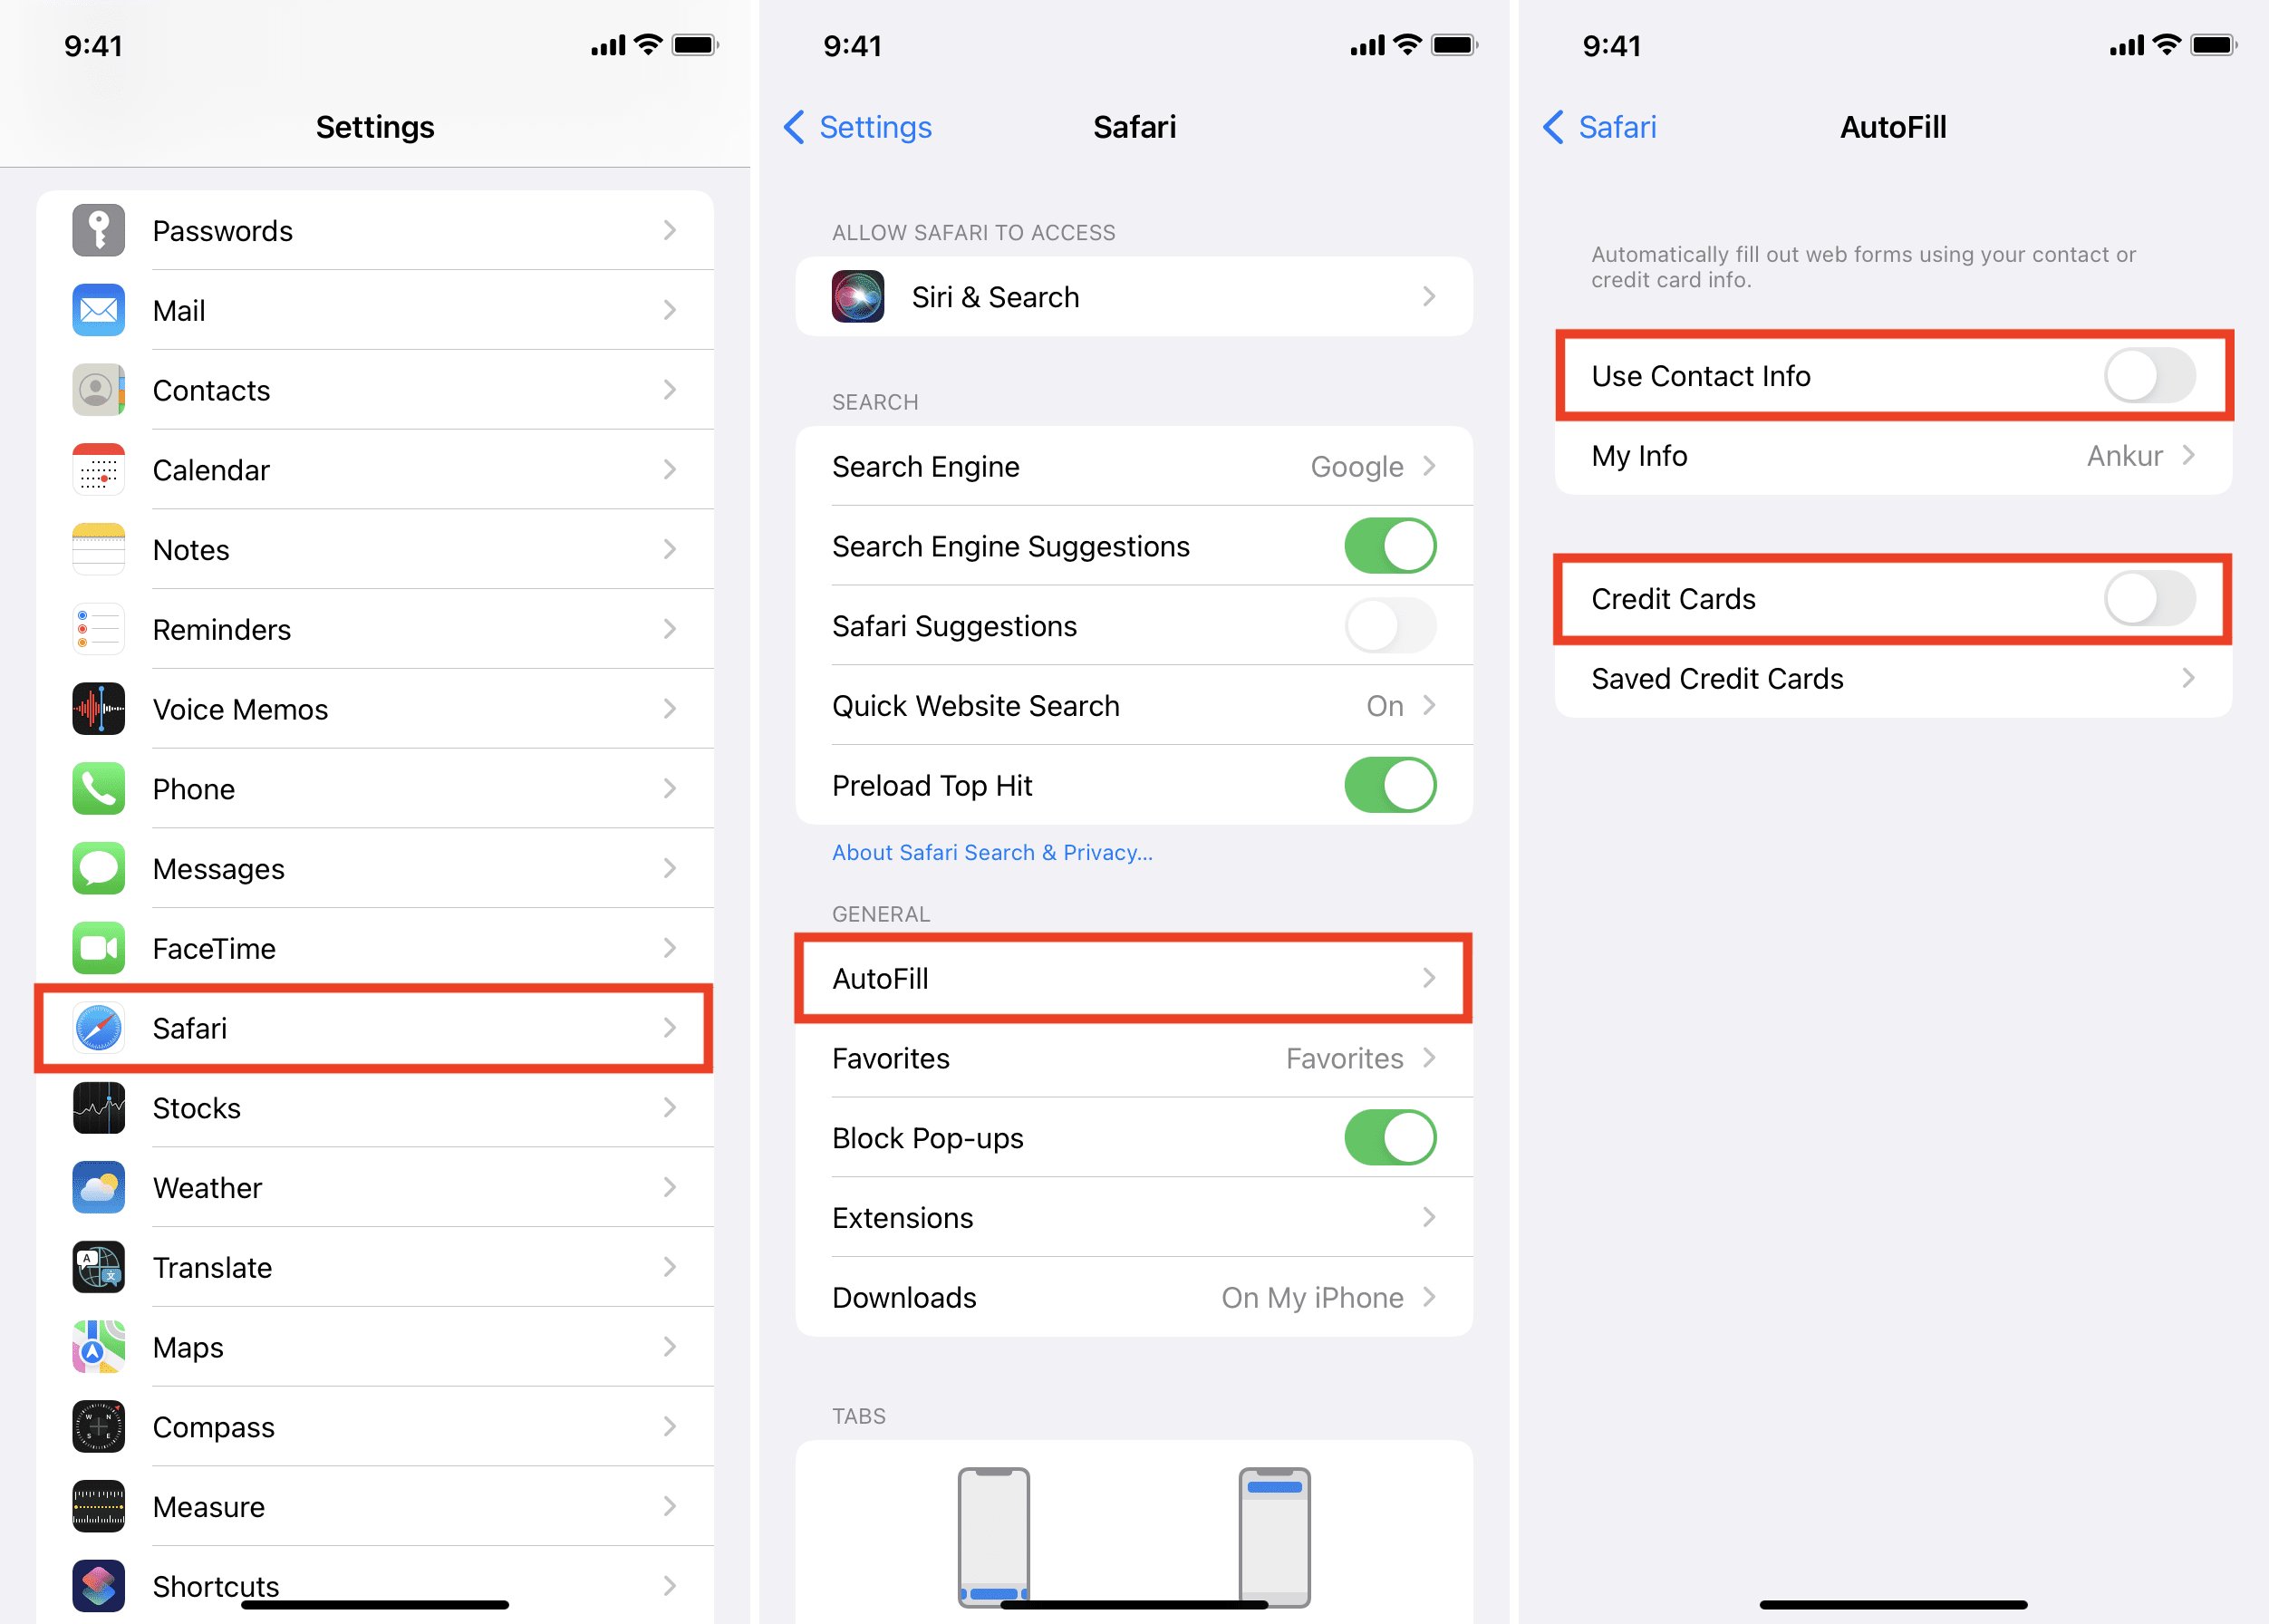
To disable autofill for Safari on your iPhone, follow these steps:
- Open the Settings app on your iPhone.
- Scroll down and tap on “Safari.”
- In the Safari settings, scroll down to the “General” section.
- Tap on “Autofill.
- Toggle off the switch next to “Use Contact Info” to disable autofill for contact details.
- Toggle off the switch next to “Names and Passwords” to disable autofill for usernames and passwords.
By following these steps, you can easily disable autofill for Safari on your iPhone. This will prevent Safari from automatically filling in your personal information when you browse the web.
Clearing Autofill Data
Autofill is a convenient feature on your iPhone that automatically fills in your personal information, such as your name, address, and payment details, when you are filling out forms online. While this can save you time, there may be occasions when you want to clear the autofill data from your device. Here’s how you can do it:
- Open the Settings app. Launch the Settings app on your iPhone, which is represented by a gear icon on your home screen.
- Scroll down and tap on Safari. In the settings menu, scroll down until you find the Safari option.
- Tap on Autofill. Inside the Safari settings, locate the Autofill section.
- Tap on “Saved Credit Cards”. To clear the autofill data related to credit card information, tap on the “Saved Credit Cards” option. This will show you a list of all the saved credit cards on your device.
- Swipe left on the credit card you want to remove. Locate the credit card you want to remove from the autofill data and swipe left on it. This will reveal the “Delete” button.
- Tap on Delete. Once the “Delete” button appears, tap on it to remove the credit card information from your autofill data.
- Tap on “Clear All” to remove all saved credit cards. If you want to clear all the saved credit cards from your device, tap on the “Clear All” option at the top right corner of the screen.
- Clear other autofill data. To clear other types of autofill data, such as your name, address, or passwords, go back to the Autofill section in Safari settings and tap on the relevant options. You will have the choice to either edit or remove the information.
That’s it! You have successfully cleared the autofill data on your iPhone. Keep in mind that clearing autofill data will remove the information from your device, and you will have to manually enter the details again when filling out forms in the future.
Managing Autofill for Passwords
Autofill for passwords is a convenient feature on the iPhone that allows you to effortlessly save and fill in your login details for websites and apps. However, there may be instances where you want to manage or disable this feature. Fortunately, iOS provides tools to help you effectively manage autofill for passwords.
To get started, open the Settings app on your iPhone and scroll down to find the “Passwords” option. Tap on it, and you will be presented with a list of saved passwords.
If you want to view or edit a specific password, simply find the website or app in the list and tap on it. You may be prompted to authenticate with Touch ID, Face ID, or your device passcode to ensure the security of your saved passwords.
Inside the password details, you can choose to view the password, update or delete it, or even add a new password manually. This gives you complete control over the passwords saved for autofill.
If you wish to disable autofill for passwords entirely, you can do so by going back to the main Passwords screen and toggling off the “Autofill Passwords” option. This will prevent your iPhone from automatically filling in passwords for websites and apps.
It’s also worth noting that you can customize which apps and websites can access your saved passwords. Simply tap on the “Website & App Passwords” option and you will see a list of all the passwords stored on your iPhone.
From here, you can manually select individual passwords and enable or disable their autofill capabilities. This level of control allows you to fine-tune autofill for different apps and websites based on your preferences.
Additionally, iOS provides an option to enable or disable the “Strong Passwords” feature. When creating a new account or changing a password, iOS can suggest a strong, unique password for you. If you find this feature helpful, keep it enabled. Otherwise, you can disable it on the main Passwords screen.
By effectively managing autofill for passwords on your iPhone, you can maintain better control and security over your sensitive login information. Whether you want to update, delete, or disable autofill entirely, iOS provides the necessary tools to help you manage this feature according to your preferences.
Disabling Autofill for Apps
Autofill is a convenient feature that saves time by automatically filling in forms and login information on your iPhone. However, there may be times when you prefer to disable autofill for certain apps. Here’s how you can do it:
1. Open Settings: Launch the Settings app on your iPhone, which can be found on your home screen.
2. Navigate to Passwords & Accounts: Scroll down and tap on “Passwords & Accounts” to access the settings related to your autofill preferences.
3. Select AutoFill: In the “Passwords & Accounts” section, tap on “AutoFill” to configure the autofill settings for your apps.
4. Disable App Autofill: Under the “Enable AutoFill” section, you will find a list of apps that support autofill. To disable autofill for a specific app, simply toggle the switch off next to its name. This will prevent the app from using autofill for forms and login information.
5. Enable App Autofill: If you ever change your mind and want to re-enable autofill for an app, you can simply toggle the switch back on next to its name in the “Enable AutoFill” section.
6. Repeat for Other Apps: You can repeat the process for other apps on your iPhone. By individually managing autofill settings for each app, you have complete control over which apps can use autofill and which ones cannot.
Disabling autofill for certain apps can help protect your privacy and prevent accidental form entries. It also gives you more control over your autofill preferences, allowing you to customize the feature according to your needs.
Keep in mind that disabling autofill for an app will not affect other autofill settings, such as Safari autofill or password autofill. Each app on your iPhone has its own autofill settings that can be managed independently.
Conclusion
In conclusion, removing the autofill feature on your iPhone is a simple process that can help protect your privacy and prevent any unwanted information from being automatically filled in forms. By following the steps outlined above, you can easily disable autofill for specific apps or completely turn it off for all apps on your device.
Whether you want to disable autofill for your contact details, passwords, or credit card information, the settings are easily accessible in your iPhone’s settings menu. Remember to regularly review and update your autofill settings to ensure that your private information remains secure.
Now that you know how to remove autofill on your iPhone, you can take control over the information that your device automatically fills in. By customizing the autofill settings to your preferences, you can streamline your browsing experience and maintain control over your personal information.
FAQs
Frequently Asked Questions About Removing Autofill on iPhone
Q: Can I remove autofill on my iPhone?
A: Yes, you can remove autofill on your iPhone. Apple provides a built-in autofill feature that saves your personal information, such as addresses and payment details, to make filling out forms and making purchases more convenient. However, if you no longer want your information to be automatically filled in, you can easily disable the autofill feature in your iPhone’s settings.
Q: How do I disable autofill on my iPhone?
A: To disable autofill on your iPhone, go to the Settings app, scroll down and tap on “Safari,” then tap on “Autofill.” From there, you can turn off the toggles for “Use Contact Info” and “Credit Cards” to stop your personal information from being automatically filled in on websites and forms.
Q: Will disabling autofill delete my saved information?
A: No, disabling autofill on your iPhone will not delete your saved information. It will simply prevent your information from being automatically filled in on websites and forms. Your saved information will still be available in your settings, and you can enable autofill again anytime you want.
Q: Can I remove specific autofill entries on my iPhone?
A: Yes, you can remove specific autofill entries on your iPhone. To do this, go to the Settings app, scroll down and tap on “Safari,” then tap on “Autofill.” Under the “Saved Credit Cards” section, you can tap on “Saved Credit Cards” to view and edit your saved credit card information. You can then swipe left on any entry and tap on “Delete” to remove it from autofill.
Q: Is there a way to clear all autofill entries at once on my iPhone?
A: Yes, you can clear all autofill entries at once on your iPhone. To do this, go to the Settings app, scroll down and tap on “Safari,” then tap on “Autofill.” Under the “Saved Credit Cards” section, you can tap on “Saved Credit Cards” to view and edit your saved credit card information. From there, you can tap on “Edit” in the top right corner and select “Delete All” to clear all saved credit cards from autofill.