
Are you tired of your iPhone automatically filling in the wrong information when you’re trying to fill out forms or enter details? Don’t worry – you’re not alone. Autofill on the iPhone can be a convenient feature, but it doesn’t always get it right. Whether it’s suggesting the wrong email address, using outdated information, or filling in the wrong form fields, dealing with autofill errors can be frustrating.
In this article, we’ll show you step-by-step how to change autofill on your iPhone. Whether you want to update your personal information, manage saved passwords, or control autofill for specific websites, we’ve got you covered. Say goodbye to those pesky autofill mistakes and regain control over your data entry. Let’s dive in and discover how to fine-tune autofill settings on your iPhone!
Inside This Article
- Steps to Change Autofill on iPhone
- Method 1: Changing Autofill Settings in Safari
- Method 2: Changing Autofill Settings in Passwords & Accounts
- Method 3: Changing Autofill Settings in Keyboard Settings
- Conclusion
- FAQs
Steps to Change Autofill on iPhone
Autofill is a convenient feature on the iPhone that automatically fills in information like usernames, passwords, and addresses when you’re filling out forms or logging into websites. However, there may be instances when you want to change the autofill settings on your iPhone. Whether you want to update your contact information or remove certain saved data, here are a few methods to change autofill on your iPhone.
Method 1: Changing Autofill Settings in Safari
To change autofill settings in Safari, follow these steps:
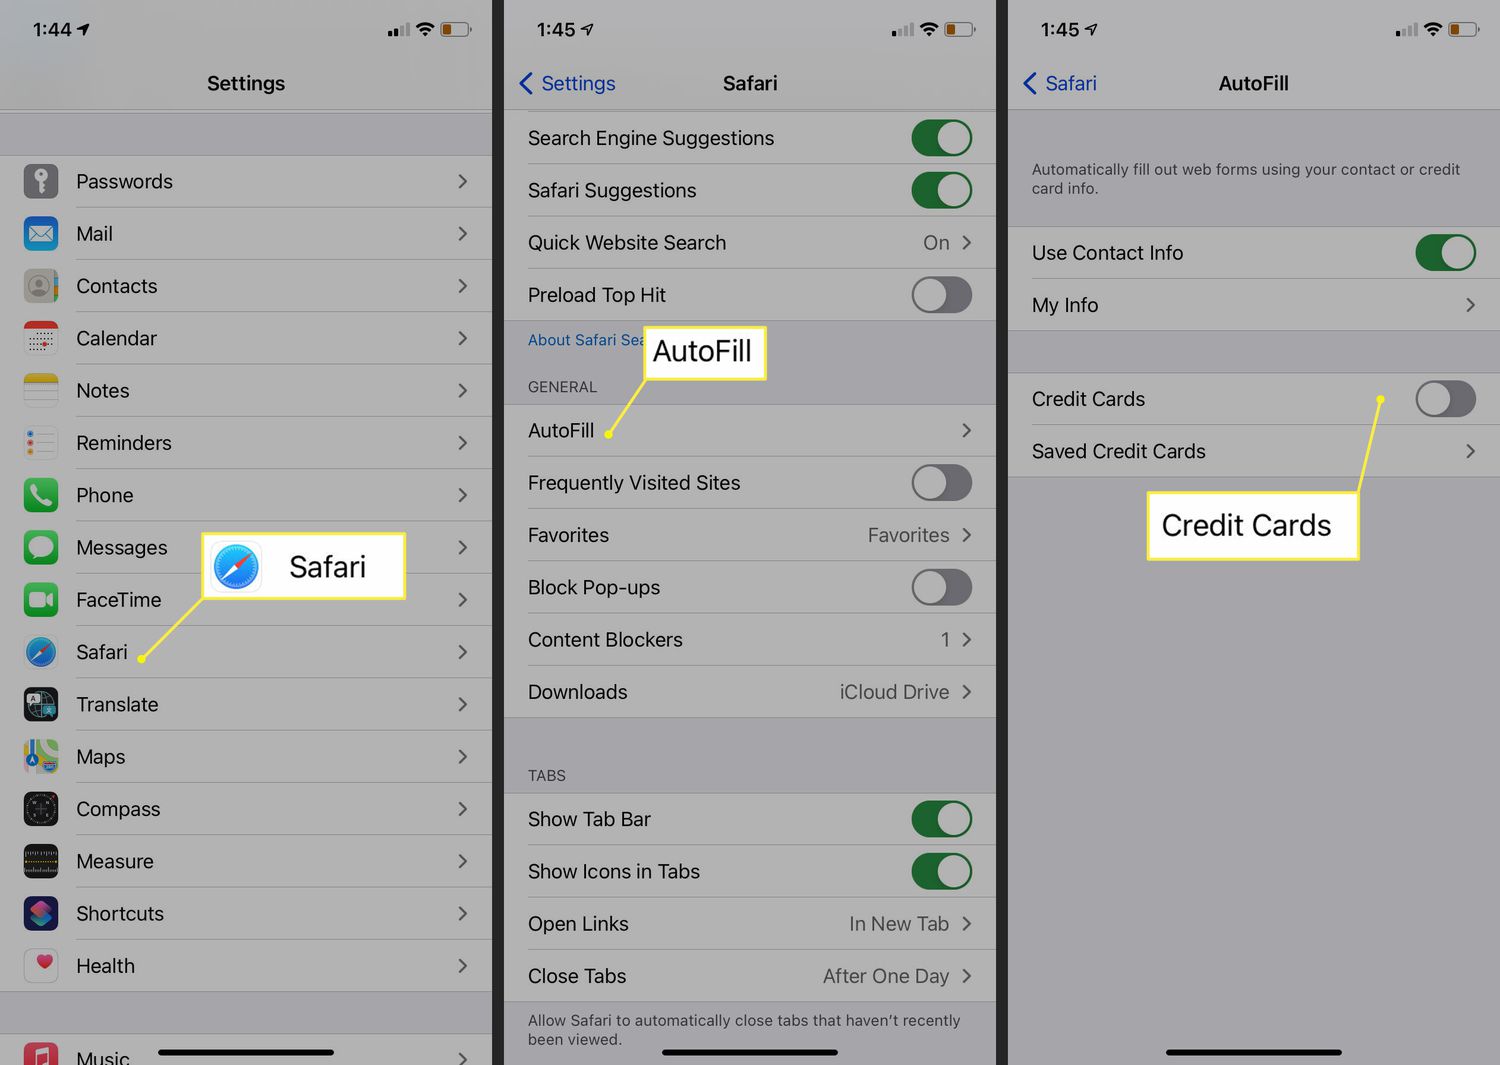
- Open the Safari app on your iPhone.
- Tap the “Settings” icon in the bottom-right corner of the screen.
- Scroll down and tap on “Safari.”
- Tap “Autofill.”
- You can now toggle the switches next to the different types of autofill information, such as “Use Contact Info” and “Names and Passwords,” to enable or disable them.
- To clear your saved autofill data, tap on “Clear All” at the bottom of the screen.
Method 2: Changing Autofill Settings in Passwords & Accounts
If you want to change autofill settings for passwords and accounts, you can do so through the Passwords & Accounts settings. Here’s how:
- Go to the Settings app on your iPhone.
- Scroll down and tap “Passwords & Accounts.”
- Under the “Website & App Passwords” section, tap on “Autofill Passwords.”
- Toggle the switch next to “Autofill Passwords” to enable or disable it.
Method 3: Changing Autofill Settings in Keyboard Settings
You can also change autofill settings through the Keyboard settings on your iPhone. Follow these steps:
- Open the Settings app on your iPhone.
- Scroll down and tap “General.”
- Tap on “Keyboard.”
- Tap “Text Replacement.”
- In this section, you can add, edit, or delete shortcuts for words or phrases that the keyboard automatically replaces.
By following these simple steps, you can easily change the autofill settings on your iPhone to suit your preferences and needs.
Method 1: Changing Autofill Settings in Safari
If you are an iPhone user, chances are you use Safari as your default web browser. Safari offers a convenient feature called Autofill, which automatically fills in forms, passwords, and other information for you. However, there may be times when you want to change or update the Autofill settings to better suit your needs. Here’s how to do it:
Step 1: Open Safari on your iPhone. You can find Safari on your home screen or by swiping down and using the search function.
Step 2: Tap the “Settings” icon in the bottom right corner of the Safari app. If you don’t see the icon, swipe up from the bottom of the screen, and it should appear.
Step 3: In the Settings menu, scroll down and tap on “Safari”.
Step 4: Under the Safari settings, you will see “Autofill”. Tap on it to access the Autofill settings.
Step 5: In the Autofill settings, you can toggle various options such as “Use Contact Info” and “Use Names and Passwords”. You can also manage saved credit card information and edit personal information.
Step 6: To change Autofill options for specific websites, tap on “Saved Passwords” and select the website you want to modify. You can edit or delete saved usernames and passwords for individual sites.
Step 7: Once you have made all the desired changes, exit the settings menu. Safari will now use the updated Autofill settings according to your preferences.
With these simple steps, you can easily change the Autofill settings in Safari on your iPhone. Whether it’s updating personal information or managing saved passwords, taking control of your Autofill settings will help enhance your browsing experience.
Method 2: Changing Autofill Settings in Passwords & Accounts
If you want to change the autofill settings for your passwords and accounts on your iPhone, you can do so by following these easy steps:
1. Open the “Settings” app on your iPhone.
2. Scroll down and tap on “Passwords & Accounts”.
3. On the next screen, you will see a list of all the accounts that are associated with your iPhone. Tap on the account for which you want to change the autofill settings.
4. Within the account settings, you will see an option for “Autofill Passwords”. Tap on it.
5. You will now see a toggle switch for “Autofill Passwords”. Toggle it off if you want to disable autofill for this account, or toggle it on if you want to enable autofill.
6. Additionally, you can also manage and edit the stored passwords for this account by tapping on “Website & App Passwords”. This will open a list of all the passwords saved on your iPhone. You can delete or edit passwords as needed.
7. To change the autofill settings for another account, simply repeat steps 3 to 6.
8. Once you have made the desired changes, exit the “Settings” app. The new autofill settings will now be applied to your passwords and accounts on your iPhone.
By following these steps, you can easily customize the autofill settings for your passwords and accounts on your iPhone, giving you greater control over your autofill experience.
Method 3: Changing Autofill Settings in Keyboard Settings
If you are looking to change the autofill settings specifically for the keyboard on your iPhone, you can do so through the Keyboard Settings. This method allows you to customize the autofill options for various text input fields across different apps and websites.
Here are the steps to change the autofill settings in the Keyboard Settings:
- Open the Settings app on your iPhone.
- Scroll down and tap on “General.”
- Next, scroll down and select “Keyboard.”
- Under the Keyboard settings, you will find the “Text Replacement” option. Tap on it.
- Here, you can view and manage the existing autofill entries.
- To add a new autofill entry, tap on the “+” symbol at the top right corner of the screen.
- Enter the phrase or word you want to use for autofill in the “Phrase” field.
- Assign a shortcut keyword that will trigger the autofill in the “Shortcut” field.
- Tap “Save” to add the new autofill entry.
- You can also delete or edit existing autofill entries by tapping on the “Edit” option and selecting the entry you want to modify.
- Finally, you can enable or disable the autofill feature for your keyboard by toggling the switch next to “Auto-Correction.”
By following these steps, you can easily customize the autofill settings specifically for your keyboard on your iPhone. This allows for more efficient and personalized text input, saving you time and effort in typing repetitive phrases or words.
In conclusion, changing the autofill settings on your iPhone is a simple and useful way to enhance your browsing experience. Whether you want to update your personal information or modify the suggestions provided by autofill, you have the power to customize this feature to suit your needs. By following the steps outlined in this article, you can easily navigate to your device’s settings and make the necessary changes. Keep in mind that staying organized and safeguarding your personal information is important, so it’s always beneficial to review and update your autofill settings regularly. Take control of your iPhone’s autofill and enjoy a seamless and personalized browsing experience!
FAQs
1. How do I change the autofill settings on my iPhone?
To change the autofill settings on your iPhone, follow these steps:
1. Go to the Settings app on your iPhone.
2. Scroll down and tap on “Safari”.
3. In the Safari settings, tap on “Autofill”.
4. You will see options such as “Use Contact Info” and “Credit Cards”. Toggle the switch next to each option according to your preference.
5. To edit the saved information, tap on “Saved Credit Cards” or “Saved Passwords”.
2. Can I choose what information gets autofilled on my iPhone?
Yes, you can choose what information gets autofilled on your iPhone. In the Autofill settings, you will see options such as “Use Contact Info” and “Credit Cards”. By toggling the switches next to these options, you can control whether your contact information or credit card details get autofilled on websites or forms.
3. How do I change the autofill data for my contact information on my iPhone?
To change the autofill data for your contact information on your iPhone, you can update your personal details in the Contacts app. Open the Contacts app, find your own contact card, and make the necessary changes. This updated information will be used for autofill purposes.
4. How do I delete saved credit card information from autofill on my iPhone?
To delete saved credit card information from autofill on your iPhone, follow these steps:
1. Go to the Settings app on your iPhone.
2. Scroll down and tap on “Safari”.
3. In the Safari settings, tap on “Autofill”.
4. Tap on “Saved Credit Cards”.
5. You will see a list of saved credit cards. To delete a card, swipe left on it and tap on “Delete”.
5. Can I turn off autofill completely on my iPhone?
Yes, you have the option to turn off autofill completely on your iPhone. In the Safari settings, you can toggle off the switches for “Use Contact Info” and “Credit Cards”. By doing so, your iPhone will no longer autofill any contact information or credit card details on websites or forms.