
Are you tired of seeing your Android device automatically fill in your personal information when you’re trying to enter a form or search query? Autofill can be helpful at times, but it can also be frustrating and intrusive. Fortunately, there’s a way to delete autofill on Android and regain control over your device’s autofill settings.
In this article, we will guide you through the process of deleting autofill data on Android. Whether you want to remove saved passwords, addresses, or payment details, we’ve got you covered. Say goodbye to those pesky autofill suggestions and reclaim your privacy and control over your Android device.
Inside This Article
- Clearing Autofill Data
- Disabling Autofill on Android
- Managing Autofill Settings
- Using Third-Party Autofill Solutions
- Conclusion
- FAQs
Clearing Autofill Data
Autofill is a convenient feature on Android that automatically fills in form fields with saved information, such as usernames, passwords, and addresses. However, there may be instances where you want to clear the autofill data, either to free up storage space or to start fresh with new information. Here’s how you can easily clear autofill data on your Android device.
1. Open the Settings app on your Android device.
2. Scroll down and tap on “System” or “System & Updates,” depending on your Android version.
3. Tap on “Languages & input” or “Language & input.”
4. Look for the “Virtual keyboard” option and tap on it.
5. Select the keyboard app you are using, such as Gboard or SwiftKey.
6. Tap on “Text correction” or “Autocorrect.
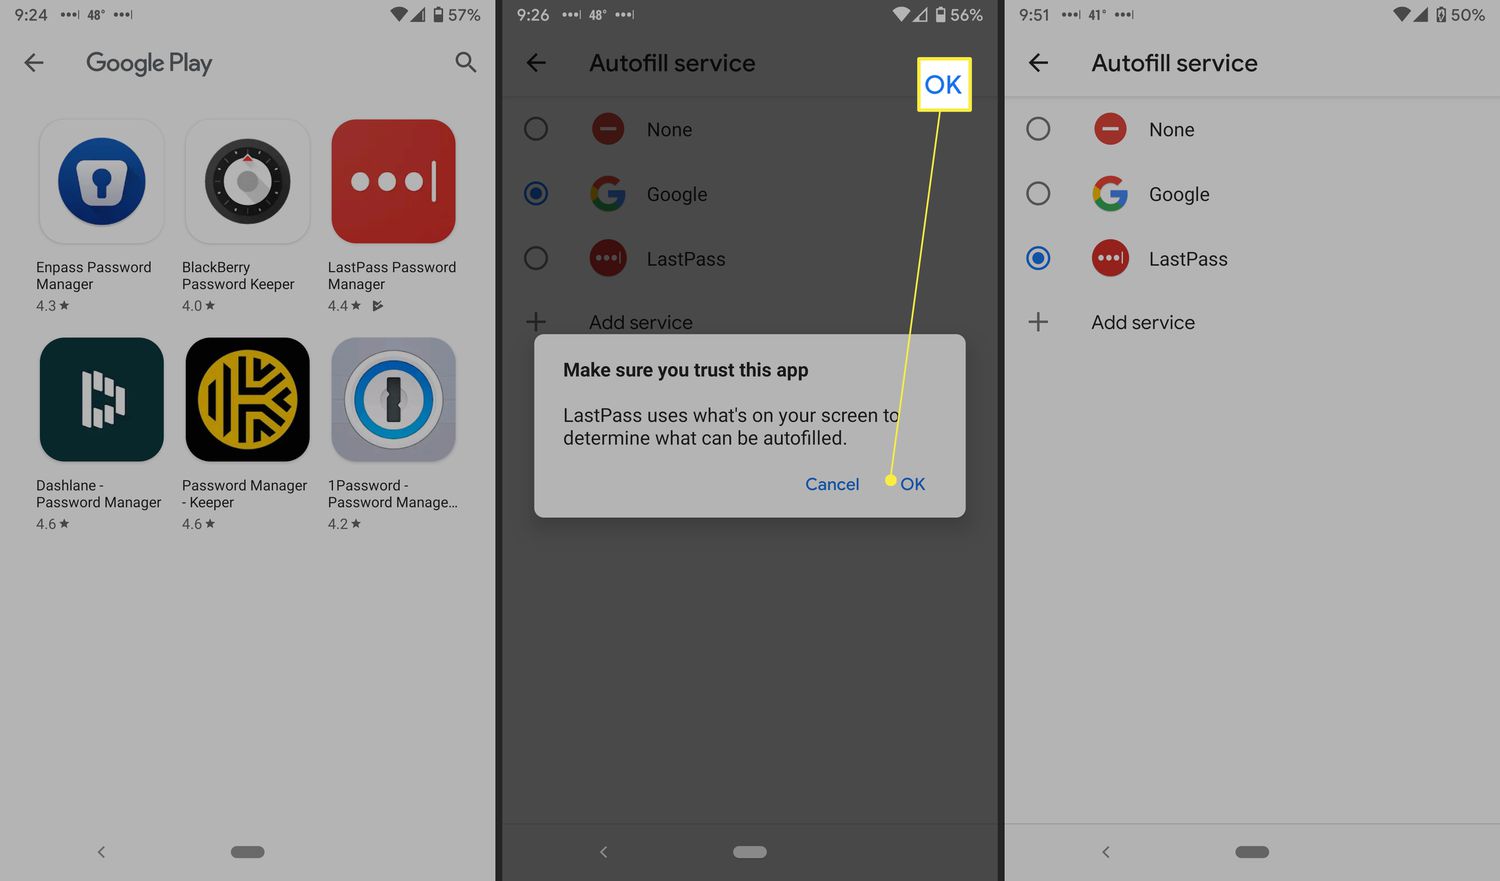
7. Find the “Autofill” or “Autofill service” option and tap on it.
8. Tap on “Clear data” or “Clear cache.”
9. Confirm the action by tapping “OK” or “Clear.” Your autofill data will be cleared.
By following these simple steps, you can easily clear autofill data on your Android device. However, keep in mind that clearing autofill data will require you to re-enter the information the next time you encounter form fields that would have been autofilled. It’s a good practice to periodically clear autofill data to ensure your information is up to date and to maintain the privacy of your personal information.
Disabling Autofill on Android
Autofill on Android is a convenient feature that automatically fills in forms and login credentials for you, saving you time and effort. However, there may be instances when you prefer to disable autofill for various reasons. Fortunately, disabling autofill on Android is a straightforward process that can be done in just a few simple steps.
To disable autofill on Android, follow these steps:
- Open the Settings app on your Android device.
- Scroll down and tap on “System” or “System & updates,” depending on your device.
- Next, tap on “Languages & input” or “Languages & keyboard.”
- Scroll down and tap on “Advanced.”
- Tap on “Autofill service.”
- Here, you will see a list of available autofill services. Tap on the one you are currently using.
- Toggle off the switch next to “Autofill service.”
Once you’ve followed these steps, autofill will be disabled on your Android device. Keep in mind that the exact steps may vary slightly depending on your device manufacturer and Android version.
If you ever decide to re-enable the autofill feature, simply follow the same steps and toggle on the switch next to the autofill service you prefer to use.
Disabling autofill can offer several advantages. It provides an extra layer of security by preventing sensitive information from being automatically filled in on forms. Additionally, disabling autofill can prevent any potential autofill errors or incorrect information from being filled in.
By knowing how to disable autofill on Android, you have the flexibility to choose whether or not to use this feature based on your specific needs and preferences. Whether it’s for privacy reasons or to have greater control over form filling, turning off autofill on your Android device is a simple process that you can easily reverse whenever you want.
Managing Autofill Settings
Autofill is a convenient feature on Android that automatically fills in information like usernames, passwords, addresses, and payment details in apps and websites. However, there may be times when you want to manage or customize your autofill settings. Here’s how you can do it:
1. Open the Settings app on your Android device.
2. Scroll down and tap on “System” or “System & Updates”, depending on your device.
3. Tap on “Languages & input” or “Language & Input”.
4. Look for the “Autofill” option and tap on it.
5. Depending on your device, you may see options like “Autofill service” or “Autofill with Google”. Tap on the relevant option.
6. Here, you can toggle the Autofill feature on or off. If you want to disable Autofill completely, simply turn off the toggle switch.
7. Additionally, you can manage the data saved by Autofill. Tap on “Autofill service” or “Manage Autofill data”.
8. You will see a list of apps or services that you have used Autofill with. Tap on an app to manage its Autofill data.
9. In the app’s Autofill settings, you can view and delete the saved data. You can also choose whether Autofill should save data for this app.
10. If you want to clear all Autofill data on your Android device, you can tap on “Clear Autofill data” or “Clear data” in the Autofill settings.
By managing your Autofill settings, you can have more control over your personal information and ensure that it is used only when and where you want it. Take the time to explore these options and customize your Autofill experience on Android.
Using Third-Party Autofill Solutions
If you’re looking for additional options outside of the built-in autofill feature on your Android device, there are several third-party autofill solutions available that can enhance your user experience. These apps provide additional features and customization options to streamline the autofill process and make filling out forms and entering credentials easier than ever before.
One popular third-party autofill solution is LastPass. LastPass is a password manager that not only securely stores your passwords but also offers a robust autofill feature. It can automatically fill in forms and login credentials across various platforms and apps, making it a convenient tool for anyone who wants to save time and ensure their information is securely stored.
Another popular option is Dashlane. Dashlane is a comprehensive password manager and digital wallet that includes an autofill feature. With Dashlane, you not only have access to your passwords but can also securely store payment information, IDs, and other personal data. The autofill feature saves you the hassle of manually entering these details every time, allowing for a seamless browsing experience.
KeePassXC is another highly-regarded third-party autofill solution. KeePassXC is an open-source, community-driven password manager that offers autofill capabilities across various platforms. It allows you to store and manage your passwords securely while providing quick autofill options for forms and login credentials.
If you prefer a paid solution, 1Password is worth considering. 1Password is a feature-rich password manager that includes autofill functionality. It offers advanced security features such as two-factor authentication and alerts for compromised passwords. With 1Password, you can easily autofill your information, saving time and ensuring your data is protected.
When using third-party autofill solutions, be sure to carefully review their features, security measures, and compatibility with your Android device. It’s also essential to choose a reputable and trusted app from a reliable source, such as the Google Play Store, to ensure the safety of your personal information.
Overall, third-party autofill solutions can offer additional convenience and customization options for Android users. Whether you choose LastPass, Dashlane, KeePassXC, or 1Password, these apps can streamline the form-filling and login process, improving efficiency and enhancing security.
Conclusion
In conclusion, managing autofill on your Android device is a crucial aspect of maintaining your privacy and ensuring a smooth user experience. By being aware of how autofill works and knowing how to delete autofill data, you can have better control over the information stored on your device.
In this article, we discussed various methods to delete autofill on Android. Whether you choose to clear autofill data for specific apps, delete individual entries, or reset the autofill service entirely, the process is relatively straightforward. However, it is important to exercise caution when deleting autofill data, as you may lose valuable information or risk unintended consequences.
Remember to regularly review and manage your autofill settings to keep your personal information secure and maintain a clutter-free autofill experience. By following the steps outlined in this article, you can ensure that your Android device is optimized for your specific needs and preferences.
So take control of your autofill settings on Android today and enjoy a more personalized and secure user experience!
FAQs
1. How do I delete autofill on my Android phone?
To delete autofill on your Android phone, follow these steps:
1. Open the Settings app on your Android device.
2. Scroll down and tap on “System” or “System & updates” (depending on your device).
3. Tap on “Languages & input” or “Language & input” (depending on your device).
4. Look for the “Virtual keyboard” or “On-screen keyboard” option and tap on it.
5. Select the keyboard app you are using (e.g., Gboard, Samsung Keyboard).
6. Tap on “Text correction” or “Advanced” (depending on your keyboard app).
7. Look for the “Autofill” or “Autocorrect” option and tap on it.
8. In the Autofill settings, you will find an option to delete your saved autofill data. Tap on this option and confirm the deletion.
Once you have completed these steps, your autofill data will be deleted from your Android device.
2. Will deleting autofill on my Android phone affect other apps or websites?
Deleting autofill on your Android phone will only remove the autofill data stored on your device. This means that any saved usernames, passwords, addresses, or other types of autofill information will be deleted from your device. However, it will not affect the autofill functionality on other apps or websites. When you revisit those apps or websites, you may need to enter the information manually or allow them to save new autofill data.
3. Can I selectively delete autofill entries on my Android phone?
Yes, you can selectively delete autofill entries on your Android phone. Here’s how:
1. Open the app or website where you want to delete the autofill entry.
2. Tap on the input field where the autofill suggestion appears.
3. Long-press on the autofill suggestion until a menu pops up.
4. Tap on “Delete” or the trash icon to remove the specific autofill entry.
By following these steps, you can delete individual autofill entries without deleting all of your saved autofill data.
4. How do I disable autofill completely on my Android phone?
To disable autofill completely on your Android phone, follow these steps:
1. Open the Settings app on your Android device.
2. Scroll down and tap on “System” or “System & updates” (depending on your device).
3. Tap on “Languages & input” or “Language & input” (depending on your device).
4. Look for the “Virtual keyboard” or “On-screen keyboard” option and tap on it.
5. Select the keyboard app you are using (e.g., Gboard, Samsung Keyboard).
6. Tap on “Text correction” or “Advanced” (depending on your keyboard app).
7. In the Autofill settings, disable the toggle switch for autofill.
Once you have completed these steps, autofill will be disabled on your Android device, and you will need to manually enter information for each field.
5. Will deleting autofill on my Android phone improve performance?
Deleting autofill on your Android phone may slightly improve performance, especially if you have a large amount of autofill data stored on your device. The autofill feature requires processing power and memory resources to suggest and populate fields automatically. By deleting unnecessary autofill data, you can free up some resources, which may result in a slightly faster and smoother performance on your Android device. However, the impact on performance may vary depending on the device’s specifications and overall usage.