
In today’s digital age, privacy and security have become paramount concerns for smartphone users. With the increasing reliance on mobile devices for browsing the internet, it’s essential to have a tool that allows users to browse anonymously and safeguard their online activities. Luckily, iPhone users can take advantage of the “incognito” or private browsing feature offered by their devices. Incognito browsing ensures that your search history, cookies, and temporary files are not recorded, providing a level of privacy that is ideal for sensitive tasks. In this article, we will delve into the world of incognito browsing on iPhones. We’ll explain how to activate and use this feature effectively, providing you with the knowledge to enjoy a more secure and private browsing experience on your iPhone.
Inside This Article
- Enabling Private Browsing on Safari
- Using Third-Party Private Browsing Apps
- Clearing Browsing Data and History
- Disabling Autofill and Location Services
- Conclusion
- FAQs
Enabling Private Browsing on Safari
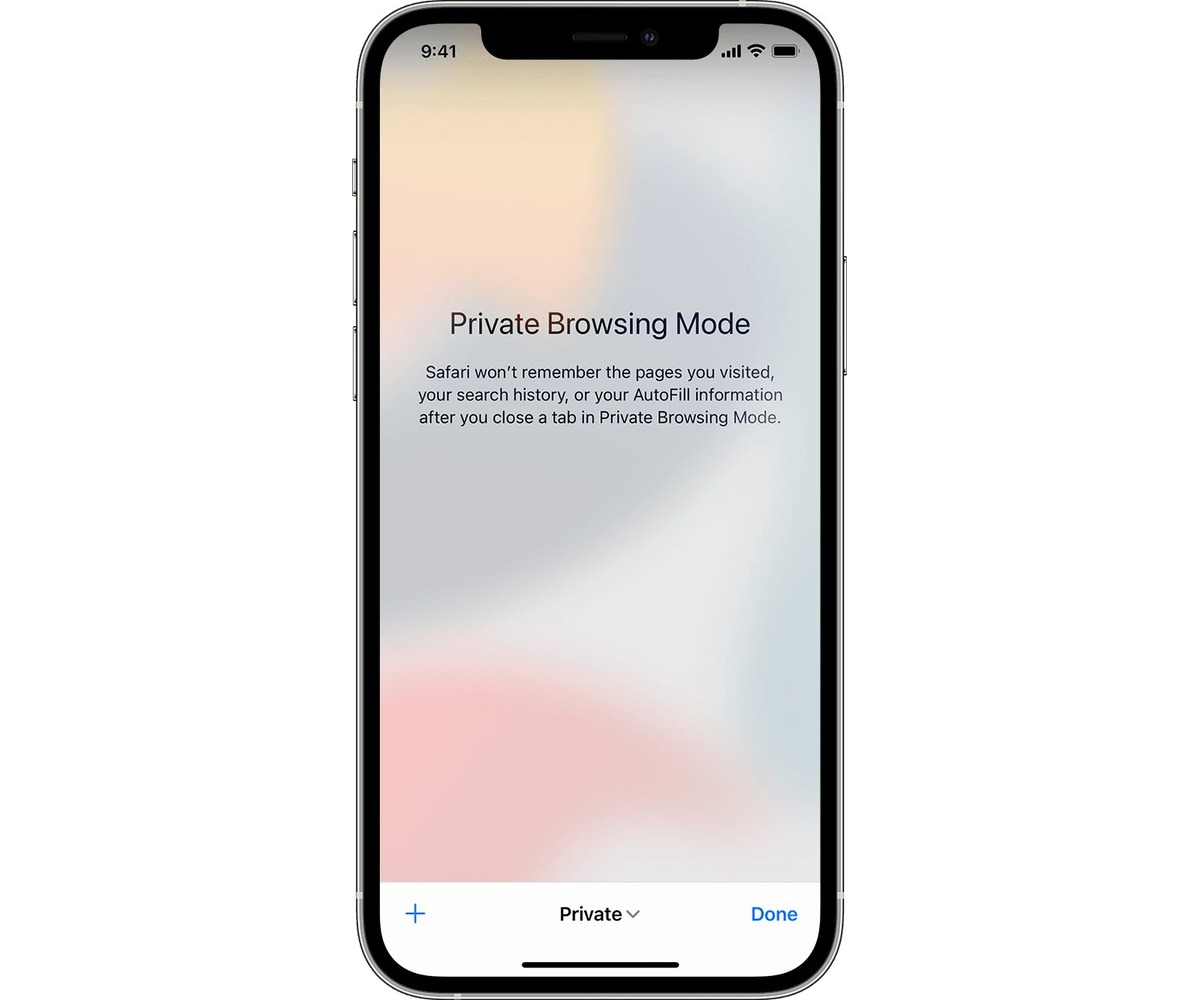
If you value your privacy and want to browse the internet without leaving any trace, Safari has a built-in feature called Private Browsing that allows you to do just that. When you enable Private Browsing, Safari won’t store your browsing history, cookies, or any other data, making it ideal for sensitive searches or when using a shared device. Here’s how you can enable Private Browsing on your iPhone:
1. Open Safari on your iPhone by tapping on the Safari icon.
2. Tap on the tabs icon in the bottom right corner of the screen. It looks like two overlapping squares.
3. In the bottom right corner of the screen, tap on the “+” button to open a new tab.
4. In the bottom left corner of the screen, tap on “Private”. This will open a new tab in Private Browsing mode.
5. You will notice that the interface changes to dark gray to indicate that you are now browsing privately. You can start searching and viewing websites without leaving any trace.
6. When you are done browsing privately, simply close the tab by tapping on the “X” button in the top left corner or switch back to regular browsing mode by tapping on the tabs icon and selecting a non-private tab.
Remember that enabling Private Browsing on Safari only affects the browsing session within the Private tab. It does not impact the rest of your device’s activities or the browsing experience in non-private tabs.
Now that you know how to enable Private Browsing on Safari, you can browse the web with peace of mind, knowing that your online activities won’t be stored or accessible by others.
Using Third-Party Private Browsing Apps
While Safari’s private browsing mode is a convenient option for most iPhone users, there are also third-party apps available that offer enhanced privacy and security features. These apps go beyond the basic functions of private browsing and provide additional layers of protection for your online activities. Here are a few popular options worth considering:
1. DuckDuckGo Privacy Browser: This app not only offers private browsing but also blocks hidden trackers that can follow your online activity. It also provides privacy grades for websites, allowing you to make informed choices about which sites you can trust with your data.
2. Ghostery Privacy Browser: Ghostery Privacy Browser focuses on privacy by blocking ads and trackers, thereby minimizing the chances of your data being collected. It also allows you to customize your browsing experience by choosing which trackers and ad types you want to block.
3. Brave Privacy Browser: Brave Privacy Browser boasts a built-in ad blocker and tracker blocker, ensuring that your online activity remains private. It also offers a feature called “Brave Rewards,” which allows you to earn rewards for opting into privacy-respecting ads.
4. Firefox Focus: Firefox Focus is designed specifically for private browsing, automatically blocking ads, trackers, and website analytics. It also erases your browsing history and cookies with just one tap, leaving no traces behind.
These third-party private browsing apps provide an alternative to Safari’s private browsing mode, offering additional features and customization options to suit your privacy needs. It’s important to note that while these apps can enhance your privacy, no method of online browsing is completely foolproof. It’s always recommended to stay vigilant and practice safe browsing habits to protect your personal information.
Clearing Browsing Data and History
Clearing your browsing data and history is another effective way to browse incognito on your iPhone. By deleting your browsing data, you ensure that no trace of your online activity remains on your device.
To clear your browsing data and history on Safari, follow these steps:
- Open the Settings app on your iPhone.
- Scroll down and tap on Safari.
- Under the “Privacy & Security” section, tap on “Clear History and Website Data”.
- A confirmation pop-up will appear. Tap on “Clear History and Data” to confirm.
By following these steps, you will remove all the browsing history, cookies, and cached data from Safari, ensuring your browsing experience remains private and secure.
It’s important to note that clearing your browsing data and history will log you out of any websites you are currently signed into. If you want to retain your login information, make sure to remember your usernames and passwords before clearing your browsing data.
Keep in mind that clearing your browsing data and history on Safari will only affect the default browser on your iPhone. If you use third-party browsers, such as Chrome or Firefox, you will need to clear the data separately within each app.
In addition to clearing your browsing data, it’s also a good practice to regularly clear your search history, form autofill data, and cookies. This extra step will further enhance your privacy and ensure that no personal information is stored on your device.
To clear these additional data on Safari, follow these steps:
- Open the Settings app on your iPhone.
- Scroll down and tap on Safari.
- Under the “Privacy & Security” section, tap on “Advanced”.
- Tap on “Website Data”.
- Scroll down to the bottom and tap on “Remove All Website Data”.
- A confirmation pop-up will appear. Tap on “Remove Now” to confirm.
By regularly clearing your browsing data and history, as well as your search history, form autofill data, and cookies, you can maintain a higher level of privacy when browsing the internet on your iPhone.
Remember to repeat these steps periodically to ensure that your browsing activity remains private and secure.
Disabling Autofill and Location Services
Autofill is a handy feature on your iPhone that remembers your personal information and fills in forms automatically. While convenient, it can also pose a security risk if someone gains unauthorized access to your device. To protect your privacy, it’s important to disable autofill on your iPhone.
To disable autofill, simply follow these steps:
- Open the Settings app on your iPhone.
- Scroll down and tap on “Safari”.
- Under the General section, tap on “Autofill”.
- Toggle off the switches next to options like “Names and Passwords” and “Credit Cards” to disable autofill for these categories.
In addition to disabling autofill, it’s also crucial to turn off location services when you want to browse incognito on your iPhone. Location services allow your device and apps to determine your location using GPS, Wi-Fi, and cellular data. This information can be used to track your activities and compromise your privacy.
To disable location services on your iPhone, follow these steps:
- Open the Settings app on your iPhone.
- Scroll down and tap on “Privacy”.
- Tap on “Location Services”.
- Toggle off the switch at the top to disable location services completely, or individually disable location services for specific apps listed below.
By disabling autofill and turning off location services, you can enhance your privacy and browse incognito on your iPhone with confidence. Remember to re-enable these features when needed, as they can be useful in certain situations.
Conclusion
In conclusion, browsing incognito on your iPhone can be a useful feature to maintain your privacy while using the internet. By following the steps outlined in this article, you can easily activate and use the incognito mode on your iPhone, ensuring that your browsing history, cookies, and other data are not stored. This feature is especially helpful if you share your iPhone with others or if you are accessing sensitive information.
Remember, although incognito mode provides some level of privacy, it does not make you completely anonymous. Your internet service provider and some websites may still be able to track your activity. Therefore, it is always wise to exercise caution and use additional security measures, such as a VPN, when browsing the internet.
With the ability to browse incognito on your iPhone, you can confidently explore the internet without leaving a trace of your activities. So go ahead, take control of your privacy, and enjoy a safer browsing experience on your iPhone.
FAQs
1. Can I browse incognito on my iPhone?
Yes, you can! Modern iPhone models come with built-in privacy features, including the option to browse incognito. This allows you to browse the internet without leaving any trace of your browsing history, cookies, or search queries.
2. How do I enable private browsing on my iPhone?
Enabling private browsing on your iPhone is simple. Open Safari, the default web browser, and tap on the tabs icon at the bottom right corner of the screen. Then, tap on “Private” at the bottom left. This will open a new private browsing window, indicated by the dark background color. You can now browse the internet without leaving any tracks.
3. What are the benefits of browsing incognito on my iPhone?
Browsing incognito offers several benefits. Firstly, it allows you to maintain your privacy by not saving any browsing history, cookies, or search data. This can be helpful when you’re using a shared device or if you simply prefer to keep your online activities private. Additionally, browsing incognito can prevent websites from tracking your information and displaying targeted advertisements.
4. Does private browsing on iPhone provide complete anonymity?
While private browsing on iPhone helps protect your privacy to a certain extent, it’s important to note that it doesn’t provide complete anonymity. Private browsing only prevents your device from storing browsing history and website data. It does not hide your IP address or encrypt your connection. If you require a higher level of anonymity, you may need to consider using a virtual private network (VPN) or other privacy-focused tools.
5. Can I use private browsing with other apps on my iPhone?
Private browsing is primarily designed for web browsers, such as Safari. While some third-party apps may have their own privacy features, they may not offer the same level of privacy as private browsing in Safari. It’s important to check the settings and options of individual apps to determine if they have any built-in privacy features.