
Screen recording has become a powerful tool in today’s digital age, allowing us to capture and share our favorite moments, tutorials, and gameplay. If you’re the proud owner of an iPhone 12, you’ll be glad to know that this sleek and advanced device offers a built-in screen recording feature. With just a few taps, you can effortlessly record and save your screen activities. Whether you want to showcase a new app, create a video tutorial, or capture memorable in-app moments, knowing how to screen record on your iPhone 12 is essential. In this article, we’ll guide you step-by-step on how to use the screen recording feature on your iPhone 12, so you can easily capture and share your screen like a pro.
Inside This Article
- Preparing your iPhone 12 for screen recording
- Using the built-in screen recording feature on your iPhone 12
- Customizing screen recording settings on your iPhone 12
- Accessing and managing your screen recordings on your iPhone 12
- Conclusion
- FAQs
Preparing your iPhone 12 for screen recording
Screen recording on your iPhone 12 can be a useful tool for capturing and sharing important moments or demonstrating specific features or functionalities. Before you start recording your iPhone’s screen, there are a few steps you need to take to ensure a smooth and hassle-free recording experience.
1. Update to the latest iOS version: Before you begin screen recording, make sure your iPhone 12 is running the latest version of iOS. Software updates often come with bug fixes and improvements that can enhance the screen recording feature’s stability and performance.
2. Check available storage: Screen recordings can take up a significant amount of storage space on your device. Before you start recording, it’s a good idea to check your iPhone 12’s available storage. If you’re running low on space, consider deleting unnecessary files or transferring them to an external storage device.
3. Enable screen recording in the Control Center: By default, screen recording is not enabled in the Control Center. To enable it, go to your iPhone 12’s Settings, tap on Control Center, and then tap on Customize Controls. From there, find the Screen Recording option and tap the green “+” button next to it to add it to your Control Center.
4. Familiarize yourself with the Control Center: The Control Center is where you can access various features and settings on your iPhone 12, including screen recording. Swipe down from the top right corner of your device (or swipe up on older iPhone models) to open the Control Center. Take a moment to familiarize yourself with the layout and location of the screen recording button.
5. Adjust audio settings: When screen recording, you have the option to record audio from your device’s internal microphone or external audio sources. To adjust these settings, open the Control Center, long-press or firmly press the screen recording button, and tap on the Microphone icon to toggle between recording audio or silencing it.
6. Customize screen recording settings: If you have specific preferences for your screen recordings, you can customize the settings. Go to your iPhone 12’s Settings, tap on Control Center, then tap on Customize Controls. You’ll see a list of options, including screen recording. Tap on the green “+” button next to screen recording to access additional options such as recording quality and frame rate.
By following these steps, you’ll ensure that your iPhone 12 is ready for screen recording. Once you’ve completed the preparation process, you can confidently move on to using the built-in screen recording feature to capture and share whatever is happening on your device’s screen.
Using the built-in screen recording feature on your iPhone 12
The iPhone 12 comes with a handy built-in screen recording feature that allows you to capture and save videos of your screen activity. Whether you want to record a tutorial, share gameplay footage, or simply save a memorable moment on your device, this feature makes it easy and convenient. Here’s how you can use the built-in screen recording feature on your iPhone 12.
To start screen recording on your iPhone 12, you need to enable the feature first. Simply follow these steps:
- Open the Settings app on your iPhone 12.
- Scroll down and tap on the Control Center option.
- Under the “More Controls” section, find the Screen Recording option and tap on the green plus button next to it to add it to your Control Center.
Now that you have enabled the screen recording feature, you can easily access it from the Control Center. Here’s what you need to do:
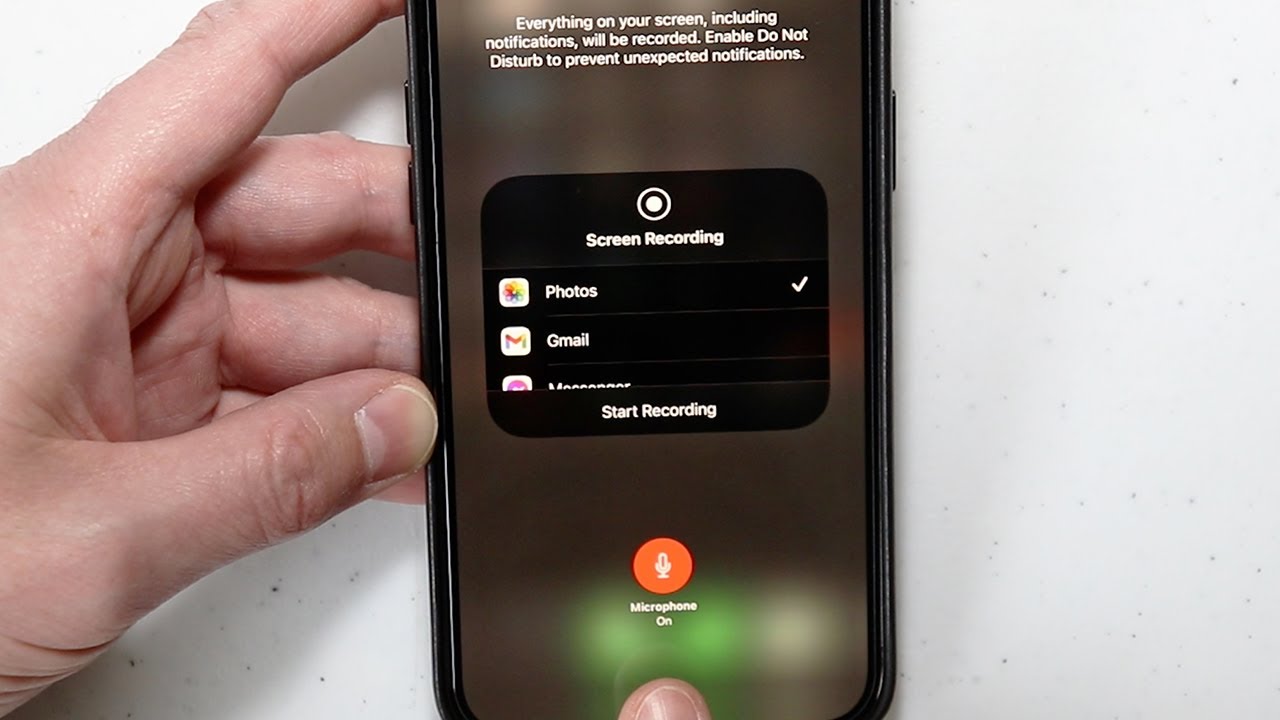
- Swipe up from the bottom of your iPhone 12 screen to open the Control Center.
- Look for the screen recording icon, which looks like a filled-in circle inside another circle.
- Tap on the screen recording icon to start recording.
- If you want to record audio along with your screen recording, long-press or force touch the screen recording icon to access the options menu, and enable the microphone audio.
Once you start the screen recording, your iPhone 12 will begin capturing everything that appears on your screen. You can freely navigate through different apps, open websites, or perform any other actions you want to record. To stop the recording, simply tap on the red status bar at the top of your screen and confirm the action.
After stopping the recording, your screen recording will be saved to your iPhone’s Photos app. You can access it by following these steps:
- Open the Photos app on your iPhone 12.
- Navigate to the “Library” tab at the bottom of the screen.
- Scroll down until you find the “Screen Recordings” album.
- Tap on the album to view and manage your recorded videos.
From the “Screen Recordings” album, you can play, edit, and share your screen recordings just like any other video on your iPhone 12.
Using the built-in screen recording feature on your iPhone 12 is a convenient way to capture and share moments on your device. Whether it’s for work, education, or entertainment purposes, this feature provides you with a powerful tool to showcase what’s happening on your screen. Give it a try and explore the possibilities!
Customizing screen recording settings on your iPhone 12
Screen recording on your iPhone 12 allows you to capture the action happening on your device’s screen. It’s a handy feature for creating tutorials, sharing gameplay moments, or documenting something important on your phone. To make the most out of screen recording, you can customize the settings on your iPhone 12 to fit your needs.
Here are some ways to customize the screen recording settings on your iPhone 12:
- Access the Control Center: To begin customizing the screen recording settings, you’ll need to access the Control Center on your iPhone 12. Swipe down from the top-right corner of the screen to open the Control Center.
- Enable screen recording: Once you’re in the Control Center, you’ll see various options for customization. If you don’t see the screen recording control, you may need to add it manually. Tap on “Customize Controls” and find the screen recording option. Tap the green plus icon next to it to add it to your Control Center.
- Adjust audio recording: By default, screen recording captures both the audio from your device and external sources. If you want to record only the device audio, you can customize this setting. In the Control Center, long-press or 3D touch the screen recording button to bring up additional options. Tap on the microphone icon to toggle between recording all audio or only the device audio.
- Change video resolution and frame rate: If you want to adjust the quality of your screen recording, you can change the video resolution and frame rate. Go to the Settings app on your iPhone 12 and navigate to “Camera” and then “Record Video.” Here, you can choose from different resolution options, including 720p HD, 1080p HD, and even 4K. You can also select the frame rate, ranging from 24fps to 60fps.
- Show touches: To make your screen recordings more informative, you can enable the option to show touches on the screen. This feature highlights your touch gestures, making it easier for viewers to follow along. In the Control Center, long-press or 3D touch the screen recording button and tap on the “Show Touches” option to enable it.
- Use external microphones: If you want to enhance the audio quality of your screen recordings, you can connect external microphones to your iPhone 12. This is particularly useful if you’re recording a voiceover or capturing audio from a specific source. Simply plug in your compatible microphone into the Lightning port or use a lightning-to-3.5mm adapter for traditional headphones with a built-in microphone.
By customizing the screen recording settings on your iPhone 12, you can tailor the experience to your liking and ensure that your recordings meet your specific requirements. Experiment with the various options and discover the perfect setup that suits your needs!
Accessing and managing your screen recordings on your iPhone 12
Once you have successfully recorded the screen on your iPhone 12, you may be wondering how to access and manage those recordings. Luckily, Apple has made it easy to find and handle your screen recordings. Follow these steps to access and manage your screen recordings on your iPhone 12.
To begin, open the Photos app on your iPhone 12. This is the default app where your screen recordings are automatically saved. Once the app is open, navigate to the “Albums” tab, located at the bottom of the screen.
Within the Albums tab, you should see a folder named “Screenshots & Screen Recordings”. This folder contains all of your screen recordings along with any screenshots you have taken. Tap on this folder to open it.
Inside the “Screenshots & Screen Recordings” folder, you will find all of your screen recordings neatly organized by date and time. Scroll through the list to find the specific recording you are looking for. You can also use the search bar at the top of the screen to quickly locate a recording by entering keywords or date range.
Once you have found the desired screen recording, you can tap on it to view it in full screen. From here, you can play, pause, rewind, or fast forward the recording to review its contents.
If you need to edit or trim the screen recording, tap on the “Edit” button located at the bottom of the screen. This will open up the editing tools where you can make adjustments to the length or content of the recording. Once you are satisfied with the edits, tap on “Done” to save the changes.
If you no longer need a particular screen recording and want to delete it, tap on the “Trash” icon located at the bottom-right corner of the screen. Confirm the deletion by tapping on “Delete Video”. Keep in mind that deleted recordings cannot be recovered.
Alternatively, if you wish to share a screen recording with others, tap on the “Share” icon which resembles a square with an arrow pointing upwards. This will open up various sharing options such as AirDrop, Messages, Mail, and more. Choose the desired method to share your recording.
Lastly, if you want to organize your screen recordings into albums or folders, you can create a new album within the Photos app. Simply tap on the “+” icon to create a new album and give it a name. Then, select the screen recordings you want to add to the album and tap on “Done” to save the changes.
That’s it! You now know how to access and manage your screen recordings on your iPhone 12. With these simple steps, you can easily find, view, edit, delete, and share your screen recordings to fit your needs.
Conclusion
Screen recording on an iPhone 12 has become an essential feature for many users. Whether you want to capture a tutorial, record gameplay, or save a video call, the screen recording function provides a convenient solution. By simply accessing the Control Center and tapping the screen recording icon, you can easily start and stop recording. Additionally, the iPhone 12 offers various customization options, such as microphone selection and screen orientation lock, to enhance the recording experience.
With its user-friendly interface and seamless integration into the iOS system, screen recording on the iPhone 12 is a powerful tool for capturing and sharing content. Whether you are a professional or a casual user, the screen recording feature can greatly benefit your mobile experience. So, go ahead and make the most of your iPhone 12 by leveraging its screen recording capabilities!
FAQs
1. How do I screen record on an iPhone 12?
To screen record on an iPhone 12, follow these steps:
– Open the Control Center by swiping down from the top right corner of the screen (or from the bottom if you have an older iPhone model).
– Look for the Screen Recording button, which looks like a circle with a dot in the center.
– Tap the Screen Recording button to start recording.
– If you want to record audio, long-press the Screen Recording button and enable the microphone.
– To stop the recording, tap the red recording indicator in the status bar at the top of the screen or open the Control Center again and tap the Screen Recording button.
2. Where can I find my screen recordings on iPhone 12?
Once you’ve finished recording your screen on an iPhone 12, the video will be saved to your Photos app. You can find the screen recording by opening the Photos app and navigating to the “Recents” album. The recorded video will be there, and you can view, edit, or share it from that location.
3. Is there a time limit for screen recordings on iPhone 12?
By default, there is no time limit for screen recordings on iPhone 12. You can record for as long as your device has sufficient storage space. However, keep in mind that extremely long recordings may take up a significant amount of storage, so make sure you have enough space available on your iPhone.
4. Can I screen record without capturing the audio?
Yes, you can screen record on your iPhone 12 without capturing the audio. When you access the Control Center to start the screen recording, simply do not enable the microphone. This way, your screen recording will only capture the visuals and not any audio from your device.
5. Can I edit my screen recordings on iPhone 12?
Yes, you can edit your screen recordings on iPhone 12 using the built-in tools in the Photos app. After opening the recorded video in the Photos app, tap on the Edit button to access editing options such as trimming, cropping, adding filters, and more. Once you’re done editing, you can save the changes and share the edited video as desired.