
In today’s technological age, the ability to screen record on our smartphones has become an essential feature. Whether you want to capture a memorable moment in a video game, record a tutorial for your followers, or simply save a funny video from social media, knowing how to screen record on your iPhone 11 is a valuable skill to have.
The iPhone 11, with its advanced capabilities and sleek design, makes screen recording a breeze. With just a few simple steps, you can capture anything on your screen and save it as a video to share with friends or keep for future reference. In this article, we will guide you through the process of screen recording on your iPhone 11, ensuring that you have the tools and knowledge to make the most of this feature.
So, let’s dive in and explore how you can easily screen record on your iPhone 11 and unlock a world of possibilities!
Inside This Article
- Prerequisites for Screen Recording on iPhone 11
- Steps to Enable Screen Recording on iPhone 11
- Customization Options for Screen Recording on iPhone 11
- Conclusion
- FAQs
Prerequisites for Screen Recording on iPhone 11
Before you start screen recording on your iPhone 11, there are a few prerequisites that you need to fulfill. These prerequisites ensure that you have the necessary tools and settings in place to successfully capture your device’s screen. Here are the prerequisites you need to consider:
1. Make sure you have an iPhone 11 or a compatible device: Screen recording is a feature available on several iPhone models, including the iPhone 11. Therefore, it’s important to ensure that you have an iPhone 11 or a device that supports screen recording.
2. Update your iPhone’s software: To ensure a smooth screen recording experience, it’s essential to keep your iPhone’s software up to date. Check for any available software updates by going to the “Settings” app, selecting “General,” and then tapping “Software Update.”
3. Allow screen recording in Control Center: By default, screen recording is not enabled in the Control Center. To enable it, go to the “Settings” app, select “Control Center,” and then tap “Customize Controls.” Look for the “Screen Recording” option and tap the green “+” icon next to it to add it to your Control Center.
4. Ensure enough storage space on your device: Screen recording creates video files, which may take up a considerable amount of storage space. Before you start recording, make sure you have enough available storage on your device to accommodate the recorded videos.
5. Familiarize yourself with screen recording controls: Once you have enabled screen recording on your iPhone 11, it’s important to familiarize yourself with the screen recording controls. These controls allow you to start, pause, and stop recordings, as well as adjust audio settings and toggle microphone inputs.
By ensuring these prerequisites are met, you will be ready to embark on your screen recording journey with your iPhone 11. So, go ahead and explore the possibilities of capturing your device’s screen and sharing your experiences with others.
Steps to Enable Screen Recording on iPhone 11
Screen recording has become an essential feature for many smartphone users, allowing them to capture important moments, create tutorials, and share content with friends and family. If you’re an iPhone 11 owner and want to harness the power of screen recording, you’re in luck. Enabling screen recording on your iPhone 11 is a simple process that can be accomplished in just a few steps:
- Open the Control Center: Swipe down from the top-right corner of your iPhone 11 screen to access the Control Center. This hub provides convenient access to various settings and features.
- Locate the Screen Recording icon: In the Control Center, you will find an array of icons representing different functions. Look for the Screen Recording icon, which resembles a filled-in circle surrounded by another circle.
- Customize Control Center (optional): If you don’t see the Screen Recording icon in the Control Center, it may not be enabled by default. In that case, you can customize your Control Center to include the Screen Recording feature. To do this, go to “Settings,” then “Control Center,” and finally, click “Customize Controls.” From here, you can add the Screen Recording icon to your Control Center for easy access.
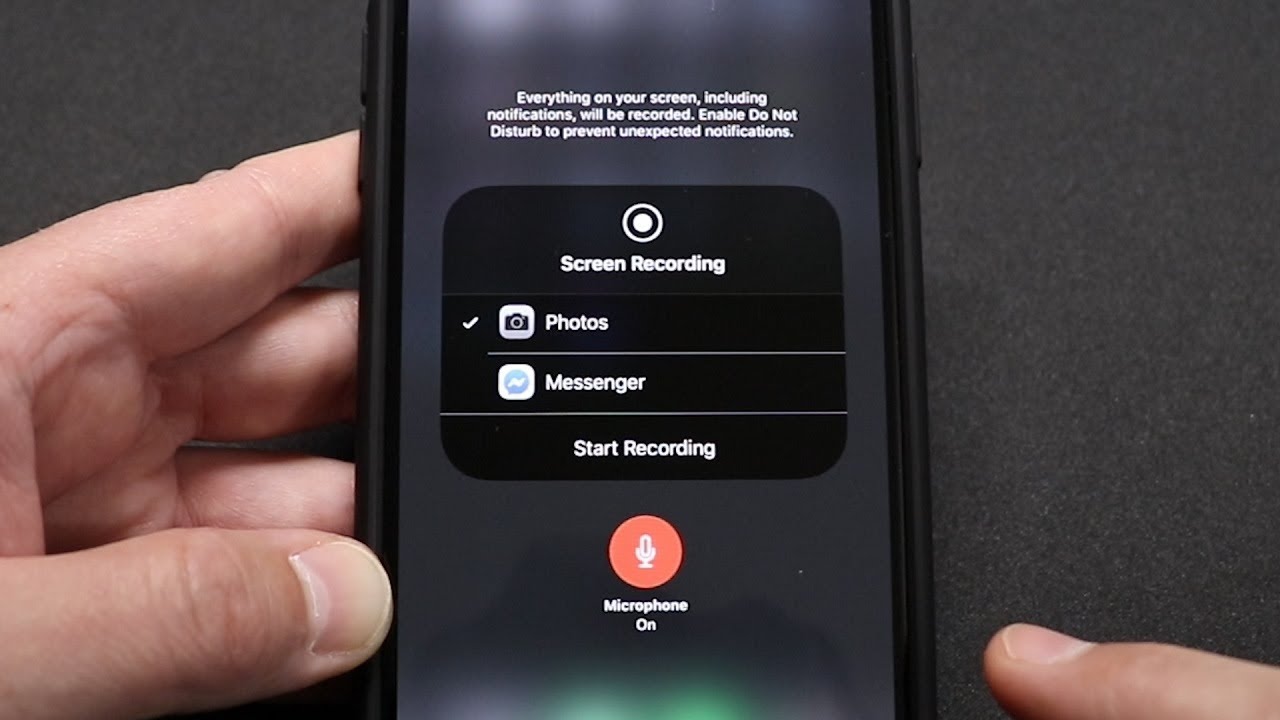
- Begin Screen Recording: Once you’ve located the Screen Recording icon in the Control Center, tap on it to initiate the screen recording process. A countdown timer of three seconds will appear, indicating when the recording will begin.
- Record Your Screen: After the countdown, your iPhone 11 will start recording everything that happens on your screen. You can navigate to different apps, open websites, or perform any action you wish to record. A red bar at the top of your screen will indicate that the recording is in progress.
- Stop Screen Recording: To stop the screen recording, simply tap on the red bar at the top of your screen. A confirmation message will appear asking if you want to stop the recording. Tap “Stop” to end the recording. Alternatively, you can also open the Control Center and tap on the Screen Recording icon again to stop the recording.
- Access the Screen Recording: Once you’ve stopped the screen recording, a notification will appear in your Notification Center. You can access the recorded video by swiping down from the top of your iPhone 11 screen and tapping on the notification. Additionally, you can also find the video in the Photos app, specifically in the “Recordings” album.
Enabling screen recording on your iPhone 11 is a straightforward process that opens up a world of possibilities for capturing and sharing content. Whether you want to create instructional videos or preserve memorable moments, the screen recording feature on the iPhone 11 has got you covered.
Customization Options for Screen Recording on iPhone 11
Screen recording on iPhone 11 offers a range of customization options to enhance your recording experience. Whether you want to capture gameplay footage, create tutorials, or save important moments from video calls, these customization options give you more control over your screen recordings. Let’s explore the various ways you can customize your screen recording on iPhone 11.
1. Enable or Disable Microphone Audio: iPhone 11 allows you to choose whether to include audio from the microphone in your screen recordings. This is especially helpful when you want to provide voiceover commentary or capture sound effects while recording a gameplay session. Simply toggle the microphone audio on or off depending on your recording needs.
2. Adjust Screen Recording Resolution: You can also adjust the resolution of your screen recordings on iPhone 11. Higher resolutions provide better video quality but may result in larger file sizes. To strike a balance, choose the resolution that best suits your requirements, considering factors such as available storage space and desired video quality.
3. Enable or Disable Touches: When recording your iPhone 11 screen, you have the option to display or hide your touches. Enabling this feature allows viewers to see your finger movements and interactions with the screen, which can be helpful for tutorial videos. However, if you prefer a cleaner visual experience, you can choose to turn off the touches display.
4. Set a Timer: If you want to limit the duration of your screen recording, iPhone 11 lets you set a timer. This is useful in scenarios where you want to capture a specific time frame or avoid recording unnecessary content. Once the preset time is reached, the screen recording will automatically stop, ensuring you have exactly what you need.
5. Enable or Disable Animations: In addition to the basic screen recording options, iPhone 11 also allows you to enable or disable the recording of animations. This feature is particularly handy when recording videos involving animated elements, such as app demonstrations or animated presentations. Choose whether to capture animations based on your recording requirements.
6. Select a Destination for Your Screen Recordings: By default, screen recordings on iPhone 11 are saved in the Photos app. However, you can choose to save them in other locations, such as the Files app or cloud storage services like iCloud Drive or Dropbox. This gives you the flexibility to organize your recordings and access them conveniently from your preferred storage location.
7. Edit and Share your Screen Recordings: Once you’ve finished your screen recording, iPhone 11 allows you to edit and share it seamlessly. You can trim the beginning or end of the recording, add captions or annotations, and even include music or voiceovers. After editing, you can share your recordings across various platforms, including social media or messaging apps, to showcase your creativity or provide valuable information to your audience.
With these customization options, screen recording on iPhone 11 becomes a versatile tool for capturing and sharing your digital experiences. Whether you’re a content creator, educator, or simply want to preserve important moments, take advantage of these features to personalize your screen recordings on iPhone 11.
So, go ahead and unleash your creativity while recording and sharing your screen on iPhone 11!
Screen recording on iPhone 11 has become effortless and seamless, thanks to the built-in screen recording feature. It allows users to easily capture, save, and share their device’s screen activity for various purposes including tutorials, gaming, troubleshooting, and sharing memorable moments with friends and family.
By following the simple steps mentioned earlier, anyone can quickly master screen recording on their iPhone 11. The ability to record high-quality videos directly from the device has revolutionized the way we capture and share our experiences.
Now, with the knowledge of how to screen record on iPhone 11, you can embark on a whole new level of content creation and communication. Whether you are a tech enthusiast, a gamer, or someone who loves sharing valuable insights, this feature opens up endless opportunities to engage, educate, and entertain.
So grab your iPhone 11, explore its screen recording capabilities, and unleash your creativity to capture and share the moments that matter to you.
Conclusion
With the built-in screen recording feature on the iPhone 11, you have the power to capture and share your device’s screen activity effortlessly. Whether you want to create tutorials, showcase gameplay, or troubleshoot issues, the screen recording functionality has made it easier than ever before.
Take advantage of this powerful feature by following the steps outlined in this article. Start screen recording on your iPhone 11 today and unlock a new world of content creation and communication. Share your knowledge, entertain your followers, or simply document memorable moments with the touch of a button.
The iPhone 11’s screen recording capability is a game-changer, offering users the ability to capture high-quality videos directly from their device. Embrace this feature and make the most out of your iPhone 11’s potential to record and share moments that matter to you.
So, grab your iPhone 11 and start screen recording. The possibilities are endless!
FAQs
Q: Can I screen record on iPhone 11?
A: Absolutely! The iPhone 11 comes with a built-in screen recording feature that allows you to capture everything happening on your screen.
Q: How do I access the screen recording feature on iPhone 11?
A: To access the screen recording feature on your iPhone 11, simply swipe down from the top-right corner of your screen to open the Control Center. Then, tap on the screen recording icon, which looks like a circle within a circle.
Q: Can I customize the settings for screen recording on my iPhone 11?
A: Yes, you can customize the settings for screen recording on your iPhone 11. To do this, go to the Settings app, then tap on Control Center. From there, you can add or remove the screen recording feature and even choose if you want to record audio from your device’s microphone.
Q: How do I start a screen recording on my iPhone 11?
A: Once you have accessed the screen recording feature in the Control Center, simply tap on the screen recording icon to begin recording. You’ll see a countdown timer, and once it reaches zero, your screen recording will commence.
Q: Where can I find my screen recordings on iPhone 11 after recording?
A: After completing a screen recording on your iPhone 11, it will be automatically saved to the Photos app. You can access your recorded videos by opening the Photos app and locating them in the “Recents” or “Albums” tab.