
Sure, here's the introduction in HTML format:
html
So, you’ve got the latest iPhone 11 and you’re eager to show off your screen recording skills, right? Well, you’re in luck because the iPhone 11 comes equipped with a nifty screen recording feature that lets you capture all the action on your screen. Whether you want to share your gaming triumphs, create a tutorial, or simply save a memorable moment, screen recording on your iPhone 11 is a breeze. In this article, we’ll walk you through the simple steps to unleash the power of screen recording on your iPhone 11. Let’s dive in and make your screen recording dreams a reality!
Inside This Article
- Setting Up Screen Recording- Accessing the Control Center- Adding the Screen Recording option
- Initiating Screen Recording- Starting the screen recording process- Customizing screen recording settings
- Completing the Screen Recording- Stopping the screen recording- Accessing the recorded video
- Using Screen Recording- Sharing and editing the recorded video- Tips for effective screen recording
- Conclusion
- FAQs
Setting Up Screen Recording- Accessing the Control Center- Adding the Screen Recording option
Screen recording on your iPhone 11 is a handy feature that allows you to capture and share on-screen activities with ease. To set up screen recording, you’ll need to access the Control Center and add the Screen Recording option to enable quick and convenient access.
To access the Control Center on your iPhone 11, simply swipe down from the top-right corner of the screen if you’re using an iPhone X or later, or swipe up from the bottom of the screen if you’re using an iPhone 8 or earlier. This action will reveal the Control Center, where you can find various shortcuts and toggles for different functions.
Once you’ve accessed the Control Center, you’ll need to add the Screen Recording option if it’s not already visible. To do this, navigate to the Settings app on your iPhone, tap on “Control Center,” and then select “Customize Controls.” Here, you can add the Screen Recording option by tapping the green plus button next to it. This will add the Screen Recording icon to the Control Center, making it readily accessible whenever you need to start a screen recording.
Initiating Screen Recording- Starting the screen recording process- Customizing screen recording settings
Screen recording on your iPhone 11 is a powerful tool that allows you to capture and share what’s happening on your screen. To start the screen recording process, begin by opening the Control Center. You can access the Control Center by swiping down from the top-right corner of the screen on iPhone models with Face ID, or by swiping up from the bottom of the screen on iPhone models with a Home button.
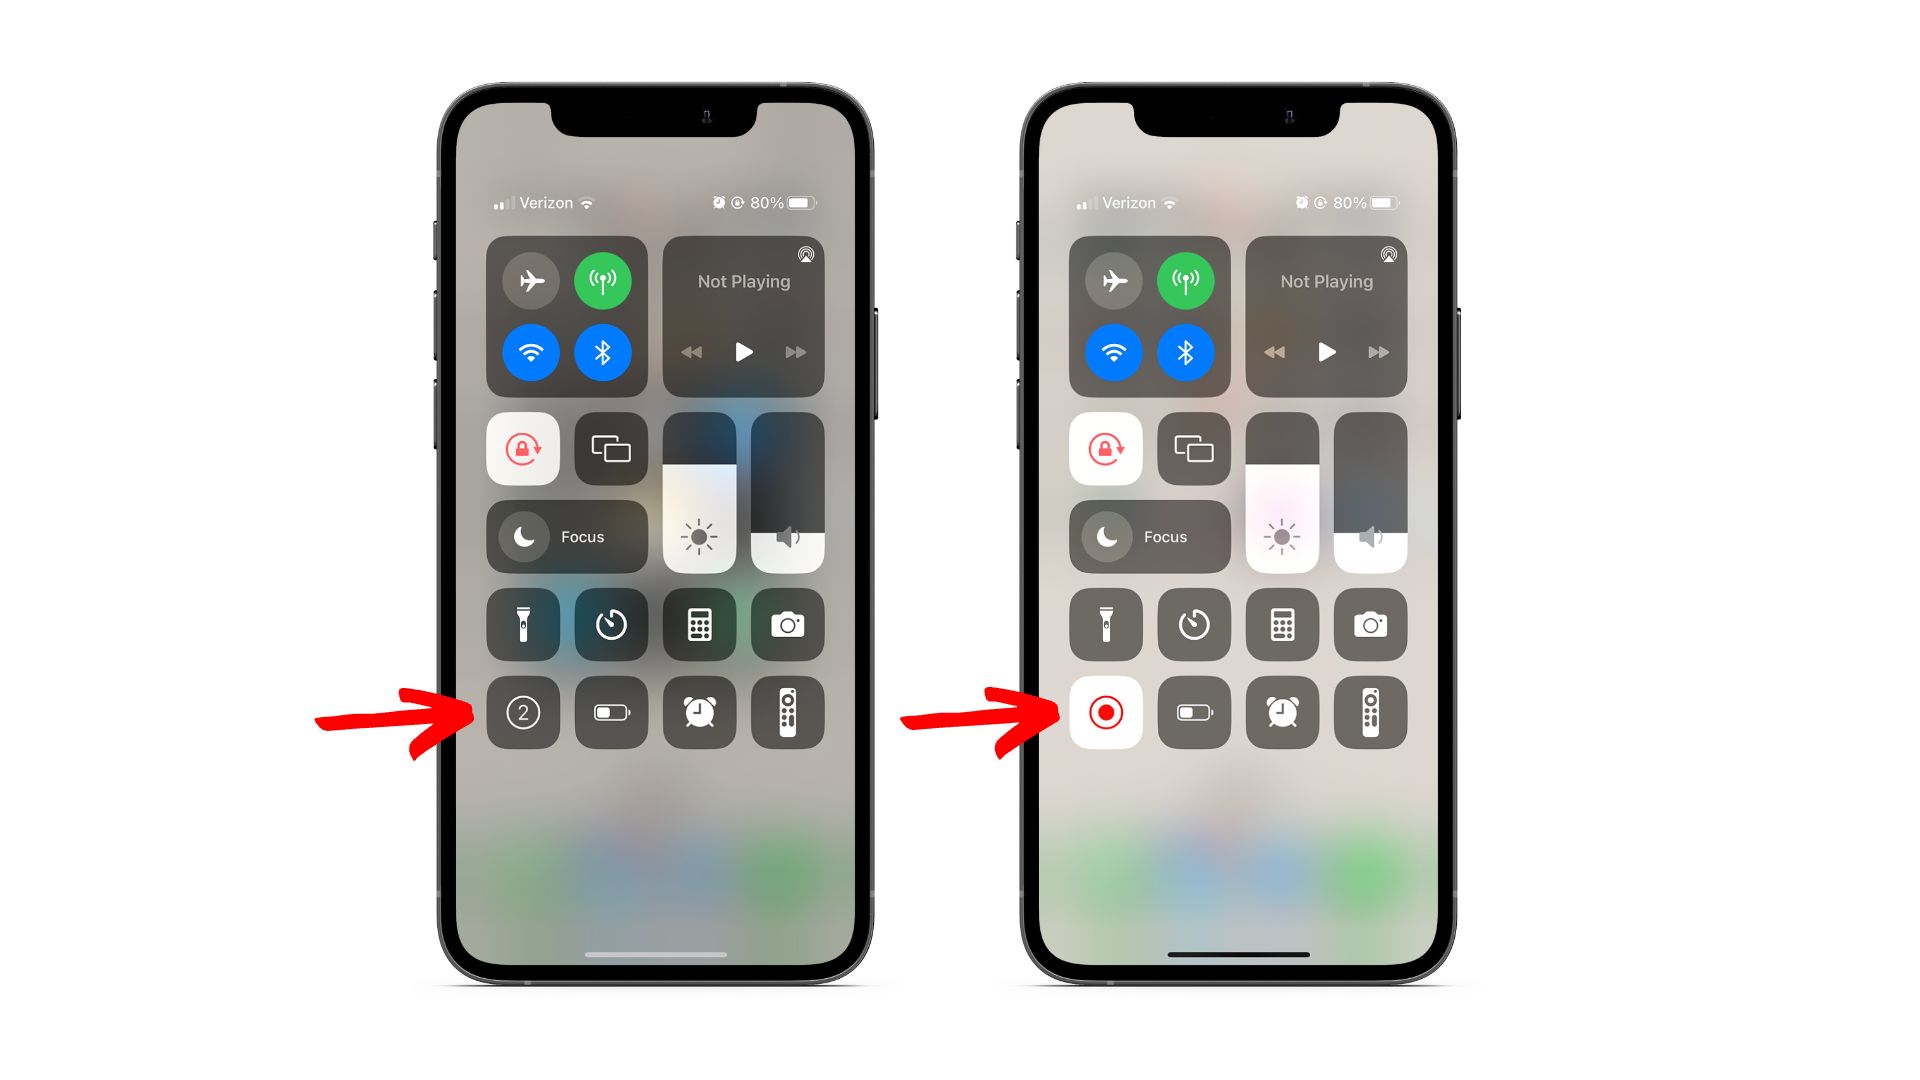
Once the Control Center is open, you’ll see a variety of icons representing different functions. To start the screen recording, simply tap the “Record” button, which looks like a solid circle inside a larger circle. After tapping the button, a three-second countdown will appear, giving you a moment to prepare before the recording begins. Once the countdown finishes, the screen recording will start, and a red status bar will appear at the top of the screen to indicate that the recording is in progress.
Customizing screen recording settings allows you to control various aspects of the recording process. To access these settings, press and hold the “Record” button in the Control Center. A menu will appear, offering options to turn on the microphone for audio recording, which is ideal for capturing your voice or other ambient sounds during the screen recording. You can also toggle the microphone off if you prefer to record without audio. Additionally, you can choose to enable or disable the option to show or hide the on-screen touches, which can be useful for tutorials or demonstrations where you want to highlight specific actions on the screen.
Completing the Screen Recording- Stopping the screen recording- Accessing the recorded video
Once you have successfully captured the desired content through screen recording on your iPhone 11, it’s essential to know how to stop the recording and access the saved video.
To stop the screen recording, simply tap the red status bar at the top of the screen. This will prompt a confirmation dialog to appear, asking if you want to stop the recording. Tap “Stop” to end the screen recording process. Alternatively, you can also access the Control Center and tap the screen recording icon to stop the recording.
After stopping the screen recording, the video will be automatically saved to your iPhone’s Photos app. To access the recorded video, navigate to the Photos app and look for the newly captured video in the “Recents” or “Videos” section. From there, you can view, edit, and share the recorded video with ease.
Sure, here's the content with each paragraph wrapped in
tags:
Using Screen Recording- Sharing and editing the recorded video- Tips for effective screen recording
Once you’ve successfully recorded your screen on your iPhone 11, you might want to share or edit the video. The screen recording feature allows you to do just that, and more. From sharing your gameplay clips with friends to creating tutorials for your followers, the possibilities are endless.
Sharing the recorded video is a breeze. Simply head to the Photos app, locate the screen recording, and tap the share icon. You can then choose to send it via Messages, Mail, or any other compatible app. Additionally, you can upload it to your favorite social media platform to showcase your skills or share valuable insights with your audience.
Editing the recorded video can be done directly on your iPhone 11 using the built-in editing tools in the Photos app. Trim, crop, add text, or include annotations to make your screen recording more engaging and informative. These editing features empower you to refine your content before sharing it with the world.
When it comes to effective screen recording, there are a few tips to keep in mind. Firstly, ensure that your device is adequately charged to avoid interruptions during the recording process. Additionally, consider using a stable surface or a tripod to minimize shaky footage, especially when recording tutorials or demonstrations.
Furthermore, it’s beneficial to declutter your screen and close any unnecessary apps to maintain a clean and focused recording environment. This ensures that the viewer’s attention is solely on the content you’re presenting. Lastly, practicing beforehand and familiarizing yourself with the screen recording controls can significantly improve the quality and flow of your recordings.
Conclusion
Screen recording on an iPhone 11 is a powerful feature that allows you to capture and share moments with ease. Whether you’re showcasing a new app, providing tech support, or simply recording a memorable interaction, the screen recording function offers a wealth of possibilities. By swiping to access the Control Center and tapping the screen recording icon, you can effortlessly create high-quality videos. Additionally, the ability to record audio alongside the screen activity enhances the overall experience. With these capabilities at your fingertips, you can unleash your creativity and share your knowledge in dynamic ways. The iPhone 11’s screen recording feature empowers users to communicate, educate, and entertain with seamless efficiency.
FAQs
Q: Can I screen record on my iPhone 11?
Yes, you can easily screen record on your iPhone 11 using the built-in screen recording feature.
Q: How do I access the screen recording feature on my iPhone 11?
To access the screen recording feature on your iPhone 11, simply swipe down from the top right corner of the screen to open the Control Center. Then, tap the screen recording icon to start recording.
Q: Where are the screen recordings saved on my iPhone 11?
After recording your screen on iPhone 11, the video will be saved to the Photos app in the "Screenshots" album.
Q: Can I record audio while screen recording on my iPhone 11?
Yes, you can record audio while screen recording on your iPhone 11. Simply long-press or 3D Touch the screen recording icon in the Control Center, and then tap the microphone icon to turn on audio recording.
Q: How can I stop a screen recording on my iPhone 11?
To stop a screen recording on your iPhone 11, simply tap the red status bar at the top of the screen or open the Control Center and tap the screen recording icon again.