
Screen recording on the iPhone 14 Plus is a handy feature that allows you to capture and save whatever is happening on your device’s screen. Whether you want to share a tutorial, showcase a game, or capture a memorable moment, screen recording can come to your rescue. In this article, we will delve into the steps you need to follow to screen record on your iPhone 14 Plus, ensuring that you can effortlessly capture and share your screen with ease. So, if you’ve been wondering how to screen record on your iPhone 14 Plus, you’ve come to the right place. Let’s jump right in and explore the methods to screen record on your iPhone 14 Plus!
Inside This Article
- Enabling Screen Recording on iPhone 14 Plus
- Using the Control Center to Start Screen Recording
- Customizing Screen Recording Settings
- Accessing and Managing Screen Recordings
- Conclusion
- FAQs
Enabling Screen Recording on iPhone 14 Plus
Screen recording has become an essential feature for many iPhone users as it allows them to capture and share important moments or create engaging instructional videos. If you own an iPhone 14 Plus and want to know how to enable screen recording, you’re in the right place. In this article, we will guide you through the process, step by step.
To begin screen recording on your iPhone 14 Plus, you need to access the Control Center. To do this, swipe down from the top-right corner of the screen. This action will open the Control Center, which provides quick access to various settings and features.
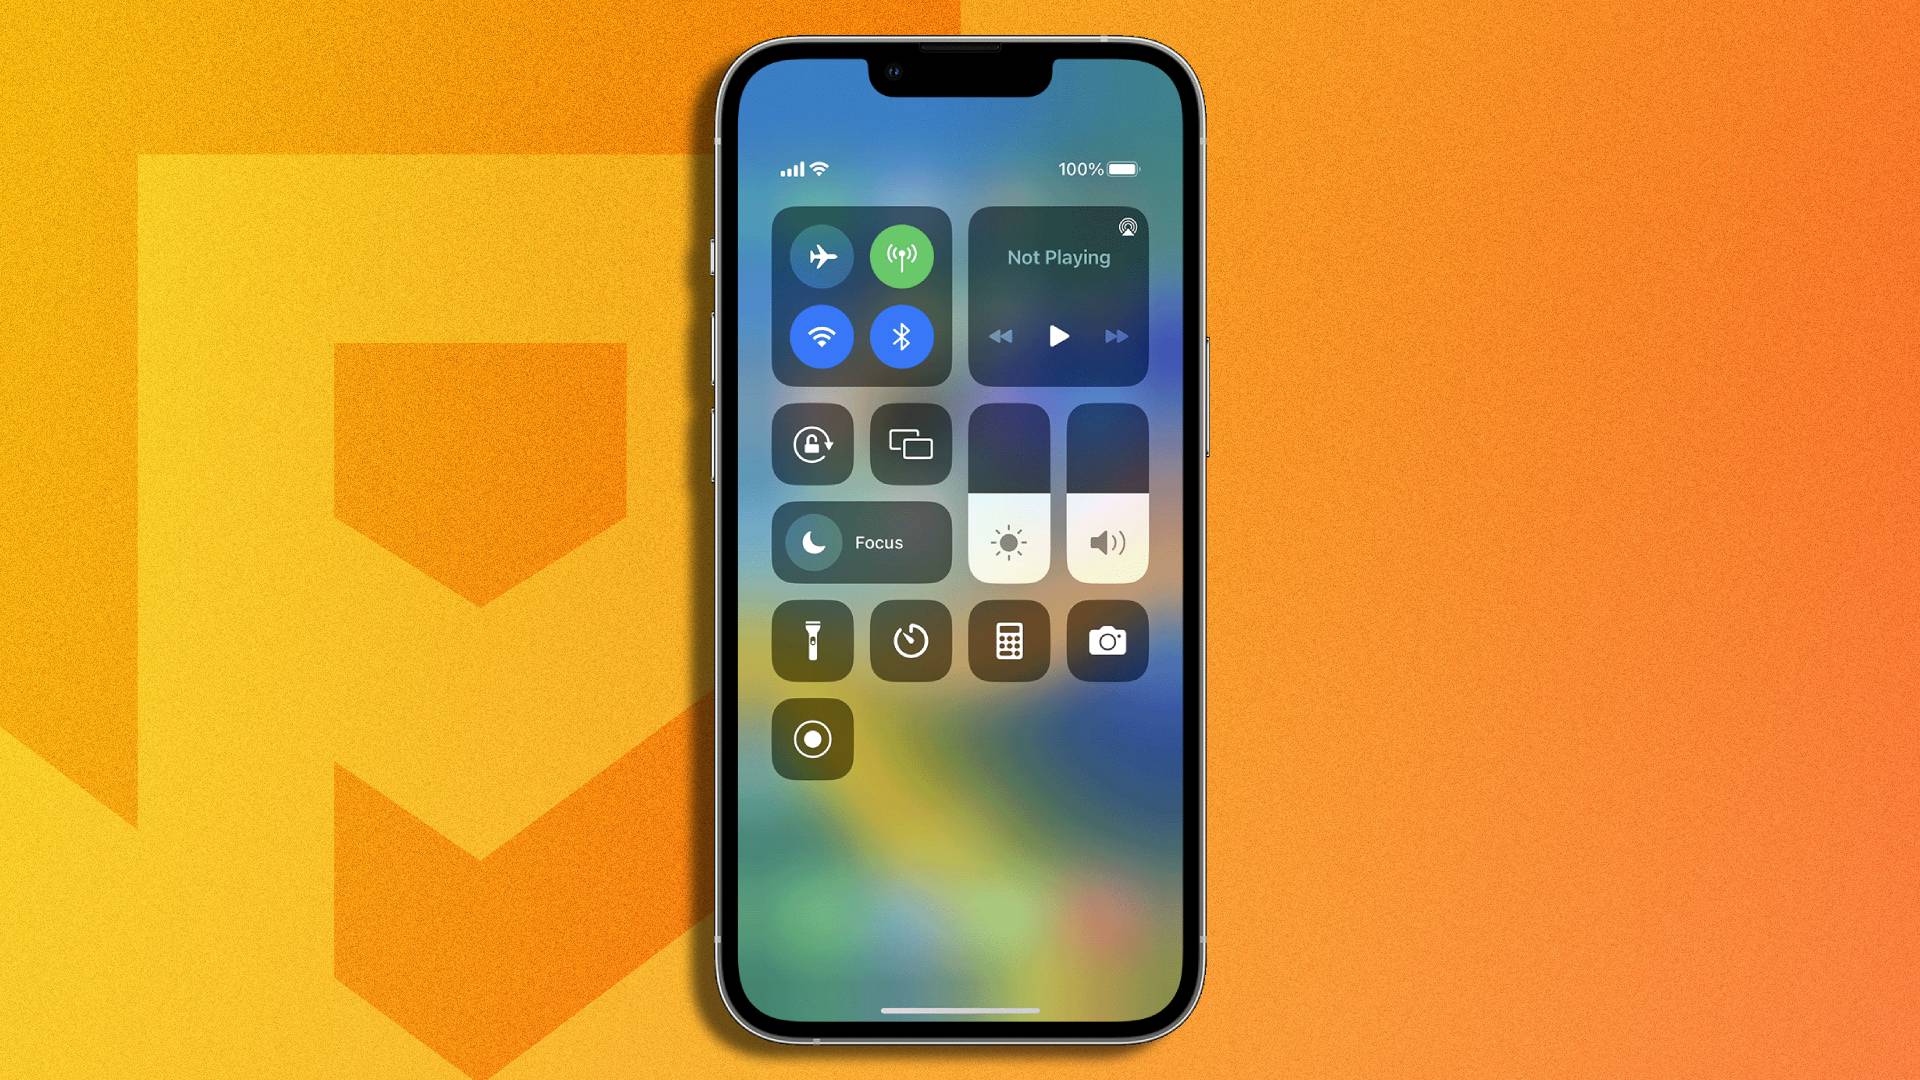
Within the Control Center, you will find a range of icons representing different functions. Look for the “Screen Recording” icon, which looks like a solid circle inside a circular frame. It may not be visible by default, so you may need to customize your Control Center to include it.
If the “Screen Recording” icon is not visible, follow these steps to add it to your Control Center:
- Go to the “Settings” app on your iPhone.
- Scroll down and tap on “Control Center”.
- Select “Customize Controls”.
- Under “More Controls”, locate “Screen Recording” and tap the green plus icon next to it.
- Exit the settings menu.
Now that you have added the “Screen Recording” icon to your Control Center, you can start using it to record your iPhone 14 Plus screen. Simply follow these steps:
- Swipe down from the top-right corner of the screen to access the Control Center.
- Locate the “Screen Recording” icon – it should be a small circle inside a circular frame.
- Tap the “Screen Recording” icon once to initiate the recording process.
- A countdown timer of three seconds will appear, giving you time to prepare.
- Once the countdown ends, your iPhone 14 Plus will start recording everything on the screen.
To stop the screen recording, you can either tap the red time indicator at the top of the screen and confirm “Stop” or access the Control Center and press the “Screen Recording” icon again.
Once you have finished recording, the screen recording will be automatically saved to your Photos app. From there, you can edit, trim, and share it with others.
Remember, screen recording on your iPhone 14 Plus allows you to capture not only the visuals on your screen but also the accompanying audio. It’s a great tool for creating tutorials, demonstrations, or even showcasing your gaming skills.
So, go ahead and enable screen recording on your iPhone 14 Plus to unlock a whole new level of creativity and functionality.
Using the Control Center to Start Screen Recording
Screen recording on your iPhone 14 Plus is a convenient and versatile feature that allows you to capture and share anything happening on your screen. With just a few simple steps, you can record videos, tutorials, gaming sessions, or any other activity you want to preserve or showcase.
The Control Center is the central hub for accessing various features and functions on your iPhone. To start screen recording, you’ll need to add the screen recording icon to your Control Center if it’s not already there. Here’s how:
- Unlock your iPhone 14 Plus and swipe down from the top-right corner of the screen to open the Control Center.
- Tap on the “Customize Controls” button, represented by the icon of three horizontal lines with a circle at the bottom.
- In the “More Controls” section, locate the “Screen Recording” option. To add it to the Control Center, tap on the green “+” symbol next to it.
- Once added, you can rearrange the order of the controls by holding down the three horizontal lines next to each control and dragging it up or down.
Now that you have added the screen recording icon to the Control Center, you are ready to start recording your screen. Follow these steps:
- Open the app or screen that you want to record.
- Swipe down from the top-right corner of the screen to open the Control Center.
- Tap on the screen recording button, represented by a solid circle inside a larger circle. A countdown timer of three seconds will appear to let you prepare.
- The status bar at the top of your screen will turn red, indicating that the screen recording has started.
- To finish the recording, tap on the red status bar and select “Stop” from the pop-up menu. Alternatively, you can swipe up from the bottom of the screen and tap on the screen recording button again.
Once you have finished recording, the screen recording will be saved to your Photos app. You can access and manage your screen recordings from there.
Using the Control Center to start screen recording on your iPhone 14 Plus is a quick and easy method to capture and document your screen activity. Whether it’s for educational, creative, or entertainment purposes, screen recording adds a new dimension to your iPhone experience.
Customizing Screen Recording Settings
Screen recording on the iPhone 14 Plus offers a variety of customization options to ensure a seamless and personalized experience. Whether you want to adjust the video quality, include microphone audio, or even capture touches on the screen, you can easily customize the settings to fit your needs.
To access the screen recording settings on your iPhone 14 Plus, follow these simple steps:
- Open the Settings app on your device.
- Scroll down and tap on Control Center.
- Tap on Customize Controls.
- Locate Screen Recording under the “More Controls” section and tap the “+” button to add it to your Control Center.
Once you have added Screen Recording to your Control Center, you can now customize the settings. Here’s how:
- Swipe down from the top-right corner of your screen to open the Control Center.
- Tap on the Screen Recording icon, which looks like a solid circle within a square.
- Before you start recording, you can customize the following settings:
- Microphone Audio: Toggle the microphone icon on or off depending on whether you want to include audio from your device’s microphone in the screen recording.
- Show Touches: Enable this option if you want your touches on the screen to be visible in the recording.
- Video Quality: Tap on “Options” to choose between recording in high efficiency or maximum compatibility. High efficiency provides better quality but may not be compatible with all devices.
Once you have customized the settings to your preference, tap on “Start Recording” to begin capturing your screen. You will see a countdown timer at the top of your screen before the recording starts. To stop the recording, either tap on the red status bar at the top of your screen or open the Control Center and tap on the Screen Recording button again.
After you stop the recording, it will be automatically saved to your Photos app, where you can easily access and manage your screen recordings.
Customizing the screen recording settings allows you to tailor your recording experience to suit your specific needs. Whether you’re creating tutorials, capturing gameplay, or simply documenting important moments on your iPhone 14 Plus, the customization options give you the flexibility to achieve the desired results with ease.
Accessing and Managing Screen Recordings
Once you’ve successfully recorded your screen on your iPhone 14 Plus, you might be wondering how to access and manage those recordings. Fortunately, Apple has made it incredibly easy to find and control your screen recordings.
To access your screen recordings, simply navigate to the Photos app on your iPhone. Open the app and tap on the “Albums” tab at the bottom of the screen. Scroll down until you find the “Media Types” section, and then tap on “Screenshots & Screen Recordings.
Once you’re in the “Screenshots & Screen Recordings” album, you will see all of your screen recordings listed in chronological order. You can tap on any recording to view it in full-screen mode and even edit or share it if desired.
Managing your screen recordings is also a breeze. You can delete unwanted recordings by simply tapping on the “Select” button in the top right corner of the screen, and then selecting the recordings you want to delete. Once you’ve made your selection, tap on the trash can icon to delete them.
If you want to save a copy of your screen recording to your computer or other device, you can easily do so by connecting your iPhone 14 Plus to your computer and using iTunes or Finder to transfer the recording.
It’s worth noting that screen recordings can take up a significant amount of storage space on your device, especially if they are lengthy or high-resolution. To free up space, you may want to periodically go through your screen recordings and delete any that are no longer needed.
Conclusion
Screen recording on the iPhone 14 Plus is a valuable feature that allows you to capture and share moments from your device’s screen with ease. Whether you want to create tutorials, demonstrate app functionalities, or save important information, screen recording provides a convenient option. By following the simple steps outlined in this article, you can quickly initiate and customize screen recording on your iPhone 14 Plus.
Remember to check your device’s settings to ensure screen recording is enabled and adjust any necessary permissions. Additionally, take advantage of the various options available, such as adding audio narration, embedding your front-facing camera, or including touches on the screen. With these in mind, you can enhance your screen recordings and make them more engaging and informative.
Whether you’re a casual user or a professional, the screen recording feature on the iPhone 14 Plus offers endless possibilities. From capturing gameplay to sharing important presentations, screen recording empowers you to showcase your device’s capabilities. So, go ahead and explore the world of screen recording on your iPhone 14 Plus today!
FAQs
Q: How do I screen record on iPhone 14 Plus?
Screen recording on iPhone 14 Plus is a simple process. To initiate screen recording, follow these steps:
- Open the Control Center by swiping down from the top-right corner of the screen.
- Locate the “Screen Recording” button, which looks like a filled-in circle within a circle.
- Tap the button to start recording.
- If prompted, you can choose to record audio from the microphone or disable it for a silent recording.
- To end the recording, tap the red status bar at the top of the screen or the “Stop” button in the Control Center.
- The recorded video will be saved in the Photos app on your iPhone 14 Plus.
Q: Can I screen record with sound on iPhone 14 Plus?
Yes, you can record sound while screen recording on your iPhone 14 Plus. When you start the screen recording process, you have the option to enable or disable audio recording from the microphone. If you want to include sound in your recording, make sure the microphone icon in the Control Center is enabled before starting the screen recording.
Q: Where are the screen recordings saved on iPhone 14 Plus?
Once you stop the screen recording, it is automatically saved in the Photos app on your iPhone 14 Plus. To access your screen recordings, open the Photos app, go to the “Albums” tab, and look for the “Screen Recordings” album. All your recorded videos will be stored there for easy access.
Q: Can I edit my screen recordings on iPhone 14 Plus?
Yes, you can edit your screen recordings on your iPhone 14 Plus using the built-in editing tools in the Photos app. Once you locate the screen recording in the “Screen Recordings” album, tap on it to open it. From there, you can trim the video, add filters, adjust brightness and contrast, and even add text or other elements to enhance your recording.
Q: Is there a time limit for screen recordings on iPhone 14 Plus?
By default, there is no time limit for screen recordings on your iPhone 14 Plus. You can record for as long as you want, as long as you have enough storage space to accommodate the video file. However, keep in mind that longer recordings may take up more storage space and require more processing power, so be mindful of your device’s resources when recording for extended periods.