
Are you struggling to insert multiple blank rows between data in Excel? Well, you’re in luck! In this article, we will guide you through a step-by-step process on how to easily insert multiple blank rows in Excel. Whether you have a large dataset or just a few rows, this handy trick will save you time and effort.
Excel is a powerful tool for data manipulation and analysis, but sometimes you need to insert blank rows to organize your data better or make room for additional information. Instead of manually inserting each row one by one, we will show you a simple technique that will allow you to insert multiple rows in just a few clicks.
By following our instructions and utilizing Excel’s built-in features, you’ll be able to seamlessly insert multiple blank rows wherever you need them, empowering you to work more efficiently and effectively in Excel.
Inside This Article
- Method 1: Using the Insert Functionality
- Method 2: Using the Fill Handle
- Method 3: Using the Go To Special Feature
- Conclusion
- FAQs
Method 1: Using the Insert Functionality
Inserting multiple blank rows in Excel between data can be done using the built-in Insert functionality. This method allows you to quickly and easily add blank rows without the need for complex formulas or macros.
To get started, follow these steps:
- Select the range where you want to insert the blank rows. This could be a single column, multiple columns, or even the entire worksheet.
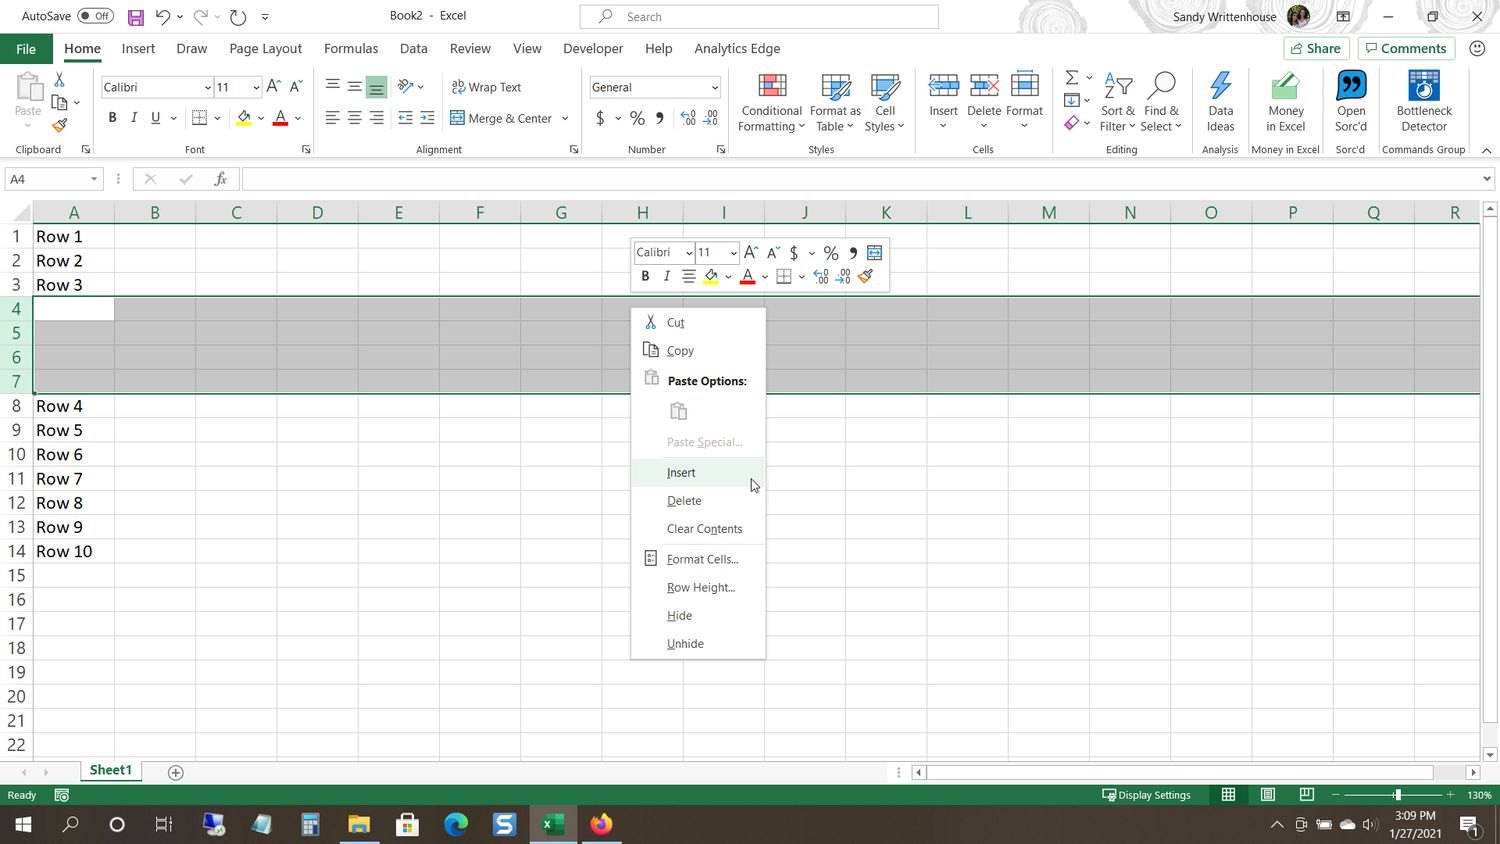
- Right-click on the selected range and choose “Insert” from the context menu. Alternatively, you can go to the “Home” tab in the Excel ribbon, click on the “Insert” drop-down arrow, and choose “Insert Sheet Rows” or “Insert Sheet Columns”.
- In the Insert dialog box that appears, make sure the “Entire row” option is selected. If you want to insert blank columns instead, choose the “Entire column” option.
- Specify the number of rows you want to insert. For example, if you want to insert 3 blank rows between each existing row of data, enter “3” in the input field.
- Click the OK button to insert the blank rows. Excel will automatically shift the existing data down to accommodate the new rows.
Once you have followed these steps, you can verify that the blank rows have been inserted correctly by scrolling through your worksheet or using the navigation keys. You should see the specified number of blank rows between each row of data.
This method of inserting blank rows in Excel using the Insert functionality is quick, straightforward, and does not require any advanced knowledge of Excel formulas or macros.
Now that you know how to insert multiple blank rows in Excel using the Insert functionality, you can easily organize and format your data to meet your specific needs.
Method 2: Using the Fill Handle
Another quick and efficient way to insert multiple blank rows in Excel between data is by using the Fill Handle feature. The Fill Handle is a small square at the bottom-right corner of a selected cell or range. It allows you to quickly fill adjacent cells with a series of values or formulas.
Here is a step-by-step guide on how to use the Fill Handle to insert blank rows:
- Select the range directly below where you want to insert the blank rows.
- Hover your mouse over the bottom-right corner of the selected range until it turns into a crosshair.
- Click and hold the left mouse button on the Fill Handle and drag it down to the desired number of blank rows you want to insert. You can see a preview of the inserted rows as you drag.
- Release the mouse button to insert the blank rows.
Once you have released the mouse button, Excel will automatically insert the specified number of blank rows between the existing data. The values in the cells below the inserted rows will move down accordingly.
Using the Fill Handle is particularly useful when you need to insert a large number of blank rows quickly. Instead of manually selecting and inserting rows, you can simply drag the Fill Handle to extend the range and let Excel do the work for you.
It’s important to note that when using the Fill Handle, the cells above the inserted rows will be copied down as well. So, if you have any formulas or data in those cells that shouldn’t be copied, you may need to adjust or clear those cells before using the Fill Handle.
In addition to inserting blank rows, you can also use the Fill Handle to insert other types of data, such as dates, numbers, or even custom series. Just enter the starting value or pattern in the first cell and drag the Fill Handle to extend the series.
Method 3: Using the Go To Special Feature
If you’re looking for a quick and efficient way to insert multiple blank rows in Excel between data, then the Go To Special feature is your best bet. This method allows you to select and manipulate specific types of cells, making it ideal for inserting blank rows.
Here’s how you can use the Go To Special feature to accomplish this:
- Select the range where you want to insert the blank rows.
- Press Ctrl + G on your keyboard or click on the Edit tab and choose Go To from the menu.
- In the Go To dialog box, click on the Special button.
- In the Go To Special dialog box, select Blanks and click OK.
- This will select all the blank cells within the selected range.
- Right-click on any of the selected cells and choose Insert from the context menu.
- Specify the number of rows you want to insert and click OK.
And voila! The blank rows will be inserted between your data, giving you the desired spacing effect. You can now proceed to enter any additional data or formatting in the newly inserted blank rows.
Using the Go To Special feature saves you time and effort, especially when dealing with large datasets. It eliminates the need to manually select and insert rows, making the process much more efficient.
Remember, to effectively use the Go To Special feature, make sure you have properly selected the range before accessing it. This ensures that the blank rows are inserted in the correct location within your spreadsheet.
So, give this method a try and see how it can simplify your Excel data manipulation tasks. With just a few clicks, you’ll be able to insert multiple blank rows exactly where you need them, saving you valuable time and effort.
Conclusion
In conclusion, knowing how to insert multiple blank rows in Excel between data is a valuable skill that can greatly enhance your productivity and data organization. By utilizing the techniques outlined in this article, including the use of the OFFSET and COUNTA functions, as well as the keyboard shortcuts, you can effortlessly insert the desired number of blank rows in just a few simple steps.
Whether you need to create space for additional data, improve readability, or prepare your spreadsheet for further analysis, these methods provide a quick and efficient solution. Remember to consider the size and complexity of your data set and choose the most suitable method for your specific needs.
By mastering this technique, you can confidently manipulate your Excel worksheets and optimize your workflow. With a little practice, you’ll be able to effortlessly insert multiple blank rows between your data, making your spreadsheets more organized and visually appealing.
FAQs
1. Why would I need to insert multiple blank rows in Excel between data?
There are several reasons why you might need to insert multiple blank rows in Excel between data. One common scenario is when you have a large dataset and want to organize it by inserting blank rows to separate different groups or categories. This can make the data easier to read and analyze. Additionally, inserting blank rows can help you create space for adding new information or performing calculations between existing data points.
2. How can I insert multiple blank rows in Excel?
To insert multiple blank rows in Excel, follow these steps:
a. Select the rows where you want to insert the blank rows. To select multiple rows, hold the shift key and click on the first and last row of the range.
b. Right-click on the selected rows and choose “Insert” from the context menu.
c. In the “Insert” dialog box, choose the option to insert “Entire row(s)” and specify the number of rows you want to insert.
d. Click “OK” to insert the blank rows.
You can also use a keyboard shortcut by pressing Ctrl + Shift + “+” to insert new rows above the selected rows.
3. Can I insert multiple blank rows based on specific criteria or conditions?
Yes, you can insert multiple blank rows based on specific criteria or conditions using Excel’s filtering feature and some formulas. Here’s how:
a. Apply a filter to your data by selecting the entire dataset and clicking on the “Filter” button on the Data tab.
b. Use the filter to display only the rows that meet the desired criteria.
c. Insert a new column next to the filtered data and enter a formula that evaluates the criteria for each row. For example, you can use an IF function to check if a specific cell meets certain conditions.
d. Filter the new column to display only the rows that meet the criteria defined in the formula.
e. Select the visible rows and follow the steps mentioned earlier to insert the multiple blank rows.
4. Will inserting multiple blank rows affect formulas or data references in my Excel worksheet?
No, inserting multiple blank rows will not affect existing formulas or data references in your Excel worksheet. The formulas and data references will automatically adjust to include the new rows. However, if you have complex formulas or specific cell references, you should double-check that they are still accurate after inserting the blank rows.
5. Can I automate the insertion of multiple blank rows in Excel?
Yes, you can automate the insertion of multiple blank rows in Excel by using VBA (Visual Basic for Applications). VBA allows you to create macros that perform repetitive tasks, such as inserting blank rows. You can record a macro while manually inserting the blank rows and then apply the macro to any other worksheet or workbook. This can save you time and effort when working with large datasets or when you need to insert blank rows regularly.