
Excel is a powerful tool for organizing and analyzing data, but sometimes the information is not presented in the most efficient format. If you find yourself with data organized in columns instead of rows, you may need to restructure it to make it easier to work with. Moving data from columns to rows in Excel can seem like a daunting task, especially if you have a large dataset. However, with the right techniques and a little bit of know-how, this process can be simplified and streamlined. In this article, we will explore various methods to effectively move data from columns to rows in Excel, giving you the ability to manipulate and analyze your data more effortlessly and efficiently.
Inside This Article
- Ways to Move Data from Columns to Rows in Excel
- Transpose Function: How to Select Data and Steps to Transpose Data
- Copy and Paste – How to Select the Data – Steps to Copy and Paste the Data
- VBA Macro: Overview of VBA macros – How to write a macro to move data from columns to rows
- Conclusion
- FAQs
Ways to Move Data from Columns to Rows in Excel
When working with data in Excel, there may be instances where you need to move data from columns to rows. This can be useful for various reasons, such as restructuring your data or preparing it for further analysis. Luckily, Excel provides several methods to accomplish this task efficiently. In this article, we will explore four different ways to move data from columns to rows in Excel: using the transpose function, using copy and paste, using Power Query, and using a VBA macro.
Using the Transpose Function
The transpose function is a built-in feature in Excel that allows you to convert data from rows to columns or vice versa. To use the transpose function to move data from columns to rows, follow these steps:
- Select the range of cells containing the data you want to move.
- Right-click on the selected range and choose “Copy” from the context menu.
- Select the cell where you want to paste the transposed data.
- Right-click on the destination cell and choose “Paste Special” from the context menu.
- In the Paste Special dialog box, check the “Transpose” option and click “OK”.
By following these steps, Excel will transpose the selected data from columns to rows, placing the transposed data in the designated cell.
Using Copy and Paste
Another simple method to move data from columns to rows is by using the copy and paste technique. This method is suitable for smaller sets of data. Here is how you can do it:
- Select the range of cells containing the data you want to move.
- Right-click on the selected range and choose “Copy” from the context menu.
- Select the cell where you want to paste the data.
- Right-click on the destination cell and choose “Transpose” from the context menu.
This method will copy the selected data from columns to rows, pasting it in the desired cell location while transposing the values.
Using Power Query
If you have a larger dataset or you need to perform more complex transformations, Power Query is a powerful tool in Excel that can help you move data from columns to rows. Here’s how you can use Power Query:
- Select the range of cells containing the data you want to transform.
- Go to the “Data” tab in the Excel ribbon and click on “Get & Transform Data”.
- Choose the “From Table/Range” option to import the data into Power Query.
- In the Power Query Editor, go to the “Transform” tab and click on “Transpose”.
- Click “Close & Load” to load the transposed data into a new sheet or the existing sheet.
By using Power Query, you have more control over the transformation process, allowing you to manipulate and organize your data as needed.
Using a VBA Macro
For advanced users and those looking for more automation options, using a VBA macro is an effective way to move data from columns to rows. Here is a basic example of how you can write a VBA macro to achieve this:
- Press “Alt+F11” to open the Visual Basic for Applications (VBA) editor.
- Click on “Insert” in the menu and choose “Module” to insert a new module.
- Copy the following VBA code and paste it into the module:
- Modify the range references in the VBA code to match your data range.
- Close the VBA editor and run the macro by pressing “Alt+F8” and selecting the “MoveDataFromColumnsToRows” macro.
Sub MoveDataFromColumnsToRows()
‘Select the range of cells containing the data you want to move
Range(“A1:C4”).Select
‘Copy the selected range
Selection.Copy
‘Select the destination cell
Range(“E1”).Select
‘Paste the data and transpose it
Selection.PasteSpecial Paste:=xlPasteAll, Operation:=xlNone, SkipBlanks:= _
False, Transpose:=True
‘Clear the clipboard
Application.CutCopyMode = False
End Sub
Running this macro will automatically move the data from columns to rows and transpose it in the process.
Transpose Function: How to Select Data and Steps to Transpose Data
The transpose function in Excel is a powerful tool that allows you to quickly and easily move data from columns to rows, or vice versa. This function is particularly useful when you have data organized in a columnar format and you need to rearrange it into a row-based format.
Here are the steps to use the transpose function in Excel:
- Select the Data: Before using the transpose function, you need to select the data you want to transpose. You can do this by clicking and dragging your mouse to highlight the range of data in the column you want to transpose.
- Copy the Data: Once you have selected the data, right-click on it and choose “Copy” from the context menu, or use the keyboard shortcut Ctrl+C to copy the data to the clipboard.
- Select the Destination: Next, select the cell where you want the transposed data to begin. This should be a blank cell in a new location in your worksheet.
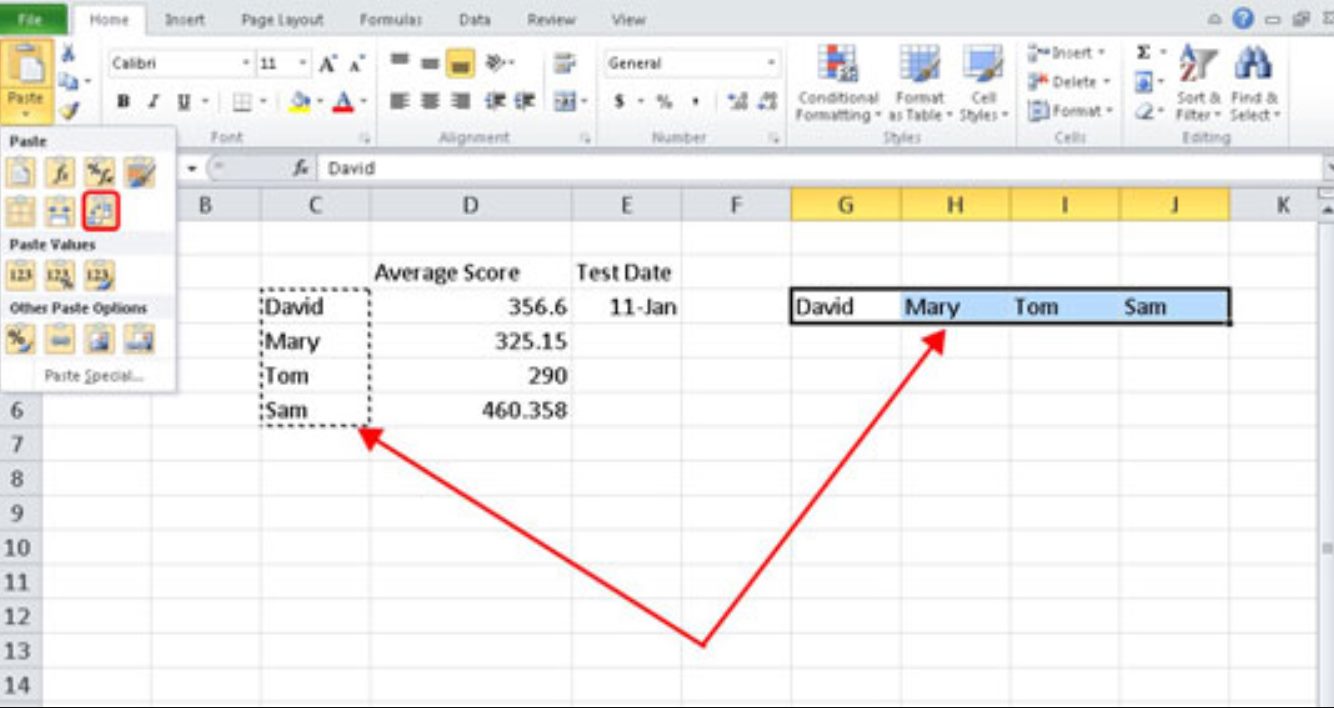
- Paste Special: Right-click on the selected cell and choose “Paste Special” from the context menu. In the Paste Special dialog box, check the “Transpose” option under the Paste section, and click “OK”.
- Review the Transposed Data: The data from the selected column will now be transposed into rows, starting from the cell you selected as the destination. Review the transposed data to ensure that it is arranged correctly.
- Adjust Formatting: Depending on your specific data, you may need to adjust formatting, such as column widths or number formats, to make the transposed data look neat and organized.
That’s it! You have successfully used the transpose function in Excel to move data from columns to rows. This can be a time-saving technique when working with large datasets or when you need to restructure your data for a specific analysis or presentation.
Copy and Paste – How to Select the Data – Steps to Copy and Paste the Data
One of the simplest and most commonly used methods to move data from columns to rows in Excel is through the copy and paste technique. This method allows you to quickly transfer data without the need for complex formulas or functions. Let’s explore how to select the data and the steps to copy and paste it.
How to Select the Data:
Before you can copy and paste the data, you need to select the relevant columns. Here’s how:
- Open your Excel worksheet and navigate to the sheet containing the data.
- Click and hold the mouse button on the top-left cell of the columns you want to move.
- Drag the mouse down to the bottom row of the columns to include all the data.
- Release the mouse button to complete the selection.
Once you have selected the data, you are now ready to proceed with the copy and paste steps.
Steps to Copy and Paste the Data:
- Right-click on the selected data and choose the “Copy” option from the context menu. Alternatively, you can use the shortcut key combination Ctrl + C to copy the data.
- Navigate to the destination location where you want to paste the data. Make sure the destination cells are empty or do not contain any important data.
- Right-click on the destination cell where you want the data to start and choose the “Paste” option from the context menu. Alternatively, you can use the shortcut key combination Ctrl + V to paste the data.
- The selected data will now be copied and pasted into the destination cells, appearing in rows instead of columns.
It’s important to note that the copy and paste technique maintains the formatting of the original data, including any formulas or conditional formatting. If you only want to paste the values without formatting, you can use the “Paste Special” option.
Using the copy and paste method provides a straightforward and efficient way to move data from columns to rows in Excel. Whether you’re working with a small dataset or a large amount of information, this technique can easily be implemented to rearrange your data for better analysis and presentation.
VBA Macro: Overview of VBA macros – How to write a macro to move data from columns to rows
VBA (Visual Basic for Applications) is a programming language that is used to automate tasks in Microsoft Office applications, including Excel. With VBA macros, you can write code to perform complex operations and manipulate data within your Excel spreadsheets.
When it comes to moving data from columns to rows in Excel using a VBA macro, the process can be relatively straightforward and efficient. Here’s an overview of how VBA macros work and how you can write a macro to achieve this specific task:
- Open your Excel file and navigate to the Developer tab. If you don’t see this tab, you may need to enable it in the Excel options.
- Click on the Visual Basic button to open the VBA editor.
- On the left-hand side of the VBA editor, locate the Project Explorer window. If it is not visible, go to View and select Project Explorer.
- Expand the Project Explorer and double-click on the sheet where your data is stored.
- In the main window of the VBA editor, you will see the code window for the selected sheet. This is where you will write your macro.
- To begin writing the macro, start with the
Substatement followed by the name you want to give to your macro. For example, you can useSub MoveColumnsToRows(). - Inside the macro, you will use a combination of variables, loops, and range manipulation to accomplish your task. The exact code will depend on the structure of your data and how you want it to be transposed.
- One popular method to move columns to rows is by using a
Forloop to iterate through the columns and rows. Within the loop, you can use theOffsetproperty to read and write values to specific cells. - Once you have written the code to move the data from columns to rows, you can close the VBA editor and return to your Excel file.
- To run the macro, go back to the Developer tab and click on the Macros button. Select the macro you created and click on Run.
- Your data will now be transposed from columns to rows based on the logic you have defined in your VBA macro.
Remember to save your Excel file with the macros enabled so that you can use the macro in the future without having to recreate it. Additionally, it is important to test and modify the code as per your specific requirements and data structure to ensure accurate results.
By leveraging the power of VBA macros, you can automate repetitive tasks in Excel and streamline data manipulation processes. Whether you are working with large datasets or need a customized solution, VBA macros offer great flexibility and efficiency in transforming data from columns to rows and vice versa.
Conclusion
In conclusion, learning how to move data from columns to rows in Excel is a valuable skill that can save you time and effort when working with large datasets. By taking advantage of the transpose function and other techniques discussed in this article, you can easily reorganize your data to suit your needs.
Remember to always save a backup of your original data before making any major changes. This will ensure that you can revert back to your original dataset if needed.
Whether you’re organizing data for analysis, creating reports, or preparing data for further processing, being able to manipulate and rearrange data is an essential Excel skill. With the tips and techniques provided in this article, you’ll be able to confidently convert your columnar data into easy-to-read rows.
FAQs
Q: Can I move data from columns to rows in Excel?
A: Yes, you can easily move data from columns to rows in Excel by using the Transpose feature. This allows you to reorganize your data and change the orientation from vertical to horizontal.
Q: How do I transpose data in Excel?
A: To transpose data in Excel, follow these steps:
- Select the range of cells that you want to transpose.
- Right-click and choose “Copy” or press Ctrl+C.
- Right-click on a new location where you want the transposed data to appear.
- Under Paste Options, select the “Transpose” icon.
- Click on it, and your data will be transposed from columns to rows.
Q: Can I transpose data from multiple columns to a single row?
A: Yes, you can transpose data from multiple columns to a single row in Excel. However, it’s important to ensure that the destination row has enough cells to accommodate the transposed data. If the row is not long enough, the data might be cut off.
Q: Is there a shortcut key for transposing data in Excel?
A: Yes, you can use the following shortcut keys to transpose data in Excel:
- Select the range of cells you want to transpose.
- Press and hold the “Ctrl” key.
- Press the “C” key to copy the data.
- Press the “V” key to paste the copied data.
- Press the “Enter” key while still holding the “Ctrl” key.
Q: Can I transpose data in Excel without losing the formatting?
A: Yes, you can transpose data in Excel without losing the formatting by using the Paste Special feature. After copying the data, instead of choosing the “Transpose” option, right-click on the destination cell and select “Paste Special.” In the dialog box that appears, check the “Transpose” checkbox and click “OK.” This will transpose the data while preserving its formatting.