
In the world of data analysis and spreadsheet management, Excel is a powerhouse. It offers a wide range of features and functions that make working with data efficient and effective. One common task that Excel users often come across is selecting all the data in a spreadsheet. Whether you’re looking to perform calculations, apply formatting, or manipulate the data in any way, having the ability to select all the data is crucial.
In this article, we will explore different methods to select all the data in Excel. From selecting entire rows and columns to selecting multiple sheets at once, we will cover various techniques to meet your specific needs. Whether you’re a beginner or an experienced Excel user, mastering the art of selecting all the data will streamline your workflow and save you time and effort. So, let’s dive in and learn how to easily select all the data in Excel!
Inside This Article
- Selecting Data using the Mouse
- Selecting Data using Keyboard Shortcuts
- Selecting Data using the Name Box
- Selecting Data in Entire Columns or Rows
- Conclusion
- FAQs
Selecting Data using the Mouse
If you prefer a more hands-on approach to selecting data in Excel, using the mouse can be a quick and efficient method. With just a few clicks, you can highlight and select the desired data with precision. Here’s a step-by-step guide on how to select data using the mouse.
1. Position your cursor: Move your mouse cursor to the cell from which you want to start selecting the data. This will be the top-left corner of your selection.
2. Click and drag: Press and hold the left mouse button while dragging the cursor to the bottom-right corner of your desired selection. You should see a highlighted area as you drag your cursor.
3. Adjust the selection: If you need to adjust your selection, you can release the left mouse button and click and drag again to include or exclude additional cells.
4. Select non-adjacent cells: To select non-adjacent cells or ranges, hold down the Ctrl key while clicking on each individual cell or range.
5. Confirm the selection: Once you have selected the desired data, you can release the left mouse button. The selected cells will remain highlighted, ready for any further operations.
Using the mouse to select data in Excel is a straightforward method that allows for precise and flexible selection. It is particularly useful when dealing with smaller data sets or when you need to make specific selections within a larger range of data.
Selecting Data using Keyboard Shortcuts
Excel provides a range of keyboard shortcuts that can make selecting data quicker and more efficient. Here are some useful keyboard shortcuts to help you select data in Excel:
Selecting a Range of Cells: To select a range of cells, use the SHIFT key in combination with the arrow keys. For example, to select a range of cells from A1 to E5, click on cell A1, hold down the SHIFT key, and then press the right arrow key four times and the down arrow key four times.
Selecting an Entire Row or Column: To select an entire row, press the SHIFT key and the spacebar at the same time. To select an entire column, press the CTRL key and the spacebar simultaneously. This shortcut is especially useful when you want to perform operations on an entire row or column.
Selecting Multiple Non-Adjacent Cells: To select multiple non-adjacent cells, hold down the CTRL key while clicking on the desired cells. This allows you to select cells that are not next to each other, which is helpful when you need to perform actions on specific cells scattered throughout the worksheet.
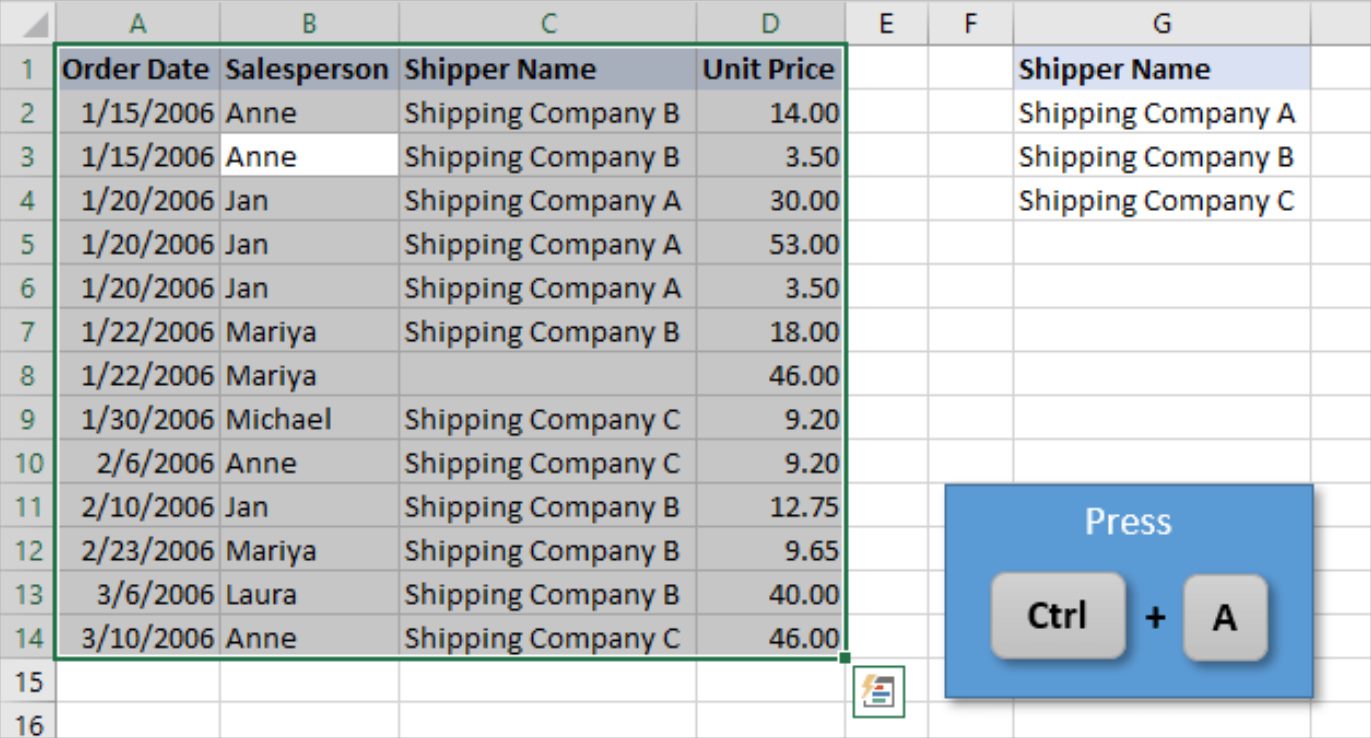
Selecting the Entire Worksheet: To select the entire worksheet, simply press the CTRL key and the letter A at the same time. This shortcut is handy when you want to apply formatting or changes to the entire worksheet in one go.
Selecting Visible Cells Only: To select only the visible cells in a filtered range, first apply the desired filter to your data. Then press ALT + ; (semicolon) to select only the visible cells. This shortcut excludes any hidden rows or columns and ensures that only the visible data is selected.
Selecting Cells with Data: If you want to select only the cells that contain data in a range, you can use the CTRL + SHIFT + Right Arrow or CTRL + SHIFT + Down Arrow keyboard shortcuts. These shortcuts will take you to the last cell with data in that direction and select all the cells containing data.
By utilizing these keyboard shortcuts, you can navigate and select data in Excel more efficiently, leading to a smoother workflow and increased productivity.
Selecting Data using the Name Box
When it comes to selecting data in Excel, there are various methods you can use. One often overlooked method is using the Name Box. The Name Box is located next to the formula bar at the top of the Excel window. It is typically used for entering and displaying cell references or named ranges.
However, you can also use the Name Box to select data in Excel. Simply follow these steps:
- Click on the Name Box to activate it.
- Type in the cell range you want to select, using the format “A1:B10” for a rectangular range or “A1,A3,A5” for non-contiguous cells.
- Press Enter or click outside the Name Box.
By using the Name Box, you can quickly and easily select specific ranges of data in Excel without the need to manually click and drag with the mouse or use keyboard shortcuts.
In addition, the Name Box can be a useful tool when working with large worksheets that have complex data structures. By simply entering the cell range in the Name Box, you can quickly navigate and select the desired data without the hassle of scrolling or searching.
Furthermore, the Name Box enables you to select data in entire columns or rows by utilizing special cell references. For example, you can enter “A:A” to select the entire column A or “1:1” to select the entire row 1.
Overall, the Name Box provides a convenient and efficient way to select data in Excel. Whether you need to select a specific range or an entire column or row, the Name Box can help streamline your workflow and improve productivity.
Selecting Data in Entire Columns or Rows
When working with large sets of data in Excel, it is often necessary to select entire columns or rows. This can be a time-saving technique, especially when you want to apply formatting, calculations, or other operations to a specific range of data.
To select an entire column in Excel, simply hover your mouse over the column header until the cursor changes to a downward-facing arrow. Then, click on the column header to select the entire column. You can also use the shortcut key by pressing Ctrl + Spacebar.
If you want to select multiple columns, you can click and drag your mouse across the column headers or use the keyboard shortcut Ctrl + Shift + Right Arrow to select multiple adjacent columns. To select non-adjacent columns, hold down the Ctrl key while clicking on the column headers.
Selecting entire rows follows a similar process. Hover your mouse over the row header until the cursor changes to a right-facing arrow. Click on the row header to select the entire row. The shortcut key for selecting an entire row is Shift + Spacebar.
To select multiple rows, click and drag your mouse along the row headers or use the keyboard shortcut Shift + Ctrl + Down Arrow to select multiple adjacent rows. To select non-adjacent rows, hold down the Ctrl key while clicking on the row headers.
Once you have selected the desired columns or rows, you can perform various operations on the selected data. You can apply formatting, enter formulas or functions, sort the data, or delete the selected rows or columns.
It’s important to note that when you select an entire column or row, any changes made to the selected data will affect all the cells within that column or row. Therefore, exercise caution when performing operations on entire columns or rows.
By selecting data in entire columns or rows, you can easily manipulate and work with large sets of data in Excel. This technique can save time and improve efficiency when conducting data analysis and management tasks.
Ultimately, selecting all the data in Excel is a fundamental skill that can save you time and effort when working with large datasets. Whether you need to perform calculations, format the data, or analyze it for insights, being able to select all the data quickly and efficiently is essential. By utilizing the various methods discussed in this article, such as using keyboard shortcuts, clicking the select all button, or using the name box, you can easily highlight and manipulate your data with ease.
Remember to choose the method that suits your workflow best and consider the specific requirements of your Excel project. With practice and familiarity, you’ll become adept at selecting all the data in Excel, making your analysis and data manipulation tasks a breeze.
FAQs
1. How do I select all the data in Excel?
Selecting all the data in Excel is a simple process. You can use the shortcut Ctrl + A on your keyboard to select all the data in the current worksheet. Alternatively, you can click on the top-left corner of your worksheet where the row header and column header intersect. This is known as the “Select All” button and it will select all the data in your worksheet.
2. Can I select specific columns or rows in Excel?
Yes, in Excel, you can select specific columns or rows by clicking on the column letter or row number. To select multiple columns, hold down the Ctrl key on your keyboard while clicking on the column letters. Similarly, to select multiple rows, hold down the Ctrl key while clicking on the row numbers. You can also use the Shift key to select a range of columns or rows.
3. Is there a way to select all the data in a specific range in Excel?
Yes, you can select all the data in a specific range in Excel by using the mouse or the keyboard. If the range is adjacent, you can click and drag the mouse over the range to select it. If the range is non-adjacent, hold down the Ctrl key on your keyboard while clicking on the different areas of the range to select them all at once. You can also use the Shift key to select a range of cells within a specific range.
4. What if I want to select all the visible cells only in Excel?
In Excel, if you have hidden or filtered data, and you want to select only the visible cells, you can use the “Go To Special” feature. Select the range of cells where you want to select the visible cells, then press Ctrl + G on your keyboard to open the “Go To” dialog box. Click on the “Special” button, select “Visible cells only”, and click “OK”. This will select only the visible cells within the range.
5. Is there a shortcut to select the entire row or column in Excel?
Yes, there are shortcuts to select the entire row or column in Excel. To select the entire row, you can click on the row header, which is the number on the far-left side of the worksheet. To select the entire column, click on the column header, which is the letter at the top of the worksheet. You can also use the keyboard shortcut Ctrl + Spacebar to select the entire column and Shift + Spacebar to select the entire row.