
In a world where staying connected is essential, mobile apps have become a lifeline for communication and productivity. One such app that has taken the virtual world by storm is Zoom. With its user-friendly interface and powerful features, Zoom has become the go-to app for video conferencing and virtual meetings.
Whether you’re an iPhone user or an iPad aficionado, Zoom has you covered. In this article, we will guide you through the process of using the Zoom app on your Apple devices, providing step-by-step instructions and tips to help you make the most out of this versatile tool.
From joining meetings with a single tap to sharing your screen and engaging in virtual breakout sessions, the Zoom app offers a plethora of features that enhance collaboration and communication. So, grab your iPhone or iPad, download the Zoom app, and let’s dive into the world of seamless virtual connections!
Inside This Article
- Downloading the Zoom App
- Creating a Zoom Account
- Scheduling a Meeting on Zoom
- Joining a Meeting on Zoom
- Conclusion
- FAQs
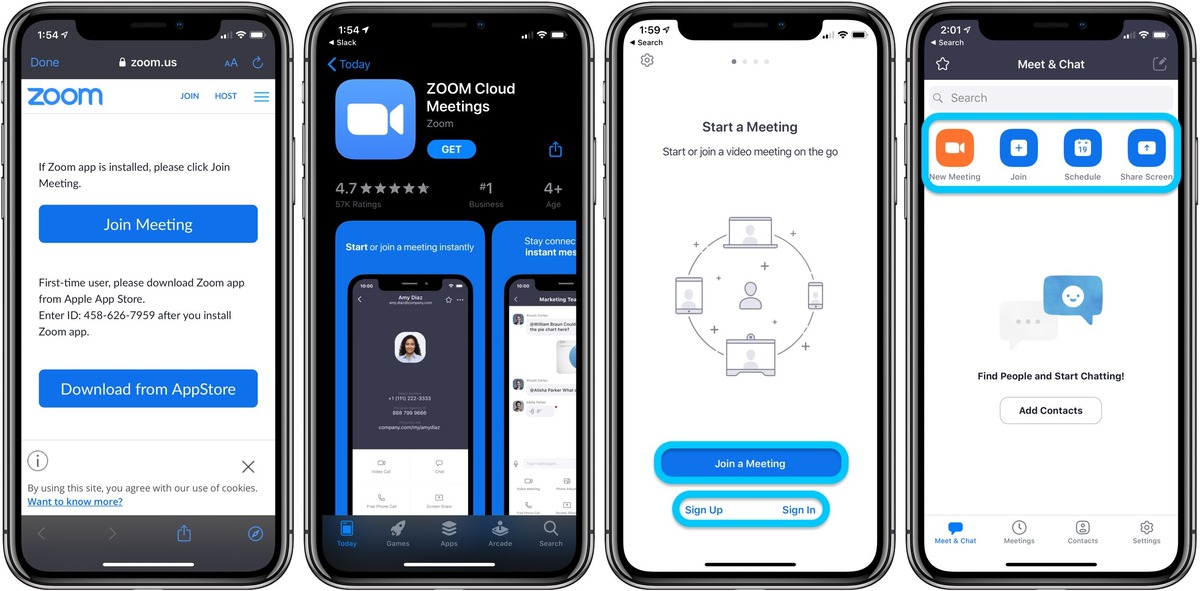
Downloading the Zoom App
Zoom is a powerful and user-friendly video conferencing app that has gained popularity, especially in today’s digital world. Whether you need to connect with colleagues, friends, or family, Zoom provides a seamless platform for virtual meetings. If you have an iPhone or iPad, here’s a step-by-step guide on how to download the Zoom app and start using it:
1. Open the App Store on your iPhone or iPad. It can be found on the home screen, typically represented by a blue icon with an “A” on it.
2. Tap on the search bar at the bottom of the screen and type in “Zoom”. As you type, the App Store will display relevant search results.
3. Look for the official Zoom app icon, which features a white camera on a blue background. Tap on it to open the app’s page.
4. On the app’s page, tap the “Get” button. It will change to “Install” once you tap on it.
5. If prompted, enter your Apple ID password, Touch ID, or Face ID to confirm the download. This step ensures the security of your device and account.
6. The app will start downloading, and once it’s finished, the “Get” or “Install” button will change to “Open”. Tap on it to launch the Zoom app.
7. The Zoom app will guide you through the initial setup process, including signing in to your account or creating a new one. Follow the on-screen instructions to complete the setup.
That’s it! You’ve successfully downloaded the Zoom app on your iPhone or iPad. Now you can begin connecting with others through video meetings, virtual events, or even hosting your own virtual gatherings.
Remember to have a stable internet connection and test your audio and video settings before joining or hosting a Zoom meeting. With the Zoom app on your iPhone or iPad, you have a comprehensive and versatile tool for seamless communication.
Enjoy the benefits of Zoom and stay connected with ease, no matter where you are.
Creating a Zoom Account
If you’re new to Zoom and want to start using this popular video conferencing app on your iPhone or iPad, the first step is to create a Zoom account. This account will allow you to host and join meetings effortlessly. Follow the steps below to get started:
- Open the App Store on your iPhone or iPad and search for the Zoom app.
- Tap on the Zoom app from the search results, then select “Get” to download and install the app.
- Once the installation is complete, open the Zoom app on your device.
- On the login screen, tap on “Sign Up” to create a new account.
- You can choose to sign up with your Google account, Facebook account, or your email address. If you prefer to use your email address, select the “Sign Up with Email” option.
- Enter your email address and tap on “Next.” Make sure to use a valid email address as you’ll receive important information and updates through it.
- Check your email inbox for a verification email from Zoom. If you don’t see it in your primary inbox, remember to check your spam or junk folder.
- Open the verification email and click on the provided link to verify your email address.
- Return to the Zoom app and enter your preferred password. Make sure to choose a strong password that includes a combination of letters, numbers, and symbols.
- Tap on “Continue” to proceed.
- On the next screen, enter your first name and last name.
- Review the terms of service and privacy policy, then tap on “I Agree” to continue.
- You will be prompted to add a profile picture if desired. You can either take a photo using your device’s camera or choose an existing photo from your gallery.
- Once you’ve added a profile picture, you’ll be taken to your Zoom account’s main screen. From here, you can start hosting or joining meetings.
That’s it! You’ve successfully created a Zoom account on your iPhone or iPad. Now you’re ready to enjoy seamless video conferencing and collaboration with Zoom’s robust features.
Scheduling a Meeting on Zoom
Scheduling a meeting on Zoom is a simple and efficient way to plan and organize virtual gatherings with colleagues, friends, or family members. Whether it’s a business conference, a team meeting, or a virtual get-together, Zoom provides a user-friendly platform to schedule and manage your meetings effortlessly.
To schedule a meeting on Zoom, follow these easy steps:
- Open the Zoom app: Launch the Zoom app on your iPhone or iPad. If you haven’t installed the app yet, you can download it from the App Store.
- Sign in to your Zoom account: Enter your login credentials to access your Zoom account. If you don’t have an account, you can create one easily by following the instructions in the previous section.
- Tap on the “Schedule” icon: On the home screen of the app, you will find the “Schedule” icon. Tap on it to start scheduling your meeting.
- Fill in the meeting details: In the scheduling screen, you will be prompted to enter the necessary details for your meeting. This includes the title of the meeting, the date and time, the duration, and any additional information you want to include.
- Set up meeting options: Zoom offers various options to customize your meeting. You can enable or disable features such as video, audio, and screen sharing. You can also choose whether participants need a password to join the meeting or if you want to enable waiting rooms for added security.
- Invite participants: You can invite participants to your meeting by entering their email addresses or by sharing the meeting link. Zoom provides options to copy the invitation or send it via email or messaging apps directly from the scheduling screen.
- Click on “Save” or “Done”: Once you have filled in all the necessary details and invited participants, click on the “Save” or “Done” button to finalize the scheduling process.
That’s it! Your meeting is now scheduled on Zoom. Participants will receive the invitation details and can join the meeting at the designated date and time. Remember to keep the meeting ID and password (if enabled) handy to facilitate a smooth experience for everyone.
With Zoom’s scheduling feature, you can efficiently plan and host virtual meetings, ensuring optimal communication and collaboration, no matter where your participants are located.
Joining a Meeting on Zoom
Once you have downloaded the Zoom app and created an account, you’re ready to join meetings. Joining a meeting on Zoom is a straightforward process that can be done in a few simple steps.
1. Open the Zoom app on your iPhone or iPad. If prompted, sign in to your Zoom account.
2. On the home screen of the app, tap on the “Join a Meeting” button. This will prompt you to enter the Meeting ID or Personal Link Name.
3. Enter the Meeting ID or Personal Link Name that you have received from the meeting organizer. This can be a 9, 10, or 11-digit number.
4. If the meeting is password-protected, you will need to enter the password provided to you by the organizer. Enter the password in the designated field and tap “Join Meeting.”
5. You will be taken to the video preview screen where you can choose whether to enable or disable your camera and microphone before joining the meeting. Adjust the settings according to your preference and tap “Join.”
6. Once you have successfully joined the meeting, you can participate in the ongoing discussion, view shared content, and engage with other participants through video and audio.
7. During the meeting, you have the option to raise your hand, use the chat feature to send messages to the group, or even share your screen if needed. These options can be accessed through the toolbar at the bottom of the screen.
8. To end the meeting and leave, simply tap on the “End” button at the top left corner of the screen. You will be prompted to confirm your decision to leave the meeting.
It’s important to note that joining a meeting may require the organizer’s approval, especially in cases where the meeting is set to “waiting room” mode. In such cases, you may need to wait until the host admits you into the meeting.
By following these steps, you can easily join a meeting on Zoom using your iPhone or iPad. Whether it’s for work conferences, educational webinars, or virtual social gatherings, being able to join meetings on the go has never been easier.
Conclusion
In conclusion, the Zoom app is a powerful tool for conducting virtual meetings and staying connected with friends, family, and colleagues. It provides a seamless experience on both iPhones and iPads, allowing users to join meetings with just a few taps. With its user-friendly interface and comprehensive features, Zoom makes it easy for individuals and businesses alike to collaborate remotely.
Whether you are hosting a virtual conference, participating in an online class, or simply having a video chat with loved ones, the Zoom app on your iPhone or iPad ensures a smooth and reliable communication experience. With features like screen sharing, virtual backgrounds, and the ability to record meetings, Zoom offers an interactive and engaging platform for remote interactions.
So, if you are looking to stay connected while on the go, the Zoom app is the ideal solution for you. Give it a try and experience the convenience of virtual meetings and seamless communication right from your iPhone or iPad.
FAQs
1. Can I use the Zoom app on my iPhone and iPad simultaneously?
Yes, you can use the Zoom app on both your iPhone and iPad. Simply download the app on both devices and sign in with your Zoom account. This allows you to access Zoom meetings and features on either device, giving you the flexibility to join meetings from your preferred device at any time.
2. How do I download the Zoom app on my iPhone or iPad?
To download the Zoom app on your iPhone or iPad, follow these simple steps:
- Open the App Store on your iPhone or iPad.
- Tap on the Search tab at the bottom of the screen.
- Type “Zoom” in the search bar and tap on the Search button.
- Tap on the Zoom Cloud Meetings app in the search results.
- Tap on the Get button, and then tap Install to download the app.
- Once the download is complete, open the Zoom app and sign in or create a new account.
3. Can I join a Zoom meeting without the Zoom app on my iPhone or iPad?
Yes, you can join a Zoom meeting without the app on your iPhone or iPad. Zoom offers the option to join a meeting through a web browser. Simply click on the meeting link provided and follow the instructions to join the meeting via the web browser on your device. However, for the best user experience and access to all features, it is recommended to download the Zoom app.
4. How do I schedule a Zoom meeting on my iPhone or iPad?
To schedule a Zoom meeting on your iPhone or iPad, follow these steps:
- Open the Zoom app on your iPhone or iPad.
- Tap on the Schedule icon at the bottom of the screen.
- Fill in the meeting details such as topic, date, time, and duration.
- Adjust any additional settings such as video and audio options.
- Tap on Save to schedule the meeting.
5. Can I share my screen during a Zoom meeting using my iPhone or iPad?
Yes, you can share your screen during a Zoom meeting using your iPhone or iPad. While in a meeting, tap on the Share Screen icon at the bottom of the screen. You will have the option to share your entire screen or specific apps or content on your device. This feature is useful for presentations, collaborations, and demonstrations, allowing participants to see what’s on your screen in real-time.