
Are you tired of accidentally swiping away important emails on your iPhone? Don”t worry, we”ve got you covered! In this article, we”ll show you how to change mail swipe options in settings on your iPhone. With these simple steps, you”ll be able to customize the swipe gestures on your Mail app, ensuring that you never lose an important email again. Whether you want to change the swipe action to mark emails as read, flag them for follow-up, or move them to a specific folder, we”ll guide you through the process. So, let”s dive in and take control of your email experience on the iPhone!
Inside This Article
- Enable Swipe Options
- Customize Swipe Actions
- Rearrange Swipe Options
- Reset Swipe Options
- Conclusion
- FAQs
Enable Swipe Options
Swipe options on the iPhone are a convenient way to quickly manage your emails in the Mail app. By enabling swipe options, you can perform actions like deleting, archiving, or marking emails as read with just a simple swipe gesture. In this article, we will guide you on how to enable swipe options for your emails on an iPhone.
To enable swipe options, follow the steps below:
- Open the “Settings” app on your iPhone.
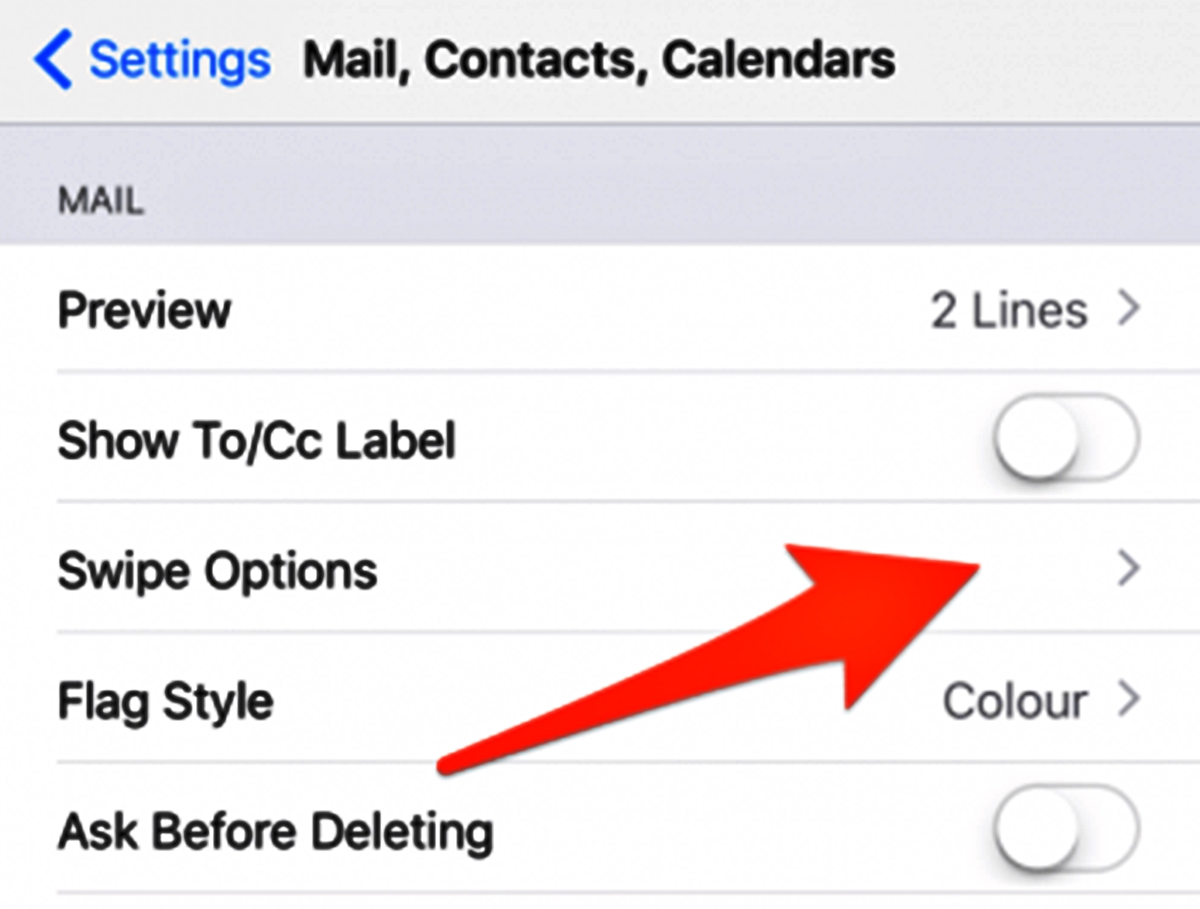
- Scroll down and tap on “Mail” or “Mail, Contacts, Calendars”, depending on the version of iOS you are using.
- Tap on “Swipe Options”.
- You will see a list of available swipe actions. Tap on the action you want to enable, such as “Archive” or “Trash”.
- The chosen action will now appear as an option when you swipe left or right on an email in the Mail app.
Once you have enabled swipe options, you can easily manage your emails with a quick swipe gesture. For example, if you have chosen “Archive” as your swipe action, simply swipe left on an email and it will be archived. If you have chosen “Trash”, swiping left will automatically delete the email.
Enabling swipe options can streamline your email management process, allowing you to efficiently stay on top of your inbox. It saves you time by eliminating the need to open each email and manually perform actions like archiving or deleting.
Remember, you can always customize the swipe options to suit your preferences and workflow. To do so, go back to the “Swipe Options” settings and select the actions you want from the available list.
So, go ahead and enable swipe options on your iPhone to enhance your email experience and make your email management faster and more efficient.
Customize Swipe Actions
One of the great features of iPhones is the ability to customize various settings according to your personal preferences. This includes the option to customize swipe actions for your Mail app. By customizing swipe actions, you can streamline your email management process and perform specific actions with just a swipe of your finger. Let’s explore how you can customize swipe actions in the Mail app on your iPhone!
To begin customizing swipe actions, open the Settings app on your iPhone. Scroll down and tap on “Mail”.
Under the “Mail” section, you will find the “Swipe Options” menu. Tap on it to proceed.
Within the “Swipe Options” menu, you will see a list of different swipe actions that you can customize. These actions include “Mark as Read/Unread”, “Flag”, “Move Message”, and “Archive.
To customize a specific swipe action, simply tap on it. You will be presented with a list of available options for that action.
For example, if you tap on “Move Message”, you can choose from a list of your mail folders to select where you want the message to be moved when you perform the swipe action.
Similarly, if you tap on “Flag”, you can select the color of the flag that will be applied to the message when you perform the swipe action.
Once you have customized the swipe actions to your liking, simply exit the Settings app. The changes you made will be applied to the Mail app.
Now, when you swipe left or right on an email in your Mail app, you will see the customized swipe actions that you have chosen. This makes it easier and faster to perform the actions that are most important to you.
If you ever want to revert back to the default swipe actions, you can easily do so by following the same steps and tapping on “Reset” within the “Swipe Options” menu. This will reset all of the swipe actions back to their default settings.
Customizing swipe actions in the Mail app on your iPhone allows you to tailor your email management experience to your needs. Whether you prefer to flag important messages, move them to specific folders, or mark them as read/unread with a swipe, you have the flexibility to do so. Take advantage of this customization feature and streamline your email workflow on your iPhone!
Rearrange Swipe Options
One of the great features of the iPhone is the ability to customize your Mail swipe options. This allows you to quickly perform actions such as archiving, deleting, or marking emails as unread with a simple swipe gesture. But did you know that you can also rearrange these swipe options to suit your preference? In this article, we will guide you on how to rearrange swipe options in the Mail settings on your iPhone.
To get started, follow these simple steps:
- Open the Settings app on your iPhone.
- Scroll down and tap on “Mail”.
- Next, tap on “Swipe Options”.
- You will see the list of available swipe options. To rearrange them, tap and hold the “three lines” icon next to the swipe option you want to move.
- Drag the swipe option to the desired position in the list.
- Repeat this process for any other swipe options you want to rearrange.
Once you have rearranged the swipe options to your liking, you can exit the settings and open the Mail app to test them out. Swipe left or right on an email in your inbox to see the newly arranged swipe options in action.
It’s important to note that when you rearrange the swipe options, the default actions associated with each swipe option will remain the same. For example, swiping left may still archive an email, even if you change its position in the list. However, by rearranging the swipe options, you can prioritize the actions that are most important to you and make your email management more efficient.
If you ever want to reset the swipe options to their default positions, simply follow these steps:
- Open the Settings app on your iPhone.
- Scroll down and tap on “Mail”.
- Tap on “Swipe Options”.
- Tap on the “Reset” button at the bottom of the screen.
- Confirm the action by tapping on “Reset” again in the pop-up window.
After resetting the swipe options, they will be restored to the original default order.
So there you have it – a simple guide on how to rearrange swipe options in the Mail settings on your iPhone. Take advantage of this customization feature to tailor your email management experience to your needs and preferences.
Reset Swipe Options
If you’ve customized your Mail Swipe Options on your iPhone but want to revert back to the default settings, you can easily reset the swipe options. The reset process allows you to start fresh and regain the default swipe actions for your emails. Follow the steps below to reset the Mail Swipe Options on your iPhone.
1. Open the “Settings” app on your iPhone and scroll down until you see “Mail” listed. Tap on it to access the Mail settings.
2. In the Mail settings, scroll down until you find the “Swipe Options” section. This section allows you to personalize the swipe actions for your emails.
3. Tap on the “Swipe Options” section to open it and view the current customized swipe actions.
4. At the bottom of the Swipe Options screen, you’ll see the “Reset” button. Tap on it.
5. A confirmation pop-up will appear, asking if you want to reset the swipe options. Tap on “Reset” to proceed.
6. Once you confirm the reset, the Mail Swipe Options will be reverted to the default settings. You can now explore the default swipe actions for your emails.
By following these steps, you can reset the Mail Swipe Options on your iPhone and restore the default settings. This can be useful if you want to start fresh or if you’re experiencing any issues with your current customization. Remember, customizing the swipe options can greatly enhance your email management, so feel free to personalize them according to your preferences. And if at any point you want to go back to the defaults, just follow the steps above to reset your Mail Swipe Options.
Conclusion
Changing the mail swipe options in settings on your iPhone can greatly enhance your email management and productivity. By customizing the swipe gestures and actions, you can quickly triage and prioritize your emails without having to open them.
Whether you prefer to mark emails as read, flag them for follow-up, or delete them in a single swipe, the flexibility of the mail swipe options allows you to tailor your email workflow to your specific needs and preferences. Taking the time to explore the available settings and experimenting with different swipe actions can help you streamline your email management and save valuable time throughout your day.
Remember, these settings can be adjusted at any time and are not set in stone. If you find that your email preferences change in the future, you can always revisit the mail swipe options in settings and make the necessary adjustments to suit your evolving needs.
So go ahead, take control of your email management on your iPhone by customizing the mail swipe options in settings and experience the power of efficient email triage at your fingertips.
FAQs
1. How do I change mail swipe options in Settings on my iPhone?
To change the mail swipe options on your iPhone, follow these steps:
- Open the Settings app on your iPhone.
- Scroll down and tap on “Mail” or “Mail, Contacts, Calendars”.
- Under the “Mail” section, tap on “Swipe Options”.
- You will see a list of actions that can be assigned to left and right swipes. Tap on any option to select it.
- Customize the swipe actions according to your preference by choosing “More” and selecting the desired action from the list.
- Repeat the above step for both left and right swipe options.
- Once you have customized the swipe options, go back to the Mail app and test the new settings by swiping left or right on an email.
2. Can I restore the default mail swipe options on my iPhone?
Yes, if you want to revert back to the default mail swipe options on your iPhone, you can follow these steps:
- Open the Settings app on your iPhone.
- Scroll down and tap on “Mail” or “Mail, Contacts, Calendars”.
- Under the “Mail” section, tap on “Swipe Options”.
- Tap on “Reset Swipe Actions”.
- A confirmation pop-up will appear. Tap on “Reset” to restore the default swipe options.
- Once you have reset the swipe actions, go back to the Mail app and the default swipe options will be restored.
3. What are the available actions that can be assigned to mail swipes?
The available actions that can be assigned to mail swipes on your iPhone include:
- Mark as Read
- Flag
- Move Message
- Archive
- Delete
- More
- Notify Me
You can customize the swipe options by selecting any of these actions for both left and right swipes.
4. Can I assign different actions to left and right swipes?
Yes, you have the option to assign different actions to left and right swipes on your iPhone. This allows you to have different actions for different swipe directions, depending on your preference and workflow. To customize the actions for left and right swipes, follow the steps mentioned in the first question and choose different actions for each swipe direction.
5. Will changing the mail swipe options affect my existing emails?
No, changing the mail swipe options will not affect your existing emails. The swipe options only determine the actions that can be performed when you swipe left or right on an email. It does not modify or delete any of your existing emails. The changes you make to the swipe options will only be applicable to new emails that you receive.