
Are you tired of endlessly scrolling through your emails on your iPhone? Well, good news! The Mail app on iPhone has a feature that allows you to use swiping gestures to quickly manage your emails. With a simple swipe, you can mark emails as read, flag them, move them to different folders, or even delete them. This makes it incredibly convenient to stay organized and efficient while dealing with your inbox. In this article, we will guide you through the steps to enable and use the swiping gestures in the Mail app on your iPhone. So, let’s dive in and discover how you can streamline your email management with these handy swiping gestures.
Inside This Article
- Setting up Mail on iPhone
- Understanding Swiping Gestures in Mail
- Managing Emails with Swiping Gestures
- Customizing Swiping Gestures in Mail
- Conclusion
- FAQs
Setting up Mail on iPhone
One of the most essential features of an iPhone is its ability to manage emails on the go. With the built-in Mail app, you can easily access and organize your email accounts right from your iPhone. Setting up Mail on your iPhone is quick and straightforward. Here’s how you can get started:
- Open Settings: First, locate the Settings app on your iPhone’s home screen and tap on it. The Settings app is represented by a gear icon.
- Select Mail: In the Settings menu, scroll down and look for the “Mail” option. Tap on it to access the Mail settings.
- Add Account: Once you’re in the Mail settings, you’ll see an option that says “Accounts.” Tap on it to add a new email account to your iPhone.
- Choose Your Email Provider: The next step is to select your email provider. iPhone supports a wide range of email providers, including Gmail, Yahoo, Outlook, and more. Choose the appropriate option for your email account.
- Enter Your Email and Password: After selecting your email provider, you’ll be prompted to enter your email address and password. Make sure to enter the correct credentials associated with your email account.
- Set up Two-Factor Authentication (Optional): Depending on your email provider, you may have the option to enable two-factor authentication for added security. Follow the on-screen instructions to set it up if desired.
- Finalize the Setup: Once you’ve entered your email and password, tap on the “Next” or “Sign In” button to proceed. You may also have to grant permissions for Mail to access your email account.
- Repeat for Additional Email Accounts: If you have more than one email account, you can repeat the above steps to add them to your iPhone’s Mail app. Simply select a different email provider and enter the respective email address and password.
That’s it! You have successfully set up the Mail app on your iPhone. Now, you can start managing your emails directly from your device, staying connected and organized wherever you go.
Understanding Swiping Gestures in Mail
Swiping gestures have become an indispensable part of our interaction with smartphones. They offer a quick and intuitive way to navigate through our email messaging apps, such as Mail on the iPhone. By swiping, we can perform various actions on our emails without the need for cumbersome menus or buttons.
In the Mail app on iPhone, swiping gestures allow us to quickly archive, delete, flag, or even reply to emails with just a simple swipe of our finger. These gestures save us time and make managing our inbox more efficient.
When we open the Mail app, we are presented with a list of our emails. By default, we can see a list of our inbox messages, sorted by date and time. To perform actions on individual emails, we can use different swiping gestures, depending on our desired action.
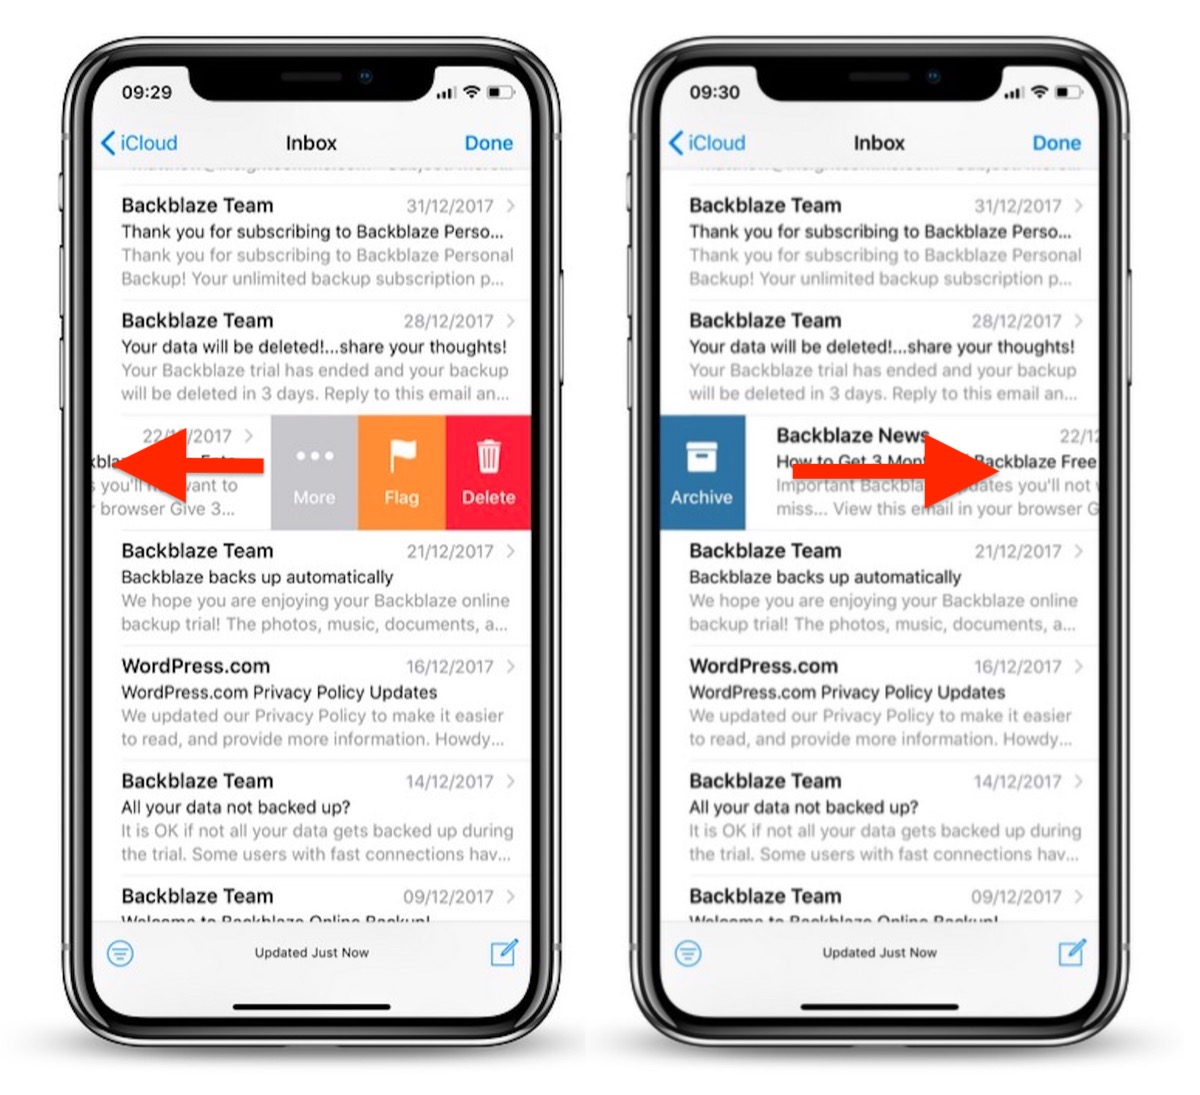
When we swipe to the right on an email, we can quickly mark it as read or unread. This is a convenient way to keep track of the status of our emails, especially if we receive a large volume of messages daily.
If we swipe to the left on an email, we are presented with a set of options. These options may include Flag, Move, Archive, or Delete, depending on our settings and preferences. Swiping allows us to easily choose the action we want to perform on that particular email.
To reply to an email, we can swipe left on the message and tap the Reply button. This allows us to quickly compose and send a response without needing to open the email fully.
In addition to the default swiping gestures, we also have the option to customize them. This means we can assign different actions to the left and right swipe gestures, based on our own preferences. For example, we can set the left swipe gesture to delete an email and the right swipe gesture to flag it. This customization feature allows us to tailor the Mail app to our specific needs and workflow.
Overall, understanding swiping gestures in the Mail app on iPhone is crucial for efficient email management. By mastering these gestures, we can streamline our workflow, save time, and stay organized. So, take some time to explore and utilize the swiping gestures in Mail, and unlock the full potential of your email management experience.
Managing Emails with Swiping Gestures
With the advent of smartphones, managing emails has become more convenient than ever. One of the most efficient ways to navigate through your emails is by utilizing swiping gestures on your iPhone. These gestures allow you to perform actions like archiving, deleting, marking as unread, or flagging emails with a simple swipe across the screen.
Swiping gestures in the Mail app on iPhone provide a quick and intuitive way to stay organized and deal with your emails efficiently. By customizing the swipe actions based on your preferences, you can streamline your email management process and save valuable time.
To access the swiping gestures feature, open the Mail app on your iPhone and go to the “Mailboxes” view. From there, tap on “Accounts,” and then select the email account you want to manage. Once you have your inbox open, follow the steps below to use the swiping gestures:
- Swipe Right: By swiping right on an email, you can instantly mark it as unread, making it easier for you to prioritize and keep track of important messages that you haven’t addressed yet.
- Swipe Left: Swiping left reveals a set of customizable actions that you can perform on the email. This may include archive, delete, flag, or more options depending on your settings.
- Customize Swipe Actions: If you prefer to have different actions associated with the swipe gestures, you can easily customize them. Open the “Settings” app on your iPhone, scroll down, and select “Mail.” From there, tap on “Swipe Options” and choose the actions you want for both left and right swipes.
- Archive Emails: Archiving emails is a handy way to remove them from your inbox without deleting them permanently. By swiping left and selecting the archive option, you can keep your inbox clutter-free while still having access to these emails in the future.
- Delete Emails: If you want to get rid of unwanted emails permanently, swiping left and choosing the delete option is the way to go. This allows you to declutter your inbox and free up storage space on your device.
- Flag Emails: To mark an email as important or needing follow-up, you can swipe left and select the flag option. This helps you easily identify and prioritize specific messages.
By leveraging these swiping gestures in the Mail app on your iPhone, you can efficiently manage your emails and stay organized. Whether it’s quickly marking emails as unread, archiving them for later reference, or deleting unwanted messages, these gestures offer a seamless and intuitive way to handle your inbox on the go.
Remember, you can always customize these gestures to suit your preferences, allowing you to tailor your email management experience to your unique needs. So go ahead and explore the power of swiping gestures on your iPhone to take control of your inbox like a pro.
Customizing Swiping Gestures in Mail
One of the great features of the Mail app on the iPhone is the ability to customize your swiping gestures. This allows you to personalize how you interact with your emails and make your workflow more efficient. By customizing the swiping gestures, you can perform actions such as archiving, deleting, marking as unread, or flagging emails with just a swipe.
To customize your swiping gestures in the Mail app, follow these simple steps:
- Open the Settings app on your iPhone and scroll down to find the “Mail” option. Tap on it to open the Mail settings.
- Under the “Mail” settings, you will see an option called “Swipe Options”. Tap on it to access the swiping gestures customization menu.
- In the “Swipe Options” menu, you will see a list of different actions that you can assign to the left and right swipe gestures. These actions include Archive, Delete, Mark as Unread, Flag, Move to Junk, and more.
- To assign an action to a swipe gesture, simply tap on the action and choose whether you want it to be assigned to the left or right swipe gesture.
- Once you have customized your swiping gestures, you can go back to the Mail app and start using them. To perform a swipe action, simply swipe left or right on an email in your inbox or any other folder.
Customizing your swiping gestures in the Mail app can greatly improve your email management efficiency. By assigning actions that align with your workflow, you can quickly perform tasks without having to open each email individually. This saves you time and makes it easier to stay organized.
Remember, you can always revisit the Mail settings to change your swiping gestures if your needs or preferences change. Experiment with different actions and find the ones that work best for you.
In conclusion, mastering the art of using swiping gestures in the Mail app on your iPhone can significantly enhance your productivity and efficiency in managing your emails. With the ability to quickly delete or archive messages, mark them as read or unread, and access additional options with a simple swipe, you’ll be able to navigate your inbox with ease.
By familiarizing yourself with the various swiping gestures available and customizing them to suit your preferences, you can streamline your email workflow and save valuable time. Whether you need to prioritize important emails, clear out clutter, or organize your inbox, swiping gestures offer a convenient and intuitive solution.
So, take advantage of these powerful features and make the most of your Mail app on iPhone. With just a swipe, you can stay on top of your emails and stay productive throughout your day.
FAQs
-
- 1. Why should I use swiping gestures in Mail on iPhone?
Swiping gestures in Mail on iPhone offer a quick and convenient way to manage your emails. By utilizing swiping gestures, you can easily delete, archive, flag, or mark emails as read without having to open each message individually. This saves you time and streamlines your email management process.
-
- 2. How do I access swiping gestures in Mail on iPhone?
To access swiping gestures in Mail on iPhone, open the Mail app and navigate to your inbox or any email folder. Once you have an email displayed on your screen, simply swipe left or right on the email to trigger the available actions. You can customize the actions associated with each swipe gesture in the Settings app.
-
- 3. Can I customize the swipe actions in Mail on iPhone?
Yes, you can customize the swipe actions in Mail on iPhone. To do this, go to the Settings app and scroll down until you find the Mail option. Tap on Mail, then tap on Swipe Options. From here, you can customize the left and right swipe actions to perform the actions that are most useful to you.
-
- 4. What are some common swipe actions available in Mail on iPhone?
Some common swipe actions available in Mail on iPhone include deleting an email, archiving an email, flagging an email, marking an email as read, marking an email as unread, moving an email to a different folder, and more. You can choose which actions to assign to the left and right swipes based on your preferences and workflow.
-
- 5. Are swiping gestures available in other email apps on iPhone?
Swiping gestures may vary between different email apps on iPhone. While the stock Mail app offers customizable swipe actions, third-party email apps may have their own unique set of swipe gestures and actions. If you use a different email app, it’s recommended to explore its settings or support documentation to learn about the available swipe gestures.