
Welcome to the world of mobile photography! If you’re passionate about capturing breathtaking moments on your smartphone and enhancing them with professional editing tools, then Lightroom Mobile is your ultimate companion. Lightroom Mobile is a powerful app that brings all the features of the desktop version of Adobe Lightroom right to your fingertips. With its intuitive interface and robust editing capabilities, you can transform your ordinary photos into stunning masterpieces.
One of the most impressive features of Lightroom Mobile is the ability to create and use presets. Presets are pre-determined settings that can instantly apply a specific look or style to your images. They save you time and effort by providing a starting point for your editing process. In this article, we will guide you through the step-by-step process of creating a preset in Lightroom Mobile, allowing you to elevate your mobile photography to the next level.
Inside This Article
- What is Lightroom Mobile
- Step 1: Opening Lightroom Mobile
- Step 2: Importing a Photo
- Step 3: Adjusting the Photo
- Step 4: Creating and Saving a Preset
- Step 5: Applying the Preset to Other Photos
- Step 6: Fine-Tuning the Preset
- Step 7: Exporting the Edited Photos
- Step 8: Syncing with Lightroom Desktop
- Step 9: Using the Preset in Lightroom Desktop
- Conclusion
- FAQs
What is Lightroom Mobile
Lightroom Mobile is a powerful photo editing and organizing app developed by Adobe. It allows users to edit, enhance, and manage their photos on their smartphones or tablets. With Lightroom Mobile, you can access your photo library from anywhere, apply professional-level edits, and synchronize your edits across all your devices.
Lightroom Mobile offers a comprehensive set of editing tools, including exposure adjustments, color correction, cropping, and more. It also provides a wide range of presets, which are predefined editing settings that can be applied to your photos with a single click. This makes it easy to achieve consistent and professional-looking edits without spending hours manually adjusting each photo.
One of the standout features of Lightroom Mobile is its seamless integration with Lightroom Desktop. This means that any edits made on your mobile device can be automatically synced to your desktop application and vice versa. This makes it incredibly convenient for photographers who want to work on their photos while on the go and then continue editing on their computer.
Furthermore, Lightroom Mobile allows users to easily share their edited photos on social media platforms or export them in various formats. The app also features a built-in camera function that lets you capture RAW photos, giving you greater control and flexibility over the editing process.
Whether you’re a professional photographer or an amateur enthusiast, Lightroom Mobile provides a versatile and user-friendly solution for editing and organizing your mobile photos. Its extensive features, seamless integration, and intuitive interface make it an essential tool for anyone looking to enhance their mobile photography workflow.
Step 1: Opening Lightroom Mobile
Welcome to the first step in creating a preset in Lightroom Mobile! Opening Lightroom Mobile is the first thing you need to do to start editing your photos and creating your personalized presets. Whether you’re using an Android or iOS device, the process is quite similar.
To begin, locate the Lightroom Mobile app icon on your smartphone or tablet. It usually features a stylized L and M in a square. Tap on the icon to open the app. If you don’t have the app installed, you can easily find it in your device’s app store and download it for free.
Once you’ve opened the Lightroom Mobile app, you’ll be prompted to sign in with your Adobe ID. If you don’t have one, you can create a new account by following the on-screen instructions. Having an Adobe ID allows you to access your presets and edited photos across different devices, including Lightroom Desktop.
Once you’re signed in, you’ll be taken to the main screen of Lightroom Mobile. This is where all your photos and editing tools are located. You’ll find various options, such as the ability to access your camera roll, create albums, and make edits to your photos.
Now that you’ve successfully opened Lightroom Mobile, you’re ready to start the exciting process of editing and creating your own presets. In the next step, we’ll delve into importing a photo into the app so you can begin your editing journey. Get ready to make your photos stand out with Lightroom Mobile!
Step 2: Importing a Photo
Now that you have Lightroom Mobile open and ready to go, it’s time to import a photo. Follow these simple steps to get started:
- Tap on the (+) icon at the bottom of the screen to access the import options.
- Select the source from which you want to import the photo. You can choose from options like the device’s camera roll, cloud storage, or other connected apps.
- Browse through your chosen source and locate the photo you wish to import. Tap on it to select it.
- After selecting the photo, tap on the “Import” button. You can find it at the bottom right corner of the screen.
Lightroom Mobile will proceed to import the selected photo into its workspace. Once the import is complete, the photo will be ready for editing.
It’s important to note that Lightroom Mobile supports various file formats, including RAW, JPEG, and PNG. So no matter the format of the photo you want to edit, you can easily import it into the app.
By following these steps, you have successfully imported a photo into Lightroom Mobile. Now it’s time to move on to the next step: Adjusting the Photo.
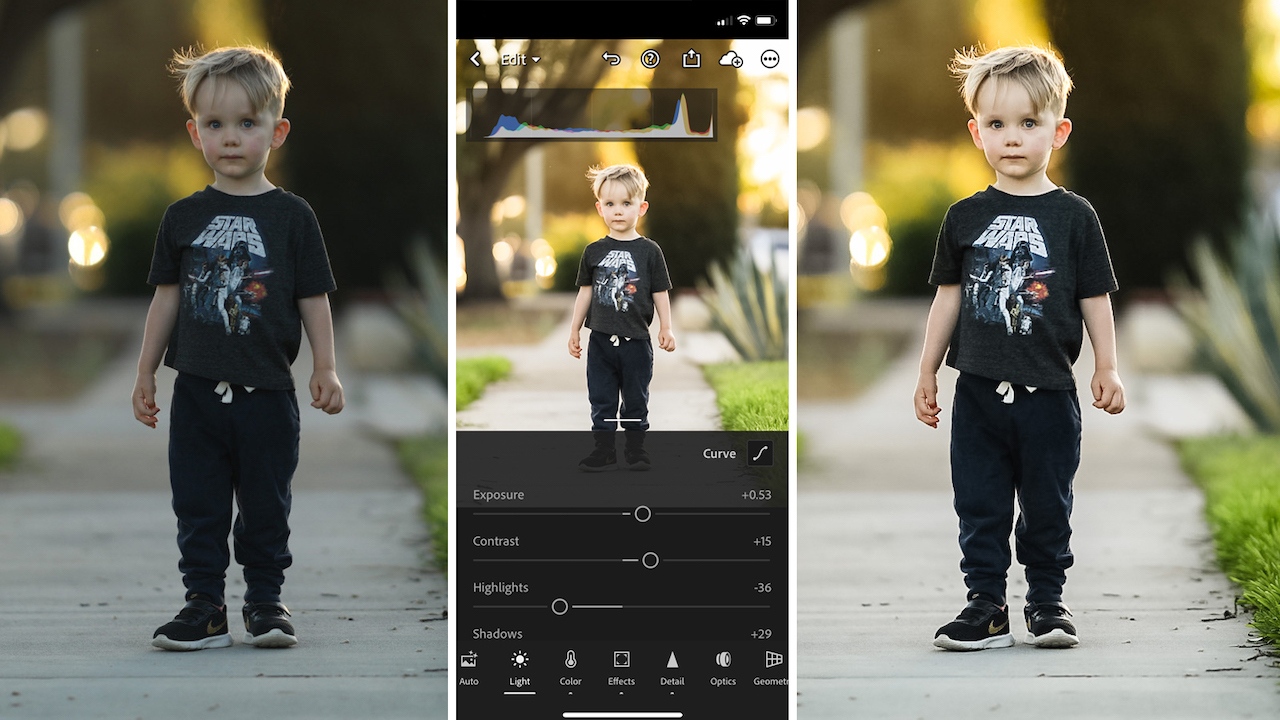
Step 3: Adjusting the Photo
Now that you have imported your photo into Lightroom Mobile, it’s time to start making adjustments to enhance its look. Lightroom Mobile offers a wide range of editing tools that allow you to fine-tune various aspects of your photo, from exposure and colors to cropping and sharpening.
The first tool you can utilize is the Basic panel, which allows you to make initial adjustments to the exposure, shadows, highlights, contrast, and more. By moving the sliders and observing the real-time changes on your photo, you can achieve the desired balance and enhance the overall tonality of the image.
Next, you can move to the Color panel, where you can adjust the temperature, tint, vibrance, and saturation. This panel enables you to modify the color balance of your photo, creating a more vibrant or muted look, depending on your preference.
For more precise adjustments, you can make use of the Tone Curve panel. This tool allows you to make adjustments to the tonal range of your photo, emphasizing highlights, shadows, or midtones. By manipulating the curve, you can achieve a more contrasted or softer look, depending on your artistic vision.
In addition to these panels, Lightroom Mobile provides tools for cropping, straightening, and transforming your photo. You can easily crop and resize your image to improve composition, and adjust the perspective to remove any distortions caused by the camera angle.
Furthermore, Lightroom Mobile offers advanced editing features such as local adjustments, which allow you to selectively apply adjustments to specific areas of your photo. Whether you want to brighten up a dark area or enhance the details in a particular section, local adjustments provide you with the flexibility to fine-tune every aspect of your image.
As you make adjustments to your photo, you can always preview the original version by tapping on the “Before” button. This allows you to compare the changes and ensure that you are satisfied with the overall result.
Remember, the key to successful photo editing is to experiment and trust your creative instincts. Don’t be afraid to push the boundaries and try different adjustments to see what works best for your photo.
Once you are happy with the adjustments made, you can move on to the next step – creating and saving a preset in Lightroom Mobile.
Step 4: Creating and Saving a Preset
Creating and saving presets in Lightroom Mobile is a fantastic way to streamline your photo editing process. Once you have fine-tuned the adjustments on a photo, you can save those settings as a preset and apply them to other photos with just a few clicks. Here’s how you can create and save a preset in Lightroom Mobile:
1. After you have adjusted your photo to your desired settings, navigate to the “Presets” tab at the bottom of the screen.
2. Next, tap on the “+” icon located on the upper-right corner of the Presets panel. This will bring up a dialog box asking you to name your new preset.
3. Give your preset a descriptive name that reflects the adjustments you made to the photo. For example, if you adjusted the exposure and added a slight vignette effect, you can name it “Outdoor Exposure & Vignette”.
4. Once you have named your preset, you can choose to include or exclude certain adjustments by tapping on the toggle switches next to each setting. This gives you the flexibility to create presets that apply specific adjustments while leaving others untouched.
5. After fine-tuning the inclusion or exclusion of adjustments, tap the checkmark icon to save your preset.
6. Your newly created preset will now appear in the Presets panel, ready to be applied to other photos in your library.
Creating and saving presets is a time-saving feature that allows you to apply consistent edits across multiple photos. Whether you want to maintain a cohesive look for your Instagram feed or apply a signature style to your travel photos, presets in Lightroom Mobile make it easy to achieve your desired look with just a few taps.
Now that you have created and saved your presets, let’s move on to the next step – applying them to other photos in Lightroom Mobile.
Step 5: Applying the Preset to Other Photos
Now that you have created a stunning preset in Lightroom Mobile, it’s time to apply it to other photos effortlessly. The beauty of presets is that they allow you to achieve a consistent look across multiple images with just a few clicks. Here’s how you can apply your preset to other photos:
- Select the Photo: Start by choosing the photo or photos that you want to apply the preset to. You can select multiple photos at once by tapping and holding on one photo, then tapping on the others.
- Access the Editing Tools: Once your desired photos are selected, tap on the “Edit” button at the bottom of the screen. This will bring up the editing tools for the selected photos.
- Choose the Preset: Within the editing tools, locate the “Presets” tab. Tap on it to open the presets library. Your newly created preset should be listed there. Scroll through the presets until you find yours.
- Apply the Preset: Tap on your preset to apply it to the selected photos. Within seconds, you will see the magic of your preset transforming the photos with the settings you have defined.
- Adjust Settings (Optional): Depending on the specific characteristics of the photos you’re working with, you might want to fine-tune the preset’s settings. Lightroom Mobile allows you to make further adjustments to exposure, temperature, contrast, and more. Don’t hesitate to experiment and make the necessary tweaks!
- Save and Export: Once you are satisfied with the changes, tap on the checkmark icon to save the edited photos. You can then choose to export them to your device’s camera roll or directly share them on social media or other platforms.
By following these simple steps, you can easily apply your carefully crafted preset to multiple photos in Lightroom Mobile. Whether you’re editing a series of travel shots, portrait photographs, or capturing the beauty of nature, presets are a game-changer in streamlining your workflow and achieving consistent results.
Step 6: Fine-Tuning the Preset
Once you have created a preset in Lightroom Mobile, you may find that it’s not perfect for every photo. Luckily, Lightroom Mobile allows you to fine-tune your preset to achieve the desired look for each individual photo. Here are some tips to help you in this process:
1. Adjust Basic Settings: Start by tweaking the basic settings such as exposure, contrast, highlights, shadows, whites, and blacks. These adjustments will help you fine-tune the overall tonal balance of the image. Remember, each photo is unique, and these adjustments will vary depending on the lighting conditions and desired aesthetic.
2. Refine Color and White Balance: Use the color sliders to make adjustments to the hue, saturation, and luminance of specific colors in the image. This will allow you to create a more vibrant or muted look depending on your preferences. Additionally, you can fine-tune the white balance to ensure accurate colors in your photo.
3. Enhance Detail: Lightroom Mobile provides tools to enhance the sharpness, noise reduction, and clarity of your image. Aligning the sharpness with your desired level of detail and reducing any noise can significantly improve the overall quality of your photo.
4. Apply Local Adjustments: If you need to make specific edits to a certain area of your photo, you can take advantage of the local adjustment tools in Lightroom Mobile. These tools allow you to selectively adjust exposure, contrast, saturation, and other settings to specific areas, providing you with greater control over the final look of your image.
5. Test and Refine: After making adjustments, it’s important to test the preset on different photos to see how it performs. Sometimes, small tweaks are necessary to achieve consistency across various images. Keep refining your preset until you are satisfied with the results.
Remember, the fine-tuning process is subjective, and it’s all about finding the right balance and aesthetic for your photos. Take your time, experiment with different settings, and trust your creative judgment to produce presets that truly enhance the visual impact of your images.
Step 7: Exporting the Edited Photos
Once you have finished editing your photos in Lightroom Mobile, the next step is to export them so that you can share them with others or use them for various purposes. Exporting your edited photos is a simple process that can be done directly within the app. Here’s how:
1. After making all the necessary adjustments to your photo, tap on the “Export” button, usually located in the upper-right corner of the screen or within the editing panel. This will bring up the export options.
2. In the export options, you can choose the file format and quality of the exported photo. Lightroom Mobile offers various formats such as JPEG, TIFF, and DNG. Select the format that best suits your needs.
3. Adjust the quality settings for the exported photo. This will determine the level of compression applied to the image, which can affect its file size and overall quality. Depending on your preferences, you can choose a higher quality for better image fidelity, or a lower quality to reduce file size.
4. Specify the destination folder for the exported photo. Lightroom Mobile allows you to choose between saving the photo to your device’s gallery or exporting it to a cloud storage service, such as Google Drive or Dropbox.
5. If desired, you can also add metadata, such as copyright information or keywords, to the exported photo. This can be useful for organizing and protecting your images.
6. Once you have made all the necessary adjustments and chosen the export settings, tap on the “Export” button to initiate the export process. Lightroom Mobile will begin rendering the edited photo according to your specified settings.
7. Depending on the complexity of the editing adjustments and the resolution of the photo, the export process may take some time. Be patient and allow the app to complete the export before proceeding.
8. Once the export is complete, you can find the exported photo in the designated destination folder. From there, you can easily share it via email, social media, or any other platform of your choice.
By following these steps, you can successfully export your edited photos from Lightroom Mobile and share them with others or use them for your creative projects. It’s a convenient and efficient way to showcase your photography skills and make your visuals shine.
Step 8: Syncing with Lightroom Desktop
Once you have created and saved your presets in Lightroom Mobile, you may want to access them on your Lightroom Desktop as well. Thankfully, Lightroom offers a seamless syncing feature that allows you to effortlessly transfer your presets between devices.
To start syncing, ensure that both your Lightroom Mobile and Lightroom Desktop applications are open and logged into the same Adobe Creative Cloud account. This will enable the smooth transfer of your presets.
Next, open Lightroom Desktop and navigate to the “Presets” panel on the left-hand side of the interface. You will notice that any presets you created in Lightroom Mobile should automatically appear on this panel.
If the presets are not syncing automatically, you may need to initiate the sync manually. In Lightroom Desktop, go to the “Preferences” menu which can be found under the “Edit” tab on Windows or “Lightroom” tab on macOS. Select the “Presets” tab within preferences and ensure that the “Store presets with this catalog” option is checked.
Once you have verified the settings, click on the “Sync Status” button located at the top-right corner of the “Presets” panel. Lightroom will then begin syncing your presets across your devices.
It is important to note that the syncing process may take some time, depending on the number of presets and the speed of your internet connection. Be patient and let the syncing process complete before accessing your presets on Lightroom Desktop.
Once the syncing is finished, you will be able to access your presets in Lightroom Desktop and apply them to your photos. The beauty of the syncing feature is that any changes made to a preset on one device will automatically update on all your synced devices, ensuring consistency and ease of use.
With the power of syncing, you can now seamlessly edit and enhance your photos using your custom presets on both Lightroom Mobile and Lightroom Desktop. This allows for a more efficient and flexible workflow, giving you the freedom to edit your photos anytime and anywhere.
Step 9: Using the Preset in Lightroom Desktop
Once you have created and saved a preset in Lightroom Mobile, you can also use it in Lightroom Desktop. This allows you to apply the same editing settings and effects to your photos across different devices, ensuring a consistent look and feel throughout your work.
To use the preset in Lightroom Desktop, follow these simple steps:
1. Launch Lightroom Desktop on your computer.
2. Import the photos you want to edit by clicking on the “Import” button or by dragging and dropping the images into the Lightroom Library.
3. Select a photo from the Library module and click on the “Develop” tab to access the editing panel.
4. On the left-hand side of the Develop panel, locate the “Presets” section. Click on the small triangle to expand the presets panel.
5. Scroll down until you find the preset group that contains the preset you created in Lightroom Mobile.
6. Click on the preset name to apply it to the selected photo. You will instantly see the editing settings and effects take effect on the image.
7. If you want to apply the same preset to multiple photos, select the photos you wish to edit (hold down the Shift key to select multiple photos), and click on the preset name.
8. To fine-tune the preset adjustments, use the editing tools and sliders available in the Develop panel. This allows you to make further adjustments to suit the specific needs of each photo.
9. Once you are satisfied with the edits, you can export the edited photos by going to the “File” menu and selecting “Export”. Choose your desired export settings, including file format, quality, and destination folder.
10. By syncing your Lightroom Mobile and Lightroom Desktop catalogs, the preset you created in Lightroom Mobile will be automatically synced and available for use on all your devices, allowing you to seamlessly edit and access photos wherever you are.
Using presets in Lightroom Desktop not only saves you time and effort but also maintains a cohesive and consistent style for your photography portfolio. Experiment with different presets, modify them to suit your preferences, and elevate your photo editing process to a whole new level of efficiency.
Conclusion
Creating a preset in Lightroom Mobile can greatly enhance your photo editing workflow and efficiency. With just a few simple steps, you can save your favorite editing settings and apply them to multiple photos with a single click. Presets not only help you achieve consistency in your editing style but also save you valuable time, allowing you to focus on capturing amazing shots.
Remember, presets are not a one-size-fits-all solution. Take the time to experiment and fine-tune your presets to suit different lighting conditions and subjects. Additionally, don’t be afraid to modify and adjust the preset settings as you see fit, as each photo may require some variations.
So go ahead and unlock the full potential of Lightroom Mobile by creating and using presets. Elevate your photo editing game and achieve stunning results with just a few taps on your smartphone or tablet.
FAQs
1. What is Lightroom Mobile?
Lightroom Mobile is a mobile application developed by Adobe that allows you to edit, organize, and share your photos on the go. It offers powerful editing tools and seamless synchronization with the desktop version of Lightroom.
2. Can I create presets in Lightroom Mobile?
Yes, you can create presets in Lightroom Mobile. Presets are a set of predetermined editing adjustments that you can apply to your photos to achieve a specific look or style. Creating presets can save you time and help maintain consistency in your photo editing workflow.
3. How do I create a preset in Lightroom Mobile?
To create a preset in Lightroom Mobile, follow these steps:
a. Open a photo in Lightroom Mobile
b. Apply the desired editing adjustments to the photo
c. Tap on the three-dot menu icon and select “Create Preset”
d. Name your preset and choose the settings you want to include
e. Tap on the checkmark icon to save the preset.
4. Can I share my presets with others?
Yes, you can share your presets with others. Lightroom Mobile allows you to export your presets as DNG files, which can be imported and used by other users. You can share the DNG files through various methods, such as email, messaging apps, or cloud storage platforms.
5. Can I use presets created in Lightroom Classic in Lightroom Mobile?
Yes, you can use presets created in Lightroom Classic in Lightroom Mobile. You can sync your presets across devices using Adobe Creative Cloud, allowing you to use your presets seamlessly between Lightroom Classic and Lightroom Mobile.