
Welcome to our comprehensive guide on how to add presets to Lightroom Mobile! If you’re an avid photographer or simply love enhancing your mobile photos, the Lightroom Mobile app is a fantastic tool to have. Presets are like magic filters that allow you to transform your photographs with just a few clicks, giving them a professional and consistent look.
In this article, we’ll walk you through the step-by-step process of adding presets to Lightroom Mobile. Whether you’re a beginner or have some experience with the app, we’ve got you covered. By the end of this guide, you’ll be able to effortlessly apply presets to your photos and take your editing skills to the next level.
Inside This Article
- Getting Started: Installing Adobe Lightroom Mobile
- Creating a Lightroom Mobile Account
- Importing Presets – Downloading the preset files – Importing presets into Lightroom Mobile
- Applying Presets – Opening an image in Lightroom Mobile – Applying presets to images
- Customizing Presets – Adjusting preset settings – Saving custom presets
- Conclusion
- FAQs
Getting Started: Installing Adobe Lightroom Mobile
If you are a photography enthusiast or a professional photographer, Adobe Lightroom Mobile can be a game-changer for editing your photos on the go. With this powerful mobile app, you can easily enhance your images, apply filters, and create stunning presets. In this section, we will guide you on how to get started by installing Adobe Lightroom Mobile on your device.
First, you need to head to your device’s app store. If you are using an iOS device, go to the Apple App Store, or if you are using an Android device, go to the Google Play Store. Search for “Adobe Lightroom Mobile” and tap on the app when you find it.
Once you have found the app, tap on the “Install” or “Get” button to start the installation process. The app will begin downloading and installing on your device. This may take a few minutes, depending on your internet connection speed.
After Adobe Lightroom Mobile has finished installing, you can open the app by tapping on the icon on your device’s home screen. The app will launch, and you will be prompted to log in or create a new account. If you already have an Adobe Creative Cloud account, you can log in with your existing credentials. If you don’t have an account, you need to create a new one.
Creating a Lightroom Mobile Account
To create a new Adobe Lightroom Mobile account, tap on the “Sign Up” or “Create Account” button on the login screen. You will be directed to a registration page where you need to provide your email address, a password, and some basic personal information.
After entering your details, tap on the “Continue” button to proceed. Adobe may ask you to verify your email address by sending a confirmation link to your inbox. Follow the instructions provided in the email to complete the verification process.
Once you have created and verified your account, you can log in to Adobe Lightroom Mobile using your newly created credentials. The app will sync your settings and preferences, ensuring a seamless editing experience across devices.
By installing Adobe Lightroom Mobile and creating a Lightroom Mobile account, you are now ready to explore the limitless possibilities of mobile photo editing. The next step is to import presets into Lightroom Mobile, which we will cover in the next section.
Importing Presets – Downloading the preset files – Importing presets into Lightroom Mobile
One of the great features of Adobe Lightroom Mobile is the ability to import presets, which are pre-defined editing settings, directly into the app. This allows you to quickly apply professional-grade edits to your photos with just a few taps. In this section, we will walk you through the process of downloading preset files and importing them into Lightroom Mobile.
The first step is to find and download the preset files that you want to import. There are many websites and online communities that offer free and paid Lightroom presets. Look for presets that match your editing style or the desired look for your photos. Once you’ve found the presets you want, download them to your computer or mobile device.
To import presets into Lightroom Mobile, you need to have the Adobe Creative Cloud app installed on your device. Make sure to sign in with your Adobe ID or create a new account if you don’t already have one. Once you have the app installed and logged in, follow these steps:
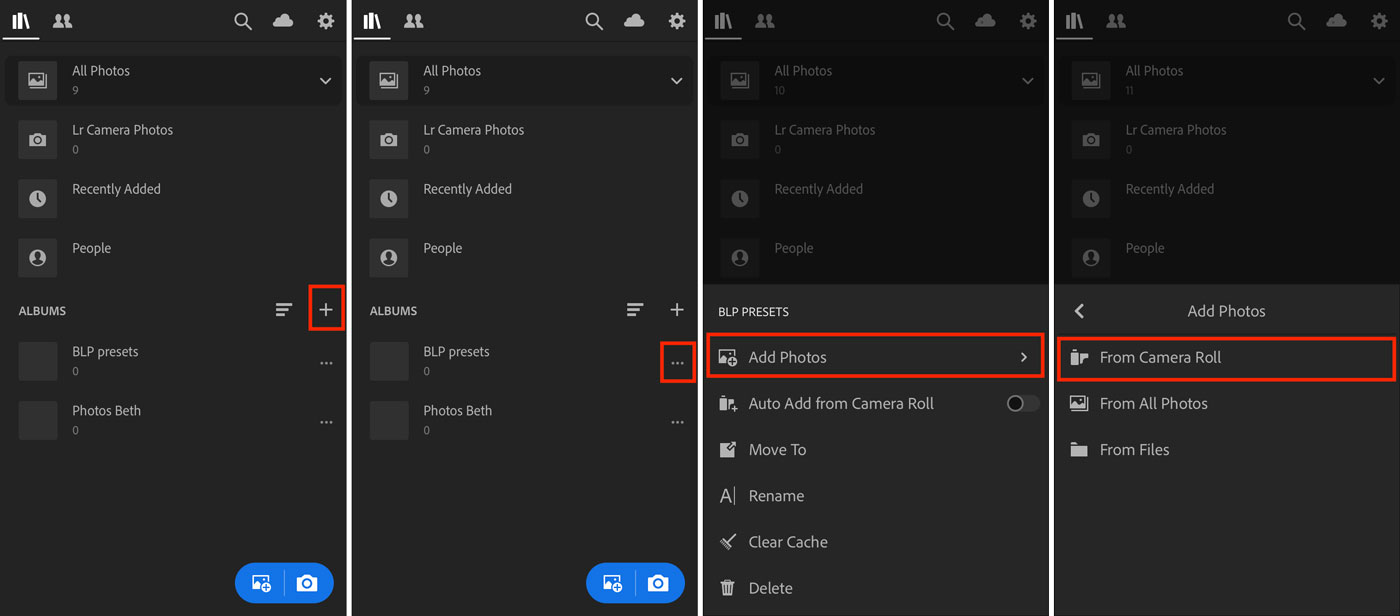
- Open the Adobe Lightroom Mobile app on your device.
- In the app’s home screen, tap on the “+” icon at the bottom of the screen to create a new album.
- Name the album and select the desired location to save it.
- Open the created album and tap on the three-dot menu icon at the top-right corner of the screen.
- From the menu that appears, select “Add Photos.”
- Navigate to the location where you downloaded the preset files and select them.
- Wait for the files to upload and import into the album. Once the import is complete, you will see the presets as individual thumbnails in the album.
Now that you have successfully imported the preset files into Lightroom Mobile, you can start applying them to your photos. Simply open an image in Lightroom Mobile and follow these steps:
- Tap on the preset thumbnail in the album to apply it to the current photo.
- You can explore different presets by tapping on their thumbnails. Lightroom Mobile provides a live preview of the preset’s effect.
- After applying a preset, you can further customize the edits by adjusting the slider settings for exposure, contrast, saturation, and more.
- To remove a preset, tap on the “Reset” button at the bottom of the editing panel.
- Don’t forget to save your edited photo by tapping on the “Save” button in Lightroom Mobile.
Now you know how to import preset files into Lightroom Mobile and apply them to your photos. With a wide range of presets available, you can quickly enhance your images and achieve professional results. Experiment with different presets, make adjustments to suit your preferences, and let your creativity shine through your photography.
Applying Presets – Opening an image in Lightroom Mobile – Applying presets to images
Once you have successfully installed Adobe Lightroom Mobile and imported your desired presets, it’s time to put them to use. In this section, we will walk you through the process of opening an image in Lightroom Mobile and applying presets to enhance its aesthetic appeal.
To begin, launch the Lightroom Mobile app on your smartphone or tablet. If you haven’t already signed in, use your Adobe ID to log in or create a new account.
Once you’re logged in, you’ll be greeted with the Lightroom Mobile home screen. Here, you can see your recently edited images and access various features of the app.
To open an image for editing, tap on the “+” icon at the bottom center of the screen. This will bring up the import options, allowing you to choose the image you want to work on.
Browse through your device’s photo library or albums and select the image you wish to edit. Tap on the image to open it in the editing interface of Lightroom Mobile.
With the image now open, you can start applying presets to achieve the desired look. To do this, tap on the “Presets” icon at the bottom of the screen. This will display all the presets you have imported into Lightroom Mobile.
Browse through the available presets and select the one you want to apply to your image. You can preview each preset by tapping on it. Once you’ve found the desired preset, tap on it to apply it to your image.
Lightroom Mobile will quickly process the preset and make the necessary adjustments to your image. You can instantly see the changes on your screen. If you’re not satisfied with the result, you can always try a different preset or make manual adjustments to fine-tune the look.
Additionally, you can adjust the intensity or strength of the applied preset. To do this, use the “Intensity” or “Strength” slider located below the preset selection menu. Sliding it to the right will increase the effect of the preset, while sliding it to the left will decrease it.
Once you’re happy with the applied preset and any additional adjustments you’ve made, you can save your edited image. Tap on the “Save” icon at the top right corner of the screen to save the image back to your device’s photo library.
That’s it! You’ve successfully opened an image in Lightroom Mobile and applied presets to enhance its appearance. With the versatility of presets, you can effortlessly transform your photos into stunning works of art, all with just a few simple taps.
Customizing Presets – Adjusting preset settings – Saving custom presets
Once you’ve imported presets into Lightroom Mobile and applied them to your images, you may find that some adjustments are needed to achieve the desired look. Fortunately, Lightroom Mobile provides various tools and options to customize presets and fine-tune the settings to suit your preferences.
Here are some steps to follow when customizing presets in Lightroom Mobile:
- Adjusting preset settings: To make changes to a preset, start by selecting an image to work with. Once the image is open, navigate to the editing panel and locate the “Presets” tab. From there, you can click on the preset you want to modify and adjust the different settings such as exposure, contrast, saturation, and more. Play around with these settings until you achieve the desired look.
- Saving custom presets: After making the necessary adjustments to the preset, you have the option to save it as a custom preset for future use. To do this, go to the “Presets” tab and click on the three-dot menu icon. From the menu that appears, select “Create Preset” and a new window will open. Give your custom preset a name and choose the desired settings that you want to include. Once you’re satisfied, click on the “Save” button, and your custom preset will be saved and ready to use.
Customizing presets in Lightroom Mobile allows you to tailor your edits and create a unique look for your images. Whether you want to make subtle tweaks or completely transform the preset, these customization options give you the flexibility to achieve your desired results.
Experimenting with different adjustments and settings can help you develop your own editing style and enhance the presets to match your creative vision. Take some time to play around with the various tools and options available, and don’t be afraid to get creative!
Remember, customizing presets is all about personalization and making the presets work for you. It’s a great way to save time in your editing workflow while still maintaining control over the final outcome. So, explore, experiment, and have fun creating stunning images with your customized presets in Lightroom Mobile!
Adding presets to Lightroom Mobile is a game-changer for any mobile photographer. With just a few simple steps, you can enhance your photos and achieve professional-looking results on the go. Presets not only save time but also allow you to explore different editing styles and create a cohesive aesthetic for your mobile photography.
By following the methods outlined in this article, you can easily import presets to Lightroom Mobile, whether you’re using a desktop version or downloading presets directly from external sources. With the ability to sync presets across devices, you can seamlessly edit photos across multiple platforms, making your mobile photography workflow more efficient and versatile.
Remember, experimenting with presets is part of the creative process. Don’t be afraid to customize and tweak presets to suit your unique style and preferences. With Lightroom Mobile and an array of presets at your disposal, the possibilities are endless for taking your mobile photography to the next level.
FAQs
1. How do I add a preset to Lightroom Mobile?
2. Can I use presets from Lightroom Classic in Lightroom Mobile?
3. Where can I find free presets for Lightroom Mobile?
4. Are presets compatible with both iOS and Android versions of Lightroom Mobile?
5. Can I create my own presets in Lightroom Mobile?