
Are you facing issues with your Android phone and wish you could turn back time to when it was working perfectly? Well, you’re in luck! Restoring an Android phone to a previous date can be a useful troubleshooting step when you encounter software glitches, performance issues, or even when you want to undo certain changes you’ve made to your device.
Whether you accidentally installed a buggy app, experienced a sudden drop in battery life, or simply want to revert back to a more stable version of your phone, this article will guide you through the process of restoring your Android device to a previous date. By following our step-by-step instructions, you can potentially resolve common issues and bring your phone back to its former glory.
Inside This Article
- Why Would You Want to Restore Your Android Phone?
- Precautions before Restoring Your Android Phone
- Method 1: Using a Backup
- Method 2: Factory Reset
- Method 3: Using Third-Party Tools
- Method 4: Restoring from a Custom Recovery Image
- Conclusion
- FAQs
Why Would You Want to Restore Your Android Phone?
There are several reasons why you may want to restore your Android phone to a previous date. Let’s explore some common scenarios:
1. Software Issues: Over time, your Android phone may encounter software glitches or stability issues that affect its performance. Restoring your phone to a previous date can help undo any recent software updates or changes that may be causing issues.
2. Unwanted Changes: Sometimes, you may accidentally make changes to your phone’s settings or install applications that cause problems or unwanted behavior. Restoring to a previous date can revert those changes and provide a fresh start.
3. Malware or Virus Attacks: Android devices are not immune to malware or virus attacks. If your phone gets infected, restoring it to a previous date can help remove any malicious software and restore the device’s security.
4. Data Loss: Losing important data like contacts, messages, or media files can be a nightmare. By restoring your Android phone to a previous date, you may be able to recover lost data from a backup and avoid permanent loss.
5. Performance Issues: If your Android phone has become sluggish or slow over time, restoring it to a previous date can help improve performance by removing unnecessary files, apps, and settings that may be causing the issue.
6. Testing Purposes: If you are a developer or tech enthusiast, you may want to test different configurations or software versions on your Android device. Restoring to a previous date allows you to switch between setups without losing your current progress.
By understanding why you would want to restore your Android phone, you can determine the best method to achieve your desired outcome. Whether it’s resolving software issues, reversing unwanted changes, or recovering lost data, restoring your Android phone to a previous date can be a useful tool in maintaining and optimizing your device.
Precautions before Restoring Your Android Phone
Restoring your Android phone to a previous date can be a useful way to fix software issues or revert back to a stable state. However, it’s important to take certain precautions before proceeding with the restoration process. Here are a few key steps you should follow:
1. Backup your data: Restoring your Android phone will erase all the data and settings on your device, so it’s crucial to back up your important files and data beforehand. Use cloud storage services, such as Google Drive or Dropbox, or connect your phone to a computer and transfer the files manually. This will ensure that you don’t lose any important information during the restoration process.
2. Check for updates: Before restoring your Android phone, make sure you have the latest software updates installed. These updates often include bug fixes and performance improvements, which can potentially resolve the issues you’re facing. To check for updates, go to your phone’s settings, navigate to the “System” or “Software Update” section, and tap on “Check for Updates”. If any updates are available, download and install them before proceeding with the restoration.
3. Charge your phone: Ensure that your Android phone has sufficient battery level before initiating the restoration process. It is recommended to have at least 50% battery power to avoid any interruptions during the restoration, as a sudden power loss can lead to incomplete or unsuccessful restoration.
4. Remove external storage: If your Android phone has an external SD card or any other removable storage, it is advisable to remove it before starting the restoration process. This will prevent any potential conflicts or unintended data loss during the restoration.
5. Disable screen lock: If you have a screen lock or password set on your Android phone, disable it temporarily before restoring your device. This will prevent any issues with the restoration process, as the screen lock can sometimes interfere with the software restoration.
By following these precautions, you can ensure a smooth and successful restoration process for your Android phone. Remember to double-check all the steps and confirm that you have backed up your important data before proceeding. With the right precautions in place, you can confidently restore your Android phone to a previous date and resolve any issues you may be facing.
Method 1: Using a Backup
If you want to restore your Android phone to a previous date, one of the most convenient and effective methods is by using a backup. When you create a backup of your Android device, you are essentially saving a snapshot of its settings, apps, and data. This allows you to restore your phone to that specific state in the future.
To use this method, you need to have previously created a backup of your Android phone using a backup tool or service. There are several options available, including built-in backup solutions provided by your phone’s manufacturer, as well as third-party apps like Google Drive, Dropbox, or even specialized backup tools like Titanium Backup.
Once you have a backup of your Android phone, follow these steps to restore it to a previous date:
- Go to the Settings app on your Android phone.
- Scroll down and tap on “System” or “System & Updates”.
- Look for the “Backup & Restore” or “Backup” option and tap on it.
- Depending on your device and backup tool, you may have different options here. Look for the option to “Restore” or “Restore from Backup”.
- Select the backup file or date that you want to restore from. This could be a local backup file saved on your phone, or a backup file stored on a cloud storage service like Google Drive or Dropbox.
- Follow the on-screen instructions to complete the restoration process.
It’s important to note that when you restore your Android phone using a backup, it will revert back to the exact state it was in when the backup was created. This means that any new files, apps, or data that were added after the backup was made will be removed.
Using a backup to restore your Android phone is a convenient method, especially if you want to go back to a specific date without losing any important settings or data. Just make sure to regularly create backups of your device to ensure you have a recent snapshot to restore from in case of any issues or unwanted changes.
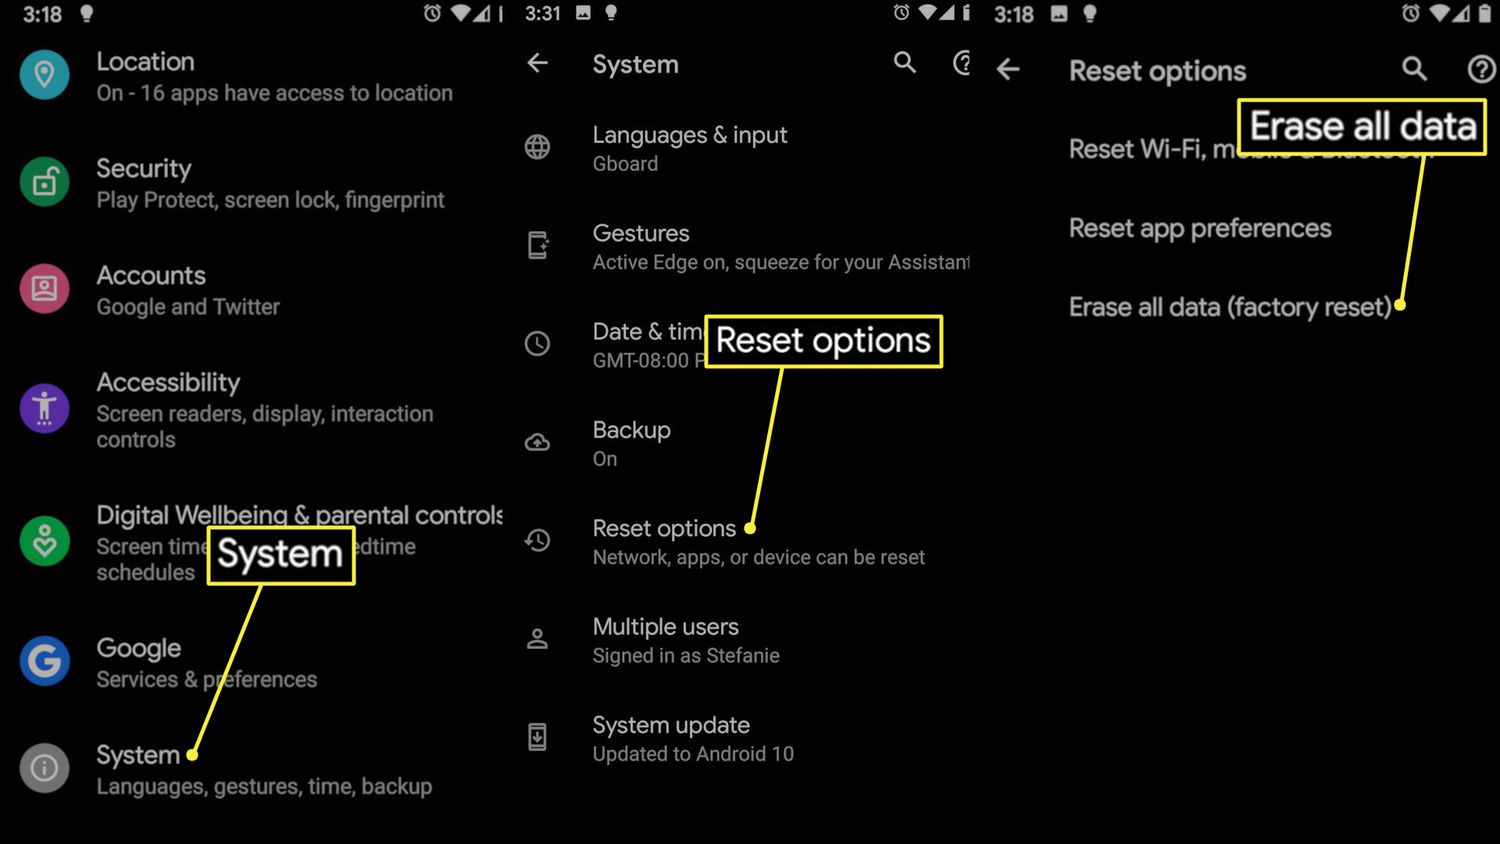
Method 2: Factory Reset
When it comes to restoring your Android phone to a previous date, one of the most effective methods is performing a factory reset. A factory reset will delete all data and settings on your device, essentially bringing it back to its original state when you first purchased it. Here’s how you can do it:
1. Open your phone’s Settings app. You can usually find it in your app drawer or by swiping down from the top of the screen and tapping on the gear icon.
2. Scroll down and tap on “System” or “System and updates”, depending on your device.
3. Look for the “Reset” option and tap on it. It might be under a sub-menu like “Backup & reset” or “Advanced.
4. Select “Factory data reset” or similar wording. You may be prompted to enter your device’s PIN, pattern, or password for security purposes.
5. Read the warning message carefully, as this action cannot be undone and will erase all data on your phone. If you’re certain about proceeding, tap on “Reset” or “Erase all data”.
6. Your device will now begin the factory reset process. It may take a few minutes for the process to complete, and your phone may restart multiple times.
7. Once the factory reset is complete, you’ll be taken to the initial setup wizard, just like when you first activated your phone. Follow the on-screen instructions to set up your device and personalize your settings.
It’s important to note that performing a factory reset will erase all data on your phone, including apps, photos, contacts, messages, and settings. Therefore, it’s crucial to back up your important data before proceeding with a factory reset. You can use methods like Google Backup, Samsung Smart Switch, or third-party apps to backup and restore your data.
By following these steps, you can easily perform a factory reset on your Android phone and revert it back to its original state. Remember to back up your data to avoid losing any important information during the process.
Method 3: Using Third-Party Tools
If you’re looking for an alternative method to restore your Android phone to a previous date, you can consider using third-party tools. These tools are specifically designed to help users backup and restore their device’s data, including apps, contacts, messages, and more.
One such popular tool is Dr.Fone – Data Recovery. It is a comprehensive data recovery software that not only allows you to recover lost or deleted files but also provides an option to restore your Android phone to a previous date.
To use the Dr.Fone – Data Recovery tool for restoring your Android phone, follow these steps:
- Start by downloading and installing Dr.Fone – Data Recovery on your computer.
- Connect your Android phone to the computer using a USB cable.
- Launch Dr.Fone – Data Recovery and select the “Restore” option.
- The tool will scan your device for available restore points.
- Select the desired restore point from the list.
- Click on the “Restore” button to begin the restoration process.
It is important to note that using third-party tools to restore your Android phone to a previous date may have certain limitations. For example, not all devices are compatible with every tool, and there may be some risks associated with the process.
Before proceeding with this method, ensure that you have taken a backup of your device’s data and follow the instructions provided by the third-party tool carefully to avoid any potential data loss or damage to your device.
Always remember to use trusted and reputable tools from reliable sources to minimize any risks and ensure a smooth restoration process for your Android phone.
Method 4: Restoring from a Custom Recovery Image
Restoring your Android phone from a custom recovery image can be a lifesaver when other methods fail. Custom recovery images, such as TWRP (Team Win Recovery Project) or ClockworkMod Recovery, offer a range of advanced options, including the ability to restore your phone to a previous date.
Before you begin, make sure you have a custom recovery image installed on your Android phone. Each device has its own specific instructions for installing custom recoveries, so be sure to refer to the appropriate resources for your device model.
Here are the steps to restore your Android phone using a custom recovery image:
- Power off your phone and enter the recovery mode by pressing a combination of keys (such as Volume Up + Power).
- In the recovery mode, navigate using the volume keys and select the “Backup” option.
- Select the “Restore” option and choose the desired backup file that corresponds to the date you want to restore your phone to.
- Confirm the restoration process and wait for it to complete.
- Once the restoration is finished, reboot your phone. Your Android phone should now be restored to the previous date.
It’s important to note that using a custom recovery image for restoring your Android phone requires some technical knowledge and can potentially void your warranty. Additionally, not all devices have support for custom recoveries.
If you don’t feel comfortable performing this method on your own, it’s best to seek the assistance of a professional or consult the device’s official support channels. They can guide you through the process and ensure that you restore your Android phone safely.
Remember to always back up your important data before attempting any kind of restoration process. This ensures that you have a copy of your files in case anything goes wrong.
Restoring your Android phone from a custom recovery image can be a powerful tool in fixing software issues, reverting to a previous state, or even trying out custom ROMs. However, it’s important to proceed with caution and follow the instructions carefully to avoid any unintended consequences.
Conclusion
Restoring your Android phone to a previous date can be a useful solution when you encounter problems or want to undo recent changes. By following the steps outlined in this guide, you can easily revert your device back to a previous state and eliminate any issues you may be experiencing.
Remember, before proceeding with a restoration, it is crucial to back up your data to prevent the loss of important files and settings. Additionally, be mindful that restoring your phone to a previous date will undo any changes or updates made after the selected date, so proceed with caution.
Overall, knowing how to restore your Android phone to a previous date is a valuable troubleshooting skill that can save you time and frustration. By effectively utilizing this feature, you can keep your device running smoothly and restore it to a functioning state whenever necessary.
FAQs
1. Can I restore my Android phone to a previous date?
Unfortunately, restoring an Android phone to a specific previous date is not possible. Android devices do not have a built-in feature to roll back to a previous date like a computer operating system. However, you can perform a factory reset to remove any unwanted changes or settings and restore your device to its original state.
2. What is a factory reset and how do I perform it?
A factory reset is a process that erases all data and settings on your Android device, bringing it back to its original factory state. To perform a factory reset, go to the Settings menu on your Android device, then look for the “Backup & Reset” or “System” option. From there, you should find the option to perform a factory reset. Note that this will erase all data on your device, so it’s essential to backup any important files or data before proceeding.
3. Will a factory reset solve all software-related issues on my Android phone?
In most cases, a factory reset can help resolve software-related issues on your Android phone. By erasing all data and settings, it essentially removes any problematic software or settings that may be causing issues. However, it’s important to note that a factory reset should only be considered as a last resort if other troubleshooting methods have failed. Always backup your data before performing a factory reset.
4. Can I restore my apps and data after performing a factory reset?
After performing a factory reset on your Android phone, all data, including apps, will be erased. However, if you have enabled automatic app backups in your Google account settings, you can restore your apps from the Play Store by signing in with your Google account. Additionally, if you have backed up your data to an external storage device or cloud service, you can restore it after the factory reset.
5. Are there any alternative methods to restore my Android phone to a previous state?
While there is no direct method to roll back an Android phone to a previous date, you can try restoring your device from a previous backup. If you have enabled the backup feature on your device or used a third-party backup solution, you may be able to restore your phone to a previous state by restoring a backup. However, this will only revert your data and settings to the time when the backup was created, not the entire phone system.