
In today’s fast-paced digital world, our mobile phones have become an integral part of our lives. Whether for business or personal use, we rely on these devices to keep us connected and organized. With the advent of smartphones, we can now conveniently access our emails on the go, ensuring that we never miss an important message. However, sometimes emails can end up in the Archive folder on our iPhones, causing confusion and frustration. If you find yourself in this situation, fear not! In this article, we will provide you with a step-by-step guide on how to stop emails from going to the Archive on your iPhone. No more hunting through folders to find that important email – let’s take control and ensure that our inbox stays organized and accessible.
Inside This Article
- Common Reasons for Emails Going to Archive on iPhone
- How to Adjust Email Settings to Prevent Archiving on iPhone
- Step-by-Step Guide to Stop Emails from Going to Archive on iPhone
- Additional Tips to Manage Emails Effectively on iPhone
- Conclusion
- FAQs
Common Reasons for Emails Going to Archive on iPhone
There can be several reasons why emails are getting automatically sent to the Archive folder on your iPhone. Understanding these reasons can help you troubleshoot and prevent this issue from occurring in the future. Here are some common causes:
1. Misconfigured Mail Settings: Incorrect mail settings can lead to emails being redirected to the Archive folder instead of the Inbox. Double-check your email account settings to ensure they are properly configured.
2. Filters and Rules: If you have set up filters or rules within your email account, they may be automatically archiving certain emails. Review your filter settings to see if any rules are causing this behavior.
3. Swipe Actions: On the iPhone, you can configure swipe actions for different email gestures. If you have unintentionally set up a swipe action to archive emails, it can result in emails being sent to the Archive folder.
4. Third-Party Apps: Some third-party email apps may have their own settings and behavior, which can cause emails to be archived. Make sure to review the settings of any third-party email apps you have installed on your iPhone.
5. Synchronization Issues: If your iPhone is not properly synchronizing with your email server, it can result in emails being archived. Check your internet connection and ensure that your email account is set up correctly.
6. Software Updates: Occasionally, software updates on your iPhone can introduce new features or changes to the way emails are handled. Verify if any recent updates have introduced changes to the email archiving behavior.
7. User Error: It’s possible that emails are being manually moved to the Archive folder by mistake. Pay attention to your actions when managing your emails to ensure you’re not inadvertently archiving them.
By understanding these common reasons for emails going to the Archive folder on your iPhone, you can take the necessary steps to prevent it from happening and ensure that your emails stay in the Inbox where you can easily access them.
How to Adjust Email Settings to Prevent Archiving on iPhone
When it comes to managing your emails on your iPhone, you may have noticed that some of your important messages are mysteriously disappearing into the archive folder. This can be frustrating and may cause you to miss important information. Fortunately, there are ways to adjust your email settings to prevent archiving on your iPhone. In this article, we will guide you through the process step by step.
Before we dive into the methods, it’s important to understand that the archive feature on the iPhone is designed to move messages out of your inbox without deleting them. Archived emails are stored in a separate folder, making it easier for you to keep your inbox clutter-free. However, if you prefer to keep all your emails in your inbox, you can disable the auto-archive feature.
Method 1: Disabling Auto-Archive for Emails
The first method involves disabling the auto-archive feature for your emails. Here’s how you can do it:
- Open the Settings app on your iPhone.
- Scroll down and tap on “Mail.”
- Under the “Mail” settings, tap on “Accounts.”
- Select the email account for which you want to disable auto-archive.
- Tap on the account name to access the account settings.
- Scroll down and find the “Archive Messages” option.
- Toggle the switch to disable the auto-archive feature.
Method 2: Adjusting Mail Settings to Prevent Archiving
If you prefer a more granular approach to prevent archiving, you can adjust specific mail settings. Here’s how:
- Open the Settings app on your iPhone.
- Scroll down and tap on “Mail.”
- Under the “Mail” settings, tap on “Accounts.”
- Select the email account for which you want to prevent archiving.
- Tap on the account name to access the account settings.
- Scroll down and find the “Mail Days to Sync” option.
- Select the desired option from the list (for example, “No Limit” to keep all emails on your device).
By adjusting the mail settings, you can ensure that your emails stay in your inbox and don’t get automatically archived. Remember to repeat these steps for each email account on your iPhone if you want to prevent archiving across all accounts.
Now that you know how to adjust email settings to prevent archiving on your iPhone, you can confidently manage your emails without worrying about important messages disappearing into the archive folder. Take control of your inbox and keep your emails organized just the way you like!
Step-by-Step Guide to Stop Emails from Going to Archive on iPhone
If you’re an iPhone user who prefers to keep your inbox organized and clutter-free, you may find it frustrating when emails automatically get archived instead of staying in your inbox. Fortunately, there are ways to prevent this from happening and regain control over your email management on your iPhone. In this step-by-step guide, we’ll walk you through two methods to stop emails from going to archive on your iPhone.
Method 1: Disabling Auto-Archive for Emails
The first method involves disabling the auto-archive feature for emails on your iPhone. Here’s how you can do it:
- Open the Settings app on your iPhone.
- Scroll down and tap on “Mail” or “Mail, Contacts, Calendars,” depending on your iOS version.
- Tap on “Accounts.”
- Select the email account for which you want to disable auto-archive.
- Under the “Mail” section, toggle off the “Archive Messages” option.
- Exit the Settings app, and now your emails will no longer be automatically archived.
Method 2: Adjusting Mail Settings to Prevent Archiving
The second method involves adjusting the mail settings on your iPhone to prevent archiving. Here’s what you need to do:
- Open the Settings app on your iPhone.
- Scroll down and tap on “Mail” or “Mail, Contacts, Calendars.”
- Tap on “Accounts.”
- Select the email account for which you want to adjust the settings.
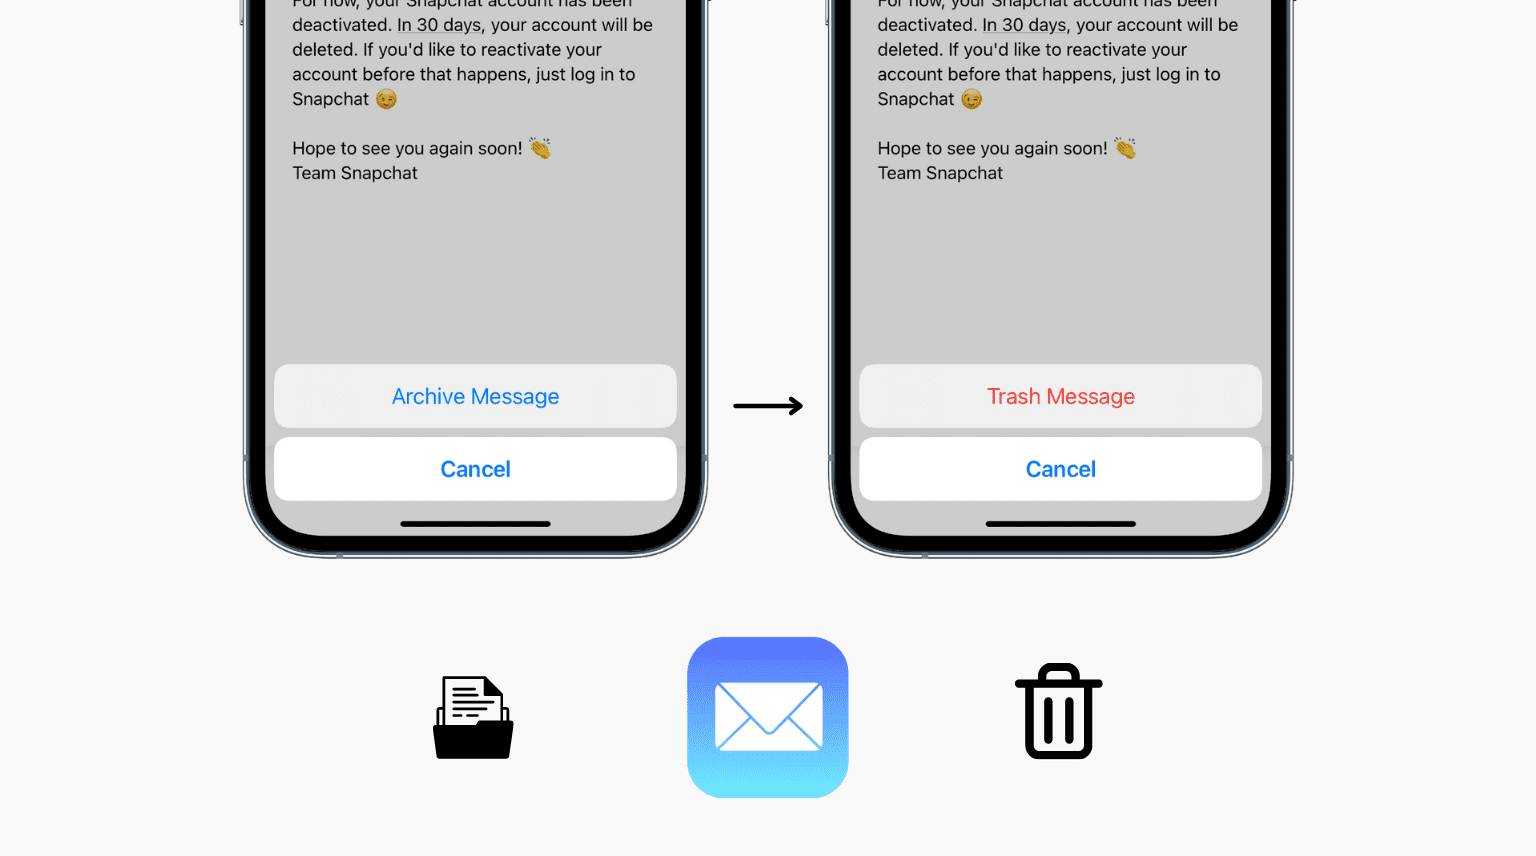
- Tap on “Advanced.”
- Under the “Move Discarded Messages Into” section, select “Deleted Mailbox” instead of “Archive Mailbox.”
- Exit the Settings app, and from now on, your emails will be moved to the deleted mailbox instead of being archived.
By following these two methods, you can effectively prevent your emails from going to the archive on your iPhone. Enjoy a clutter-free inbox and have better control over your email organization and management.
Additional Tips to Manage Emails Effectively on iPhone
Managing emails on your iPhone can be a breeze when you have the right tips and tricks up your sleeve. Here are some additional tips to help you stay organized and efficient:
1. Set up email folders: Creating folders for different categories or projects can help you keep your emails organized. Simply tap on the “Edit” button in the Mail app and select “New Mailbox” to create a new folder. You can then move emails into the appropriate folder by tapping on the email and selecting “Move” or “Archive”.
2. Utilize email filters: Filters can help you automatically sort incoming emails into specific folders or apply certain actions. To set up a filter, go to “Settings” on your iPhone, tap on “Mail”, select “Filters”, and then tap on “Add Filter”. From there, you can define the conditions for the filter and choose the desired action.
3. Take advantage of swipe gestures: Enable swipe gestures in your Mail settings to perform quick actions on emails. For example, you can swipe left to archive or delete an email, and swipe right to mark it as unread or flag it. To enable swipe gestures, go to “Settings”, tap on “Mail”, and then select “Swipe Options”.
4. Use VIP contacts: If you receive emails from important contacts that require immediate attention, you can designate them as VIPs. VIPs will be displayed in a separate mailbox, making it easier for you to prioritize their emails. To add a contact to your VIP list, open an email from that contact, tap on their name or email address, and select “Add to VIP”.
5. Enable email notifications: To stay on top of your emails, make sure to enable notifications for your email accounts. You can customize the notification settings by going to “Settings”, tapping on “Notifications”, selecting the Mail app, and adjusting the notification preferences.
6. Regularly delete unnecessary emails: Over time, your email inbox can get cluttered with old and unnecessary emails. Take some time to go through your inbox and delete or archive emails that you no longer need. This will help keep your inbox clean and make it easier to find important messages.
7. Set up email signatures: Customize your email signatures to include your name, contact information, and any other relevant details. This can save you time when composing emails and provide a professional touch. To set up an email signature, go to “Settings”, tap on “Mail”, select “Signature”, and enter your desired signature text.
8. Use Siri to manage emails: Apple’s virtual assistant, Siri, can help you with email management tasks. You can use voice commands to compose and send emails, check your inbox, or search for specific messages. Simply activate Siri by saying “Hey Siri” or holding down the home button, and then ask Siri to perform the desired task.
By implementing these additional tips, you can take control of your email management on your iPhone and make the most out of your mailbox.
In conclusion, preventing emails from going to the archive on your iPhone is a crucial step in managing your inbox effectively. By following the steps outlined in this article, you can ensure that important emails stay at the forefront of your attention and don’t get lost in the vast sea of your archive. Remember to regularly check your email settings and adjust them as needed to maintain the organization and efficiency of your inbox. With a little bit of effort and attention to detail, you can take control of your email flow and never miss out on important messages again. So, go ahead and apply these tips to keep your inbox tidy and streamline your email management on your iPhone.
FAQs
Q: How can I stop emails from going to archive on my iPhone?
A: To prevent emails from going to the archive on your iPhone, you can follow these steps:
- Open the “Settings” app on your iPhone.
- Scroll down and tap on “Mail.”
- Under the “Threading” section, toggle off the “Organize by Thread” option.
- Return to the main Mail settings menu and tap on “Accounts.”
- Select your email account, then tap on “Mailbox Behaviors.”
- Tap on “Archive Mailbox” and select the “On My iPhone” option.
- Finally, go back to the “Mail” app and check if emails are no longer being archived.
Q: Are there any alternatives to stopping emails from going to archive on my iPhone?
A: Yes, besides the method mentioned above, you can also try the following alternatives to prevent emails from being archived:
- Disable the Archive feature for your email account: Some email providers allow you to disable the archive feature altogether from your account settings. Check your email provider’s documentation or website for instructions on how to do this.
- Use a different email app: If the default Mail app on your iPhone is automatically archiving your emails, you can try using a different email app from the App Store. There are several third-party email apps available that offer more customization options.
Q: Will stopping emails from going to archive on my iPhone delete any of my existing archived emails?
A: No, stopping emails from going to the archive on your iPhone will not delete any of your existing archived emails. It will only change the behavior of new incoming emails. Your existing archived emails will still be accessible in the archive folder.
Q: Can I undo the changes and allow emails to be archived again on my iPhone?
A: Yes, if you want to enable the archiving feature again on your iPhone, you can follow these steps:
- Open the “Settings” app on your iPhone.
- Scroll down and tap on “Mail.”
- Under the “Threading” section, toggle on the “Organize by Thread” option.
- Return to the main Mail settings menu and tap on “Accounts.”
- Select your email account, then tap on “Mailbox Behaviors.”
- Tap on “Archive Mailbox” and select the desired option (usually “All Mail” or “Archive”).
- Go back to the “Mail” app, and your emails will now be archived again.
Q: Will stopping emails from going to archive on my iPhone affect my email syncing across devices?
A: Disabling the archiving feature on your iPhone will only affect the behavior of emails on your iPhone. It will not affect the syncing of emails across other devices connected to the same email account. Emails will still synchronize and be accessible on other devices such as your iPad, Mac, or webmail client.