
Are you one of those iPhone users who constantly struggle with cluttered email inboxes? Do you often find yourself archiving emails, only to realize that you actually wanted to delete them? Well, you’re not alone. Many iPhone users mistakenly archive their emails instead of deleting them, leading to a cluttered and disorganized inbox.
In this article, we will guide you on how to delete instead of archive your emails on your iPhone. We will walk you through the steps to ensure that you can efficiently clean up your email inbox and free up much-needed space on your device.
So, if you’re tired of scrolling through countless archived emails and want to declutter your inbox once and for all, read on to learn how to delete emails on your iPhone like a pro.
Inside This Article
- Point 1: Disabling Archive Feature on iPhone
- Point 2: Moving Emails to Trash Folder
- Point 3: Deleting Multiple Emails at Once
- Point 4: Setting Up the Delete Button Functionality
- Conclusion
- FAQs
Point 1: Disabling Archive Feature on iPhone
By default, iPhones have the archive feature enabled for emails. This means that when you swipe on an email in your inbox, you are given the option to archive it instead of deleting it. While archiving can be useful for some users, others prefer to have the option to delete their emails right away. If you fall into the latter category, don’t worry—there’s a simple way to disable the archive feature on your iPhone.
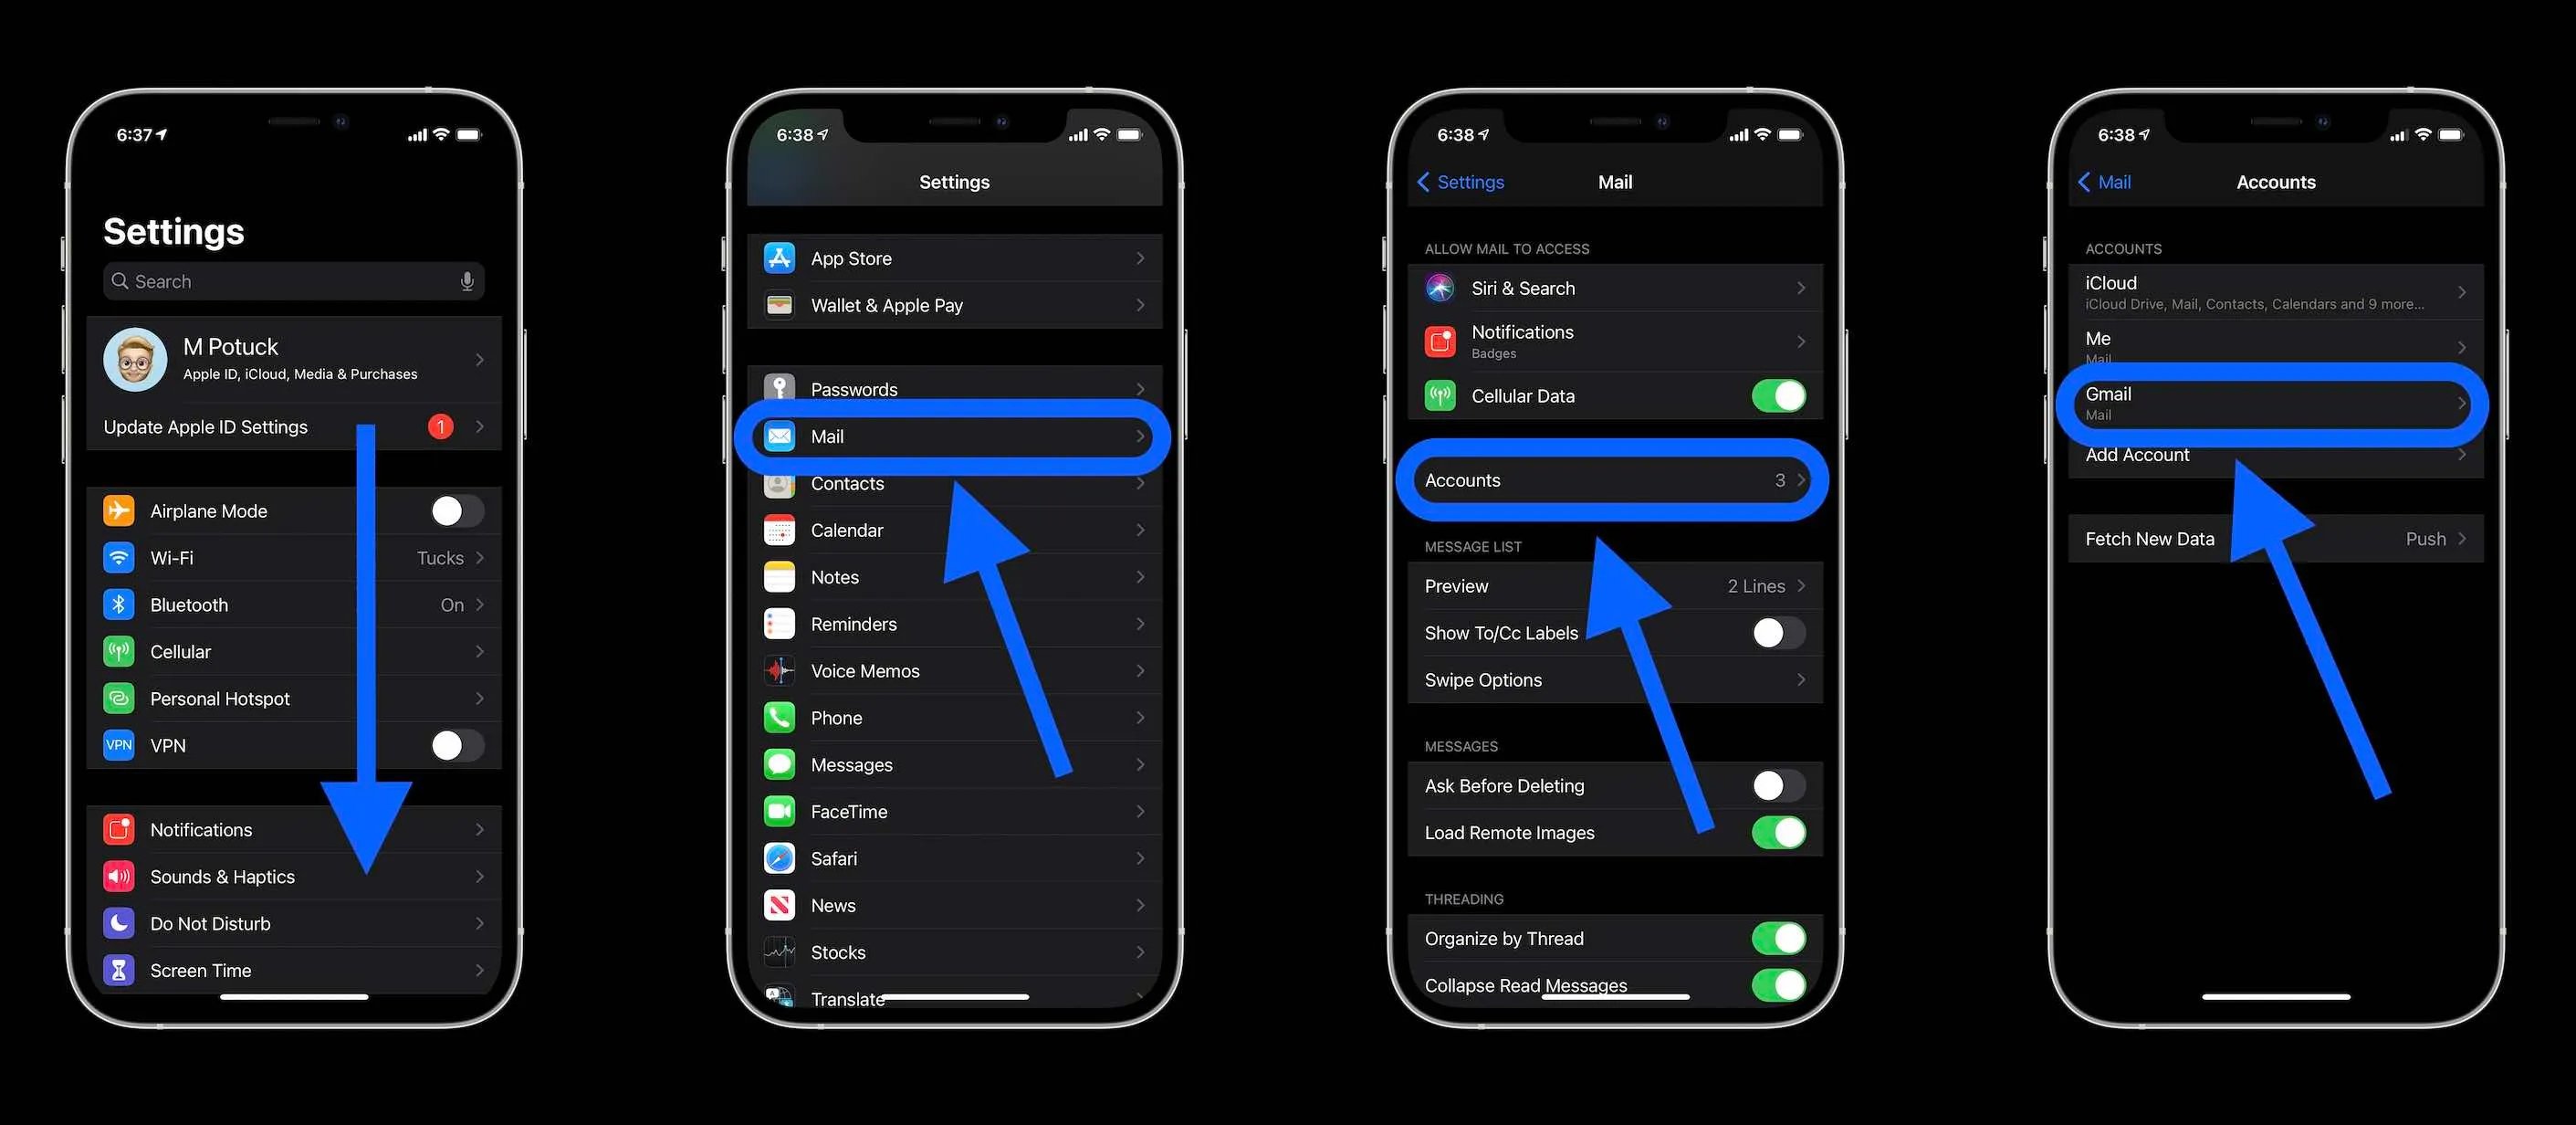
To disable the archive feature, open the Settings app on your iPhone and scroll down to Mail. Tap on it to open the Mail settings. Next, select the Accounts option and choose the email account for which you want to disable the archive feature.
Now, in the account settings page, tap on the Account option again, and then select the Advanced option. In the Advanced settings, you will see an option called Archive Messages. By default, it is set to All Mailboxes. To disable the archive feature, simply tap on this option and select Deleted Mailbox instead.
Once you’ve made this change, any email you swipe left on will no longer be archived, but will be moved to the trash folder instead. This makes it easier to delete unwanted emails quickly and without having to go through the extra step of archiving them first.
It’s important to note that disabling the archive feature will permanently delete your emails instead of moving them to an archived folder. So, make sure you are certain about deleting the emails before disabling the archive feature. Otherwise, you may lose important emails that you might have wanted to keep for future reference.
Now that you know how to disable the archive feature on your iPhone, you can have more control over how your emails are managed. Whether you prefer to delete them right away or keep them in an archived folder, customizing your email settings can help streamline your inbox and make it more personalized to your preferences.
Point 2: Moving Emails to Trash Folder
When it comes to managing your emails on your iPhone, it’s crucial to know how to effectively move them to the trash folder. Archiving emails might be the default option, but what if you want to delete them instead? Fortunately, the process is simple and can be done in just a few steps.
To move an email to the trash folder, start by opening the Mail app on your iPhone. Find the email you want to delete and swipe left across the email. This action will reveal a few options, including “Trash”. Tap on “Trash” to move the email directly to the trash folder.
If you prefer a different method, you can also tap and hold on the email you want to delete. After a few seconds, a menu will pop up with various options. Select the “Move” option, and from the sub-menu that appears, choose “Trash. This will instantly move the email to the trash folder.
To ensure that your deleted emails are permanently removed from your device, it is important to regularly empty the trash folder. To do this, open the Mail app and navigate to the mailbox section at the top left corner of the screen. Then, locate the “Trash” folder and tap on it to open it. Next, tap “Edit” in the top right corner, and finally, tap “Delete All” to permanently delete all the emails in the trash folder.
It’s worth noting that once you delete an email from the trash folder, it cannot be recovered. So, double-check before emptying the trash folder to avoid accidentally deleting important emails.
Point 3: Deleting Multiple Emails at Once
Deleting multiple emails individually can be time-consuming and tedious. Thankfully, there is a convenient way to delete multiple emails at once on your iPhone. Follow these simple steps:
1. Open the Mail app on your iPhone and navigate to the mailbox or folder from which you want to delete multiple emails.
2. Tap on the “Edit” button located at the top-right corner of your screen. This will enable the multi-select mode.
3. Now, you can start selecting the emails you want to delete by tapping on the small circles located next to them. Each selected email will be marked with a checkmark.
4. After selecting all the emails you wish to delete, look for the trash bin icon located at the bottom-right corner of the screen. Tap on it to delete the selected emails.
5. A confirmation message will appear, asking you to confirm the deletion. Tap on “Delete” to permanently remove the selected emails from your iPhone.
You can also use swipe gestures to delete multiple emails quickly. To do this, simply swipe left on an email and tap on the trash bin icon that appears. Repeat this action for each email you want to delete.
By using these methods, you can efficiently delete multiple emails at once, freeing up valuable storage space on your iPhone and achieving a clutter-free mailbox.
Point 4: Setting Up the Delete Button Functionality
In order to simplify the process of deleting emails on your iPhone, you can set up the delete button functionality. By default, when you swipe to the left on an email, the archive option appears. However, with a few simple steps, you can configure your iPhone to show the delete option instead.
To set up the delete button functionality, follow these steps:
1. Open the “Settings” app on your iPhone.
2. Scroll down and tap on “Mail” or “Mail, Contacts, Calendars”, depending on your iOS version.
3. Under the “Mail” section, tap on “Swipe Options”.
4. You will see the list of swipe options available for both left and right swipes. Tap on “Archive”.
5. A pop-up menu will appear with different options. Select “Delete Message” from the list.
6. Press the “Back” button to save the changes and exit the settings.
Now, when you swipe left on an email in your inbox, the delete option will be displayed instead of the archive option. This makes it easier to quickly delete unwanted emails without having to go through the extra step of archiving them.
It’s important to note that setting up the delete button functionality will override the archive option. So, make sure you’re completely comfortable with deleting emails instead of archiving them before making this change.
By customizing the swipe options on your iPhone, you can streamline your email management process and delete unwanted emails with ease. This can help you declutter your inbox and stay organized, ultimately improving your productivity.
So go ahead and configure your iPhone to set up the delete button functionality today!
Conclusion
In conclusion, being able to delete instead of archive your emails on iPhone can greatly improve your email management and organization. By following the steps outlined in this article, you can ensure that unwanted emails are permanently removed from your device rather than being stored in the archive. This not only helps declutter your inbox but also saves valuable storage space on your iPhone.
Remember, it is essential to exercise caution when deleting emails, as some messages may contain important information that you might need in the future. Always double-check the contents of the email before deleting it permanently. Additionally, consider regularly going through your inbox and deleting unnecessary emails to keep your email account streamlined and efficient.
Overall, mastering the art of deleting emails on your iPhone empowers you to take control of your inbox and maintain a tidy email system. So, why wait? Start implementing these tips today and enjoy a clutter-free email experience on your iPhone.
FAQs
1. Can I delete emails instead of archiving them on my iPhone?
Absolutely! By default, the Archive option is prominent in the Mail app on iPhone. However, you can easily change this setting to delete your emails instead of archiving them. Just follow the steps below:
- Go to Settings on your iPhone.
- Scroll down and tap on Mail.
- Next, tap on Accounts to access your email accounts.
- Select the email account for which you want to change the archiving behavior.
- Tap on the Account option at the top.
- In the Account settings, tap on Advanced.
- Finally, under the “Move Discarded Messages into” section, choose the “Deleted Mailbox” option.
From now on, when you delete an email from this particular account, it will be permanently removed instead of being archived.
2. What happens to deleted emails on iPhone?
When you delete an email on your iPhone, it is usually moved to the Trash or Deleted Items folder. However, the exact behavior may vary depending on your email account settings. In most cases, the deleted emails are retained in the Trash folder for a limited period of time (typically 30 days) before they are permanently deleted. This allows you to recover accidentally deleted emails within a certain timeframe.
3. How can I recover deleted emails on iPhone?
If you accidentally delete an email on your iPhone and want to recover it, follow these steps:
- Go to the Mail app on your iPhone.
- Tap on the Mailboxes button at the top left corner of the screen to go back to the main Mailboxes view.
- Scroll down and tap on the Trash or Deleted Items folder, depending on your email provider.
- Once you’re in the Trash folder, locate the deleted email you want to recover and swipe left on it.
- Tap on the “More” button that appears.
- Finally, tap on the “Move To” button and select the desired destination folder, such as the Inbox, to move the email back.
The recovered email will now be moved back to the selected folder and will become accessible again.
4. Can I permanently delete emails without moving them to Trash?
Yes, it is possible to bypass the Trash or Deleted Items folder and directly permanently delete emails on your iPhone. To do this, follow these steps:
- Open the Mail app on your iPhone.
- Go to the Mailboxes view by tapping on the Mailboxes button at the top left corner of the screen.
- Scroll down and tap on the All Mail or Archive folder, depending on your email provider.
- Find the email that you want to permanently delete and swipe left on it.
- Tap on the Trash or Delete button that appears.
By using this method, you can avoid moving deleted emails to the Trash folder and directly remove them from your iPhone.
5. Will permanently deleting emails free up storage space on my iPhone?
Deleting emails, especially from large attachments, can help free up storage space on your iPhone. When you delete emails, the storage space occupied by those emails is reclaimed and made available for other uses. However, it is important to note that the amount of storage space freed up will depend on the size and quantity of the deleted emails.
To check how much storage space your emails are occupying on your iPhone, go to Settings > General > iPhone Storage. From there, you can view a breakdown of the storage used by various apps, including the Mail app. If you notice that the Mail app is taking up a significant amount of storage space, deleting unnecessary and large emails can help optimize your device’s storage.