
Are you a photography enthusiast looking to enhance your editing skills on Lightroom Mobile? One great way to do that is by using presets. Lightroom presets are pre-defined settings that you can apply to your photos with just a click, giving them a professional and consistent look. But how do you actually download presets to Lightroom Mobile? In this article, we will guide you through the process, step by step. Whether you are a beginner or an experienced user, this guide will help you discover new presets and easily import them into your Lightroom Mobile app. So, grab your smartphone and let’s dive into the world of mobile photo editing!
Inside This Article
- What are Presets?
- Methods to Download Presets to Lightroom Mobile
- Method 1: Download Presets from Lightroom Mobile App
- Method 2: Import Presets from Adobe Creative Cloud
- Method 3: Import Presets through Dropbox or Google Drive
- Method 4: Use Desktop and Sync with Lightroom Mobile
- Conclusion
- FAQs
What are Presets?
Presets in the context of Adobe Lightroom Mobile refer to pre-defined settings that you can apply to your photos to achieve a specific look or style. They are essentially a collection of adjustments in various editing parameters such as exposure, contrast, saturation, and color grading, among others. With just a few clicks, presets allow you to transform the entire mood and tone of your photos, giving them a professional and cohesive appearance.
Presets are widely used by photographers and enthusiasts to streamline their editing process and maintain consistency in their images. Instead of manually adjusting each individual setting, presets provide a quick and efficient way to achieve desired effects, saving both time and effort.
Lightroom Mobile comes with a range of built-in presets that you can use as a starting point. Additionally, you can download and import presets created by other photographers or even create your own custom presets to suit your unique editing preferences and style.
Whether you’re a beginner just starting to explore photo editing or an experienced photographer looking to enhance your workflow, presets are a powerful tool that can greatly enhance your photographs and help you express your creative vision.
Methods to Download Presets to Lightroom Mobile
Adobe Lightroom Mobile is a powerful tool for mobile photography enthusiasts. One of the key features of Lightroom Mobile is the ability to enhance your photos with presets. Presets are pre-defined settings that you can apply to your photos to achieve a specific look or style. While Lightroom Mobile comes with a built-in collection of presets, you may also want to download additional presets to customize your editing options. In this article, we will explore different methods to download presets to Lightroom Mobile.
Method 1: Downloading Presets Directly from Adobe Lightroom Mobile App
If you want to download presets directly from the Lightroom Mobile app, follow these steps:
- Open the Lightroom Mobile app on your device.
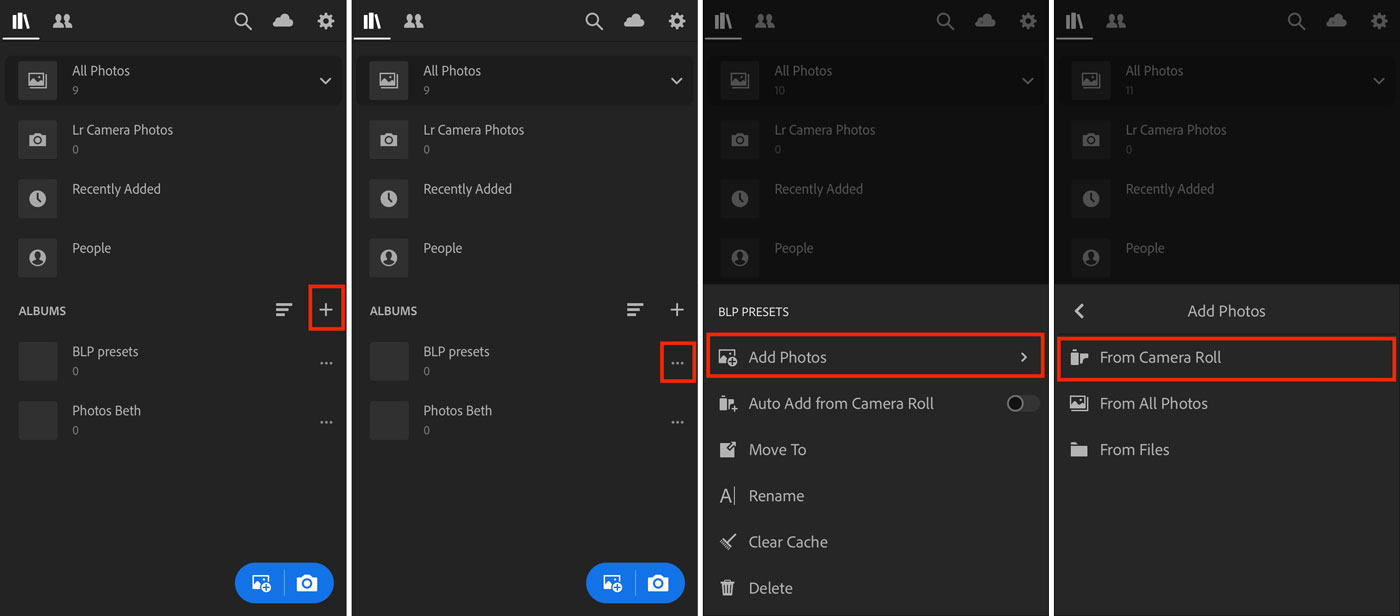
- Tap on the “+” icon to create a new album.
- From the “Create a new album” dialog, choose “Add Photos” option.
- Select the presets you want to download from your device’s file manager.
- Once the presets are added to the album, you can apply them to your photos by tapping on the preset and selecting “Apply to Photos”.
Method 2: Importing Presets from a Computer to Lightroom Mobile App
If you have presets saved on your computer and want to import them to Lightroom Mobile, here’s how you can do it:
- Export the preset files from your computer to your mobile device using a cloud storage service or by connecting your device to your computer.
- Open the Lightroom Mobile app on your device.
- Tap on the “+” icon to create a new album.
- From the “Create a new album” dialog, choose “Add Photos” option.
- Select the presets you exported to your mobile device.
- The presets will be added to the album, and you can apply them to your photos as mentioned in Method 1.
Method 3: Using Adobe Creative Cloud to Sync Presets to Lightroom Mobile App
If you have presets saved on Adobe Creative Cloud, you can easily sync them to your Lightroom Mobile app. Here’s how:
- Ensure that you are logged in to Adobe Creative Cloud on both your computer and your Lightroom Mobile app.
- In Lightroom Classic on your computer, create a new collection and add the desired presets to it.
- Go to the collections panel in Lightroom Classic and enable syncing for the collection containing the presets.
- Open the Lightroom Mobile app on your device.
- Go to the albums panel and the synced collection will appear.
- You can now access and apply the synced presets to your photos in Lightroom Mobile.
Method 1: Download Presets from Lightroom Mobile App
Lightroom Mobile is a powerful app that allows you to edit and enhance your photos on the go. One of the best features of this app is the ability to download and use presets, which are pre-made settings that can instantly transform the look and feel of your images.
Follow these steps to download presets from the Lightroom Mobile app:
- Open the Lightroom Mobile app on your smartphone or tablet.
- Tap on the “Presets” icon at the bottom of the screen. It looks like four stacked squares.
- On the Presets page, tap on the “+” icon at the top right corner of the screen. This will open the preset library.
- Browse through the available presets or use the search bar to find specific ones.
- Once you find a preset you like, tap on it to view a preview of how it will affect your photo.
- If you are satisfied with the preset, tap on the “Download” button to add it to your collection.
- The downloaded preset will now appear in your Presets library, ready to be applied to your photos.
That’s it! You have successfully downloaded a preset from the Lightroom Mobile app. Now you can apply the preset to your photos with just a few taps, saving you time and helping you achieve the desired look without much effort.
Method 2: Import Presets from Adobe Creative Cloud
If you have your Lightroom presets stored in Adobe Creative Cloud, you can easily import them into the Lightroom Mobile app to use on your mobile device. Here’s how:
- Ensure that you have the Adobe Creative Cloud app installed on both your computer and your mobile device.
- Open the Adobe Creative Cloud app on your computer and navigate to the “Assets” section.
- Locate the preset file that you want to import to Lightroom Mobile.
- Right-click on the preset file and select the “Sync to Creative Cloud” option.
- Once the preset file is synced to the Creative Cloud, open the Lightroom Mobile app on your mobile device.
- In the Lightroom Mobile app, tap on the “+” icon to create a new album.
- Give the album a name and tap on the “Add Photos” option.
- Navigate to the “From Creative Cloud” section and select the preset file you want to import.
- Tap on the “Add” button to import the preset file to the album in Lightroom Mobile.
Now, you have successfully imported the preset from Adobe Creative Cloud to Lightroom Mobile. To apply the preset to your photos, simply open the album in Lightroom Mobile, open a photo, and tap on the preset name to apply its adjustments.
Using Adobe Creative Cloud to sync presets to Lightroom Mobile provides a convenient way to access your presets across multiple devices. Whether you’re on your computer or your mobile device, you can have your favorite presets at your fingertips for quick and seamless editing.
Method 3: Import Presets through Dropbox or Google Drive
If you’re looking for a convenient way to import presets to Lightroom Mobile, utilizing cloud storage platforms like Dropbox or Google Drive can be a time-saving solution. With the ability to access your files from multiple devices, including your mobile phone, you can easily download and import presets to enhance your mobile editing workflow. Follow the steps below to import presets through Dropbox or Google Drive:
- Step 1: Upload the Preset Files
- Step 2: Install the Dropbox or Google Drive App
- Step 3: Sign in to Your Account
- Step 4: Locate and Download the Preset Files
- Step 5: Open Lightroom Mobile App
- Step 6: Import the Preset Files
- Step 7: Select the Preset Files
- Step 8: Confirm the Import
- Step 9: Apply the Presets
First, you need to upload the preset files to your Dropbox or Google Drive account. Ensure that the presets are stored in a folder for easier organization.
If you haven’t done so already, install the Dropbox or Google Drive app on your mobile phone. These apps are available for download from the App Store (for iOS users) or Google Play Store (for Android users).
Open the Dropbox or Google Drive app and sign in to your account using your credentials. This will give you access to your stored files and folders. Make sure you use the same account you uploaded the preset files to.
Navigate to the folder where you uploaded the preset files. Tap on the preset files to download them to your mobile device. The files may take some time to download depending on their size and your internet connection speed.
Once the preset files are downloaded, open the Lightroom Mobile app on your device. If you haven’t installed it yet, you can download it for free from the App Store or Google Play Store.
In the Lightroom Mobile app, tap on the “+” icon at the bottom of the screen to create a new edit. Select “Create Preset” and then tap on the “…” icon at the top right corner of the “Preset” section. Choose “Import Presets” from the drop-down menu.
Navigate to the folder where you downloaded the preset files from Dropbox or Google Drive. Tap on the preset files you want to import. You can select multiple presets at once by tapping on each file.
After selecting the preset files, tap on the “Import” button. Lightroom Mobile will begin importing the presets into the app. Once the import process is complete, you will see the newly imported presets under the “User Presets” section in the “Presets” tab.
To apply the imported presets, open a photo in Lightroom Mobile and go to the “Presets” tab. Tap on the preset you want to use and adjust the intensity if needed. The preset will instantly apply its settings to the photo, allowing you to achieve the desired look with just a few taps.
By importing presets through Dropbox or Google Drive, you can easily access your favorite editing styles on your mobile device. Whether you’re a professional photographer or an avid mobile photographer, utilizing this method will streamline your editing process and help you achieve consistent and impressive results.
Method 4: Use Desktop and Sync with Lightroom Mobile
If you prefer to work with Lightroom presets on your desktop and then sync them with your Lightroom Mobile app, this method is for you. Using this method allows for more control and flexibility when it comes to organizing and editing your photos.
Here’s a step-by-step guide on how to use your desktop to sync presets with Lightroom Mobile:
- Start by selecting and editing your photos on Lightroom desktop app. Apply the presets you want to use to enhance your images until you’re satisfied with the results.
- Once you’ve finished editing, you need to sync your desktop catalog with your mobile devices. To do this, make sure you’re signed in to your Adobe account on both your desktop and mobile app.
- In the Lightroom desktop app, go to the “Preferences” or “Lightroom Sync” menu, depending on your version of Lightroom.
- Enable the sync feature by clicking on the checkbox next to “Sync with Lightroom Mobile”. This will ensure that your presets are available on your mobile devices.
- Now, go to the library module in Lightroom desktop and select the photos or presets you want to sync with your mobile app.
- Right-click on the selected presets or photos and choose the “Sync with Lightroom Mobile” option.
- Wait for the syncing process to complete. You can monitor the progress in the activity panel located at the top-left corner of the Lightroom desktop interface.
- Once the sync is done, open the Lightroom Mobile app on your mobile device. You’ll find the synced presets and photos ready to use.
- Start editing your photos with the synced presets on Lightroom Mobile. You can make further adjustments if needed and save the edited images to your device or share them directly to your social media platforms.
By using this method, you can take advantage of the more advanced editing capabilities of Lightroom desktop while having the flexibility to edit and access your photos on the go with Lightroom Mobile.
Remember to regularly sync your desktop catalog with your mobile app to ensure that any updates or changes you make on either platform are reflected on the other.
Now that you’re familiar with Method 4, you have multiple approaches to downloading presets to Lightroom Mobile. Choose the method that suits your preferences and needs, and start enhancing your photos with stunning presets.
In conclusion, downloading presets to Lightroom Mobile is a simple and effective way to enhance your photos and take your editing skills to the next level. With a wide range of preset options available online, you can easily find the perfect look and style for your images. By following the steps outlined in this article, you can quickly and easily download and install presets to Lightroom Mobile, allowing you to transform your photos with just a few clicks.
Whether you’re a professional photographer looking to streamline your editing process or an amateur photographer wanting to give your images a professional touch, Lightroom Mobile presets offer a convenient and powerful solution. So go ahead, explore the world of presets, experiment with different styles, and let your creativity take flight in the world of photography.
FAQs
1. How do I download presets to Lightroom Mobile?
Downloading presets to Lightroom Mobile is a simple process. First, ensure that you have the Lightroom Mobile app installed on your mobile device. Next, find the preset you would like to download, either from a website or a trusted source. Once you have the preset file, follow these steps:
- Open the Lightroom Mobile app and import a photo.
- Tap on the presets button on the bottom toolbar.
- Select the three-dot menu at the top right corner of the presets panel.
- Choose “Import Presets” and locate the preset file on your device.
- Once imported, the preset will be available in the presets panel for you to apply to your photos.
2. Can I use custom presets on Lightroom Mobile?
Yes, Lightroom Mobile allows you to use custom presets. Simply follow the same steps mentioned above to import custom presets to your app. Once imported, you can access and apply these presets to your photos just like any other preset in Lightroom Mobile.
3. Are Lightroom Mobile presets compatible with all mobile devices?
Yes, Lightroom Mobile presets are compatible with both iOS and Android devices. The Lightroom Mobile app is available for free download on the App Store for iOS devices and on Google Play for Android devices.
4. Where can I find free Lightroom Mobile presets?
There are several websites and platforms where you can find free Lightroom Mobile presets. Some popular options include platforms like Adobe’s official website, photography forums, and social media groups dedicated to Lightroom presets. Additionally, many photographers and influencers also offer free presets on their websites or through their social media accounts.
5. Can I edit Lightroom Mobile presets to suit my preferences?
Absolutely! One of the advantages of using Lightroom Mobile presets is the ability to customize and tweak them according to your preferences. Once you have applied a preset to your photo, you can further adjust the settings like exposure, contrast, color tone, and more, to achieve the desired look. This flexibility allows you to create a unique editing style while still starting with a preset as a foundation.