
Are you struggling with importing data from a text file into Excel? Look no further! In this comprehensive guide, we will show you exactly how to import data from a text file into Excel, step-by-step. Whether you are a beginner or an experienced Excel user, this tutorial will provide you with all the information you need to successfully import data from a text file, saving you time and effort.
Importing data from a text file into Excel is a powerful way to organize and analyze large amounts of data. It allows you to take raw data from various sources, such as surveys, reports, or any other text-based files, and transform it into a structured and manageable format within Excel. By following our instructions and utilizing the built-in features of Excel, you’ll be able to import text data with ease, helping you make better data-driven decisions in your projects.
Inside This Article
- Step 1: Open Excel
- Step 2: Prepare the Excel worksheet
- Step 3: Import the text file data
- Step 4: Choose the text file to import
- Step 5: Specify the delimiter or file type
- Step 6: Review Import Settings
- Step 7: Select the destination for the imported data
- Step 8: Adjust column formats (optional)
- Step 9: Complete the import process
- Step 10: Verify and Edit the Imported Data
- Step 11: Save the Excel file with imported data
- Conclusion
- FAQs
Step 1: Open Excel
One of the first steps to importing data from a text file into Excel is to open Excel itself. Excel is a powerful spreadsheet program developed by Microsoft that allows you to analyze, organize, and manipulate large sets of data. Whether you have an existing Excel file that you want to import the data into or you want to create a new file, opening Excel is the starting point.
To open Excel, simply locate and click on the Excel application icon on your computer or use the shortcut on your desktop. If you don’t have Excel installed on your computer, you can download it from the official Microsoft website or consider using alternative spreadsheet programs such as Google Sheets or LibreOffice Calc.
Once Excel is open, you will be greeted with a blank workbook. This workbook consists of multiple worksheets that you can use to organize and store your data. Each worksheet is represented by a tab at the bottom of the Excel window. You can add, rename, and navigate between worksheets as needed.
Opening Excel is the first step towards importing data from a text file. Once you have Excel open, you can proceed to the next steps to prepare the worksheet and import the text file data.
Step 2: Prepare the Excel worksheet
Before importing data from a text file into Excel, it’s important to prepare the Excel worksheet appropriately. This step ensures that the imported data will be organized and properly aligned in the worksheet.
To prepare the Excel worksheet, follow these steps:
- Open Excel: Launch Microsoft Excel on your computer. If you already have Excel open, create a new workbook or open an existing one where you want to import the text file data.
- Create a new sheet: If you are importing data into an existing workbook, click on the ‘+’ symbol at the bottom of the screen to add a new sheet. This will ensure that your imported data does not overwrite any existing data.
- Set up column headers: In the first row of the Excel worksheet, create column headers that correspond to the data you will be importing. This will make it easier to identify and work with the imported data.
- Format columns: Adjust the width of the columns to accommodate the data. To do this, hover your cursor over the line between two columns, click, and drag to adjust the width. You can also select multiple columns and right-click to choose the “Column Width” option and set the desired width.
- Apply cell formatting: If needed, format cells to match the data type you will be importing. For example, if you are importing dates, you can format the cells as “Date” to ensure proper alignment and sorting.
- Apply styling (optional): If you prefer, you can apply cell formatting, styles, or colors to make the worksheet visually appealing. This step is optional but can make it easier to differentiate and interpret the imported data.
- Save the Excel worksheet: Save your worksheet to ensure that any changes or formatting you have applied are retained. Choose a location on your computer where you can easily access the file later.
By following these steps, you will have a properly prepared Excel worksheet ready to import the data from your text file. This preparation ensures that the imported data will be seamlessly integrated into your existing workbook, making it easier for you to work with and analyze.
Step 3: Import the text file data
Now that you have prepared your Excel worksheet, it’s time to import the data from the text file. Excel provides a straightforward process to import text files, allowing you to easily transfer the data into your worksheet for analysis and manipulation.
To import the text file data, follow these simple steps:
- Step 1: Open Excel
- Step 2: Prepare the Excel worksheet
- Step 3: Import the text file data
- Step 4: Choose the text file to import
- Step 5: Specify the delimiter or file type
- Step 6: Review import settings
- Step 7: Select the destination for the imported data
- Step 8: Adjust column formats (optional)
- Step 9: Complete the import process
- Step 10: Verify and edit the imported data
- Step 11: Save the Excel file with imported data
Now, let’s dive into the details of how to import the text file data:
1. Go to the “Data” tab
In Excel, navigate to the “Data” tab located in the ribbon at the top of the Excel window. This tab contains the tools and options related to data import and manipulation.
2. Click on “From Text/CSV” in the “Get External Data” group
Within the “Data” tab, you will find the “Get External Data” group. Click on the “From Text/CSV” option to initiate the text file import process.
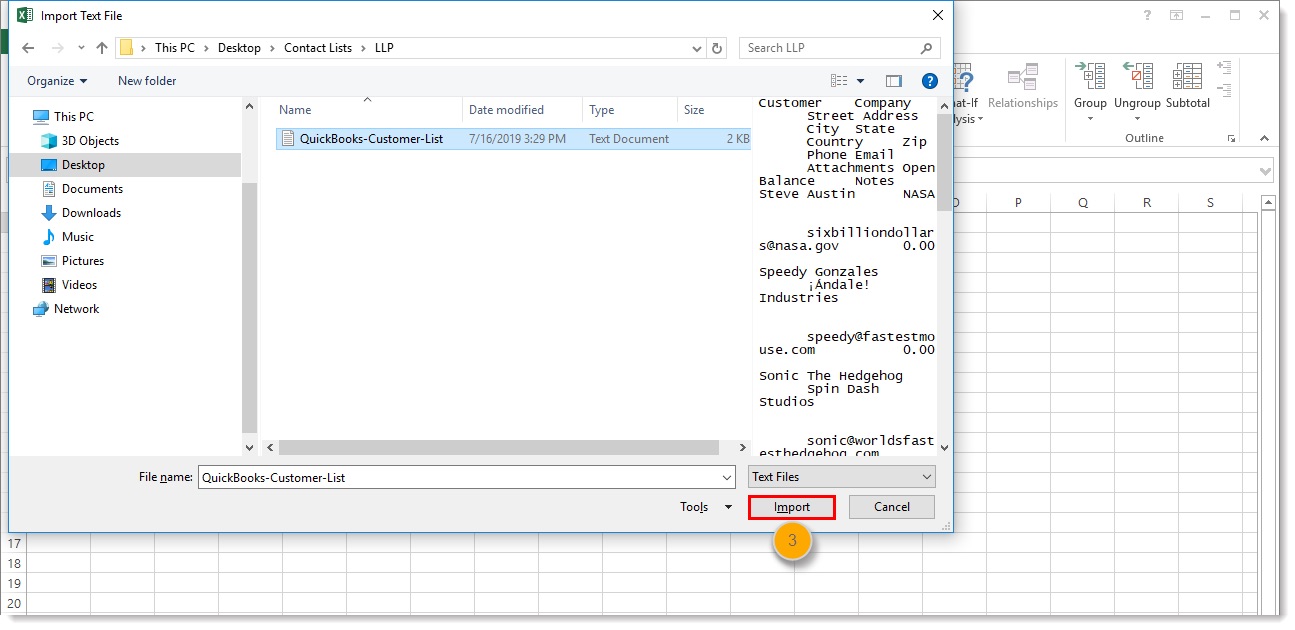
3. Locate and select the text file to import
A file selection dialog box will appear. Navigate to the folder where your text file is stored and select the file that you want to import into Excel. Once selected, click on the “Import” button.
4. Specify the delimiter or file type
In the “Text Import Wizard – Step 1 of 3” dialog box, you will be prompted to specify the delimiter used in your text file or choose the file type. Delimiters are characters that separate the data in your file, such as commas, tabs, or pipes. Select the appropriate option based on the structure of your text file and click on the “Next” button.
5. Review import settings
In the “Text Import Wizard – Step 2 of 3” dialog box, Excel will provide you with a preview of the data and its layout based on the specified delimiter. Make sure the data is correctly displayed and adjust any settings if necessary. Once you are satisfied, click on the “Next” button.
6. Select the destination for the imported data
In the “Text Import Wizard – Step 3 of 3” dialog box, you can choose where you want to place the imported data. You can either select an existing worksheet or create a new one. Once you have made your selection, click on the “Finish” button.
7. Adjust column formats (optional)
After the import process, Excel may automatically format the columns based on the detected data types. However, you can manually adjust the column formats to meet your specific requirements. Simply select the desired column(s), right-click, and choose the “Format Cells” option from the context menu.
8. Complete the import process
Once you have reviewed and adjusted the import settings, and made any necessary column formatting changes, click on the “OK” button to complete the import process. Excel will import the data from the text file and display it in the specified location within your worksheet.
Congratulations! You have successfully imported the data from a text file into Excel. Now you can manipulate and analyze the data using Excel’s powerful functionalities.
Step 4: Choose the text file to import
Now that you have opened Excel and prepared the worksheet, it’s time to choose the text file that you want to import. This file can be the one you have already saved on your computer or a new one that you need to import into Excel. Follow the steps below to select the text file:
- Click on the “File” tab in the Excel ribbon at the top left corner of the window.
- In the dropdown menu, select “Open” to open the file browser.
- Navigate to the folder where the text file is located.
- Select the text file by clicking on it once to highlight it.
- Click on the “Open” button at the bottom right corner of the file browser.
Once you have chosen the text file, Excel will display the file name at the top of the data import wizard. Make sure that the selected file is the correct one that you want to import.
If you cannot see the file you are looking for, check if the file extension is supported by Excel. By default, Excel supports various file formats, such as .txt, .csv, .prn, and .tab. If your file has a different extension, you may need to convert it to a supported format before importing.
It’s important to select the correct text file at this stage to ensure the accuracy of the imported data. Taking the time to double-check the file you have chosen will help you avoid any potential mistakes or discrepancies in your Excel worksheet.
Step 5: Specify the delimiter or file type
Once you have selected the text file you want to import in Excel, the next step is to specify the delimiter or file type. This step is crucial to ensure that Excel recognizes the structure of the data correctly.
In most cases, the default delimiter is a comma (‘,’), also known as a comma-separated values (CSV) file. However, if your text file uses a different delimiter such as a tab (‘\t’) or semicolon (‘;’), it is important to specify it accordingly. This helps Excel properly separate the data into columns in the worksheet.
To specify the delimiter, follow these simple steps:
- On the “Text Import Wizard” dialog box, you will see a section called “Delimiters”.
- By default, the “Tab” and “Comma” checkboxes are selected. If your text file uses one of these delimiters, make sure the appropriate checkbox is selected.
- If your text file uses a different delimiter, uncheck the corresponding checkboxes and check the “Other” checkbox.
- In the “Other” field, enter the character that represents the delimiter in your text file.
- If your file has a header row that contains column names, make sure to check the “My data has headers” box.
It is important to choose the correct delimiter or file type to ensure that the imported data is properly organized in Excel. If you are unsure about the delimiter or file type, you can try different options until you see the desired results.
Once you have specified the delimiter or file type, you can proceed to the next step to review the import settings.
Step 6: Review Import Settings
Once you have selected the text file and specified the delimiter or file type in Step 5, it’s time to review the import settings before proceeding with the data import process. Reviewing the import settings allows you to ensure that the data will be imported correctly into Excel and that any desired transformations or adjustments are applied.
Here are a few important aspects to consider during the review:
- Data preview: Take a look at the data preview section to get an idea of how the imported data will be structured in the Excel worksheet. This gives you a visual representation of how your data will be organized, making it easier to spot any anomalies or issues.
- Column data format: Check the column data format selection to verify that Excel is interpreting the data correctly. This step is crucial, especially if the text file contains different types of data, such as numbers, dates, or text. You can make adjustments here to ensure that each column is formatted according to your requirements.
- Import options: Depending on the complexity of your data, there may be additional import options available. These options allow you to specify the encoding, choose whether to skip or replace duplicate values, or handle special characters, among other things. Take a moment to review these options and customize them as needed.
It’s worth mentioning that the specific import settings may vary slightly depending on the version of Excel you are using. However, the general principles remain the same.
By carefully reviewing the import settings in Step 6, you can ensure that your data is accurately imported into Excel and that any necessary adjustments are made upfront. This will save you time and effort in the long run, as you won’t have to manually modify the data after the import process.
Step 7: Select the destination for the imported data
Once you have specified the text file and its delimiter or file type, it’s time to select the destination where you want to import the data in Excel. This step allows you to choose the exact location within your worksheet where the imported data should be placed.
Here’s how you can select the destination for the imported data:
- Select the worksheet: If your workbook contains multiple worksheets, you need to specify the worksheet where you want the imported data to be placed. Excel provides a drop-down menu to choose the desired worksheet.
- Select the starting cell: You can decide which cell should be the starting point for the imported data. By default, Excel selects the active cell as the starting point, but you have the flexibility to choose any specific cell within the worksheet.
By specifying the worksheet and starting cell for the imported data, you can ensure that the existing data in your Excel worksheet remains intact and organized. This allows you to seamlessly integrate the imported data without disturbing any pre-existing information.
Keep in mind that the selected destination should have enough space to accommodate the imported data. If the imported data exceeds the available space, Excel will display an error message, prompting you to either extend the existing range or choose a different starting cell.
Once you have selected the destination for the imported data, you are ready to proceed with the next step and adjust the column formats if necessary.
Step 8: Adjust column formats (optional)
Once you have imported the data from a text file into Excel, you might want to consider adjusting the column formats to ensure that the data is displayed correctly and can be readily analyzed. This step is optional but can greatly enhance the readability and usability of the imported data.
Excel provides various formatting options that allow you to customize the appearance of your data. Here are a few ways you can adjust column formats:
- Number formatting: If you have numeric data in your imported text file, you can choose from a wide range of number formats in Excel. Whether you want to display the numbers as percentages, currency, or with a specific number of decimal places, Excel has you covered. Simply select the desired cells, right-click, and choose “Format Cells” to access the formatting options.
- Date and time formatting: If your text file includes date and time values, you can format the corresponding columns to display them in a way that suits your needs. Excel offers a variety of date and time formats, allowing you to choose between different display styles such as “mm/dd/yyyy,” “dd/mm/yyyy,” or even custom formats.
- Text formatting: When importing text data, Excel automatically applies the “General” format by default. However, you can modify the formatting to emphasize certain aspects of the text, such as highlighting specific words or phrases, changing font styles, or applying conditional formatting to highlight cells that meet certain criteria.
- Column width adjustment: Adjusting the column widths can make your data more readable and prevent truncation of long texts. You can manually adjust the width of individual columns by dragging the borders or use the “AutoFit” feature to automatically resize the column width based on the content within it.
- Conditional formatting: If you want to highlight specific values or apply color scales, data bars, or icon sets to your imported data, you can utilize the powerful conditional formatting feature of Excel. This allows you to visually analyze your data and spot trends or patterns instantly.
Remember, adjusting column formats is an optional step, but it can significantly enhance the presentation and readability of your imported data. Take some time to explore the formatting options and find the best way to represent your data in Excel.
Step 9: Complete the import process
Once you have reviewed and adjusted the import settings in Step 6, you can proceed to complete the import process. This step finalizes the transfer of data from the text file into your Excel worksheet.
After ensuring that the import settings are correctly configured, click on the “Finish” button or a similar option to initiate the import. Depending on the size of the text file and the complexity of its data, the import process may take a few seconds to a few minutes.
While the import is in progress, you may see a progress bar indicating the status of the operation. It is essential to refrain from making any changes to the Excel worksheet or the text file during this time to avoid any disruptions or data corruption.
Once the import is complete, you will see a confirmation message or dialog box indicating that the data has been successfully imported into Excel. You can typically click “OK” or a similar option to close the message and proceed to view the imported data.
At this point, you can start working with the imported data within Excel. You can apply various formatting options, perform calculations, create charts and graphs, or apply any other Excel features to analyze and manipulate the imported data as needed.
It’s important to note that the imported data remains connected to the original text file. Any modifications made to the text file will not automatically update in the Excel worksheet. Therefore, if you make changes to the text file after the import, you will need to repeat the import process to update the data in Excel.
Once you have completed the import process and made any necessary adjustments to the imported data, you can save the Excel file to preserve your work. It is advisable to save the file with a different name or in a different location to ensure that the original text file and the imported data are kept separate.
Now that you have successfully completed the import process, you can continue working with your data in Excel, utilizing its powerful tools and features to analyze, manipulate, and present the information in a meaningful way.
Step 10: Verify and Edit the Imported Data
After importing the data from the text file into Excel, it is crucial to take the time to verify and edit the imported data. This step ensures the accuracy and completeness of your spreadsheet, allowing you to work with clean and reliable information.
Here are some important tasks to undertake during the verification and editing process:
- Check for errors: Carefully review the imported data for any errors or inconsistencies. Pay attention to missing or incorrect values, formatting issues, and any other data discrepancies. Identify and note down any issues you encounter.
- Validate data against expected values: If you have predefined expectations or criteria for the imported data, compare the values in the spreadsheet with these expectations. Identify any data that deviates from the expected parameters and take corrective actions.
- Perform data cleaning: Utilize Excel’s data cleaning tools to correct any errors or inconsistencies. This may involve removing duplicate entries, standardizing data formats, removing empty or unnecessary cells, or performing other necessary data cleaning tasks.
- Apply formulas or calculations: If you need to perform calculations or apply formulas to the imported data, do so in this step. Double-check the formulas and calculations to ensure their accuracy and validity.
- Format the data: Adjust the formatting of the imported data to enhance its readability and visual appeal. You can change fonts, colors, cell borders, and other formatting options based on your preferences and the requirements of your analysis or presentation.
- Validate data relationships: If your imported data contains multiple columns or tables, verify the relationships between the different datasets. Ensure that the relationships are correct and update them if needed.
- Remove unnecessary columns or rows: If the imported data includes extraneous columns or rows that are not relevant to your analysis or presentation, consider removing them to simplify the spreadsheet and improve its clarity.
- Apply data validation rules: If you want to restrict the input values in specific cells or ranges, apply data validation rules to ensure data integrity. This can help prevent incorrect data entry or data inconsistencies in the future.
- Review and cross-reference with the original source: If you have access to the original source of the data, cross-reference your imported data with the original source to ensure accuracy and completeness. This step helps identify any potential data loss or discrepancies during the importing process.
- Make necessary edits: Based on your verification and review, make any necessary edits to the imported data. Correct errors, update values, and ensure that the data aligns with your requirements.
By thoroughly verifying and editing the imported data, you can have confidence in the accuracy and reliability of your Excel spreadsheet. This will enable you to make informed decisions, perform data analysis, and present information with confidence.
Step 11: Save the Excel file with imported data
After successfully importing the data from the text file into Excel, you need to save the file to ensure that all your changes and imported data are preserved. Here is how you can save the Excel file with the imported data:
1. Click on the “File” tab: Located in the top-left corner of the Excel window, the File tab will open the backstage view.
2. Select “Save As”: In the backstage view, click on the “Save As” option.
3. Choose the file location: Specify the folder or location where you want to save the Excel file. You can choose an existing folder or create a new one by clicking on the “New Folder” button.
4. Enter a file name: Give a meaningful name to your Excel file that corresponds to the imported data. This will make it easier to identify and locate the file later on.
5. Select the file format: Choose the appropriate file format for your Excel file. By default, the file format will be set to .xlsx, which is the most commonly used format. However, you can also save the file as .xls or .csv depending on your requirements.
6. Click on the “Save” button: Once you have selected the file location, entered the file name, and chosen the file format, click on the “Save” button to save the Excel file.
7. Verify the saved file: Navigate to the folder or location where you saved the Excel file and double-check that it contains the imported data. Open the file to ensure that everything is intact and accurate.
8. Make any necessary edits: If you notice any discrepancies or errors in the imported data, you can make the necessary edits directly in the Excel file. You can insert or delete rows, update values, format the data, or perform any other required modifications to ensure the accuracy of the imported data.
9. Save the changes: After making the necessary edits, remember to save the file again to reflect the updated data in the Excel file.
By following these steps, you can confidently save your Excel file with the imported data, making it easily accessible and ready for further analysis, manipulation, or sharing.
Importing data from a text file into Excel can be a useful skill for anyone working with data analysis or management. By following the steps outlined in this guide, users can effortlessly transfer data from a text file into Excel, saving time and effort in data entry. Whether you’re dealing with large datasets or simply need to import a few values, the process is straightforward and can be completed by anyone with basic computer skills.
Remember to choose the appropriate delimiter and format the data correctly before importing. Additionally, make use of Excel’s powerful data manipulation tools to further analyze and visualize the imported data. With this newfound ability, you’ll be able to efficiently handle text files and transform them into meaningful insights in Excel.
FAQs
1. Why is importing data from a text file into Excel important?
Importing data from a text file into Excel allows you to easily manipulate and analyze large volumes of data in a structured and organized manner. It saves you time and effort compared to manually inputting data and ensures accuracy while dealing with complex datasets.
2. What file formats can be imported into Excel?
Excel supports various file formats for importing data, including CSV (Comma Separated Values), TXT (Plain Text), XML (eXtensible Markup Language), and many others. This flexibility allows you to import data from different sources and systems.
3. How do I import a text file into Excel?
To import a text file into Excel, you can follow these steps:
a) Open Excel and create a new workbook.
b) Go to the “Data” tab and click on “From Text/CSV” in the “Get External Data” section.
c) Locate the text file on your computer and click “Import.”
d) Follow the Text Import Wizard to specify file format, delimiters, and how to handle the data.
e) Click “Finish” to import the data into Excel.
4. How can I format the imported data in Excel?
After importing the data, you can format it in Excel using various features and options. You can adjust column widths, modify cell formatting, apply filters, sort data, create formulas, and generate charts to visualize the information. Excel provides a wide range of tools to format and analyze your imported data comprehensively.
5. Can I automate the process of importing text files into Excel?
Yes, you can automate the process of importing text files into Excel using macros or scripts. Macros allow you to record a series of actions and play them back whenever needed. By creating a macro to import text files, you can save time and streamline repetitive tasks. Additionally, you can use programming languages such as VBA (Visual Basic for Applications) to build custom import routines for more complex scenarios.