
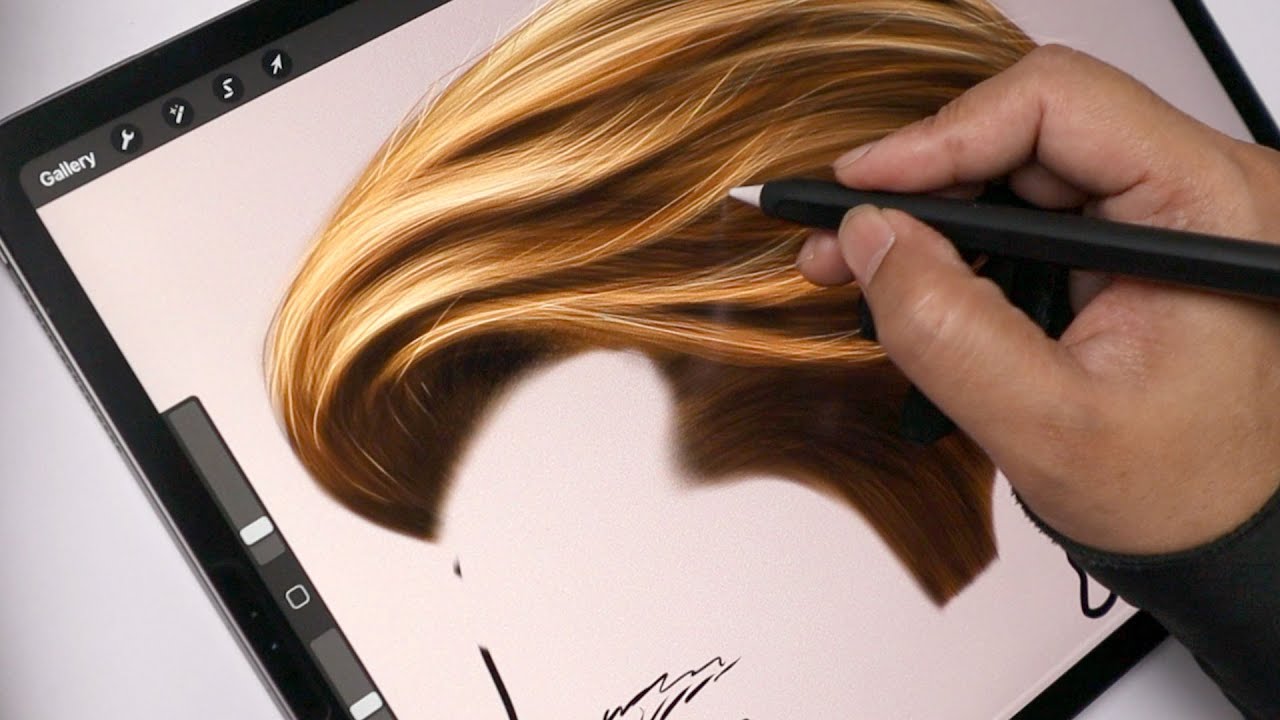
Are you an artist looking to improve your digital drawing skills? One essential element that can make or break a character drawing is hair. Drawing realistic and intricately detailed hair can be a challenge, especially when working digitally. However, with the help of Procreate, a powerful drawing app for iPad, you can create stunning and lifelike hair designs.
In this article, we will guide you through the process of drawing hair on Procreate, providing tips and techniques to help you master this important skill. From understanding the fundamentals of hair structure to utilizing Procreate’s brushes and layers effectively, you’ll learn how to bring your digital hair creations to the next level. So, grab your stylus, fire up Procreate, and let’s dive into the exciting world of drawing hair!
Inside This Article
- Brush Selection
- Creating the Base Shape
- Adding Volume and Texture
- Adding Highlights and Shadows
- Final Touches and Detailing
- Conclusion
- FAQs
Brush Selection
When it comes to drawing hair on Procreate, selecting the right brushes is crucial. The brush you choose will determine the texture, flow, and overall appearance of the hair you create. Procreate offers a wide range of brushes, each with its own unique characteristics, allowing you to experiment and find the perfect brush for your desired hair style.
Firstly, consider the type of hair you want to draw. Is it straight or curly? Thin or thick? Depending on the style, you may prefer a brush that mimics the movement and characteristics of that particular hair type. For straight hair, a smooth and precise brush with minimal texture might be ideal, while a brush with more texture and irregular strokes could be better suited for curly hair.
Next, think about the level of detail you want to achieve. If you’re aiming for highly realistic hair, choose a brush that allows for fine lines and intricate shading. Brushes with tapered ends and varying thicknesses are great for creating realistic strands of hair. On the other hand, if you’re going for a more stylized or cartoonish look, you can opt for brushes with more pronounced textures or unique shapes to add character to the hair.
Another important aspect to consider is the brush’s opacity and blending capabilities. Hair often has a natural variation in color and depth, so using brushes that can smoothly blend colors together can help achieve a more realistic look. Play around with the opacity settings to create gradual transitions between different shades of hair, adding depth and dimension to your drawing.
Lastly, don’t be afraid to experiment and combine different brushes to achieve the desired effect. Procreate offers the ability to create custom brushes, allowing you to mix and match textures, shapes, and settings to create unique hair brushes tailored to your style.
Remember, selecting the right brush is just the first step. Practice and experimentation will ultimately determine your ability to create stunning and realistic hair in Procreate. So, don’t hesitate to try out different brushes and techniques to find what works best for you!
Creating the Base Shape
When it comes to drawing hair on Procreate, creating the base shape is an essential step. This is the foundation upon which you will build the rest of the hair, so it’s important to get it right. There are a few different techniques you can use to create the base shape, depending on the hairstyle you are trying to achieve.
If you are going for a flowing, wavy hairstyle, you can start by using the brush tool to create long, curving strokes. These strokes will form the outline of the hair and give it a natural and organic look. You can adjust the size and opacity of the brush to add variation and depth to the base shape.
For more structured and defined hairstyles, such as a bob or a pixie cut, you can use straight lines and sharp angles to create the base shape. The straight line tool in Procreate is perfect for this. Simply draw the outline of the hair using straight lines and then refine the shape by adding curves and details.
When creating the base shape, keep in mind the direction of the hair flow. Hair usually has a natural flow and movement, so try to capture that in your drawing. Think about how the hair would fall and which direction it would move in. This will add a sense of realism to your artwork.
Don’t worry about adding too much detail at this stage. The base shape is just the starting point, and you will add more texture and detail later on. Focus on getting the overall shape and flow of the hair right before moving on to the next step.
Once you have created the base shape, you can move on to adding volume and texture to make the hair look more realistic and dynamic. This is where the real magic happens and the hair starts to come alive on your Procreate canvas.
Adding Volume and Texture
When it comes to drawing hair on Procreate, adding volume and texture is crucial to bringing your artwork to life. Follow these steps to create realistic and dynamic-looking hair:
- Select the right brush: Choose a brush that mimics the texture and look of hair. Experiment with different brushes and find the one that gives you the desired effect.
- Start with the base shape: Use a darker color to sketch the basic shape of the hair. This will serve as the foundation for adding volume and texture.
- Add strands of hair: Using a lighter color, begin adding individual strands of hair. Vary the thickness and direction of the strands to achieve a natural and flowing appearance.
- Create depth with layers: To add volume, use layers. Start with a base layer and gradually build up additional layers of hair, paying attention to the different areas where the hair falls or overlaps.
- Add highlights and lowlights: To give the hair depth and texture, incorporate highlights and shadows. Use a lighter shade for the highlights and a darker shade for the shadows, applying them strategically to create the illusion of light and dimension.
- Blend and refine: Use the smudge tool or a soft brush to blend the strands of hair together and make them appear more realistic. This step can help soften any harsh lines and create a seamless blend between the strands.
- Add details: Take some time to refine and add small details to the hair. This can include flyaway strands, wisps, or any other intricate elements that will enhance the overall texture and volume of the hair.
- Experiment and practice: The key to achieving great results with volume and texture is to experiment and practice. Take the time to study real-life references, observe how hair falls and moves, and continue to refine your technique.
By following these steps and practicing regularly, you’ll be able to add volume and texture to your hair drawings on Procreate, giving them a realistic and captivating look.
Adding Highlights and Shadows
Once you have created the base shape and added volume and texture to the hair in your Procreate drawing, it’s time to take your artwork to the next level by adding highlights and shadows. Highlights and shadows play a crucial role in creating depth and realism in your hair illustrations. They give your artwork dimension and make the hair appear more lifelike.
To start adding highlights, choose a lighter tone of the hair color you are using. Create a new layer and set the blending mode to “Screen” or “Add” to achieve a luminous effect. Use a soft brush with low opacity to apply the highlights where the light naturally hits the hair. Pay attention to areas like the top of the head, where the light is most intense, and any strands that catch the light.
Remember to consider the direction of your light source when applying highlights. Imagine where the light would fall on the hair and use your brush accordingly. By adding highlights strategically, you can create the illusion of individual strands catching the light and reflecting it.
Next, it’s time to add shadows. Choose a darker tone of the hair color or go one shade darker to create depth. Create a new layer and set the blending mode to “Multiply” or “Darken” to achieve the desired shadow effect. Use a soft brush with low opacity to apply the shadows in areas where they would naturally occur, such as underneath strands, at the roots, or in areas that are not directly illuminated.
Be mindful of the shape and flow of the hair when adding shadows. Think about the way the hair falls and the direction it moves, and add shadows accordingly to enhance the three-dimensional aspect of your artwork.
As you add highlights and shadows, remember to use varying levels of opacity and brush sizes to achieve a more realistic and nuanced look. It’s important to experiment and observe how the light interacts with hair in real life to create convincing highlights and shadows in your digital artwork.
Once you are satisfied with the highlights and shadows in your hair drawing, don’t forget to merge the layers or group them for easier management. This will help you maintain a clean and organized workspace as you proceed with adding final touches and detailing to your artwork.
Final Touches and Detailing
Once you have created the base shape, added volume and texture, and added highlights and shadows, it’s time to put the final touches on your hair drawing in Procreate. This stage allows you to refine the details and add those extra elements that bring your drawing to life.
Here are some tips and techniques for adding the final touches and detailing to your hair drawing:
- Refine the Edges: Pay attention to the edges of the hair strands and make sure they are clean and defined. Use a smaller brush size to carefully refine and sharpen the edges for a polished look.
- Add Flyaways: Hair isn’t always perfectly smooth and uniform. Use a scratchy brush or a textured brush to add some flyaways and stray hairs to create a more realistic and natural appearance.
- Create Hair Strands: Use a fine brush or a single hair brush to add individual strands of hair. This adds detail and depth to your drawing, giving it a more intricate and realistic look. Vary the thickness and direction of the strands to add visual interest.
- Enhance the Texture: If you want to add more texture to the hair, consider using a textured brush or overlaying a texture layer. This can give your drawing a more tactile and realistic feel.
- Add Shine and Gloss: To make the hair look shiny and healthy, add some subtle highlights or a glossy sheen. Use a lighter color and gently brush it over certain areas of the hair to create the illusion of light reflecting off the strands.
- Adjust the Colors: Experiment with different color adjustments to enhance the overall look of the hair. Increase or decrease the saturation, play with the color balance, or apply a color overlay to achieve the desired effect.
- Blend and smudge: Use the smudge tool or a soft brush to blend and soften any harsh lines or transitions in your hair drawing. This can help create a more seamless and natural appearance.
- Add Facial Features: Depending on your drawing, you may need to add facial features such as eyebrows, eyelashes, or beard hair. Pay attention to the direction and thickness of these features to maintain consistency with the hair.
Remember, the final touches and detailing stage is all about adding those little nuances that make your hair drawing stand out. Take your time, experiment with different techniques, and don’t be afraid to make adjustments along the way. With practice and patience, you’ll be able to achieve stunning hair drawings in Procreate.
Conclusion
Mastering the art of drawing hair on Procreate can truly bring your digital artwork to life. By utilizing the powerful tools and features of this digital drawing platform, you can create stunning and realistic hair textures that will mesmerize your audience. Whether you’re a beginner or an experienced artist, Procreate offers a wide range of brush options and customization settings that allow you to achieve the desired style and look for your hair drawings.
Remember to start with a solid foundation, sketching out the basic hair shape and flow before adding intricate details and textures. Experiment with different brush settings, layer blending modes, and opacity levels to add depth and dimension to your hair. Don’t be afraid to study real-life references and observe the way hair behaves, paying attention to lighting, shadows, and movement. With practice and patience, you can develop your own unique hair drawing style and create captivating digital artworks.
So, grab your iPad, open up Procreate, and let your creativity flow as you master the art of drawing hair like never before!
FAQs
Q: Can I draw hair on Procreate?
Yes, Procreate is a powerful digital art app that allows you to draw and paint on your iPad. It provides various drawing tools and features that make it ideal for creating detailed and realistic hair textures.
Q: Do I need any special brushes to draw hair on Procreate?
While Procreate comes with a variety of built-in brushes, there are also numerous custom hair brushes available for download online. These brushes are specifically designed to mimic the appearance and texture of different types of hair, helping you achieve more realistic and detailed results.
Q: Are there any tutorials or resources available for drawing hair on Procreate?
Absolutely! Procreate has a large and active community of artists who share their techniques and resources online. You can find tutorials on platforms like YouTube or join forums and social media groups dedicated to Procreate. These resources can provide invaluable guidance and inspiration for mastering the art of drawing hair on Procreate.
Q: How can I make hair look more realistic on Procreate?
To make hair look more realistic on Procreate, consider paying attention to details such as hair strands, texture, and shading. Experiment with different brush settings, such as brush opacity and size, to create varied and natural-looking hair. Additionally, study real-life photos and observe how hair behaves in different lighting conditions to better replicate those effects in your artwork.
Q: Can I animate hair on Procreate?
While Procreate primarily focuses on static digital artwork, there are techniques you can use to create the illusion of animated hair. By utilizing Procreate’s animation features, such as creating multiple frames and slight changes in hair position, you can achieve a simulated hair movement effect. However, keep in mind that Procreate is not a dedicated animation program, so the capabilities in this regard may be somewhat limited compared to specialized animation software.