
Procreate is a powerful digital art app used by artists and designers to create stunning illustrations and artwork. One of the key functionalities of Procreate is its ability to organize files and projects into folders. With folders, you can easily manage your artwork, keep your projects organized, and find what you need with ease.
In this article, we will guide you through the process of creating folders in Procreate, step by step. Whether you’re a seasoned Procreate user or just starting out, learning how to make folders can greatly enhance your workflow and help you stay organized. So, let’s dive in and discover how you can make folders in Procreate.
Inside This Article
- Creating a New Canvas in Procreate
- Accessing the Layers Panel in Procreate
- Using the Drawing Tools to Create a Folder
- Organizing Artwork within the Folder
- Conclusion
- FAQs
Creating a New Canvas in Procreate
Procreate is a powerful digital art app that allows artists to create stunning artwork on their mobile devices. One of the first steps when starting a new project in Procreate is creating a new canvas. Fortunately, this process is straightforward and can be done in just a few simple steps.
To create a new canvas in Procreate, open the app and tap on the “+” icon located at the top right corner of the screen. This will open the canvas creation menu, where you can adjust various settings such as canvas size, resolution, and color profile. Procreate offers a wide range of preset canvas sizes to choose from, or you can input custom dimensions to suit your specific needs.
Once you have selected the desired canvas settings, simply tap on the “Create” button, and Procreate will generate a new canvas based on your specifications. You will then be directed to the main drawing interface, where you can begin your creative journey.
Procreate also offers additional customization options within the canvas creation menu. You can customize the canvas orientation, choosing between portrait or landscape mode. Additionally, you can adjust the canvas DPI (dots per inch) to ensure optimal print quality if you plan on exporting your artwork.
Furthermore, Procreate allows you to choose from various color profiles such as RGB, CMYK, or even the popular P3 color space. This flexibility ensures that your colors are accurately represented, whether you’re creating artwork for screen or print.
Creating a new canvas in Procreate gives you a blank digital canvas to unleash your creativity. Whether you’re a professional artist, a hobbyist, or just starting your artistic journey, Procreate’s canvas creation feature provides the perfect starting point for your digital artwork.
Accessing the Layers Panel in Procreate
Procreate is a powerful digital art software that offers a wide range of features and tools for artists. One of the essential functions in Procreate is the Layers panel, which allows you to organize and manage your artwork efficiently.
To access the Layers panel in Procreate, follow these simple steps:
- Open Procreate on your mobile device or tablet.
- Open an existing artwork or create a new canvas.
- Look for the icon in the top-right corner of your screen. This icon resembles two stacked squares, which represents the Layers panel.
- Tap on the Layers icon to open the Layers panel. It will open as a floating panel on the right side of your screen.
Now that you have accessed the Layers panel in Procreate, you can take advantage of its various functionalities. The Layers panel allows you to create, delete, duplicate, rearrange, and merge layers, giving you complete control over your artwork’s composition and organization.
Additionally, you can use the Layers panel to adjust the opacity and blending modes of individual layers, enabling you to create unique and visually stunning effects. Experimenting with different layer settings can add depth and dimension to your artwork.
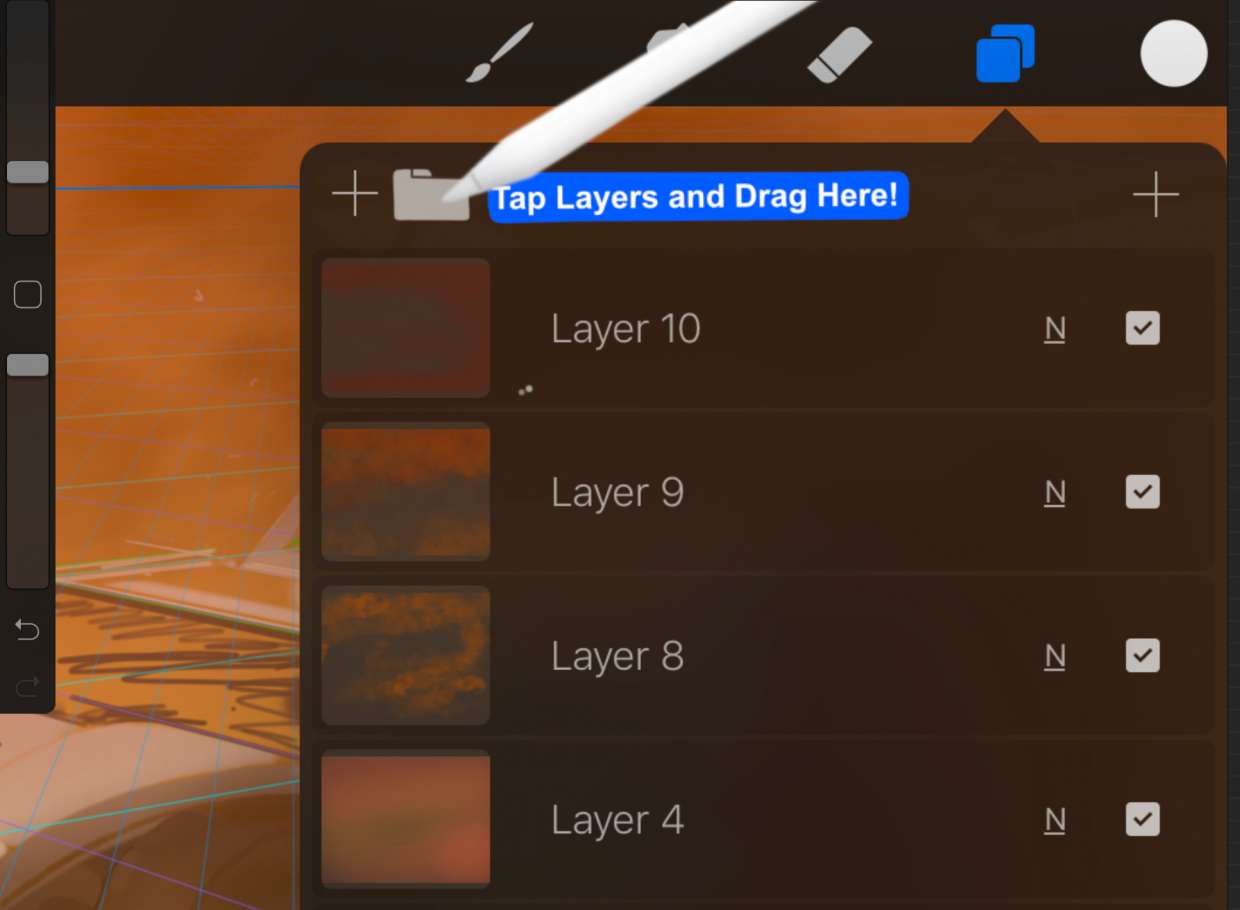
Another handy feature of the Layers panel is the ability to group layers into folders. By organizing your layers into folders, you can keep your artwork more structured and easily navigate through complex compositions. To create a folder in the Layers panel, simply tap the”+” icon at the top right of the panel and select “New Group.” You can then drag and drop layers into the folder for better organization.
Accessing and utilizing the Layers panel in Procreate is an essential skill for any digital artist. By understanding how to access and navigate the Layers panel, you can streamline your workflow and unlock the full potential of Procreate’s layers-based workflow.
Using the Drawing Tools to Create a Folder
Procreate is a powerful and versatile digital art app that allows you to create stunning artwork on your iPad. Not only can you draw, paint, and sketch with ease, but you can also organize your artwork using folders to keep everything neat and easily accessible. In this section, we’ll explore how to use the drawing tools in Procreate to create a folder.
First, open Procreate and navigate to the canvas where you want to create the folder. Tap on the icon in the top-right corner of the screen that looks like a square with a plus sign in it. This will open the canvas creation menu.
In the canvas creation menu, you’ll find a variety of options for creating different types of canvases. To create a folder, choose the “Folder” option. This will open a new folder canvas where you can organize your artwork.
Once you’ve created the folder canvas, you can start adding artwork to it. To do this, tap on the brush icon in the top-right corner of the screen to open the brush library. From here, you can choose a brush and start drawing or painting on the canvas.
To add new layers within the folder, tap on the layers icon in the top-right corner of the screen. This will open the layers panel. From here, you can tap on the “+” icon to add a new layer. You can then use the drawing tools to create artwork on the new layer.
If you want to add more pages to the folder, simply tap on the thumbnail of the folder canvas in the gallery view. This will open the folder canvas, and you can tap on the “+” icon in the top-right corner of the screen to add a new page.
Once you’ve finished creating your folder and adding artwork to it, you can easily navigate between the pages by swiping left or right on the screen. This makes it convenient to organize and view your artwork within the folder.
Creating a folder using the drawing tools in Procreate is a simple and effective way to keep your artwork organized and easily accessible. Whether you’re a professional artist or just starting out, utilizing folders can help streamline your workflow and make it easier to find and showcase your artwork. So, unleash your creativity and start organizing your digital artwork in Procreate today!
Organizing Artwork within the Folder
Once you have created a folder in Procreate to keep your artwork organized, it’s time to start organizing your artwork within the folder. Procreate offers various ways to effectively manage and arrange your artwork, making it easy to locate specific pieces and maintain a streamlined workflow.
1. Drag and drop: One of the simplest ways to organize your artwork is by utilizing the drag and drop feature in Procreate. You can easily rearrange your artwork within the folder by dragging and dropping them into your desired order. This allows you to prioritize certain pieces or group similar artwork together.
2. Naming your artwork: Assigning descriptive names to your artwork can greatly facilitate organization. By giving each piece a unique and meaningful name, you can quickly identify them without having to open them individually. This is especially helpful when you have a large number of artworks within a folder.
3. Utilize layers: Procreate allows you to use layers within your artwork. You can separate different elements of an artwork onto different layers, such as background, foreground, or specific details. This not only helps you organize your artwork visually but also makes it easier to make changes or adjustments to specific elements without affecting the rest of the artwork.
4. Grouping similar artwork: If you have multiple pieces of artwork that belong to a specific theme or project, you can group them together within the folder. This grouping feature allows you to keep related artwork organized and easily accessible. For example, if you have a series of illustrations for a children’s book, you can create a group for all the illustrations related to that book.
5. Use tags and metadata: Procreate offers the option to add tags and metadata to your artwork, allowing for detailed organization and easy searchability. You can add keywords, labels, or specific information to your artwork, making it easier to find them later using the search function in Procreate.
By implementing these strategies, you can maintain a well-structured and organized collection of artwork within your Procreate folders. Whether you are a professional artist or a hobbyist, organizing your artwork will help you stay focused, boost productivity, and ensure that you can easily locate and showcase your creations.
Conclusion
In conclusion, knowing how to create a folder in Procreate can greatly improve your workflow and organization when working on digital art projects. With just a few simple steps, you can categorize and organize your artwork, brushes, and other resources, making them easily accessible and reducing the clutter in your workspace. By creating folders, you can stay focused and spend less time searching for specific files, allowing you to fully immerse yourself in the creative process. Whether you are a professional artist or just starting out, mastering this feature in Procreate will help you optimize your workflow and unleash your creativity. So go ahead and start organizing your artwork with Procreate folders today!
FAQs
-
Can I create folders in Procreate?
Yes, you can create folders in Procreate. Creating folders allows you to organize your artwork into different categories or projects, making it easier to find and manage your files.
-
How do I create a folder in Procreate?
To create a folder in Procreate, follow these steps:
- Open the Procreate app on your device.
- Tap on the “+” button located at the top right corner of the gallery screen.
- Choose the “New Folder” option from the pop-up menu.
- Enter a name for your folder and tap “Create” to finalize.
-
Can I move artworks into a folder in Procreate?
Yes, you can move your artworks into a folder in Procreate. To do this, follow the steps below:
- Open the gallery screen in Procreate.
- Tap on the artwork you want to move.
- Tap and hold the artwork until it lifts up.
- Drag the artwork over the folder you want to move it to.
- Release your finger to drop the artwork into the folder.
-
How do I delete a folder in Procreate?
To delete a folder in Procreate, please follow these steps:
- Open the gallery screen in Procreate.
- Swipe left on the folder you want to delete.
- Tap the “Delete” button that appears.
- Confirm the deletion by tapping “Delete” again in the pop-up confirmation.
-
Is it possible to rename a folder in Procreate?
Yes, you can rename a folder in Procreate. Just follow these simple steps:
- Open the gallery screen in Procreate.
- Tap on the folder you want to rename.
- Tap on the folder name at the top of the screen.
- Edit the name as desired.
- Tap “Done” to save the new folder name.