
The Procreate app has taken the digital art community by storm, offering a powerful and intuitive platform for artists to create breathtaking artwork on their iPads. One of the key skills every digital artist needs to master is the ability to create smooth, clean lines. Whether you’re sketching, inking, or adding details, having crisp lines can elevate your artwork to the next level.
In this article, we will explore various techniques and tools available in Procreate that can help you achieve those smooth lines you desire. We’ll delve into brush settings, stroke gestures, and other handy features that can make a significant difference in refining your line work. So, if you’re ready to take your digital art to a new level of professionalism, follow along as we uncover the secrets of creating smooth lines in Procreate.
Inside This Article
- Drawing smooth lines in Procreate
- Tools and settings for line smoothing
- Adjusting pressure settings for smoother lines
- Utilizing the streamline feature for smoother strokes
- Additional tips and techniques for achieving smooth lines in Procreate
- Conclusion
- FAQs
Drawing smooth lines in Procreate
When it comes to digital art, creating smooth and precise lines is crucial for achieving a polished and professional look. Procreate, the popular digital art app, offers several tools and settings that can help you achieve smooth lines in your artwork. In this article, we will explore the techniques and features that can assist you in drawing smooth lines in Procreate.
One of the key factors in drawing smooth lines in Procreate is utilizing the right tools and settings. The app offers a variety of brushes, such as the “Studio Pen” or the “Technical Pen,” that are specifically designed for creating smooth lines. These brushes have built-in settings that allow for more precise control over line weight and thickness.
In addition to selecting the appropriate brush, adjusting the pressure settings can also contribute to smoother lines. Procreate allows you to customize how the app responds to pressure sensitivity. By increasing the pressure curve, you can create a more sensitive response, resulting in smoother lines with variations in width. Experimenting with these settings can help you find the perfect balance for your desired line smoothness.
Procreate also offers a powerful feature called “Streamline,” which can be incredibly helpful in achieving smooth lines. Streamline automatically corrects your strokes by applying a smoothing algorithm to your pen movements. This feature is particularly useful for artists who struggle with shaky or unsteady hands, as it helps to create fluid and polished lines effortlessly.
When using the Streamline feature, you can adjust the amount of correction applied to your strokes. By increasing the streamline value, you can achieve more precise and controlled lines, while reducing it allows for looser and more natural strokes. Finding the optimal balance will depend on your personal preference and the style you’re aiming for.
It’s worth mentioning that practicing proper hand and arm posture can greatly contribute to smoother lines. Maintaining a relaxed grip, using your arm rather than just your wrist to make strokes, and focusing on even, fluid movements can make a significant difference in creating smooth lines in Procreate.
Tools and settings for line smoothing
When it comes to creating smooth lines in Procreate, having the right tools and understanding the available settings is essential. In this section, we will explore some of the tools and settings that can help you achieve those silky-smooth lines in your artwork.
1. Brush Selection: Choosing the right brush is the first step towards achieving smooth lines. Procreate offers a wide range of brushes, each with its own unique properties. Look for brushes labeled as “Smooth” or “Ink” as they are specifically designed for creating clean and smooth lines.
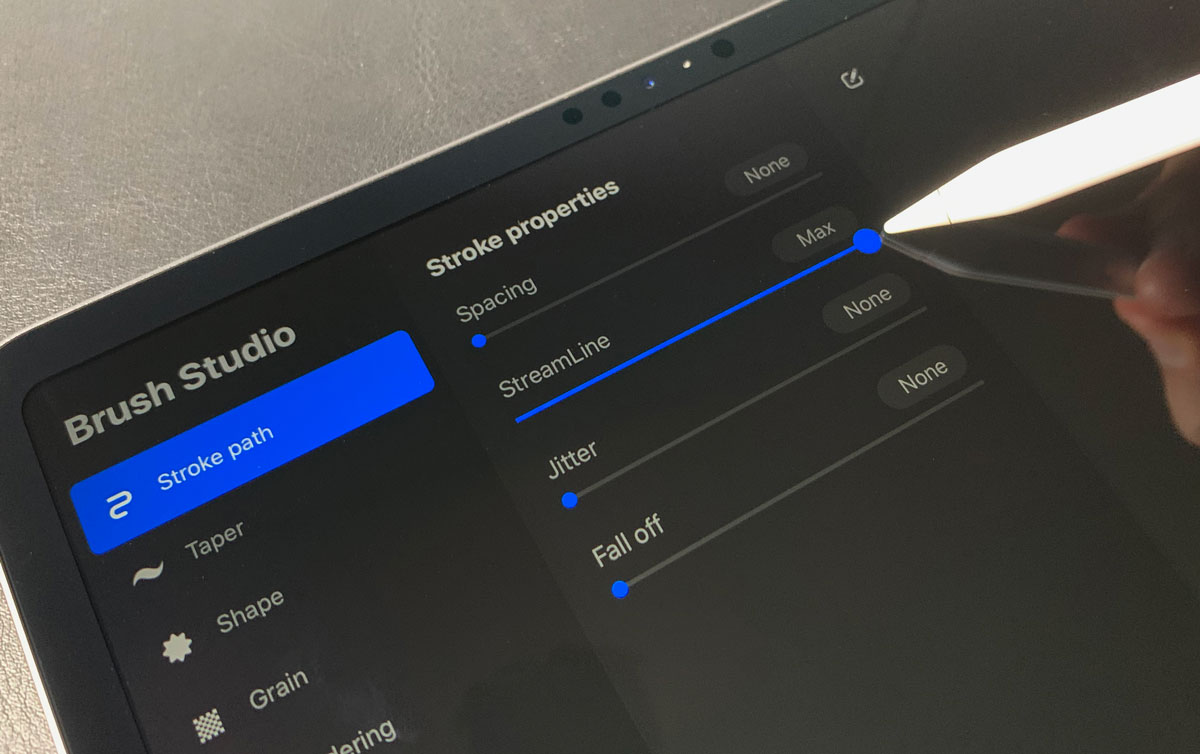
2. Stroke Path: Enabling “Stroke Path” in the brush settings can be a game-changer for line smoothing. This feature stabilizes your strokes by predicting your intended path and adjusting the line accordingly. It helps eliminate any shakiness or inconsistencies, resulting in smoother lines.
3. Brush Opacity: Adjusting the opacity of your brush can affect line smoothness. Lowering the opacity can create softer and more blended lines, while higher opacity can produce crisp and defined strokes. Experiment with different opacity levels to find the desired smoothness in your lines.
4. Brush Size: The size of your brush can also impact line smoothness. A smaller brush size is generally recommended for creating finer details and smoother lines. However, if you’re going for a bolder or more expressive look, a larger brush size might be preferable.
5. Streamline: The “Streamline” feature, found in the brush settings, is specifically designed to smooth out your strokes. By enabling it, you can reduce any wobbliness in your lines, making them appear neater and more polished. Adjust the “Streamline” slider to control the level of smoothing.
6. Pressure Sensitivity: If you’re using a pressure-sensitive stylus, take advantage of the pressure settings in Procreate. By adjusting the pressure curve, you can fine-tune the responsiveness of your strokes, resulting in smoother and more controlled lines.
Remember to experiment with different combinations of tools and settings to find what works best for your artistic style and preferences. Practice and patience are key, so keep refining your technique to achieve those smooth and flawless lines in your Procreate creations!
Adjusting pressure settings for smoother lines
One of the key features in Procreate that can help you achieve smoother lines is the ability to adjust pressure settings. By fine-tuning the sensitivity of your stylus or Apple Pencil, you can gain better control over the thickness and opacity of your lines.
Firstly, it’s important to ensure that your stylus or Apple Pencil is properly calibrated. This can be done through the settings of your device. Make sure that the pressure sensitivity is set to its highest level for the most responsive drawing experience.
Within Procreate, navigate to the Brush Settings panel. Here, you will find a variety of options to customize your brushes, including the pressure settings. Experiment with different pressure curves to find the one that best suits your drawing style.
If you prefer a more gradual change in line thickness, select a pressure curve that ramps up slowly. This will allow for more precision in your strokes and prevent sudden jumps in line weight. On the other hand, if you prefer a more dynamic and expressive stroke, choose a pressure curve that has a steep incline.
Another handy feature in Procreate is the ability to adjust the pressure sensitivity on a per-brush basis. This means that you can fine-tune the pressure settings for each individual brush, giving you even more control over your line quality.
Remember to strike a balance between sensitivity and control. While high sensitivity can result in smoother lines, it may also lead to unintentional variations in line weight. Adjust the pressure settings according to your comfort level and the specific effect you want to achieve in your artwork.
Once you’ve adjusted the pressure settings to your liking, it’s time to put them to use. Practice drawing smooth lines with different strokes and angles. Experiment with various brushes and pressure intensities to see how they affect the outcome. The more you practice, the better you’ll become at creating effortlessly smooth and controlled lines in Procreate.
Utilizing the streamline feature for smoother strokes
One of the key features in Procreate that can help you achieve smoother strokes and lines is the streamline feature. This feature works by automatically adjusting your brush strokes to create cleaner and more refined lines.
To access the streamline feature, simply select the brush tool and tap on the brush settings icon. From there, you will see the option to enable and adjust the streamline feature. You can slide the control to increase or decrease the streamline effect, depending on your preference.
When the streamline feature is enabled, Procreate will analyze your brush strokes and apply corrective measures to smooth out any unevenness or wobbliness. This can be particularly useful when working on intricate details or precise linework.
By using the streamline feature, you can achieve more consistent and controlled strokes, allowing you to create cleaner and more polished artwork. It can be especially helpful if you have a shaky hand or lack the experience in creating smooth lines manually.
It’s worth noting that the streamline feature is not a one-size-fits-all solution. The effectiveness of this feature will depend on the individual’s drawing style, the type of brush being used, and the desired outcome of the artwork. It may take some experimentation and adjustment to find the right balance for your specific needs.
If you’re using Procreate on an iPad or iPhone with Apple Pencil, the streamline feature can greatly enhance the precision and quality of your lines. Combined with the pressure sensitivity of the Apple Pencil, you can achieve incredibly smooth and expressive strokes that mimic traditional drawing tools.
Remember, the streamline feature is just one tool in Procreate’s arsenal to help you create smooth lines. It’s essential to explore and experiment with other settings, brushes, and techniques to find the combination that works best for you. With practice and patience, you’ll be able to master the art of creating beautiful, smooth lines in Procreate.
Additional tips and techniques for achieving smooth lines in Procreate
When it comes to digital art, achieving smooth lines can make a significant difference in the final outcome of your artwork. Procreate is a powerful tool that offers various features and settings to help artists create smooth and clean lines. In this section, we will explore some additional tips and techniques to enhance your line work in Procreate.
1. Experiment with different brushes: Procreate offers a wide range of brushes, each with its own unique characteristics. Take the time to explore different brush options and experiment with them to find the ones that suit your style and desired line quality. Some brushes have built-in smoothing features or customizable settings that can help you achieve smoother lines.
2. Use the QuickShape feature: Procreate’s QuickShape feature allows you to create perfectly straight lines, circles, and other shapes effortlessly. By enabling this feature, you can simply draw a rough shape, and Procreate will automatically refine it into a clean and smooth line or shape. This can be particularly useful when you need precise and symmetrical lines in your artwork.
3. Adjust the brush opacity and flow: Play around with the opacity and flow settings of your brush to control the density and smoothness of your lines. Lowering the opacity and flow can help create subtle and smoother lines, while increasing them can result in more solid and defined strokes. Find the right balance that works best for the specific effect you’re trying to achieve.
4. Utilize the Symmetry feature: Procreate’s Symmetry feature is a powerful tool that allows you to create perfectly mirrored strokes. By enabling symmetry, you can achieve symmetrical and smooth lines effortlessly. This feature is particularly useful when working on symmetrical illustrations or designs.
5. Use the ColorDrop feature: When coloring your artwork, the ColorDrop feature can help you create smooth and clean edges. Simply select the desired color, hold the ColorDrop tool over a closed shape, and watch as Procreate automatically fills it with a smooth and solid color. This can save you time and ensure uniformity in your coloring process.
6. Practice drawing with fluid and confident strokes: One of the key factors in achieving smooth lines is practicing your drawing technique. Work on developing fluid and confident strokes, maintaining consistent pressure on your stylus or device. The more you practice, the more control and precision you will have over your lines.
7. Experiment with different pressure and angle settings: Procreate allows you to adjust pressure and angle settings for certain brushes, influencing the smoothness and thickness of your lines. Play around with these settings to find the sweet spot that gives you the desired line quality for your artwork.
8. Use the Stabilize feature: Procreate’s Stabilize feature helps smooth out shaky or uneven lines by automatically correcting them as you draw. Enable this feature and adjust the stabilization strength to reduce any wobbliness and create cleaner lines, especially when drawing freehand.
9. Zoom in for precision: When working on intricate details or fine linework, zooming in on your canvas can give you better control over your strokes. This allows you to make precise adjustments and ensure smoother lines in those delicate areas.
10. Experiment and have fun: Don’t be afraid to explore and experiment with different techniques and settings in Procreate. Every artist has their unique approach to achieving smooth lines, so take the time to find what works best for you and have fun along the way!
By implementing these additional tips and techniques, you can take your line work in Procreate to the next level. Remember, practice makes perfect, so keep honing your skills and experimenting with different methods to find your own unique style and produce stunning artwork with smooth and clean lines.
After exploring the various techniques on how to smooth lines in Procreate, it’s clear that this powerful software offers an array of tools to help artists achieve clean and polished artwork. Whether it’s adjusting brush settings, utilizing stabilizers, or using the streamline feature, Procreate provides artists with the flexibility and precision needed to create smooth and professional-looking lines.
By incorporating these techniques into your Procreate workflow, you can elevate your digital art to new levels and produce results that are visually stunning. Remember to experiment, practice, and fine-tune your process to find what works best for you.
Embrace the versatility of Procreate and unlock your true artistic potential. Smooth lines are just a few strokes away!
FAQs
1. What is Procreate?
Procreate is a digital illustration app designed exclusively for Apple devices. It allows artists and designers to create stunning artwork and illustrations using a wide range of digital brushes and other creative tools.
2. How do I smooth lines in Procreate?
To smooth lines in Procreate, you can use the “Smoother” tool, which is located in the toolbar at the top of the screen. Simply select the tool and then drag it across the lines you want to smooth. This tool helps in reducing any jaggedness or roughness in your strokes, resulting in cleaner and more polished lines.
3. Can I adjust the smoothness level in Procreate?
Yes, you can adjust the smoothness level in Procreate to suit your preferences. After selecting the “Smoother” tool, you will find the smoothness slider in the tool options at the top of the screen. By moving the slider to the right, you can increase the smoothness level, while moving it to the left will decrease it.
4. Are there any other methods to smooth lines in Procreate?
In addition to the “Smoother” tool, Procreate offers other methods to smooth lines. You can utilize the “Quick Shape” feature, which helps in automatically adjusting your strokes to more precise and smooth shapes. The “Streamline” option in the brush settings also assists in smoothing out your lines by automatically correcting any wobbles or inconsistencies as you draw.
5. Can I undo the smoothing effect in Procreate?
Yes, Procreate allows you to undo the smoothing effect if you’re not satisfied with the results. Simply tap on the “Undo” button located at the top of the screen, or use the two-finger tap gesture to undo multiple actions. This enables you to experiment with different smoothing levels and revert back to the original lines if needed.