
Are you an aspiring digital artist looking to explore the world of digital painting? Look no further than Procreate – a powerful and intuitive app that will unleash your creativity on your cell phone. Procreate has gained immense popularity among artists and designers due to its extensive set of creative tools, exceptional performance, and user-friendly interface.
In this article, we will guide you on how to paint in Procreate, taking you through the step-by-step process of creating stunning artwork on your cell phone. Whether you are a beginner or an experienced artist, Procreate offers a wide range of features and functionalities that will elevate your digital artwork to a new level.
So, grab your cell phone and let’s dive into the world of digital painting with Procreate!
Inside This Article
- Getting Started with Procreate
- Choosing the Right Tools and Brushes
- Understanding Layers and Blend Modes
- Exploring Procreate’s Color Palette
- Conclusion
- FAQs
Getting Started with Procreate
Procreate is a powerful digital painting app for iOS devices that allows artists to create stunning artwork on the go. Whether you are a seasoned professional or just starting out, Procreate offers a wide range of tools and features to unleash your creativity. In this guide, we will walk you through the basics of getting started with Procreate, from installing the app to creating your first masterpiece.
The first step to getting started with Procreate is to download and install the app from the App Store. Procreate is compatible with most recent iPad models, so make sure your device is up to date. Once installed, open the app and you will be greeted with a blank canvas, ready for your artistic vision.
Next, familiarize yourself with the different tools and brushes available in Procreate. Procreate offers a wide range of brushes that mimic traditional art mediums, such as pencils, charcoal, and watercolors. Experiment with different brushes to see which ones suit your style and preferences. You can also customize and create your own brushes to further enhance your artwork.
Layers and blend modes are powerful features in Procreate that allow you to organize and manipulate your artwork. Layers function like transparent sheets stacked on top of each other, allowing you to make changes to specific elements without affecting the rest of your artwork. Blend modes, on the other hand, control how different layers interact with each other, resulting in stunning visual effects.
Lastly, take some time to explore Procreate’s color palette and experiment with different color combinations. Procreate offers a wide range of color options, including custom palettes, color harmony guides, and color drop sampling. Whether you prefer vibrant and bold colors or subtle and muted tones, Procreate gives you the tools to bring your artwork to life.
Getting started with Procreate is just the beginning of your artistic journey. With its intuitive interface, powerful tools, and endless possibilities, Procreate is a must-have app for any digital artist. So, go ahead, unleash your creativity and start painting in Procreate!
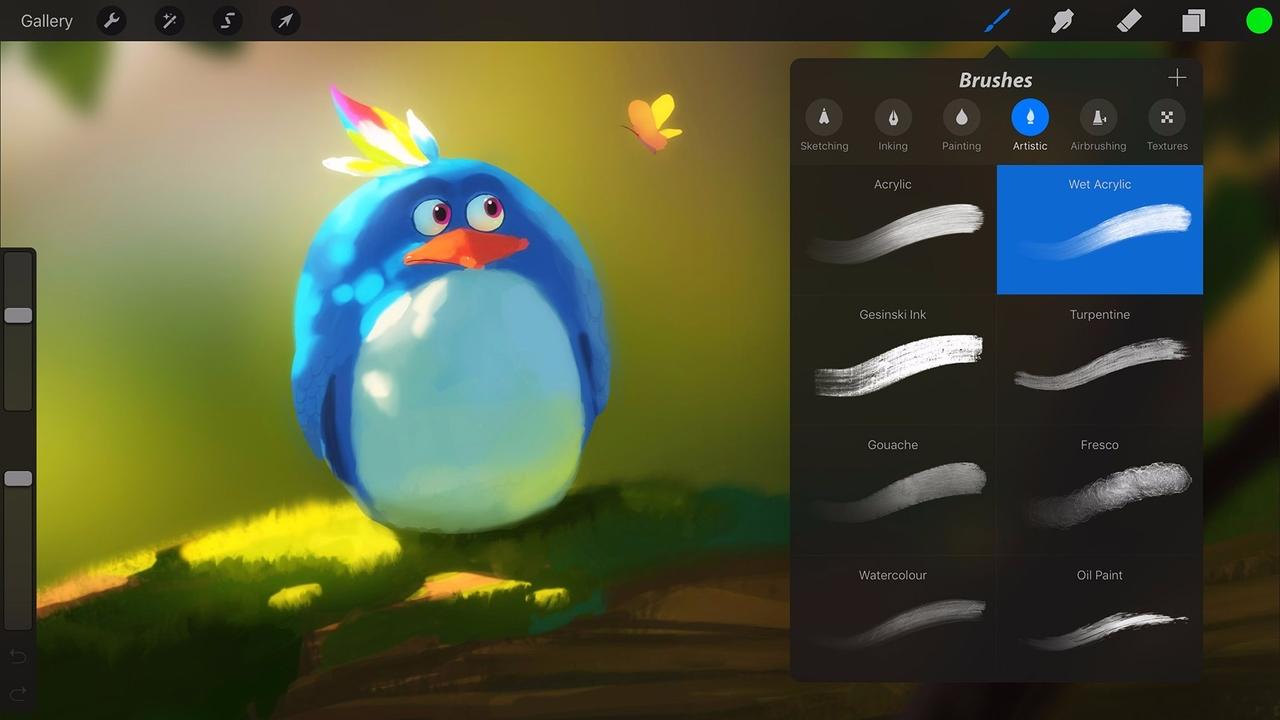
Choosing the Right Tools and Brushes
When it comes to digital painting in Procreate, choosing the right tools and brushes can make a world of difference. The app offers a wide range of options to cater to various artistic styles and preferences. Here are a few tips to help you make the best choices for your digital masterpiece:
1. Experiment with Different Brushes: Procreate offers an extensive collection of brushes, each with its own unique characteristics. Take the time to explore and experiment with different brushes to find the ones that suit your style and needs. Whether you prefer realistic textures, smooth lines, or expressive strokes, Procreate has a brush for you.
2. Consider the Brush Settings: In addition to the brush selection, pay attention to the brush settings. Procreate allows you to adjust various parameters like size, opacity, flow, and pressure sensitivity. By tweaking these settings, you can achieve the desired effect and control the level of detail in your artwork.
3. Organize and Customize: As you explore the brushes, you may find it helpful to organize them into sets that cater to specific purposes or themes. Procreate provides the option to create custom brush sets, allowing you to access your favorite brushes quickly. You can also customize and create your own brushes using Procreate’s brush studio, giving you even more flexibility and creative possibilities.
4. Consider the Type of Artwork: Different types of artwork require different types of brushes. For example, if you’re working on a detailed portrait, you may want to use a brush with high precision and fine details. On the other hand, if you’re creating a vibrant and textured landscape, you might opt for brushes with dynamic textures and blending capabilities.
5. Seek Inspiration: Don’t hesitate to seek inspiration from other artists using Procreate. Social media platforms like Instagram and YouTube are treasure troves of tutorials, tips, and artwork created by talented Procreate users. By observing and learning from others, you can gain insights into which tools and brushes they use and apply similar techniques to enhance your own artwork.
Remember, choosing the right tools and brushes is a personal process. Take the time to explore, experiment, and find the ones that resonate with your artistic vision. Procreate’s intuitive interface and vast selection of tools make it a versatile platform for artists of all skill levels. So, dive in, explore, and let your creativity soar in the digital realm!
Understanding Layers and Blend Modes
If you’re familiar with digital art, you know that layers are a fundamental part of the creative process. And when it comes to painting in Procreate, understanding layers and blend modes can take your artwork to the next level.
Layers in Procreate function much like transparent sheets stacked on top of each other. Each layer can contain different parts of your artwork, allowing you to make changes without affecting the rest of the image. This non-destructive editing workflow gives you endless creative possibilities.
Whether you want to add depth to your painting or experiment with different effects, blend modes can help you achieve the desired results. Blend modes control how colors on one layer interact with colors on the layers underneath.
Procreate offers a wide range of blend modes, each yielding unique visual effects. For example, the “Multiply” blend mode darkens the colors on the layer, creating a shading effect. The “Overlay” blend mode enhances contrast and saturation, while the “Screen” blend mode lightens the colors, allowing for vibrant highlights.
Understanding blend modes involves experimentation and practice. By trying out different combinations, you can discover unexpected and stunning effects that bring life to your artwork.
When working with layers in Procreate, it’s important to organize them effectively. You can rearrange the layer order, merge layers together, or group layers to keep your workflow tidy. This flexibility enables you to work efficiently and make precise adjustments as needed.
Take advantage of Procreate’s ability to adjust opacity and blend modes on individual layers. This allows you to create transparent and subtle layers that contribute to the overall composition of your artwork.
Whether you’re a beginner or an experienced artist, understanding layers and blend modes in Procreate is essential. It opens up a world of creative possibilities, allowing you to achieve stunning and professional-looking digital paintings.
Exploring Procreate’s Color Palette
One of the most exciting features of Procreate is its versatile and powerful color palette. With this creative tool, artists and designers can unleash their imagination and bring their artwork to life with a wide range of vibrant colors. In this section, we will explore the different ways to utilize Procreate’s color palette to enhance your digital artwork.
1. Choosing Colors: Procreate offers a myriad of color options to select from. You can create your own custom color swatches or choose from the extensive preset color libraries. Whether you prefer subtle pastels or bold, saturated hues, there is a perfect color waiting to be discovered.
2. Color Harmony: To create visually appealing and harmonious artwork, it is crucial to understand color theory. Procreate’s color palette provides various color harmony options, such as complementary, analogous, triadic, and more. Experimenting with different combinations will help you achieve the desired mood and atmosphere in your artwork.
3. Color Adjustments: Procreate gives you the ability to tweak and refine colors with its powerful adjustment tools. You can easily adjust brightness, saturation, and color balance to achieve the perfect look. This flexibility allows you to fine-tune colors to match your artistic vision.
4. Gradient Tools: Gradients can add depth and dimension to your artwork. Procreate offers a range of gradient tools, allowing you to create smooth transitions between colors. You can customize the angle, scale, and even create your own unique gradients for a personalized touch.
5. Color Swatches: Procreate allows you to save and organize your favorite colors into swatches. This feature is particularly useful if you are working on a series of artworks or want to maintain consistency within a project. Having easy access to your preferred colors saves time and keeps your workflow seamless.
6. Color History: Procreate keeps track of your color history, allowing you to revisit previously used colors with ease. This feature is helpful when you want to maintain consistency or make adjustments to specific color elements in your artwork.
7. Color Dropper: The color dropper tool in Procreate enables you to select colors directly from your artwork. Whether you need to match an existing color or sample a specific shade, the color dropper tool ensures precision and accuracy in your color selection.
8. Experimentation and Exploration: Procreate encourages artistic experimentation, and the color palette is no exception. Don’t be afraid to explore different color combinations, try new techniques, and push the boundaries of your creativity. Procreate’s color palette is a playground for your imagination.
Conclusion
In conclusion, learning how to paint in Procreate can open up a whole new world of creativity and artistic expression. This powerful software provides a wide range of tools and features that enable artists of all levels to create stunning digital artwork. Whether you are a beginner or an experienced artist, Procreate offers a user-friendly interface and intuitive controls that make painting a breeze.
With its extensive brush library, customizable settings, and blend modes, Procreate gives you the freedom and flexibility to bring your imagination to life. The ability to work on multiple layers and easily make adjustments allows for endless experimentation and refinement. Plus, the export options make sharing your artwork with the world effortless.
So, whether you’re a traditional artist looking to transition into digital art or a seasoned digital artist seeking new possibilities, Procreate is a must-have tool. Dive into the world of Procreate, unleash your creativity, and discover a whole new realm of artistic possibilities.
FAQs
Q: Can I use Procreate to create realistic paintings?
A: Absolutely! Procreate is a powerful digital painting tool that offers a wide range of brushes and tools to achieve realistic effects. With its advanced layering system and blend modes, you can create stunning paintings that rival traditional media.
Q: Can I import my own brushes in Procreate?
A: Yes, you can import custom brushes into Procreate. Whether you create your own brushes or download them from various online resources, Procreate allows you to import and use these brushes to enhance your artwork.
Q: Is Procreate only available on iPad?
A: Yes, Procreate is exclusively available for iPad users. It utilizes the Apple Pencil and takes advantage of the iPad’s hardware capabilities to deliver a seamless and powerful digital painting experience.
Q: Can I export my artwork from Procreate in different file formats?
A: Yes, Procreate offers various export options. You can save your artwork as a Procreate file, which preserves all layers and editable elements. Additionally, you can export your artwork as a PNG, JPEG, TIFF, PSD, or even as a time-lapse video.
Q: Does Procreate have image editing capabilities?
A: While Procreate primarily focuses on digital painting, it does offer some image editing capabilities. You can make adjustments to brightness, contrast, saturation, and more. However, for extensive image editing, there are dedicated apps available.