
Procreate is a powerful digital art and design app that has gained immense popularity among artists and creatives. One of the essential skills to master in Procreate is the ability to paste and manipulate elements within your artwork. Whether you want to copy and paste a shape, image, or section of your design, understanding how to paste in Procreate can greatly enhance your creative workflow.
In this article, we will provide you with a comprehensive guide on how to paste in Procreate, covering various methods and tips to make the most out of this feature. Whether you are a beginner or an experienced Procreate user, this article will equip you with the knowledge and techniques to seamlessly incorporate pasted elements into your digital artwork. So, let’s dive in and explore the world of pasting in Procreate!
Inside This Article
- Understanding the Basics of Procreate
- Techniques for Copying and Pasting in Procreate
- Tips and Tricks for Efficient Pasting in Procreate
- Conclusion
- FAQs
Understanding the Basics of Procreate
Procreate is a powerful digital painting and illustration app designed exclusively for the iPad. Whether you’re an artist, designer, or hobbyist, Procreate offers a wide range of tools and features to unleash your creativity. Let’s dive into the basics of Procreate and get to know the app better.
One of the key features that sets Procreate apart is its intuitive interface. The app is designed to be user-friendly, with a minimalist layout that puts the focus on your artwork. With just a few taps and swipes, you can access brushes, layers, and other essential tools.
Procreate offers a vast library of brushes that mimic real-world artistic tools. From pencils and pens to watercolors and oil paints, you can find a brush that suits your style and creative vision. The app also allows you to customize brushes, giving you even more control over your artwork.
Layers are another important aspect of Procreate. Layers allow you to work on different elements of your artwork independently, making it easier to make adjustments or experiment with different effects. You can rearrange, merge, and hide layers with just a few taps, giving you ultimate flexibility.
Procreate also offers a range of powerful selection tools. These tools allow you to select and manipulate specific parts of your artwork, making it easier to apply effects or make precise edits. From simple selections to complex masks, you can achieve incredible results with Procreate’s selection tools.
Another standout feature of Procreate is its seamless integration with the Apple Pencil. The app is optimized to take full advantage of the Apple Pencil’s pressure sensitivity and tilt recognition, giving you a natural and responsive drawing experience. It’s a dream come true for digital artists seeking the feel of traditional art tools.
Finally, Procreate offers a variety of export options, allowing you to save your artwork in different file formats and resolutions. Whether you’re creating illustrations for print or sharing your work online, Procreate makes it simple to export and showcase your art.
These are just some of the basics of Procreate to get you started. With practice and exploration, you’ll discover even more features and techniques to enhance your digital artwork. So grab your iPad, download Procreate, and let your creativity run wild!
Techniques for Copying and Pasting in Procreate
Procreate is a powerful digital illustration app that offers a wide range of tools and features to help artists create stunning artworks. One of the essential skills that every Procreate user should master is the ability to copy and paste elements within their artboard efficiently. In this section, we will explore some techniques for copying and pasting in Procreate.
The first technique is the basic copy and paste function. To copy an element, select it by tapping and holding on it until a menu appears. Then, choose the “Copy” option. Next, navigate to the desired location on your artboard and tap on the canvas to activate it. Finally, tap and hold on the canvas until the menu appears again and select the “Paste” option. The copied element will now be pasted onto the canvas.
Another useful technique is the ability to copy and paste multiple elements simultaneously. To do this, start by selecting multiple elements on your canvas. You can do this by tapping and dragging to create a selection box, or by tapping on each element individually while holding down the “Shift” key. Once you have selected the elements you want to copy, follow the same steps as before to paste them onto a different location.
Procreate also provides a feature called “Copy and Paste Layers”. This allows you to copy an entire layer, including all its contents, and paste it onto another layer or canvas. To use this technique, select the layer you want to copy by tapping on its name in the Layer panel. Then, tap on the layer options button (represented by three dots) and choose the “Copy” option. Next, navigate to the destination layer or canvas and tap on the layer options button again. This time, select the “Paste” option to paste the copied layer.
When copying and pasting in Procreate, it’s important to note that the pasted elements will retain their original attributes, such as layer opacity, blending modes, and transformation settings. This allows for seamless integration of copied elements into your artwork, giving you more creative freedom.
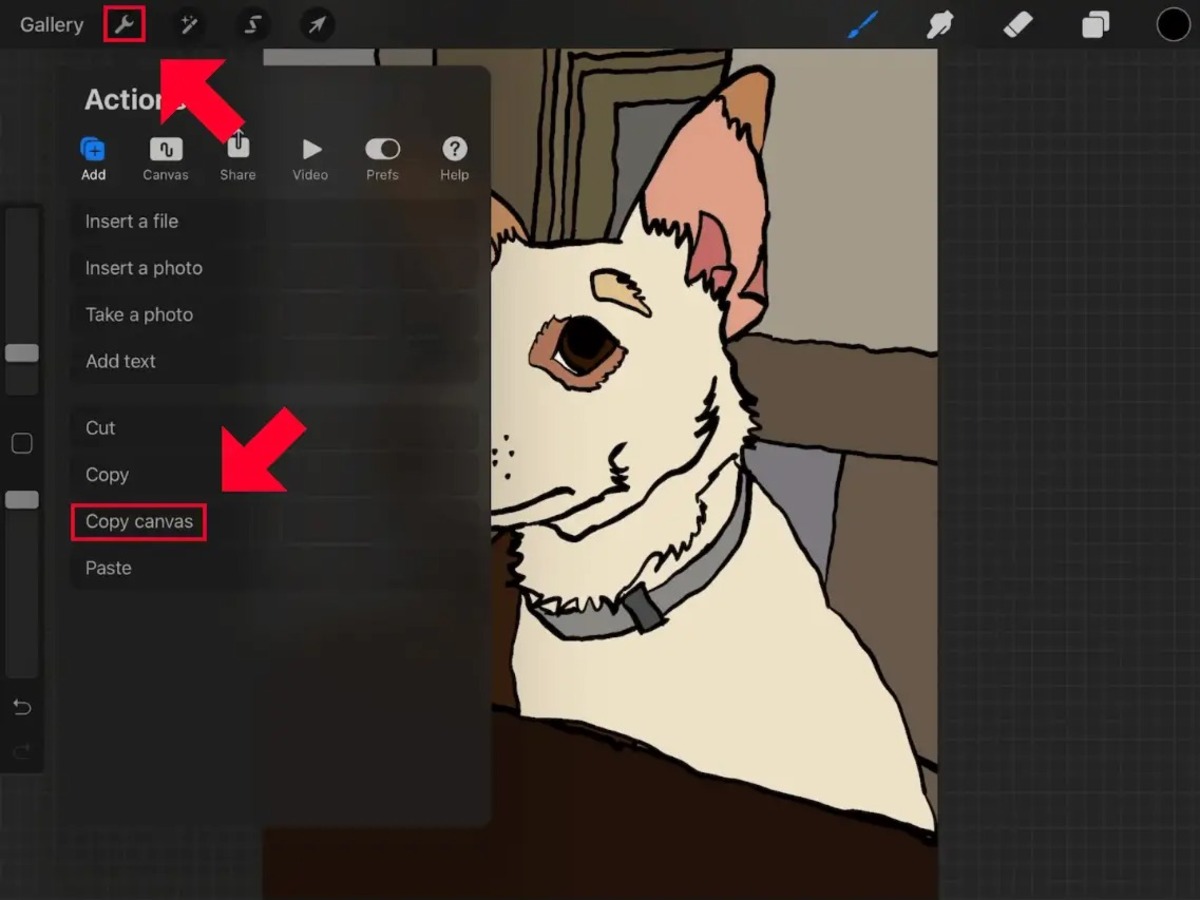
Lastly, Procreate offers a convenient “Copy and Paste Canvas” feature that allows you to copy an entire canvas and paste it as a new document or into an existing document. To use this technique, go to the Actions menu by tapping on the wrench icon, then choose “Copy” under the Canvas section. Next, tap on the “+” icon to create a new canvas or open an existing canvas, and select the “Paste” option. The entire canvas, including all its layers and elements, will be pasted into the new document.
By mastering these techniques for copying and pasting in Procreate, you can streamline your workflow, save time, and unleash your creativity in the digital art world. Experiment with these techniques and discover the possibilities that Procreate offers for creating unique and captivating artworks.
Tips and Tricks for Efficient Pasting in Procreate
Copying and pasting is a fundamental technique in digital art, and mastering it can greatly enhance your workflow. In Procreate, a powerful and popular graphic design software for iPad, you can take your pasting skills to the next level with a few handy tips and tricks. Whether you’re working on a complex composition or simply adding elements to your artwork, these techniques will help you paste with precision and efficiency.
1. Use the Selection Tool
Before pasting any content in Procreate, make sure to use the Selection Tool to precisely choose the area you want to copy. This tool allows you to define a custom shape or select an existing one. By making an accurate selection, you can avoid unnecessary content and ensure a clean and seamless paste.
2. Utilize the Clipboard Menu
Procreate comes equipped with a convenient Clipboard Menu that stores the content you’ve copied. To access it, simply tap and hold on the canvas until the menu appears. From there, you can select the item you want to paste. This feature is particularly helpful when you need to paste multiple elements repeatedly, saving you time and effort.
3. Precision Paste Alignment
If you want to precisely align the pasted item in Procreate, you can enable the Snapping feature. Go to the Actions menu, select Preferences, and toggle on the Snapping option. With Snapping activated, your pasted content will automatically align with the existing elements, ensuring a seamless integration into your artwork.
4. Adjust Opacity and Blend Mode
Procreate offers a wide range of adjustment options for pasted items, such as opacity and blend mode. By adjusting the opacity, you can make the pasted content more transparent or fade it into the background. Additionally, experimenting with different blend modes can create interesting effects, allowing your pasted elements to seamlessly blend with the existing artwork.
5. Explore Transformation Options
When pasting elements in Procreate, you can take advantage of the various transformation options available. Use the Transform tool to resize, rotate, or skew the pasted content according to your artistic vision. These options give you the flexibility to manipulate the pasted elements and fit them perfectly into your composition.
6. Group Pasted Elements
If you’re working with multiple pasted elements, it’s helpful to group them together. This allows you to easily move, resize, or edit the entire group as a single unit. To group elements, simply select all the pasted items and tap the Group button in the Layers menu. This organizational technique keeps your layers tidy and makes it easier to manage complex compositions.
7. Undo and Redo
Don’t be afraid to experiment while pasting in Procreate. If you’re not satisfied with the result, you can always use the Undo button to revert to the previous state. Conversely, the Redo button allows you to restore any changes you’ve undone. These options give you the freedom to try different pasting techniques and find the perfect fit for your artwork.
By implementing these tips and tricks for efficient pasting in Procreate, you can elevate your digital art to new heights. Take advantage of the selection tool, clipboard menu, and transformation options to paste with precision and creativity. Experiment with opacity, blend modes, and group functionality to seamlessly integrate pasted elements into your artwork. With practice, you’ll become a master at pasting in Procreate and unlock endless possibilities for your artistic expression.
Conclusion
In conclusion, the Procreate app offers a wide range of tools and features that make it a powerful and versatile tool for digital art creation. With the ability to paste in Procreate, artists can easily bring in images, elements, and textures from other sources to enhance their artwork. Whether you’re creating illustrations, paintings, or designs, the paste function allows for seamless integration and experimentation.
By following the simple steps outlined in this article, you can paste in Procreate effortlessly. Remember to consider the size and resolution of your pasted elements, as well as making use of the transform and blending options to achieve the desired effect. With practice and experimentation, you will be able to take your digital art to new heights using the amazing capabilities of Procreate.
So go ahead, unleash your creativity, and explore the possibilities that Procreate has to offer. Happy pasting!
FAQs
Q: Can I paste in Procreate?
Yes, you can paste in Procreate. Procreate supports clipboard functionality, allowing you to copy and paste content within the app.
Q: How do I paste in Procreate?
To paste in Procreate, follow these steps:
1. Tap and hold on the canvas where you want to paste the content.
2. When the context menu appears, select the “Paste” option.
3. The copied content will be pasted onto the canvas.
Q: Can I paste multiple items in Procreate?
No, currently Procreate does not support pasting multiple items at once. You can only paste one item at a time.
Q: Can I paste images or text in Procreate?
Yes, you can paste both images and text in Procreate. You can copy an image or text from another app or even from a different layer within Procreate, and then paste it onto the desired canvas or layer.
Q: Does the paste option function differently for different Procreate versions?
Procreate is constantly evolving, and new features and improvements are introduced in each update. While the paste functionality remains consistent across versions, it is always a good idea to check the official Procreate documentation or online forums for any specific changes or enhancements related to the paste feature in the version you are using.