
Are you familiar with Procreate? It is a popular digital art application designed for iPad and iPhone users. One of the essential features in Procreate is the ability to alpha lock, which allows artists to protect the transparent areas of their artwork while making changes to the opaque areas. Alpha locking is a powerful tool that can help you refine your digital illustrations, create seamless color gradients, and add special effects.
If you’re new to Procreate or want to learn more about how to use alpha lock effectively, you’ve come to the right place. In this article, we will guide you through the process of alpha locking in Procreate, step-by-step. Whether you’re an aspiring digital artist or a seasoned pro, understanding alpha lock and how to use it can take your artwork to the next level. So, let’s dive in and unlock the secrets of alpha lock in Procreate!
Inside This Article
- What is Alpha Lock in Procreate?
- How to Use Alpha Lock in Procreate
- Tips and Tricks for Alpha Lock in Procreate
- Conclusion
- FAQs
What is Alpha Lock in Procreate?
Alpha Lock is a powerful feature in the Procreate app that allows users to lock the transparency of a specific layer. This means that any changes made to that layer will only affect the existing opaque pixels, while the transparent areas remain untouched. Essentially, Alpha Lock acts as a protective mask, allowing you to modify the color, texture, or other attributes of only the visible elements on the layer.
Alpha Lock is particularly useful when you want to add shading, highlights, or details to specific areas of your artwork without altering the transparent parts of a layer. It gives you more control over your edits, allowing for seamless blending and precise adjustments. Whether you’re working on digital illustrations, lettering, or creating textures, Alpha Lock can be a real game-changer in your Procreate workflow.
The concept of Alpha Lock is similar to the mask feature in other graphic editing software. By using Alpha Lock, you can isolate certain parts of your artwork, making it easier to experiment with different effects and techniques, or even create complex layering effects.
One of the advantages of using Alpha Lock in Procreate is its non-destructive nature. It allows you to make changes to a layer while preserving the original content. This makes it easier to refine your artwork and make adjustments without worrying about accidentally affecting other parts of your composition.
Overall, Alpha Lock is a valuable tool for any artist or designer who wants to have more control over their digital artwork. It enables you to work with precision, create dynamic designs, and explore various creative possibilities in Procreate.
How to Use Alpha Lock in Procreate
If you’re an artist, illustrator, or designer using Procreate on your iPad, you may have come across a feature called Alpha Lock. Alpha Lock is a powerful tool that allows you to isolate and edit specific areas or elements of your artwork without affecting the rest. In this article, we will guide you through the steps of using Alpha Lock in Procreate to enhance your creative process and make your digital artwork shine.
To begin using Alpha Lock in Procreate, follow these simple steps:
- Open your desired artwork or create a new canvas in Procreate.
- Select the layer you want to work on. It can be an existing layer or a new one you create.
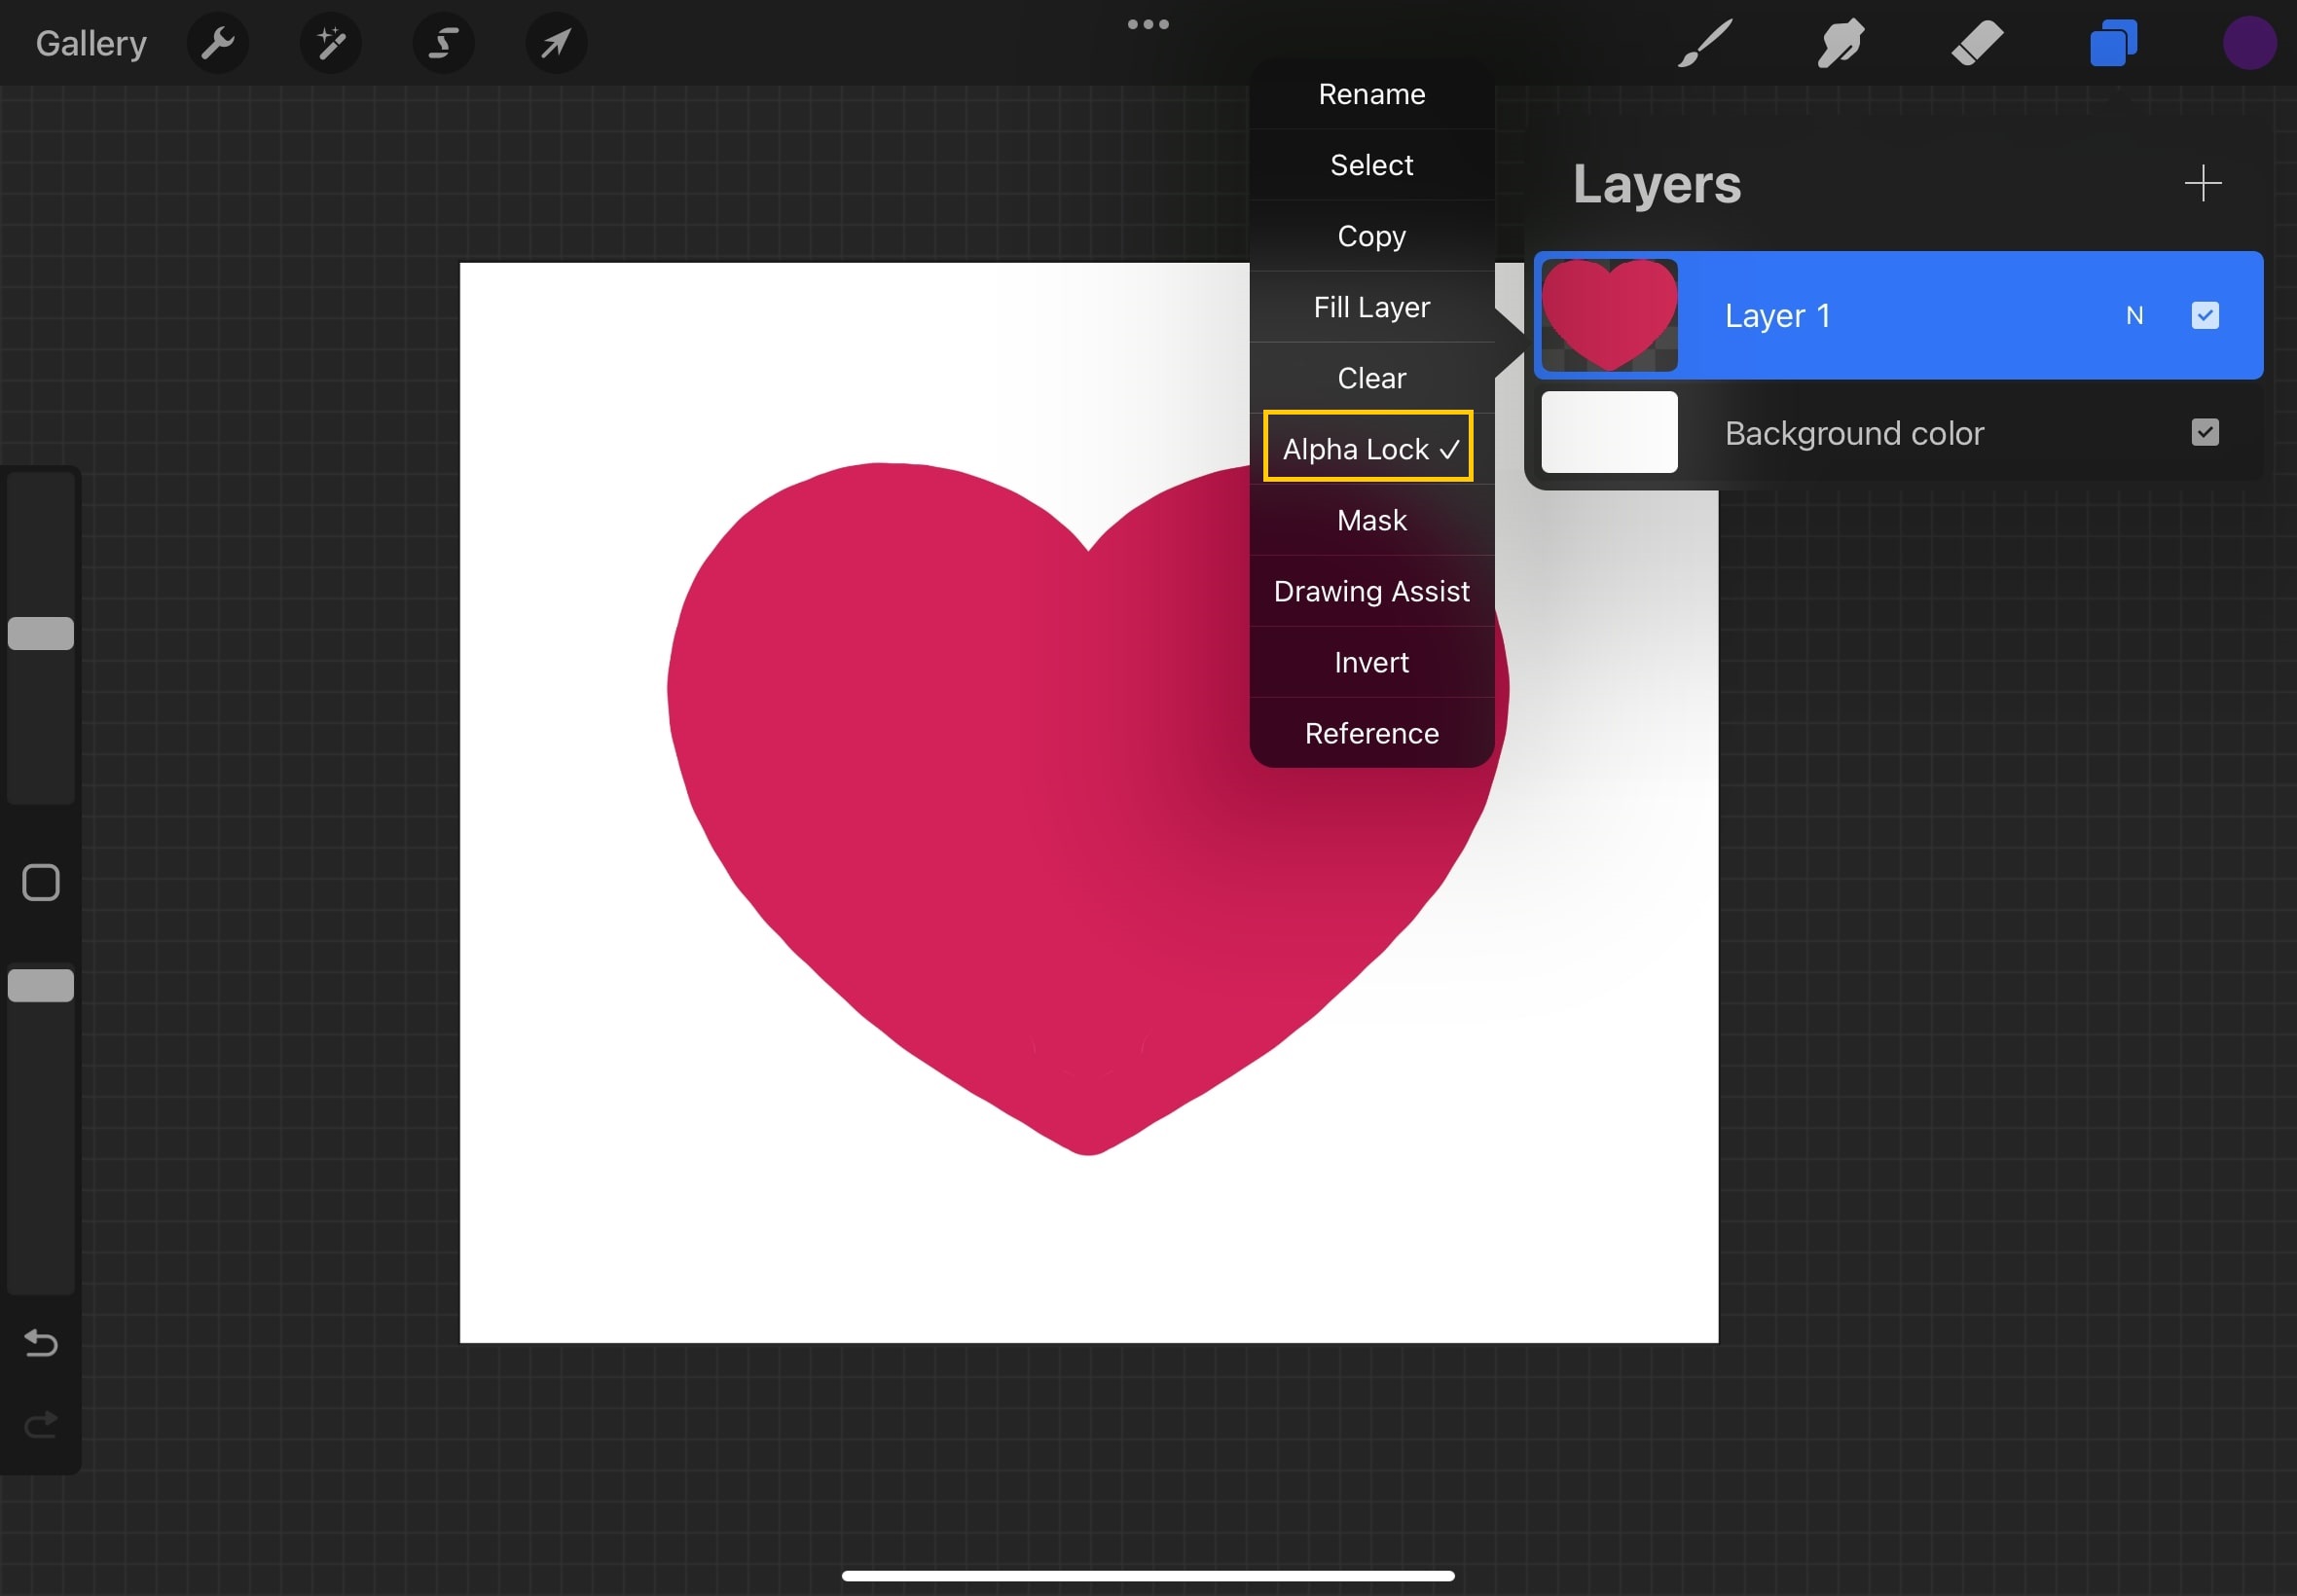
- Tap on the layer to open the layer options menu, located at the top right corner of the screen. (Note: you may need to have the layer selected or double-tap on the layer to access the menu.)
- In the layer options menu, scroll down and find the “Alpha Lock” option. It is represented by a checkerboard icon.
- Tap on the “Alpha Lock” option to activate it. Once activated, you will notice a small lock icon appearing next to the layer thumbnail.
Now that you have activated Alpha Lock, you can begin making changes to the selected layer without affecting the transparency or color of other elements in your artwork. This is particularly useful when you want to apply textures, gradients, or shading to specific areas of your artwork while maintaining precise control over them.
Here are a few tips and tricks for using Alpha Lock effectively in Procreate:
- Experiment with Brushes: With Alpha Lock activated, try using different brushes to add various textures and effects to the selected layer. You can create interesting patterns and details that seamlessly blend with the rest of your artwork.
- Blend Modes: Play around with different blend modes to further enhance the look of your artwork. By combining brushes, colors, and blend modes, you can create stunning visual effects that bring depth and dimension to your illustrations.
- Masking: Use the selection tools and masking features in Procreate to refine the areas you want to work on with Alpha Lock. This allows you to have even more precise control over the edits you make to specific parts of your artwork.
- Experiment with Layers: Alpha Lock works seamlessly with layer adjustments, such as opacity and blending modes. You can duplicate the Alpha Locked layer, apply different adjustments to each duplicate, and create stunning variations of your original artwork.
By mastering the use of Alpha Lock in Procreate, you can unlock a world of creative possibilities. Whether you’re a digital artist, illustrator, or designer, this feature will help you achieve precise and beautiful edits to your artwork. So go ahead, experiment, and let your creativity take flight with Alpha Lock in Procreate!
Tips and Tricks for Alpha Lock in Procreate
Alpha Lock is a powerful feature in Procreate that allows you to lock the transparency of a layer. This means you can apply colors and adjustments to a specific area without affecting the surrounding pixels. While it may seem simple at first, there are several tips and tricks that can help you make the most out of Alpha Lock in Procreate. Let’s explore some of them:
1. Experiment with Layer Blending Modes: When using Alpha Lock, don’t be afraid to try out different layer blending modes. This can give your artwork a unique and interesting look. For example, try using the “Multiply” blending mode to add shadows or the “Overlay” blending mode for subtle color variations.
2. Use the Alpha Lock for Detailed Coloring: Alpha Lock is particularly useful when working on intricate details in your artwork. By enabling Alpha Lock on a layer, you can color inside the lines without worrying about going over the edges. This can save you time and ensure clean and precise coloring.
3. Combine Alpha Lock with Clipping Masks: Clipping Masks allow you to apply adjustments or colors to one layer based on the transparency of another layer. Combining Alpha Lock with Clipping Masks can open up a world of creative possibilities. Use Alpha Lock on the layer you want to apply the adjustment to, and then clip it to another layer to control where the effect is visible.
4. Practice Non-Destructive Editing: When working with Alpha Lock, it’s important to practice non-destructive editing techniques. Instead of directly applying adjustments to the layer with Alpha Lock, create adjustment layers or use the Adjustment tool. This way, you can always modify or remove the adjustments without losing any of your original artwork.
5. Utilize Masks with Alpha Lock: Masks work hand in hand with Alpha Lock to refine your artwork further. Add a mask to a layer with Alpha Lock to selectively reveal or hide portions of the layer. This allows you to have precise control over which areas are affected by the colors or adjustments you apply.
6. Combine Alpha Lock with Selection Tools: The combination of Alpha Lock and the selection tools in Procreate can be a game-changer. Use the selection tools to isolate specific areas of your artwork, then enable Alpha Lock to apply colors or adjustments only within the selected area. This technique can help you achieve intricate and precise effects.
7. Experiment with Brush Opacity and Flow: Adjusting the opacity and flow settings of your brushes while using Alpha Lock can give you more control over the application of colors or adjustments. Lower opacity and flow settings can create subtle, gradual effects, while higher settings can produce bolder and more pronounced changes.
8. Take Advantage of Alpha Lock on Multiple Layers: Did you know that you can enable Alpha Lock on multiple layers at once? This can be incredibly useful when you want to apply colors or adjustments to multiple layers simultaneously without affecting the surrounding layers. Simply select the layers you want to enable Alpha Lock on and toggle it on.
9. Explore Alpha Lock with Gradient and Fill Tools: Alpha Lock doesn’t have to be limited to brushes. Try using the Gradient and Fill tools while Alpha Lock is enabled to quickly apply colors or gradients to a specific area. Experiment with different gradients and opacities to achieve stunning results.
10. Remember to Save Versions of Your Artwork: As with any digital artwork, it’s always a good idea to save different versions of your work as you progress. This way, if you’re not satisfied with the changes you made using Alpha Lock, you can easily revert back to a previous version and start again without losing your original artwork.
By incorporating these tips and tricks into your Procreate workflow, you can unlock the full potential of Alpha Lock and create stunning artwork with precise colors and adjustments. So go ahead, unleash your creativity, and have fun experimenting with Alpha Lock in Procreate!
Conclusion
In conclusion, learning how to alpha lock in Procreate can greatly enhance your digital artwork by allowing you to easily work on specific areas without affecting the rest of the image. Alpha locking is a powerful tool that gives you greater control over your layers and allows for precise editing and blending.
By using the alpha lock feature, you can create stunning gradients, add intricate details, and achieve seamless textures in your artwork. Whether you are an experienced artist or just starting out, mastering this technique will undoubtedly elevate your digital artistry to the next level.
So, don’t hesitate to explore and experiment with alpha locking in Procreate. It opens up a whole new world of creative possibilities and helps you bring your artistic vision to life. Start unlocking the potential of alpha lock today and watch your digital artwork flourish!
FAQs
1. What is alpha lock in Procreate?
Alpha lock in Procreate is a feature that allows you to lock the transparency of a specific layer. When alpha lock is enabled, you can only paint within the existing content on that layer, without affecting the transparent areas. It is a useful tool for creating precise edits and adding details to your artwork without accidentally modifying other parts of the image.
2. How do I enable alpha lock in Procreate?
To enable alpha lock in Procreate, you need to first select the layer you want to apply alpha lock to. Then, swipe right on the layer in the Layers panel to open its options. Tap on the “Alpha Lock” button, which looks like a checkerboard pattern. Once enabled, the layer will be alpha locked, and you can start painting or modifying the content without affecting the transparency.
3. Can I use alpha lock on multiple layers simultaneously?
Yes, you can use alpha lock on multiple layers simultaneously in Procreate. To do this, simply select the desired layers by tapping on them in the Layers panel while holding down the Shift key. Once the layers are selected, enable alpha lock as mentioned in the previous question, and you will be able to paint or make adjustments without affecting the transparency of the selected layers.
4. How do I disable alpha lock in Procreate?
To disable alpha lock in Procreate, select the layer that has alpha lock enabled. Swipe right on the layer in the Layers panel to open its options, and tap on the “Alpha Lock” button, which will be highlighted with a checkmark when enabled. Tapping on it again will disable alpha lock, and you will be able to paint freely on the layer, affecting both the existing content and the transparency.
5. Are there any limitations or considerations when using alpha lock in Procreate?
While alpha lock in Procreate is a powerful feature, there are a few things to keep in mind. Firstly, alpha lock works best on layers that contain pixel-based content, such as paint or brush strokes. It may not have any effect on layers with vector-based or text elements. Additionally, it’s important to note that alpha lock is specific to each layer. If you merge alpha locked layers or apply any transformations, the alpha lock will be lost.