
Procreate is a powerful and versatile digital art application that has gained immense popularity among artists and creators. With its wide array of features and tools, Procreate allows users to bring their artistic visions to life on their electronic devices, offering a convenient and portable platform for artistic expression.
One of the many features that Procreate offers is the ability to control the opacity of brushes, which allows artists to create stunning and dynamic effects in their artwork. Whether you’re looking to create soft and subtle transitions or bold and dramatic strokes, adjusting the opacity of your brushes can greatly enhance the depth and realism of your digital artwork.
In this article, we will explore different methods to turn down the opacity on Procreate and discuss how this technique can elevate your artistic creations to new heights. From adjusting individual brush settings to employing layer blending modes, we will cover everything you need to know to master the art of opacity control in Procreate.
Inside This Article
- Method 1: Adjusting Opacity using the Opacity slider
- Method 2: Using the Layer Opacity option
- Method 3: Utilizing the Brush Opacity feature
- Conclusion
- FAQs
Method 1: Adjusting Opacity using the Opacity slider
In Procreate, adjusting the opacity of your artwork can add depth and subtle variations to your creations. The Opacity slider is a powerful tool that allows you to control the transparency of your brush strokes or layers, giving you more control over the overall look of your artwork.
To adjust the opacity using the Opacity slider in Procreate, follow these simple steps:
- Open your Procreate project and select the brush you want to use.
- Tap the ‘Brush’ icon located on the top menu to open the Brush Studio.
- In the Brush Studio window, scroll down and find the ‘Opacity’ option.
- Slide the Opacity slider to the left or right to decrease or increase the opacity, respectively.
- Begin painting on your canvas and observe how the opacity of your brush strokes change as you apply them.
By adjusting the opacity using the Opacity slider, you can gradually build up layers of transparency or create solid areas of color. This technique is especially useful when working on illustrations, digital paintings, or any project that requires controlling the opacity of different elements.
Experimenting with different opacity values can help you achieve various effects. Lower opacity values can create a more subtle, transparent look, while higher opacity values yield bolder and more opaque brush strokes.
Remember to save your work regularly to ensure you don’t lose any progress. Procreate allows you to easily save your projects and export them in various file formats to share or print later.
Now that you know how to adjust opacity using the Opacity slider in Procreate, you can explore the endless possibilities of creating stunning artwork with varying levels of transparency.
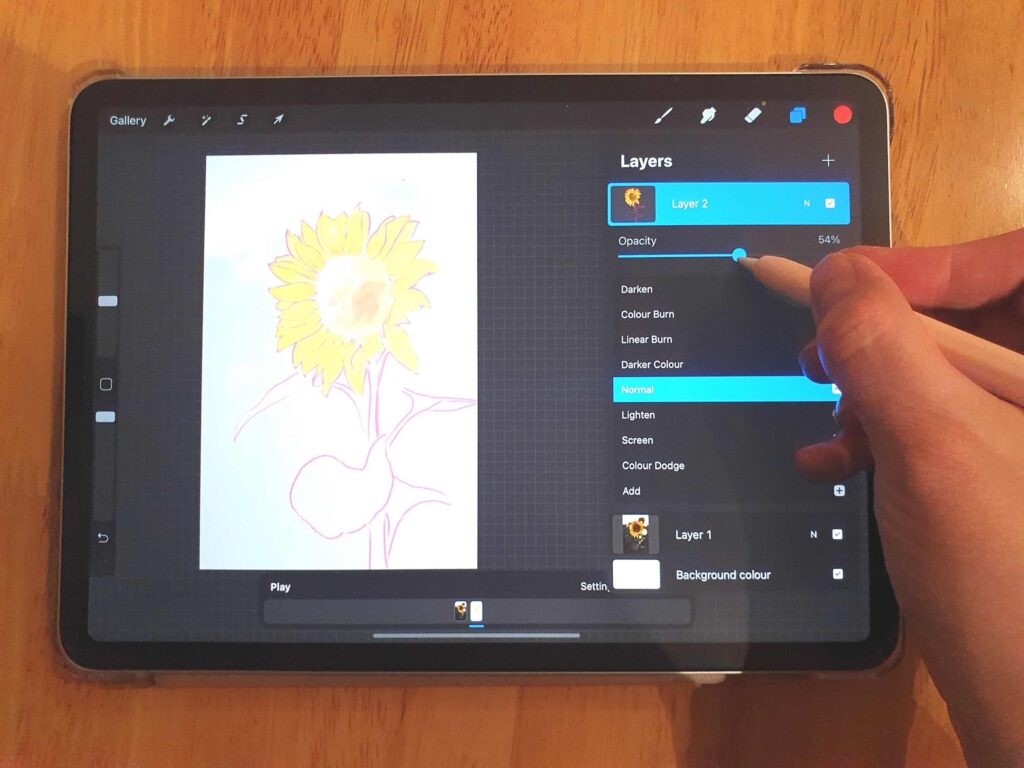
Method 2: Using the Layer Opacity option
If you’re using Procreate on your iPad or iPhone and want to adjust the opacity of a layer, you can use the Layer Opacity option. This feature allows you to control the transparency of your artwork, giving you more flexibility and control over your designs.
Here’s how you can use the Layer Opacity option in Procreate:
- Open the Procreate app and select the artwork that contains the layer you want to adjust.
- Tap on the layer you wish to modify to bring up the layer settings menu.
- In the layer settings menu, you’ll find the Opacity slider. This slider allows you to adjust the transparency of the selected layer.
- Drag the slider to the left to decrease the opacity, making the layer more transparent. Dragging it to the right will increase the opacity, making the layer less transparent.
- As you adjust the Opacity slider, you’ll immediately see the changes reflected in your artwork.
- Keep experimenting with different opacity levels until you achieve the desired effect. This feature provides a great way to add subtle or dramatic variations to your artwork.
By using the Layer Opacity option, you have the power to control how transparent or opaque your layers appear in Procreate. This functionality is especially useful when creating layered illustrations, blending colors, or adding shadows and highlights. It allows you to fine-tune and refine the overall look and feel of your artwork with ease.
Method 3: Utilizing the Brush Opacity feature
When you are working on a digital artwork in Procreate, sometimes you may want to adjust the opacity of your brush to create different effects or achieve the desired level of transparency. Procreate provides a convenient Brush Opacity feature that allows you to easily control the opacity of your brush strokes. Let’s explore how you can utilize this feature to turn down the opacity on Procreate.
To begin, you need to select the brush you want to work with. Once you have your brush selected, look for the Brush Opacity option in the brush settings. This option allows you to adjust the opacity of your brush strokes. You can either increase or decrease the opacity value using the slider.
To turn down the opacity, simply drag the opacity slider towards the left to decrease the opacity value. This will make your brush strokes more transparent, enabling you to create subtle and translucent effects in your artwork.
It’s important to note that the brush opacity setting is independent of the layer opacity. So even if the opacity of your brush strokes is low, the overall opacity of the layer will remain the same unless you adjust the layer opacity separately.
By utilizing the brush opacity feature, you have the flexibility to experiment with different levels of transparency in your artwork. Whether you want to create a soft and ethereal look or add depth and dimension to your illustrations, adjusting the brush opacity gives you the control to achieve your desired effect.
Additionally, Procreate allows you to enable pressure sensitivity for the brush opacity. This means that the opacity of your brush strokes can be influenced by the amount of pressure you apply on your stylus pen. By varying the pressure, you can create dynamic and nuanced opacity variations in your artwork.
Remember, the brush opacity feature in Procreate is just one of the many powerful tools that the software offers. Explore and experiment with different settings to unlock the full potential of your digital artwork.
Now that you know how to utilize the brush opacity feature in Procreate, you can confidently turn down the opacity on your brush strokes and bring new levels of depth and creativity to your artwork.
Conclusion
In conclusion, adjusting the opacity in Procreate can greatly enhance your digital artwork by allowing you to create realistic and nuanced effects. By following the step-by-step guide outlined in this article, you can easily turn down the opacity of your brush strokes or layers, enabling you to achieve the desired level of transparency in your artwork.
Remember, opacity adjustments can be a powerful tool in your creative arsenal, giving you greater control and flexibility when it comes to layering different elements in your artwork. Don’t be afraid to experiment and explore different opacity settings to bring depth and dimension to your digital creations.
Whether you’re a professional artist, a hobbyist, or just starting out on your digital art journey, understanding how to adjust opacity in Procreate will unlock a whole new world of creative possibilities. So go ahead, grab your iPad, open up Procreate, and start playing around with opacity settings to take your artwork to the next level!
FAQs
**Q: What is Procreate and why would I want to turn down opacity?**
A: Procreate is a popular digital art application designed for iPad. It allows artists to create stunning illustrations, paintings, and designs. Opacity refers to the transparency of a layer or brush stroke. Adjusting opacity can help artists achieve different artistic effects, create smooth blends, or subtly integrate layers into their artwork.
**Q: How can I turn down opacity in Procreate?**
A: To adjust the opacity of a layer or brush stroke in Procreate, first, select the layer or specific stroke you want to modify. Then, go to the Brush Library or Layers panel and locate the Opacity slider. Move the slider to the left to decrease opacity or to the right to increase it. Experiment with different levels to achieve the desired effect.
**Q: Can I adjust the opacity of multiple layers at once in Procreate?**
A: Yes, Procreate offers a convenient feature called “Alpha Lock” that allows you to adjust the opacity of multiple layers together. To do this, tap and hold on the desired layer until the contextual menu appears. Then, select “Alpha Lock” from the options. Now, any changes you make to the opacity of one layer will also be applied to the others that have Alpha Lock enabled.
**Q: Are there other ways to adjust opacity in Procreate?**
A: Yes, besides using the Opacity slider, there are a few alternative methods for controlling opacity in Procreate. One option is to use the Brush Opacity setting, which allows you to adjust the transparency of the brush itself. Additionally, Procreate offers Blend Modes that can affect the overall opacity and blending of multiple layers. Experimenting with different brush settings and blend modes can lead to unique and exciting results.
**Q: Can I animate the opacity in Procreate?**
A: Yes, Procreate’s Animation Assist feature allows you to create animations, including changes in opacity. With Animation Assist enabled, you can set keyframes for different frames of your animation and adjust the opacity at each keyframe. This enables you to create captivating and dynamic visual effects by smoothly transitioning between varying levels of transparency.