
Welcome to our comprehensive guide on how to load a ringtone to a Motorola Moto G smartphone. The Motorola Moto G is a popular and reliable smartphone that offers an array of features, including the ability to customize your ringtone. Whether you want to set your favorite song as your ringtone or choose from a selection of pre-installed tones, this article will walk you through the step-by-step process. With our easy-to-follow instructions, you’ll be able to personalize your Moto G with a unique ringtone that suits your style and preferences. Say goodbye to generic ringtones and let your individuality shine through. Let’s get started on creating the perfect sound for your Motorola Moto G!
Inside This Article
- Methods to Load Ringtones on Motorola Moto G
- Using the Default Settings
- Using Third-Party Apps
- Transferring Ringtones from a Computer
- Tips for Troubleshooting
- Conclusion
- FAQs
Methods to Load Ringtones on Motorola Moto G
If you’re looking to personalize your Motorola Moto G by adding custom ringtones, you’re in luck! There are several methods you can use to load ringtones onto your device. Whether you prefer to use the default settings, install third-party apps, or transfer ringtones from a computer, we’ve got you covered. Let’s explore each method in detail.
Using the Default Settings
The easiest way to load ringtones on your Motorola Moto G is by using the default settings. Follow these simple steps:
- Open the “Settings” app on your Moto G.
- Select the “Sound” or “Sound & notification” option.
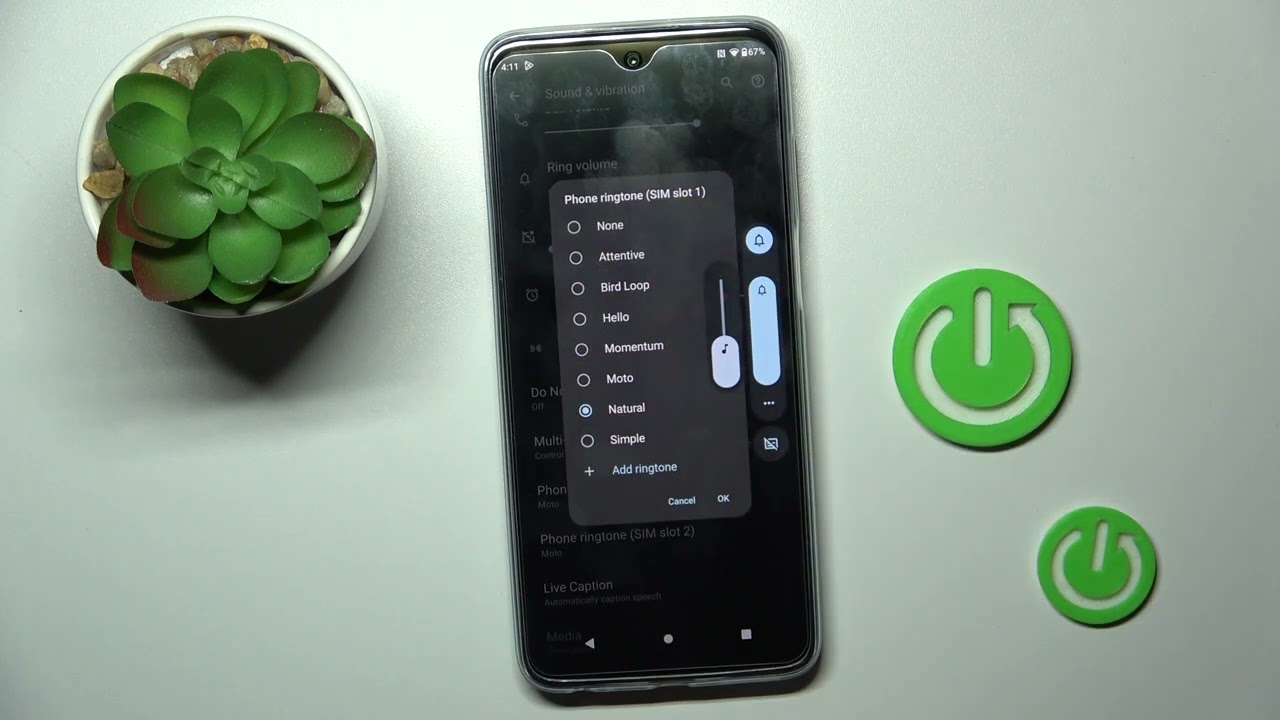
- Tap on “Phone ringtone” to change the default ringtone.
- You’ll be presented with a list of pre-installed ringtones. Choose the one you like.
- If you want to use a custom ringtone, scroll down and select “Add ringtone” to browse your device’s storage for audio files. Once you’ve found your desired ringtone, tap on it to select it.
- Click “OK” or “Save” to apply the changes.
That’s it! You’ve successfully loaded a new ringtone using the default settings on your Moto G.
Using Third-Party Apps
If you’re looking for more customization options and a wider variety of ringtones, you can rely on third-party apps. Here are a few popular ones:
- Zedge: Zedge offers a vast collection of free ringtones, wallpapers, and notification sounds. Simply download the app from the Google Play Store, browse through the available ringtones, and select the ones you want to use.
- Ringtone Maker: This app allows you to create your own custom ringtones from music files stored on your Moto G. You can trim the desired portion of the song and save it as a ringtone.
- Myxer: Myxer provides a range of free ringtones and wallpapers. You can search for specific ringtones or explore various categories to find the perfect one for your Moto G.
Once you’ve installed the desired app from the Google Play Store, launch it, browse through the available ringtones, and select the one you want. The app will guide you on how to set the selected ringtone as your default or assign it to specific contacts.
Transferring Ringtones from a Computer
If you have custom ringtones saved on your computer that you’d like to use on your Moto G, you can transfer them using a USB cable. Here’s how:
- Connect your Moto G to your computer using a USB cable.
- On your Moto G, swipe down from the top of the screen to access the notifications panel and select “File Transfer” or “Transfer files.
- Your computer will recognize your Moto G as an external storage device.
- Open the folder on your computer where the ringtones are saved.
- Copy and paste the desired ringtones into the “Ringtones” folder on your Moto G.
- Once the transfer is complete, disconnect your Moto G from the computer.
- On your Moto G, go to the “Settings” app, select the “Sound” or “Sound & notification” option, tap on “Phone ringtone,” and choose the transferred ringtone from the list.
Your custom ringtone is now set on your Motorola Moto G!
Tips for Troubleshooting
If you encounter issues while loading ringtones on your Moto G, here are a few troubleshooting tips:
- Make sure the audio file format is compatible with your device. MP3 is the most commonly supported format.
- Check the location of the audio file. If it’s stored in a different folder, move it to the “Ringtones” folder for easy access.
- Restart your Moto G. Sometimes, a simple restart can resolve any temporary glitches.
- If you’re using a third-party app, make sure it is up-to-date. Update the app to the latest version to avoid any compatibility issues.
By following these methods and troubleshooting tips, you can easily load ringtones onto your Motorola Moto G and personalize your device with a unique sound. Enjoy the freedom to choose the perfect ringtone that reflects your style and personality!
Using the Default Settings
When it comes to loading ringtones on your Motorola Moto G, one of the easiest methods is by using the default settings available on the device. Follow these simple steps to personalize your phone’s ringtone:
- Start by unlocking your Moto G’s screen and navigating to the home screen.
- Locate and tap on the “Settings” app. This will open the device’s settings menu.
- Scroll down the settings menu and find the “Sound” or “Sound & vibration” option and tap on it.
- Within the sound settings, look for the “Phone ringtone” or “Default ringtone” option and tap on it.
- You will be presented with a list of pre-installed ringtones that are available on your Moto G. Browse through the options to find the one that suits your preference.
- Once you have chosen a ringtone, tap on it to select it as your default ringtone.
That’s it! Your Motorola Moto G will now use the selected ringtone for incoming calls. It’s a simple and quick way to personalize your phone and make it stand out from the crowd.
Using Third-Party Apps
If you want to customize your ringtone options on your Motorola Moto G, one of the easiest ways to do so is by using third-party apps. These apps provide a wide range of ringtones to choose from, including popular songs, sound effects, and even custom creations. Here’s how you can use third-party apps to load ringtones on your Moto G.
1. Download a reputable ringtone app: Start by browsing through the Google Play Store and identify a reputable app that offers a wide selection of ringtones. Some popular options include Zedge, Audiko, and Ringtone Maker.
2. Install and open the app: Once you have chosen an app, install it on your Moto G and open it. You will be greeted with a user-friendly interface that allows you to browse and search for specific ringtones.
3. Browse or search for your desired ringtone: Use the app’s search function or browse through categories to find the perfect ringtone for your Moto G. You can select from a variety of genres, artists, or even upload your own audio files.
4. Preview and select your chosen ringtone: Most ringtone apps allow you to preview the ringtone before downloading it. This is helpful to ensure that the ringtone suits your preferences. Once you have found the ideal ringtone, select it and proceed to the next step.
5. Download and apply the ringtone: After selecting your desired ringtone, the app will give you the option to download or apply it directly. Choose the “Download” or “Apply” option, and the ringtone will be saved to your Moto G’s ringtone library.
6. Set the ringtone as your default or assign it to specific contacts: Once the ringtone is downloaded, you can set it as your default ringtone for all incoming calls or assign it to specific contacts. Simply go to your Moto G’s sound settings and choose the appropriate option.
Using third-party apps is a convenient way to personalize your ringtone selection on your Motorola Moto G. With an extensive range of options available, you can easily find a ringtone that matches your style and preferences. Remember to choose reputable apps from trusted sources to ensure the quality and safety of the ringtones you download.
Transferring Ringtones from a Computer
Transferring ringtones from a computer to your Motorola Moto G is a convenient way to personalize your device and add a touch of personality to your incoming calls. Here is a step-by-step guide on how to transfer your favorite ringtones from your computer to your Motorola Moto G:
1. Connect your Motorola Moto G to your computer using a USB cable. Make sure that your phone is unlocked and the USB connection mode is set to “File Transfer” or “MTP” mode.
2. On your computer, open the file explorer or finder and navigate to the location where your ringtone files are stored. These can be in various file formats such as MP3, WAV, or OGG.
3. Select the ringtone files you want to transfer to your Motorola Moto G by either clicking and dragging them to a different folder or copying and pasting them.
4. Once you have selected the ringtone files, go to the destination folder on your Motorola Moto G where you want to store the ringtones. This can be the default ringtone folder or a custom folder you have created.
5. Paste the ringtone files into the selected folder on your Motorola Moto G. The files will start transferring from your computer to your phone.
6. Once the transfer is complete, disconnect your Motorola Moto G from your computer by safely ejecting the USB connection. This will ensure that no data is lost or corrupted during the disconnection process.
7. Now, on your Motorola Moto G, go to the “Settings” menu and select “Sound & vibration” or “Sound” depending on your device’s settings menu structure.
8. From the sound settings menu, tap on “Ringtone” or “Phone ringtone” to access the list of available ringtones on your device.
9. Scroll through the list of ringtones and select the newly transferred ringtones that you want to use. You can preview each ringtone by tapping on it. Once you have found your desired ringtone, tap on it to set it as your default ringtone.
10. Congratulations! You have successfully transferred and set your desired ringtone on your Motorola Moto G. Now you can enjoy personalized ringtones on your device.
Remember, you can go back to these settings at any time to change or update your ringtones and customize your Motorola Moto G to suit your preferences.
Tips for Troubleshooting
When it comes to loading ringtones on your Motorola Moto G, you may encounter some issues along the way. Don’t worry, as we have some helpful tips for troubleshooting common problems:
1. Check the file format: Make sure the ringtone you are trying to load is in a compatible format. The Moto G typically supports MP3, AAC, and WAV file formats. If your ringtone is in a different format, you may need to convert it using a file conversion tool.
2. Verify the file size: If you are unable to load a particular ringtone, it could be due to its large file size. The Moto G has a limit on the file size for ringtones, so it’s essential to check if your ringtone meets the requirements. You can try compressing the file or selecting a shorter clip from the song to reduce its size.
3. Clear cache and data: If you have been experiencing issues in loading ringtones, it could be due to cache or data buildup in the default ringtone settings. Clearing the cache and data for the ringtone app can help resolve this problem. Go to the Settings, navigate to the Apps section, find the ringtone app, and clear its cache and data.
4. Ensure proper file location: When transferring ringtones from a computer or downloading them from third-party apps, make sure you are placing the files in the appropriate folder. The Moto G usually has a designated folder for storing ringtones. Double-check if the files are in the right location to ensure they are recognized by the device.
5. Restart your device: Sometimes a simple restart can help resolve any temporary glitches or conflicts that may be hindering the loading of ringtones. Restart your Moto G and try loading the ringtone again after the device boots up. This can often clear out any minor issues and allow you to load the desired ringtone successfully.
6. Update your software: If you are facing persistent issues with loading ringtones, make sure that your Moto G is running the latest software version. Software updates often come with bug fixes and improvements, which may address the problems you are experiencing. Check for any available updates and install them if necessary.
7. Contact customer support: If all else fails, and you are still unable to load ringtones on your Moto G, it may be time to seek assistance from customer support. Motorola’s customer support team can provide you with further guidance and troubleshooting steps specific to your device model.
By following these troubleshooting tips, you should be able to overcome any obstacles and successfully load ringtones on your Motorola Moto G. Enjoy personalizing your device with your favorite tunes!
Conclusion
In conclusion, loading a ringtone to your Motorola Moto G is a simple process that allows you to customize your phone and add a personal touch to your device. Whether you prefer to use pre-existing ringtones or create your own, the Moto G provides a user-friendly interface that makes it easy to set and change your ringtone.
By following the step-by-step instructions outlined in this article, you can quickly and effortlessly load a ringtone to your Moto G. Remember to choose a file format that is compatible with your device and ensure that the ringtone file is saved in the correct folder for easy access.
With the ability to customize your ringtone, you can personalize your Moto G and make it truly your own. So go ahead, select your favorite tune and start enjoying the sound of your choice every time your cellphone rings!
FAQs
1. How do I load a ringtone to my Motorola Moto G?
To load a ringtone to your Motorola Moto G, follow these steps:
- Connect your Moto G to your computer using a USB cable.
- On your computer, navigate to the internal storage or SD card of your Moto G.
- Create a new folder called “Ringtones” if it doesn’t already exist.
- Find the ringtone file you wish to load. Ensure that it is in a compatible format such as MP3 or WAV.
- Copy and paste the ringtone file into the “Ringtones” folder on your Moto G.
- Disconnect your Moto G from the computer.
- Open the Settings app on your Moto G.
- Select “Sound” or “Sounds & Vibration”.
- Select “Phone ringtone” or “Ringtone”.
- Choose the ringtone you just loaded from the list of available options.
Your new ringtone is now set on your Motorola Moto G.
2. Can I set a custom ringtone for different contacts on my Moto G?
Yes, you can set a custom ringtone for different contacts on your Motorola Moto G. Here’s how:
- Open the Contacts app on your Moto G.
- Select the contact you want to set a custom ringtone for.
- Tap on the “Edit” or “Modify” option.
- Scroll down to find the “Ringtone” section.
- Select “Default” if you want to use the phone’s default ringtone or choose “Add ringtone” to use a custom one.
- If you choose “Add ringtone”, follow the steps mentioned in the previous FAQ to load a custom ringtone to your Moto G.
- Select the desired ringtone for the contact.
- Save the changes.
Now, whenever that specific contact calls you, the chosen custom ringtone will play.
3. What file formats are compatible with the Moto G for ringtones?
The Motorola Moto G supports various audio file formats for ringtones, including MP3 and WAV. It is recommended to use these formats to ensure compatibility and optimal playback quality. If you have a ringtone in a different format, you can convert it to MP3 or WAV using audio conversion software or online tools.
4. Can I download ringtones directly to my Moto G?
Yes, you can download ringtones directly to your Motorola Moto G. There are several ways to do this:
- Visit online platforms that offer free or paid ringtones and download them directly to your phone.
- Use a ringtone app from the Google Play Store to search and download ringtones.
- Transfer ringtones from another device, such as a computer, using a USB cable or Bluetooth.
After downloading or transferring the ringtone file to your Moto G, you can follow the steps mentioned in the first FAQ to load and set the desired ringtone.
5. How do I delete a custom ringtone from my Moto G?
To delete a custom ringtone from your Motorola Moto G, proceed as follows:
- Open the Settings app on your Moto G.
- Select “Sound” or “Sounds & Vibration”.
- Select “Phone ringtone” or “Ringtone”.
- From the list of available options, choose the ringtone you want to delete.
- Tap on the “Remove” or “Delete” option next to the selected ringtone.
- Confirm the deletion if prompted.
The custom ringtone will be removed from your Moto G, and the phone’s default ringtone will be set in its place.