The internet is a hot pot for a lot of data available to everyone with a few taps. This is particularly concerning for many parents who allow their kids to get their hands on a mobile phone or tablet for their past time. It is because of this concern that Apple has come up with a solution — parental control on iPhone or iPad. While parents can opt to download third-party apps to set parental controls on their kids’ iPhones or iPads, Apple is a step ahead by building features within its own settings.
If you are looking at how you can put parent controls on kids’ iPhones and iPads, we just have the right thing for you! At the end of this article, we can only hope we have given you new information to make the internet a safe place for your family.
Related: How to Create an Apple ID for Kids [Step-by-Step Guide]
Inside This Article
Parent Controls on iPhone or iPad

Keeping your kids safe while surfing the internet should be of utmost importance. Having access to either iPhones or iPads at home does have its own sets of pros and cons. This is why parents shouldn’t ignore how kids access the internet and what they can access.
The following sections will underline the different ways parents can access the following:
- How to Setup Parental Control on iPhone or iPad
- How to Block Websites on iPhone or iPad
- Free Parental Control App for iPhone or iPad
How to Enable Parental Control on iPhone – with Screen Time
Screen Time iPhone or iPad has become a useful feature and a tool for parents to limit what their kids can access. It is a built-in feature within the latest iOS versions that has a number of settings parents access to assert parental control on their kids’ Apple devices. The Content & Privacy Restrictions in Screen Time is powerful enough to block or limit app access, explicit internet websites and content, and what kids can download from the App Store.
A. Setting Content Restrictions Using Screen Time
To start using Screen Time to assert parent controls on an iPhone or iPad, here’s what you need to do:
- Launch the Settings app then tap on Screen Time.
- On the welcome screen, tap on Continue. Then select This is My Child’s iPhone.
- Follow the prompts on your screen until you reach the part wherein you need to set up a passcode. Re-enter the passcode to confirm it.
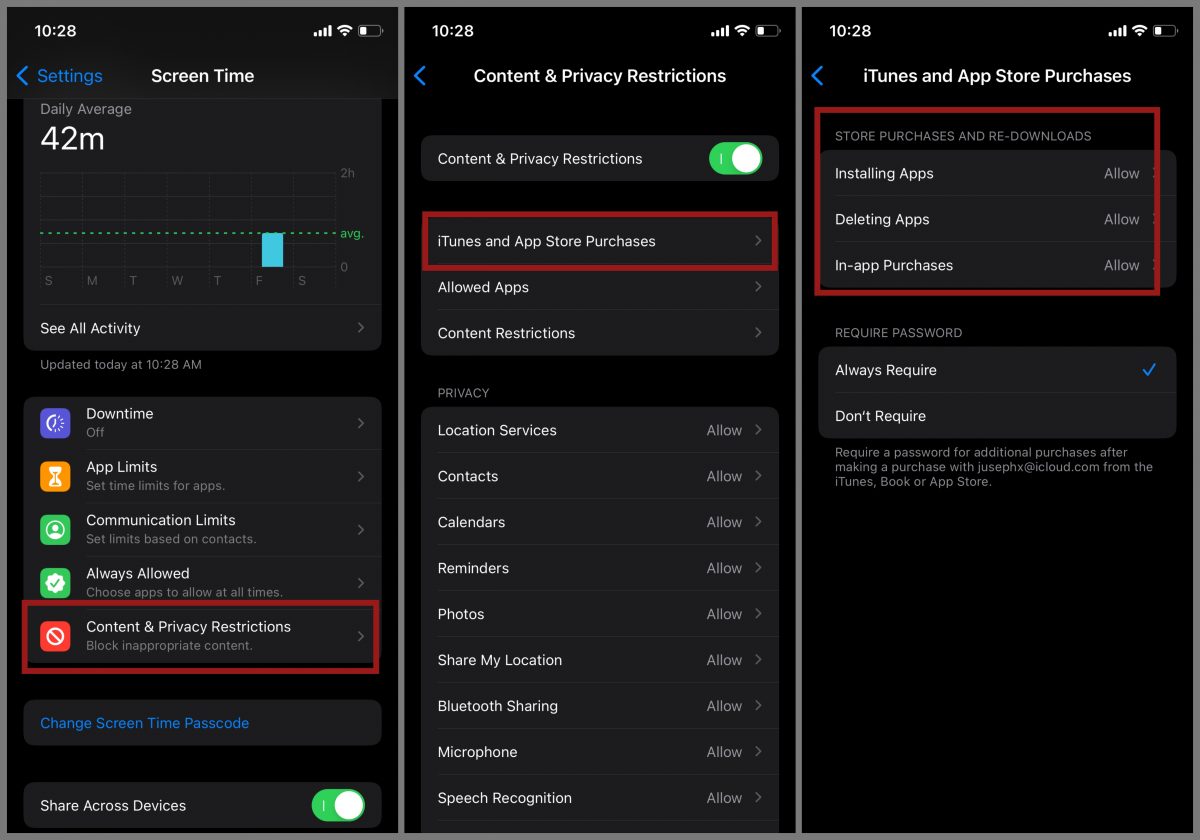
- Next, tap Content & Privacy Restrictions. If asked, enter your passcode, then turn on Content & Privacy.
Make sure to choose a passcode that is unique but easy to remember. The passcode can also be changed or turned off for whatever reason you deem fit.
B. Setting Downtime via Screen Time
Downtime is a scheduler within Screen Time that allows parents to set a time period for kids to stay away from their screens. However, kids can still access “allowed apps” when Downtime is on. Here’s how to set up Downtime:
- Launch Settings then tap Screen Time.
- Tap on Downtime.
- You can choose to turn Downtime on (a) every day or (b) on selected days. If you choose every day, tap From to select the time on a day when Downtime will start and when it will end.
However, if you choose to customize when Downtime will activate, you can set it manually by setting Downtimes at different times for each day of the week.
We have a comprehensive guide on how to use Screen Time including its many subfeatures to assert parental control on your kids’ iPhones and iPads. Go check out How to Check and Limit Screen Time on iPhone or iPad.
How to Limit Web Searches and Allowed Websites
It is easy to access explicit and adult content on Safari (or other web browsers) today; you simply need an active internet connection and a device that can launch a browser then off you go. While kids really don’t bother galivanting on web browsers because they have apps to keep them from doing so, kids are naturally curious. The solution? Limit what can be accessed on Safari. Here’s how to do it:
- Launch Settings then go to Screen Time.
- Tap on Content & Privacy Restrictions then select Content Restrictions.
- When prompted, enter your passcode.
- Next, tap on Web Content. Here you can choose to Limit Adult Websites or choose Allowed Websites Only.
Apple has preselected kid-friendly websites and compiled them on a list if you choose Allowed Websites Only. However, you can opt to add more websites that are not on the list. Now, go back to the previous page to set up the next restrictions.
- Under Siri section, tap Web Search Content then select Don’t Allow.
- Go back to the previous page then tap Explicit Language.
- Again, select Don’t Allow.
These settings will ensure that Siri wouldn’t be used as a way to bypass the restrictions put in place via Screen Time.
Prevent In-app and iTunes Purchases

It’s not just on the web where kids can access content with violent themes. Mobile games and songs can be categorized for kids but sometimes they have themes that border on violent undertones. Of course, we don’t want kids consuming those content. Hence, to put parent controls on iTunes and App Store purchases, here’s what you need to do:
- Launch Settings then go to Screen Time.
- Tap on Content & Privacy Restrictions then select iTunes and App Store Purchases.
- Under Store Purchases and Re-Downloads, make sure to set (a) Installing Apps, (b) Deleting Apps, and (c) In-app Purchases to Don’t Allow.
- Additionally, make sure to set Require Password to Always Require.
This is an effective way to ensure that you, as the parent, are the sole person who can make downloads and purchases; a way to control what your kid can and can’t access.
Restrict Game Center
Game Center is Apple’s gaming social network and it has a number of features that a user can use. Considering this is a place where players can get in touch with one another, this can also foster a hostile environment for kids aged below 10. With that, parents would definitely want to restrict access to Game Center.
- Go to Settings and tap Screen Time.
- Tap Content & Privacy Restrictions, then tap Content Restrictions.
- Scroll down to Game Center, then choose your settings.
According to Apple, you can restrict these Game Center features:
- Multiplayer Games: Prevent the ability to play multiplayer games with everyone, allow with friends only, or allow with anyone
- Adding Friends: Prevent the ability to add friends to Game Center
- Connect with Friends: Prevent the ability to share a Game Center friend list with third-party games
- Screen Recording: Prevent the ability to capture the screen and sound
- Nearby Multiplayer: Prevent the ability to enable the nearby setting
- Private Messaging: Prevent the ability to voice chat or send or receive custom messages with game and friend invitations
- Profile Privacy Changes: Prevent the ability to change profile privacy settings
- Avatar & Nickname Changes: Prevent the ability to change Game Center avatars and nicknames
Setting Restrictions on Built-in Apps
Restricting access to built-in apps will result in an inability to use the app and its features; you wouldn’t be able to see the app icon on your home screen as well. It’s an effective way to hide these apps from plain sight giving the impression you have deleted them.
To change your Allowed Apps, follow these steps:
- Go to Settings and tap Screen Time.
- Tap Content & Privacy Restrictions then key in your Screen Time passcode when prompted.
- Tap Allowed Apps.
- Select the apps that you want to allow.
