
Are you looking to leave iTunes Family Sharing but don’t know where to start? In this article, we’ll guide you through the process step-by-step, ensuring a smooth transition. iTunes Family Sharing is a convenient feature that allows up to six family members to share purchases, subscriptions, and even their own Apple Music libraries. However, there may come a time when you no longer wish to be a part of the Family Sharing group. Whether it’s due to personal reasons or a change in your digital content needs, we’ve got you covered. We’ll walk you through the necessary steps to exit iTunes Family Sharing, ensuring that your personal data and purchases stay secure and that you can regain full control of your digital content. So, if you’re ready to say goodbye to Family Sharing, let’s get started!
Inside This Article
- Removing Members from iTunes Family Sharing
- Merging Your Apple ID with Another Family
- Disbanding iTunes Family Sharing
- Frequently Asked Questions (FAQs)
- Conclusion
- FAQs
Removing Members from iTunes Family Sharing
iTunes Family Sharing is a great feature that allows family members to share purchases, subscriptions, and iCloud storage. However, there may come a time when you need to remove a member from your iTunes Family Sharing group. Whether it’s due to a change in family dynamics or simply because someone wants to manage their own purchases, the process is fairly straightforward. In this guide, we’ll walk you through the steps to remove a member from iTunes Family Sharing.
Before we proceed, it’s essential to note that only the Family Organizer has the ability to remove members from the iTunes Family Sharing group. If you’re not the organizer, you’ll need to contact them and ask them to remove you.
- Launch the “Settings” app on your iOS device.
- Scroll down and tap on your name at the top of the screen.
- Tap “Family Sharing” from the list of options.
- Select “Your Name’s Family” under the “Family” section.
- Tap on the member you want to remove from the group.
- Scroll down and select “Remove” at the bottom of the member’s details.
- Confirm your selection by tapping “Remove” again in the pop-up message.
Once you’ve followed these steps, the selected member will be removed from your iTunes Family Sharing group. They will no longer have access to shared purchases, subscriptions, or iCloud storage. It’s important to note that any content they have downloaded from your shared purchases will no longer be available to them. However, they will still be able to keep any content they have purchased on their own.
If you ever change your mind and want to invite them back to your iTunes Family Sharing group, you can do so by following the same steps and selecting “Invite Family Member” instead of “Remove.” Keep in mind that if the removed member had shared purchases or subscriptions, they will need to purchase them again or join another Family Sharing group to regain access.
Merging Your Apple ID with Another Family
If you find yourself wanting to merge your Apple ID with another family on iTunes Family Sharing, you’re in luck. Apple offers a simple process to make this happen. By merging your Apple ID with another family, you can enjoy the benefits of sharing purchases, subscriptions, and other content seamlessly.
Here is a step-by-step guide on how to merge your Apple ID with another family on iTunes Family Sharing:
- Ensure that both families have set up iTunes Family Sharing successfully. Each family should have a designated organizer who manages the sharing settings.
- Contact the organizer of the family you want to merge with and request to be added to their family sharing group.
- Once the organizer adds you to their family group, you will receive an invitation to join. Accept the invitation by following the instructions provided.
- Sign in to your Apple ID account on your device and head to the “Settings” app.
- Tap on your name at the top of the screen, then select “Family Sharing.”
- Tap “Merge with Another Family” when prompted.
- Enter the Apple ID and password of the organizer of the family you want to merge with.
- Review the terms and conditions, then tap “Merge” to proceed.
- Wait for the merge process to complete. This may take a few moments, so be patient.
- Your Apple ID will now be merged with the other family, and you can start enjoying the benefits of sharing purchases and other content.
Remember, merging your Apple ID with another family means that you will no longer be the organizer of your own family group. You will lose control over the sharing settings and content management. If you want to regain control, you will need to disband the merged family and start a new family group of your own.
Merging your Apple ID with another family is a convenient solution for those who want to consolidate their iTunes purchases and subscriptions with a different family group. It allows for easy sharing and collaborative use of digital content across devices within the merged family.
If you have any questions or encounter any issues during the merge process, Apple’s support team will be happy to assist you.
Disbanding iTunes Family Sharing
If you no longer wish to continue using iTunes Family Sharing and want to disband the group, follow these steps:
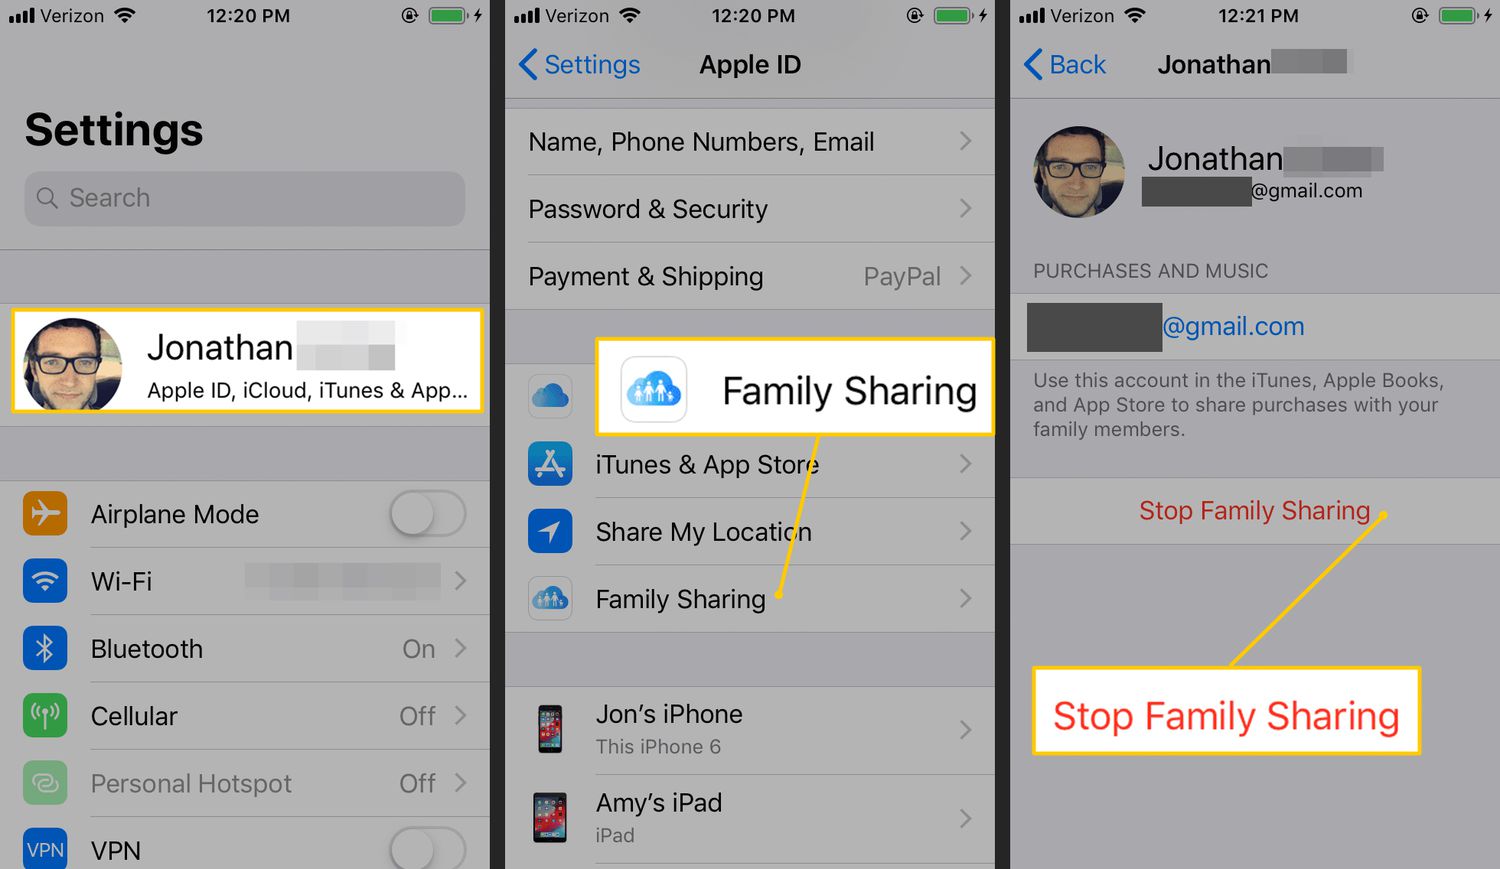
- Open the Settings app on your iOS device.
- Scroll down and tap on your name at the top.
- Select “Family Sharing” from the list.
- Tap on your name again under the “Family members” section.
- On the next screen, scroll down and tap “Stop Family Sharing.”
- Confirm your decision by tapping “Stop Sharing” in the pop-up window.
Once you disband the iTunes Family Sharing group, all shared purchases, including apps, music, movies, and TV shows, will no longer be accessible to the other members. Each member would need to purchase or download their own copy of the shared content.
It’s important to note that disbanding Family Sharing does not affect any other subscriptions or services linked to your Apple ID, such as Apple Music or iCloud. These subscriptions will remain unaffected, and you can continue using them as before.
In addition, disbanding Family Sharing does not delete the Apple IDs of the other members. Each member’s Apple ID will still be active, and they can continue to use it for their personal purchases and downloads.
If you decide to create a new Family Sharing group in the future, you can easily do so by following the steps outlined in the “Setting Up iTunes Family Sharing” article.
Frequently Asked Questions (FAQs)
Here are some frequently asked questions about leaving iTunes Family Sharing:
1. Can I remove individual family members from iTunes Family Sharing?
Yes, as the organizer, you have the option to remove individual family members from your iTunes Family Sharing group. This can be done through your Family Sharing settings on your device.
2. What happens to the purchases made by the removed member?
When you remove a family member from iTunes Family Sharing, their individual purchases and content will remain with their Apple ID. They will no longer have access to the shared purchases made by the Family Sharing group.
3. Can I merge my Apple ID with another family?
Yes, it is possible to merge your Apple ID with another family if you want to switch to a different Family Sharing group. To do this, you need to disband your current Family Sharing group and join the new one.
4. How do I disband iTunes Family Sharing?
If you are the organizer and want to disband iTunes Family Sharing altogether, you can do so through your Family Sharing settings. This will remove all family members from the group and dissolve the sharing arrangement.
5. Will I be charged for leaving iTunes Family Sharing?
No, there is no charge for leaving iTunes Family Sharing. You will only be responsible for your individual purchases and subscriptions.
6. Can I rejoin iTunes Family Sharing after leaving?
Yes, you can rejoin iTunes Family Sharing after leaving, either by being invited again by the organizer or by creating a new Family Sharing group with a different Apple ID.
7. What happens to my Apple Music membership if I leave iTunes Family Sharing?
If you leave iTunes Family Sharing but have an active Apple Music membership, it will continue uninterrupted. However, you will be responsible for the subscription fees.
8. Can I still share my App Store purchases with my family members after leaving?
No, once you leave iTunes Family Sharing, you will no longer be able to share your App Store purchases with your family members. Each person will have to make individual purchases.
9. Are there any limitations to the number of times I can leave and join iTunes Family Sharing?
There are no specific limitations on leaving and joining iTunes Family Sharing. However, keep in mind that constantly switching Family Sharing groups may have an impact on the availability of shared purchases and content.
10. How do I contact Apple Support for assistance with iTunes Family Sharing?
If you need further assistance with iTunes Family Sharing, you can contact Apple Support through their website, app, or phone number. They will be able to provide you with personalized help and guidance.
Conclusion
Leaving iTunes Family Sharing is a simple process that can be done in just a few steps. Whether you’re looking to manage your own purchases or need to remove someone from your family group, the steps outlined in this article will guide you through the process. By following the instructions, you can regain control of your purchases or make the necessary changes to your family sharing setup.
Remember, before leaving iTunes Family Sharing, it is important to consider the implications it may have on shared purchases and other connected services. Communication with all members involved is key to ensuring a smooth transition and managing any potential complications that may arise.
Now that you have a better understanding of how to leave iTunes Family Sharing, you can confidently make the necessary changes to suit your needs. Whether you’re navigating the world of digital purchases on your own or adjusting your family sharing setup, these steps will help you take control of your iTunes experience.
FAQs
Here are some frequently asked questions about leaving iTunes Family Sharing:
1. Why would I want to leave iTunes Family Sharing?
There could be various reasons why you might want to leave iTunes Family Sharing. Perhaps you no longer wish to share your purchases with family members or maybe you want to create a new Family Sharing group. Whatever the reason, it’s important to understand the steps involved in leaving iTunes Family Sharing.
2. How do I leave iTunes Family Sharing?
To leave iTunes Family Sharing, follow these steps:
- Go to the Settings app on your iPhone or iPad.
- Tap on your name at the top of the screen.
- Select “Family Sharing”.
- Tap on your name again.
- Scroll down and tap on “Leave Family Sharing”.
- Confirm your choice by tapping on “Leave Family Sharing” again.
3. Will leaving iTunes Family Sharing affect my purchased content?
No, leaving iTunes Family Sharing will not affect your purchased content. All the apps, music, movies, and other media that you have purchased will remain in your account and will not be impacted by leaving the Family Sharing group.
4. What happens to the shared purchases when I leave iTunes Family Sharing?
When you leave iTunes Family Sharing, your shared purchases will no longer be accessible to the other members of your Family Sharing group. However, any purchases they made using their own accounts will still be available to them.
5. Can I rejoin iTunes Family Sharing after leaving?
Yes, you can rejoin iTunes Family Sharing after leaving. If you want to rejoin the same Family Sharing group, you will need an invitation from the organizer. If you want to join a different Family Sharing group, you can create or be invited to a new group by the organizer.
These are some common FAQs related to leaving iTunes Family Sharing. If you have any other questions or need further assistance, feel free to reach out to Apple Support for personalized guidance.