
Are you tired of running out of storage space on your cell phone? Do you have tons of photos saved on your phone’s storage that you want to transfer to your SD card? Well, you’re in luck! In this article, we will guide you through the process of moving pictures from your phone’s internal storage to the SD card.
By transferring your photos to the SD card, not only will you free up valuable space on your phone, but you’ll also have the convenience of accessing and transferring your pictures easily. So, whether you’re looking to save space, backup your photos, or simply organize your picture gallery, we’ve got you covered!
In the following sections, we will provide step-by-step instructions for both Android and iPhone devices, sharing tips and tricks along the way to ensure a smooth transfer process. So, let’s get started and unlock the potential of your phone’s SD card!
Inside This Article
- Subtitle 1: Checking SD Card Compatibility
- Subtitle 2: Accessing the File Manager
- Subtitle 3: Moving Pictures to SD Card
- Subtitle 4: Verifying Successful Transfer
- Conclusion
- FAQs
Subtitle 1: Checking SD Card Compatibility
Before you can move pictures from your phone’s storage to an SD card, it’s important to ensure that they are compatible with each other. Not all phones support expandable storage, so it’s crucial to check if your device has an SD card slot.
First, locate the external memory slot on your phone. This is usually found on the side or back of the device, covered by a small door or flap. If you’re unsure, consult your phone’s user manual or do a quick online search for your specific phone model.
Once you’ve found the SD card slot, you need to determine the maximum capacity supported by your phone. Look for the specified SD card type and maximum storage size. This information can also be found in the user manual or by researching your phone model. Common SD card types include microSD, microSDHC, and microSDXC.
It’s important to note that SDXC cards have a higher storage capacity, ranging from 64GB and up, but not all devices support this type. If your phone only supports microSD or microSDHC cards, it won’t be compatible with an SDXC card.
Once you’ve confirmed that your phone has an SD card slot and identified the compatible card type and maximum capacity, you’re ready to proceed with transferring your pictures.
Subtitle 2: Accessing the File Manager
When it comes to managing files on your cell phone, accessing the File Manager is a crucial step in the process. The File Manager acts as a gateway to your device’s internal storage and external storage, such as the SD card. By using the File Manager, you can easily locate and organize your files, including images, in a user-friendly interface.
To access the File Manager on your cell phone, follow these simple steps:
- Open the app drawer by tapping on the app icon grid typically found at the bottom of your cell phone’s home screen.
- Scroll through the app drawer and locate the “File Manager” or “File Explorer” app. It might be pre-installed on your device or available for download from the app store.
- Tap on the “File Manager” app to launch it. If prompted for permissions, grant the necessary access to ensure smooth functioning.
Once you have successfully accessed the File Manager, you are ready to take control of your files and begin moving pictures to your SD card. It’s important to note that different cell phone models may have slight variations in terms of the File Manager’s interface and placement, but the overall process should remain similar.
Subtitle 3: Moving Pictures to SD Card
So, you’ve checked the compatibility of your SD card and accessed the file manager on your cell phone. Now it’s time to move your pictures from the phone’s storage to the SD card. Follow these steps to ensure a successful transfer:
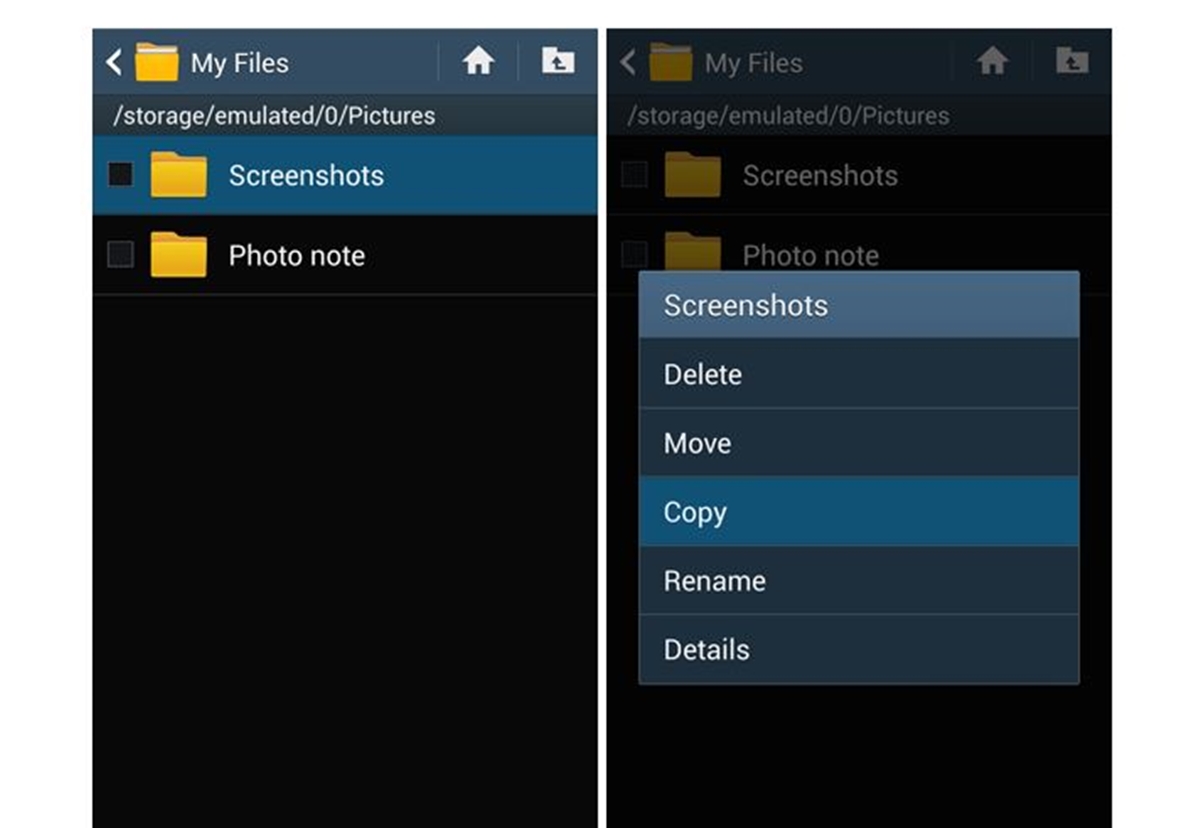
1. Select the pictures you want to move: Open your file manager and navigate to the folder where your pictures are stored. You can typically find them in the “Pictures” or “Gallery” folder. Long press on a picture to start the selection mode. Once in selection mode, tap on each picture you want to move. You can also tap on the “Select All” option if you want to move all the pictures in that folder.
2. Locate the option to move or cut the pictures: Once you have selected the pictures, look for the options at the top or bottom of the screen. Usually, there will be an icon that resembles a file with an arrow pointing outward or an icon that resembles a pair of scissors. This indicates the move or cut option.
3. Choose the SD card as the destination: After selecting the move or cut option, you will be prompted to choose the destination for the pictures. Tap on the option that allows you to navigate to the SD card. This might be labeled as “External Storage” or “SD Card”. Once you’ve selected the SD card, tap on the “Move” or “Paste” button to start the transfer.
4. Wait for the transfer to complete: Depending on the number and size of the pictures, the transfer process may take a few moments. Be patient and avoid interrupting the process, as it may result in incomplete or corrupted files. You can monitor the progress of the transfer through a progress bar or a notification on your screen.
5. Verify the successful transfer: Once the transfer is complete, go to the file manager and navigate to the location where you moved the pictures. Ensure that the pictures are now stored on the SD card and are accessible. You can also check the storage details of the SD card to confirm that the pictures have been successfully moved.
Moving your pictures from the phone storage to the SD card not only helps free up space on your device but also ensures that your precious memories are safely stored. Follow these steps diligently to make the process smooth and hassle-free.
Subtitle 4: Verifying Successful Transfer
After successfully moving your pictures from phone storage to the SD card, it is important to verify that the transfer was completed without any issues. Here are a few steps you can follow to ensure your pictures are safely stored on the SD card:
1. Open the file manager app on your phone. This app allows you to navigate through the different directories and files stored on your device.
2. Locate the SD card section within the file manager. This section will display the contents of your SD card.
3. Look for the folder where you moved the pictures. If you created a new folder specifically for your pictures, navigate to that folder.
4. Open the folder and check if all the pictures you transferred are present. You can do this by scrolling through the list of thumbnails or by opening each picture to view its content.
5. Ensure that the transferred pictures are intact and can be accessed without any issues. Try opening a few random pictures and verify that they can be displayed properly.
6. If you encounter any missing pictures or any errors when trying to open them, it is possible that the transfer was not successful. In such cases, try repeating the transfer process or seek assistance from a technical expert.
7. Once you have confirmed that all your pictures are safely transferred and accessible on the SD card, you can delete the original copies from your phone’s internal storage to free up space.
By following these steps, you can ensure that your pictures are securely stored on the SD card and easily accessible whenever you need them. Verifying the successful transfer not only gives you peace of mind but also helps you avoid any potential loss of precious memories.
Conclusion
Transferring pictures from phone storage to an SD card is a convenient way to free up space and ensure your memories are safely stored. By following the simple steps outlined in this article, you can easily move your pictures to an SD card and enjoy the benefits of expanded storage capacity.
Remember to regularly backup your pictures before making any changes to avoid losing precious memories. Additionally, ensure that your SD card is compatible with your phone and has enough available space to accommodate your pictures.
With the right tools and techniques, managing your phone’s storage becomes a breeze. Make the most out of your device by taking advantage of the vast storage capabilities offered by SD cards.
Now that you have the knowledge and confidence to transfer your pictures to an SD card, go ahead and liberate your phone from the burden of limited storage space. Enjoy capturing countless moments without the worry of running out of room for new memories!
FAQs
1. How do I move pictures from my phone storage to the SD card?
To move pictures from your phone storage to the SD card, follow these steps:
– Open the File Manager app on your phone.
– Navigate to the folder where your pictures are stored.
– Tap and hold the picture you want to move.
– Look for the option that says “Move” or “Move to SD card” and select it.
– The picture will be moved to the SD card, and you can find it in the respective folder on your SD card.
2. Can I move all my pictures from phone storage to the SD card at once?
Yes, you can move multiple pictures from phone storage to the SD card at once. To do this:
– Open the File Manager app on your phone.
– Navigate to the folder where your pictures are stored.
– Tap and hold one of the pictures you want to move.
– Select the other pictures you want to move by tapping on them.
– Look for the option that says “Move” or “Move to SD card” and select it.
– All selected pictures will be moved to the SD card.
3. What happens to the pictures after I move them to the SD card?
When you move pictures from your phone storage to the SD card, the pictures are physically transferred from one storage location to another. The pictures remain intact, and you can access them from the respective folder on your SD card. Moving pictures to the SD card helps free up space on your phone’s internal storage.
4. How do I access my pictures on the SD card after moving them?
After moving pictures to the SD card, you can access them by:
– Opening the File Manager app on your phone.
– Navigating to the folder where the pictures are located on the SD card.
– Tapping on the picture you want to view or share.
5. Can I still view my pictures if I remove the SD card from my phone?
If you remove the SD card from your phone, you won’t be able to access the pictures stored on the SD card through the phone’s gallery or camera app. However, you can use a card reader to connect the SD card to a computer and access the pictures that way.