
Are you tired of seeing the “Sent from my iPhone” signature at the end of your emails? Don’t worry, you’re not alone. Many people find this signature unnecessary and would prefer to remove it. Fortunately, it’s a quick and easy process that can be done on both iPhones and Android devices. In this article, we will guide you through the steps to remove the “Sent from my iPhone” signature from your email signature. Whether you want to maintain a professional image or simply personalize your emails, we’ve got you covered. So, let’s get started and bid farewell to the default signature once and for all!
Inside This Article
- Why Remove “Sent from my iPhone”?
- Methods to Remove “Sent from my iPhone”
- Changing Email Signature on iPhone
- Changing Email Signature on Android Devices
- Changing Email Signature on Webmail Clients
- Conclusion
- FAQs
Why Remove “Sent from my iPhone”?
When you send an email from your iPhone, you may have noticed that it automatically adds the infamous “Sent from my iPhone” signature at the end of the message. While this signature may seem harmless, it can actually have a negative impact on your professional image and communication. Here are a few reasons why you might want to consider removing it:
1. Professionalism: Having a default “Sent from my iPhone” signature can give the impression that you are not taking the time to craft a thoughtful and personalized message. It may be seen as a lack of professionalism, especially in formal or business communications.
2. Branding: If you are representing a company or a brand, having a generic email signature can dilute your branding efforts. By removing the default signature, you have the opportunity to create a customized signature that reflects your brand identity.
3. Clarity: The “Sent from my iPhone” signature can sometimes cause confusion or misunderstandings. Recipients may assume that you are on the go, unable to provide a thorough response, or using your phone as an excuse for brevity. By removing the default signature, you can ensure that your messages are not misconstrued.
4. Control: When you remove the default signature, you regain control over your email communications. You can choose to add a more informative and relevant signature that includes your name, job title, contact information, or any other details you deem necessary.
5. Consistency: If you use multiple devices for email communication, having a consistent email signature across all platforms can help maintain a cohesive and professional image. Removing the default “Sent from my iPhone” signature allows you to achieve this consistency.
Overall, removing the default “Sent from my iPhone” signature gives you the opportunity to present yourself or your brand in a more professional, branded, and consistent manner. It allows for clearer communication and conveys a sense of attention to detail and professionalism.
Methods to Remove “Sent from my iPhone”
If you own an iPhone, you have likely noticed that every email you send from your device includes the signature “Sent from my iPhone.” While this signature can be convenient for mobile communication, you may prefer to remove it for a more professional or personalized touch. Fortunately, there are several methods you can use to remove the “Sent from my iPhone” signature from your emails. Let’s explore these methods below.
1. Changing Email Settings: The most direct way to remove the “Sent from my iPhone” signature is to modify your email settings on your device. You can usually find these settings in your device’s Mail or Settings app. Look for an option related to your email signature, and simply delete or modify the existing text to remove the default signature. This method varies slightly depending on the iOS version you are using, so make sure to consult your device’s user manual or search online for specific instructions.
2. Using Third-Party Email Apps: If changing your email settings doesn’t give you the desired result, you can consider using third-party email apps that allow you to customize your email signature. These apps often offer more flexibility and customization options compared to the default email app on your iPhone. Look for apps like Outlook, Spark, or Gmail that have signature customization features. Install the app, set it up with your email account, and navigate to the settings to customize your email signature to your liking.
3. Using Webmail Clients: Another option to remove the “Sent from my iPhone” signature is to access your email account through a webmail client on your iPhone’s browser. By accessing your email account through the web, you can bypass the default signature set by your device. Simply open your preferred webmail client (such as Gmail or Outlook) in Safari or another browser, log in to your account, and compose your email. Since you are using the web interface, the “Sent from my iPhone” signature will not be added to your emails.
4. Editing Email Signature in Drafts: If you want more control over your email signature, you can create a blank email in the default Mail app on your iPhone and edit the signature in the drafts section. Start by opening the Mail app, creating a new mail, and typing your desired signature without the “Sent from my iPhone” text. Then, save the email as a draft. Whenever you want to send an email without the default signature, open the draft, edit the content if necessary, and send it without the “Sent from my iPhone” signature.
5. Using a Different Email Account: If all else fails, you can consider using a different email account that doesn’t have the default “Sent from my iPhone” signature. This may require creating a new email account specifically for your phone or using an existing account that you don’t mind using exclusively on your iPhone. By using a different account, you can have full control over your email signature and personalize it according to your preferences.
Now that you know these methods, you can choose the one that suits you best and remove the “Sent from my iPhone” signature from your email communications. Whether you prefer a more professional signature or simply want to add your personal touch, these methods will help you achieve it. Happy emailing!
Changing Email Signature on iPhone
Changing your email signature on an iPhone is a simple process that can add a personal touch to your emails. Follow these steps to customize your email signature:
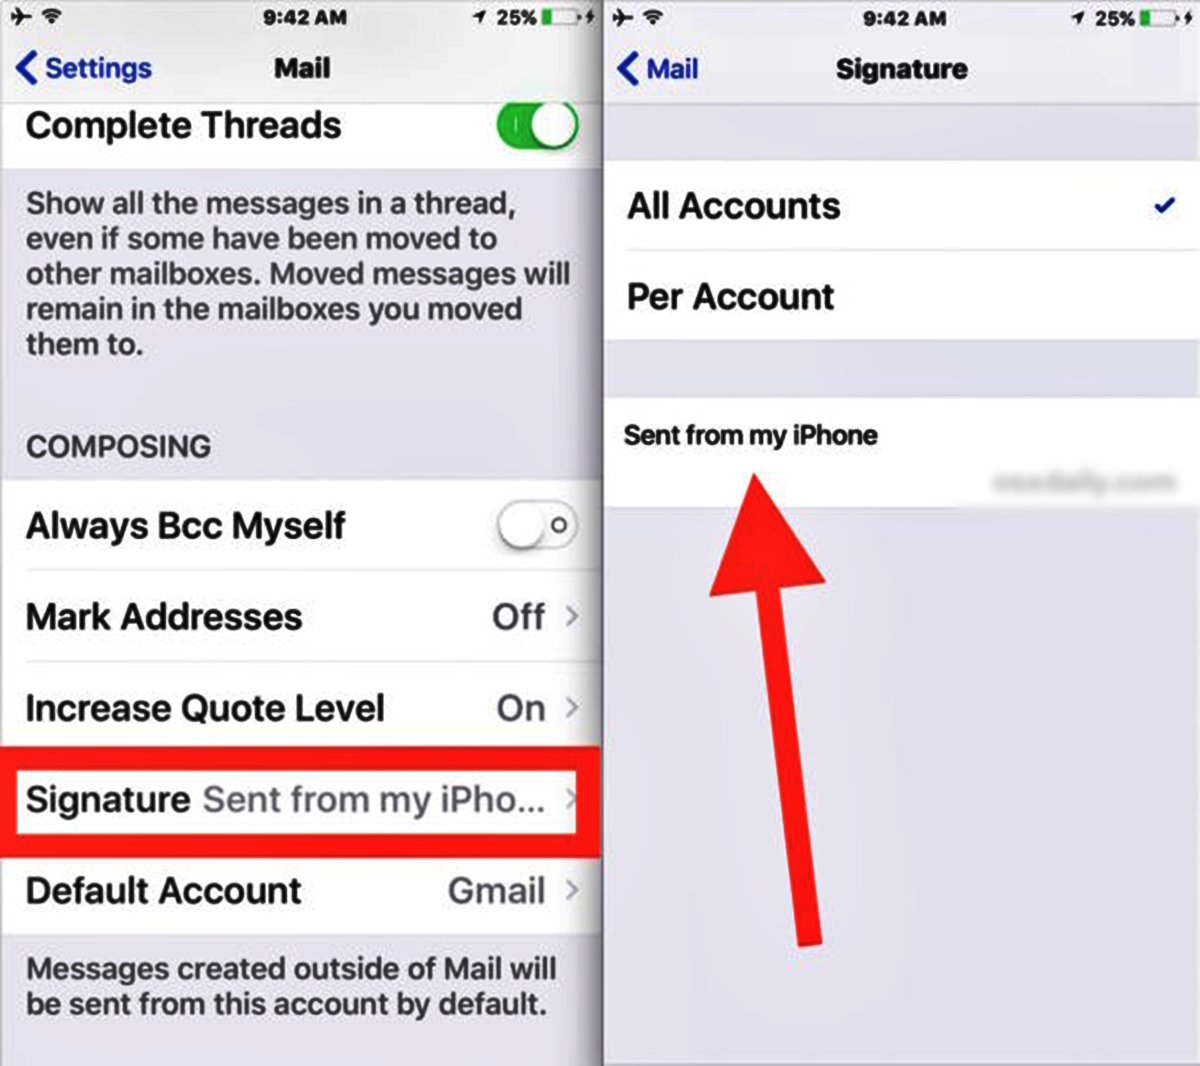
- Unlock your iPhone and open the “Settings” app.
- Scroll down and tap on “Mail.”
- Under the “Mail” settings, select “Signature.”
- You will see a text box with “Sent from my iPhone” as the default signature. Tap on the text box to edit your signature.
- Remove the existing signature and enter your desired signature. You can add your name, contact information, or a witty quote.
- Once you have entered your new signature, tap on the “Back” button to save your changes.
That’s it! Your email signature has been changed on your iPhone. Now, every time you send an email from your iPhone, your new signature will be included at the end.
Remember, your email signature is a representation of yourself or your business. Make sure to keep it professional, concise, and relevant to ensure a positive impression on your recipients.
It’s worth mentioning that the steps to change the email signature might vary slightly depending on the version of iOS you are running on your iPhone. However, the general process remains the same across all versions.
So go ahead, personalize your email signature on your iPhone and make a lasting impression!
Changing Email Signature on Android Devices
Customizing your email signature on an Android device is a straightforward process that allows you to add a personal touch to your outgoing emails. Follow these steps to change your email signature on Android:
- Open the email application on your Android device. The specific app may vary depending on the device manufacturer or the email service you are using.
- Tap on the menu icon, usually represented by three horizontal lines or dots, located in the top left or right corner of the screen.
- Scroll down and select “Settings” from the menu options. This will open the settings panel for your email application.
- In the “Settings” menu, look for the “Signature” or “Email Signature” option. Tap on it to access the signature settings.
- You will be presented with a text box where you can enter or modify your email signature. Tap on this text box and start customizing your signature.
- You can include your name, job title, contact information, or any other details you want to include in your signature. Remember to keep it concise and professional.
- Once you have finished customizing your signature, tap on the “Save” or “Apply” button to save your changes.
- Now, whenever you send an email from your Android device, your new signature will be automatically added to the end of your message.
It is important to note that not all email applications on Android devices have the option to customize the email signature. If you are using the default email app and cannot find the signature settings, consider downloading a third-party email app from the Google Play Store that provides more customization options.
Remember, your email signature is a reflection of your professionalism and personal brand. Take some time to craft an engaging and professional signature that represents you and your role effectively.
Changing Email Signature on Webmail Clients
If you access your email through a web-based client, such as Gmail, Yahoo Mail, or Outlook.com, you may be wondering how to remove the “Sent from my iPhone” signature that appears at the end of your outgoing emails. Fortunately, it’s relatively simple to customize your email signature on these webmail clients. Follow the steps below to make the necessary changes.
1. Sign in to your email account using your preferred web browser.
2. Locate the settings or options menu within the webmail client. This is typically represented by a gear icon or a dropdown menu.
3. Look for the option to manage or customize your email signature. In Gmail, this can be found under the “Settings” tab, while in Yahoo Mail, it is under the “More Settings” section.
4. Click on the email signature section to edit or modify it. Remove the default “Sent from my iPhone” text and type in your preferred email signature.
5. Customize your email signature by adding personal details, contact information, and any other relevant information you want to include. You may also choose to add a professional sign-off or a link to your website or social media profiles.
6. Once you have made the desired changes, save your new email signature by clicking the “Save” or “Apply” button.
7. Test your updated email signature by sending a test email to yourself or a friend to ensure that it appears correctly.
Remember to double-check your signature for any spelling errors or formatting issues before finalizing the changes. It’s also a good idea to keep your email signature concise and professional, avoiding excessive graphics or large blocks of text that may appear cluttered.
By following these steps, you can remove the “Sent from my iPhone” signature and personalize your email signature to better reflect your identity and professionalism.
Conclusion
In conclusion, removing “Sent from my iPhone” from your email signature is a simple but effective way to personalize your communications and maintain a professional image. By following the steps outlined in this article, you can easily customize your email signature on your iPhone and other devices to reflect your own style and branding.
Remember, your email signature is an important element of your digital identity, and it should represent you in the best possible way. Taking the time to remove the default “Sent from my iPhone” not only adds a personal touch to your emails but also shows that you pay attention to the details and are willing to go the extra mile for professionalism.
So, go ahead, customize your email signature, and let your contacts know that you’re not just sending emails from your iPhone, but that you’re sending them with care, thoughtfulness, and professionalism.
FAQs
Q: Why should I remove “Sent from my iPhone” from my email signature?
A: While it may seem harmless, having “Sent from my iPhone” in your email signature can come across as unprofessional to some recipients. It gives the impression that you are always on the go or not taking the time to personalize your emails. Removing it can help you present a more polished and dedicated image.
Q: How can I remove “Sent from my iPhone” from my email signature?
A: The process of removing “Sent from my iPhone” from your email signature depends on the email service or app you are using. Generally, you will need to access your email settings, go to the signature section, and manually edit or delete the unwanted text. Specific instructions may vary, so it’s best to refer to the help documentation provided by your email provider.
Q: Can I customize my email signature on mobile devices?
A: Yes, most email apps on mobile devices allow you to customize your email signature. Whether you use an iPhone, Android device, or another mobile platform, you can usually access the settings menu within your email app and make changes to your signature. This allows you to add or remove “Sent from my [device]” or include other personal information you prefer.
Q: Should I replace “Sent from my iPhone” with something else in my email signature?
A: The decision to replace “Sent from my iPhone” with something else in your email signature is entirely up to you. If you choose to replace it, you might consider adding a more professional sign-off or a simple contact method such as your phone number or website. Just ensure that your signature is concise and not overly cluttered.
Q: Can I remove “Sent from my [device]” from other email clients?
A: Yes, “Sent from my [device]” is not exclusive to iPhone users. Similar signatures can appear on emails sent from Android devices, Windows phones, or other mobile platforms. The steps to remove or edit these signatures will vary depending on the email client you are using. Always refer to the settings or preferences section within your email app for customization options.